
Haas+Sohn Askja 235.17-AUT Documento tecnico

1
Equipment sheet fireplace Askja 235.17-AUT
0423517000000
Suitable fuels:
The following materials are
approved for burning in your
fireplace (refer also to chapter
5.1.):
Dry, natural wood, wood
briquettes according to DIN
51731;
lignite briquettes 6“ and 7“.
Fuel quantities, setting of
combustion air damper,
operation:
See chapters 5.4, 5.5 and 5.6
in the Operating Instructions
and table below.
Spare parts no. Item Designation Spare parts no. Item Designation
- 1 Oven body 0423517005066 16 Adjustable feet
0423517005300 2 Fire chamber door 0423517005700 17 Cover plate
0427717005600 3 Ash pan - 18 panel
0425515005002 5 Smoke pipe spigot - 19 panel
- 6 Refractory - 20 Insert plate
0020100020006 8 Grating Ø 215 0423117005020 21 Door spring
0020100150005 9 Base support framework - 22 Riddling grate
0424917005500 10 Upright grating 0423017006500 23 Automatic
0425317005302 11 Fire chamber door handle 0088500050005 24 Outside air - pipe fitting
- 12 Air damper 0423517005022 25 Power Controller
0424917005301 13 Glass pane 475x350 0423517005052 26 Protective metal sheet right
0424917005502 14 Upper draft deflection plate 0423517005053 27 Protective metal sheet left
0050500620005 15 Lower draft deflection plate 400x275 0040012120005 - Seal door 12 mm
0040210040005 - Seal glass 10x4 mm
0050102200005 Stone 220 370x235x30
0050102210005 Stone 221 450x204x30
0050102250005 Stone 225 450x204x30
0050101580005 Stone 158 370x120x30
Item no.0423517009032
V09 F25
2
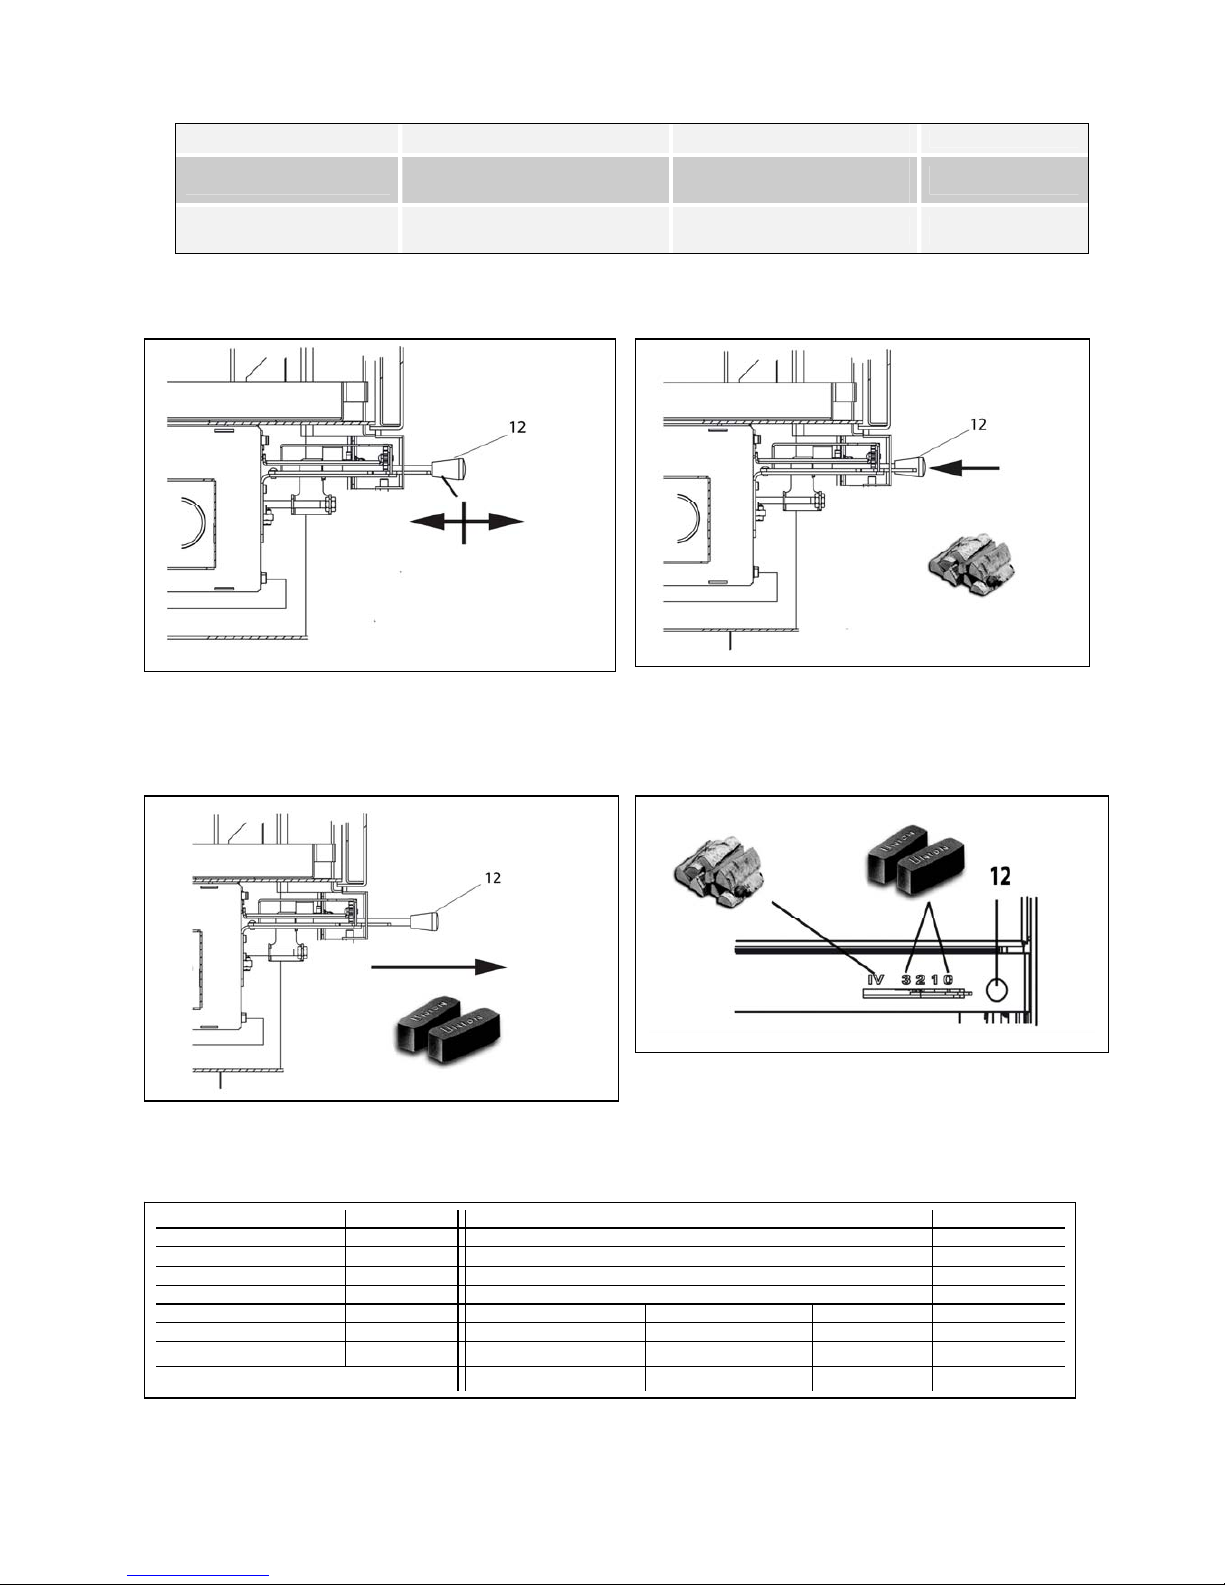
Fuels : Maximum fuel quantity : Air damper (12) Automatic (25)
Wood logs , wood briquettes 2 – 3 logs (approx. 2,0 – 2.5 kg)
or 1 wood briquette (2,0 kg) For 10 minutes:Open (middle),
then closed IV
Lignite briquettes: 3 – 4 briquettes
Approx. 2,0 -2,5 kg Open Automatic 0 - 3
Technical data: Askja 235.17-AUT
Height 1241 mm Flue gas temperature on the spigot of the heat generator 290 °C
Width 640 mm Minimum delivery pressure 12 Pa
Depth without handles 740 mm Minimum delivery pressure with 0.8 times rated thermal capacity 10 Pa
Weight 285 kg Flue mass flow 7,5 g/s
Pipe spigot 150 mm Fuel Wood Wood briquette lignite briquettes
Rated heating capacity 8 kW CO2 9,4% 10,0% 9,8%
Thermal output range 3,6-8,6 kW Efficiency 80,7% 81,0% 80,2%
Approval no. EN 13240 RRF 40 09 1990
Burning: wood (12)
Heating up (12)
Burning: lignite briquettes (12) Adjustment by: Power Controller (25)

1
Item no 0621350009031
V09 H06
ASKJA Assembly and Installation Instructions
Room for type designation and manufacturing number:
Our supply program: Oil stoves
Fireplaces
Pellet stoves
Tiled and slow-burning stoves for wood and coal
Slow-burning and auxiliary stoves for wood, coal and oil
Fireplace inserts for wood
Accessories for stove and fireplace
Accessories for central oil supply
Air humidifiers
HAAS+SOHN Sales in Germany
OFENTECHNIK GMBH Haas+Sohn Ofentechnik GmbH
Urstein Nord 67 Herborner Straße 7-9
A-5412 Puch D-35764 Sinn
Tel.:0043 (0) 662 44955-0 Telephone: 0049 (0) 2772 5010-0
Fax: 0043 (0) 662 44955 210 Fax: 0049 (0) 2772 5010-99
http://www.haassohn.com

2
1 PRELIMINARY REMARKS
Please read the installation and operating instructions of your fireplace insert before these
installation instructions.
These installation instructions also comprise:
∗“Complete equipment sheet “,
When unpacking the concrete elements you might discover irregularities (cracks or joints) which are
filled with the enclosed adhesive.
2 PREREQUISITES
Before installing your fireplace kit always ascertain the load carrying capacity of the floor. The total
weight of the complete fireplace kit (fireplace with refractory lining and the artificial stone lining) can
range from approximately 290 to roughly 300 kg depending on the model. In the case of wooden
beam ceilings it is imperative to consult a structural engineer.
Important: Observe the regulations of the fire protection authorities and the national building
regulations applicable at the place of installation when installing your fireplace kit.
3 TOOLS
The following tools are required for the installation of the artificial stone lining:
– Water level – Rubber hammer – Open-end wrench size
13
– Steel square 90 o– Pencil – Paint roller
– Trowel or spatula – Sponge
4 MATERIAL
– Paint – Possibly plaster – Water
5 INSTALLING THE KIT
1. Carefully unpack the artificial stone lining with accessories. Check your kit for completeness
using the enclosed parts list. Sort the parts in accordance with the installation sequence (see
written and illustrated parts list).
2. Align the fireplace at the right height by turning the adjusting feet using the open-end wrench
size 13. The ideal height is shown in (Figure 2). For verification, also set up the base with marble
slab or the slate slab. The lower edge of the panel with the air damper on the fireplace can be
flush with the understructure of the concrete lining without joint or approximately 1 to 2 millimetre
higher (Note: Bonding slightly changes the overall height: However it is possible to subsequently
adjust the fireplace height by turning the adjusting feet as required.
3. Also adjust the distance to the adjustable wall to the right dimension (see Figure 2).

3
Important: After this, adjust the fireplace in horizontal position using the water level.
4. It is now necessary to secure the flue pipe connection (for instance with double wall lining) in the
fireplace (see installation and operating instructions of the fireplace).
5. Start with the installation of the kit.
6 NOTE
It is not permissible to assemble the kit without bonding the elements together and without securing
the fireplace hood against sliding!
To avoid minor cracks in the wall we recommend filling these with acrylic compound (acrylic
compound can be immediately painted over unlike silicon).
Once the fireplace kit has dried the fireplace can be painted (use mineral-base paint, no depth
primer required). To obtain a fine-grain structure, simply mix some adhesive into the paint for the
first coat. Use only paint for the second coat. Of course you can also use roll-on or rubbing plaster to
finish the surface.
Allow the fireplace kit to dry at least 2 weeks before initial use.
To start the fireplace: Carefully read the operating instructions and start the oven using little wood.
Heating at rated output can then commence after approximately one hour.

4
Artificial stone kit - ASKJA – Parts list
Article No. No. Quantity Designation Type Material
0621350000100 1 1 Base plate Artificial stone Artificial stone
0621350000200 2 1 Base element lateral Artificial stone Artificial stone
0621350000300 3 1 Base element front Artificial stone Artificial stone
0621350000400 4 1 Lateral cover right Artificial stone Artificial stone
0621350000500 5 1 Lateral cover left Artificial stone Artificial stone
0621350000600 6 1 Support side parts Steel Steel
0621350010100 7 1 Base plate great black Artificial stone
0621350010200 8 1 Base plate front black Artificial stone
0621350010300 9 1 Base plate small black Artificial stone
0621350010400 10 1 Side parts right black Artificial stone
0621350010500 11 1 Side parts left black Artificial stone
0621350030100 7 1 Base plate great cotto Artificial stone
0621350030200 8 1 Base plate front cotto Artificial stone
0621350030300 9 1 Base plate small cotto Artificial stone
0621350030400 10 1 Side parts right cotto Artificial stone
0621350030500 11 1 Side parts left cotto Artificial stone
0621800105000 12 1 Adhesive
0621800105050 13 1 Acryl
Assembly instructions artificial stone kit ASKJA
Note: Ensure that the insert is accurately positioned prior to the assembly. Always ensure that the
parts are assembled horizontally and plumb.
1. Assemble the fireplace kit in the dry condition. Check to see whether the elements are plumb
and level. Mark the correct position using the pencil.
After this, remove all elements and assemble one by one using the tile adhesive.
2. Mix the supplied adhesive (safety adhesive) with water until a consistency similar to toothpaste
is obtained. Bond all elements together and to the wall. The bonding surface should be clean
and slightly moistened to achieve optimum adhesive strength. Remove excess adhesive with
the spatula and a moist cloth.
3. Once the kit has been finish painted, finally glue the plates to the bases.
5
4.
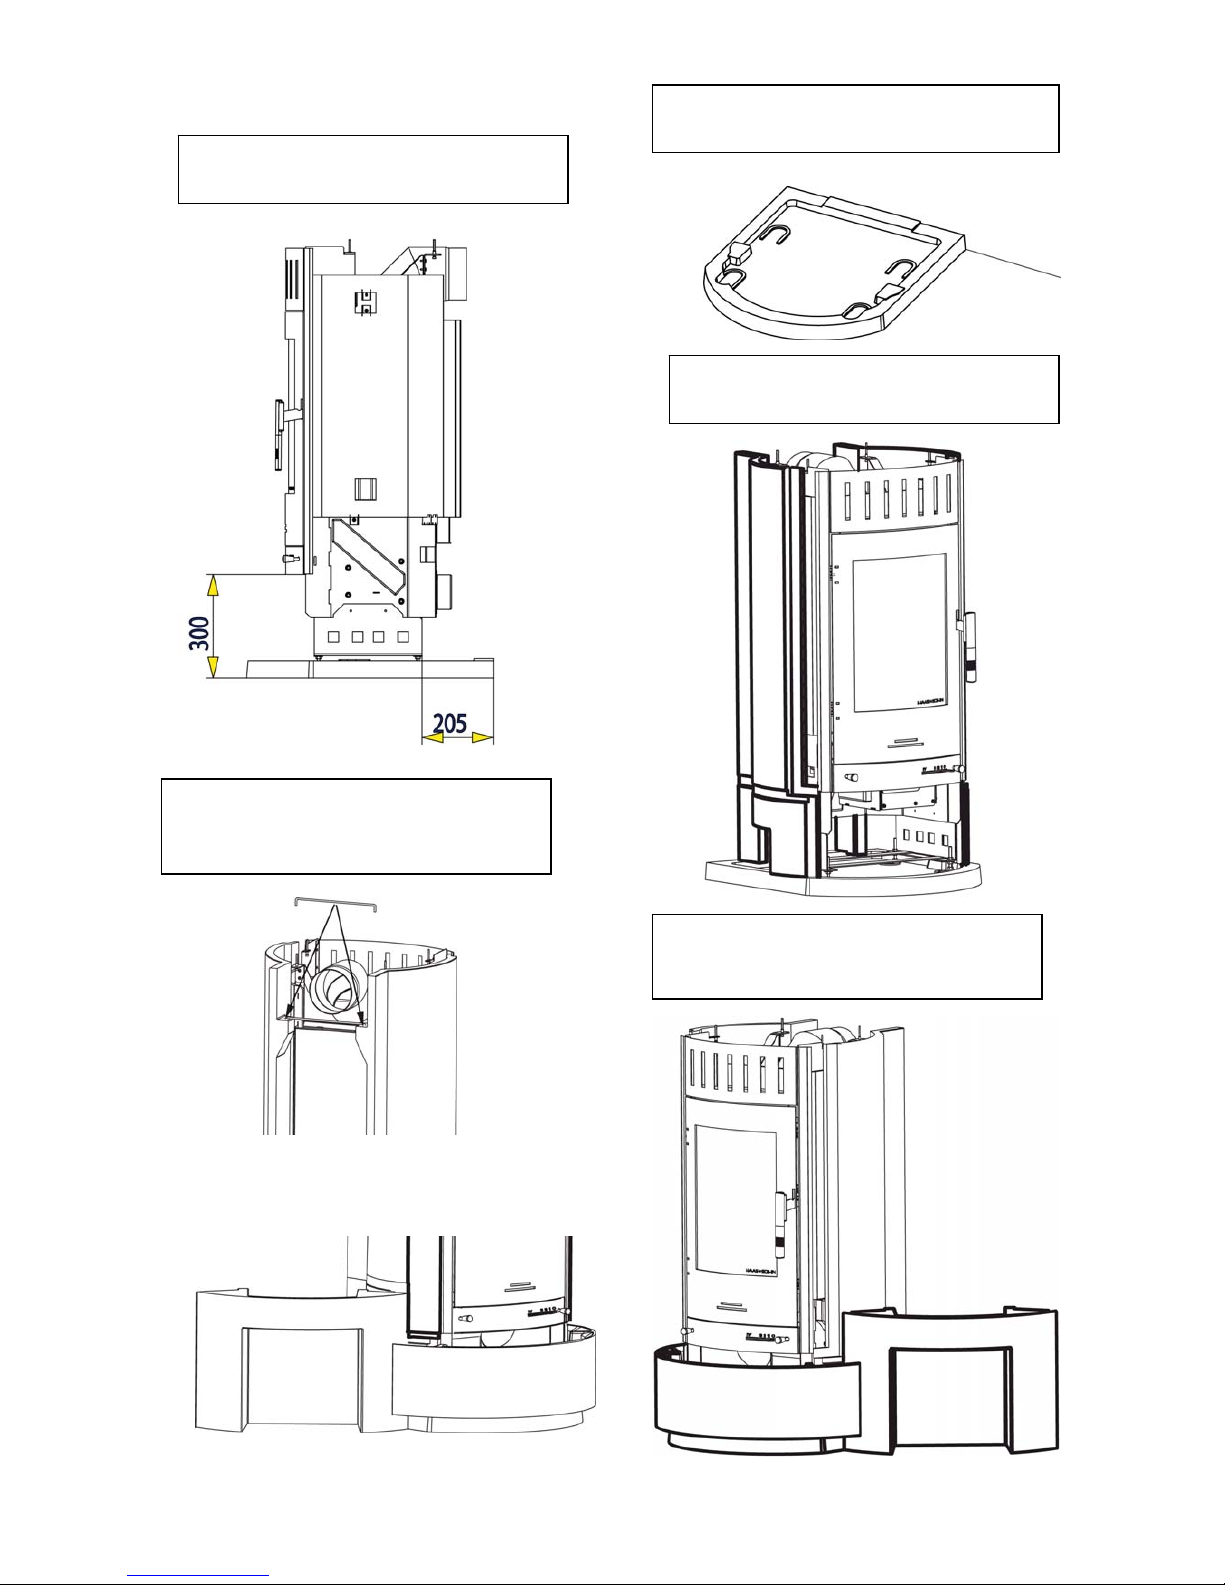
Figure 2: Position fireplace insert
Figure 1: Position the base plate
Figure 5: Assemble the base
elements right or left
Figure 3: Assemble the lateral covers
Figure 4: Assemble the support of
lateral covers

6
Figure 6 : Assemble the side parts
Figure 8 : Assemble the cover plate
Figure 7 : Assemble the base plates

7
8
We wish you lots of pleasure with your fireplace kit by
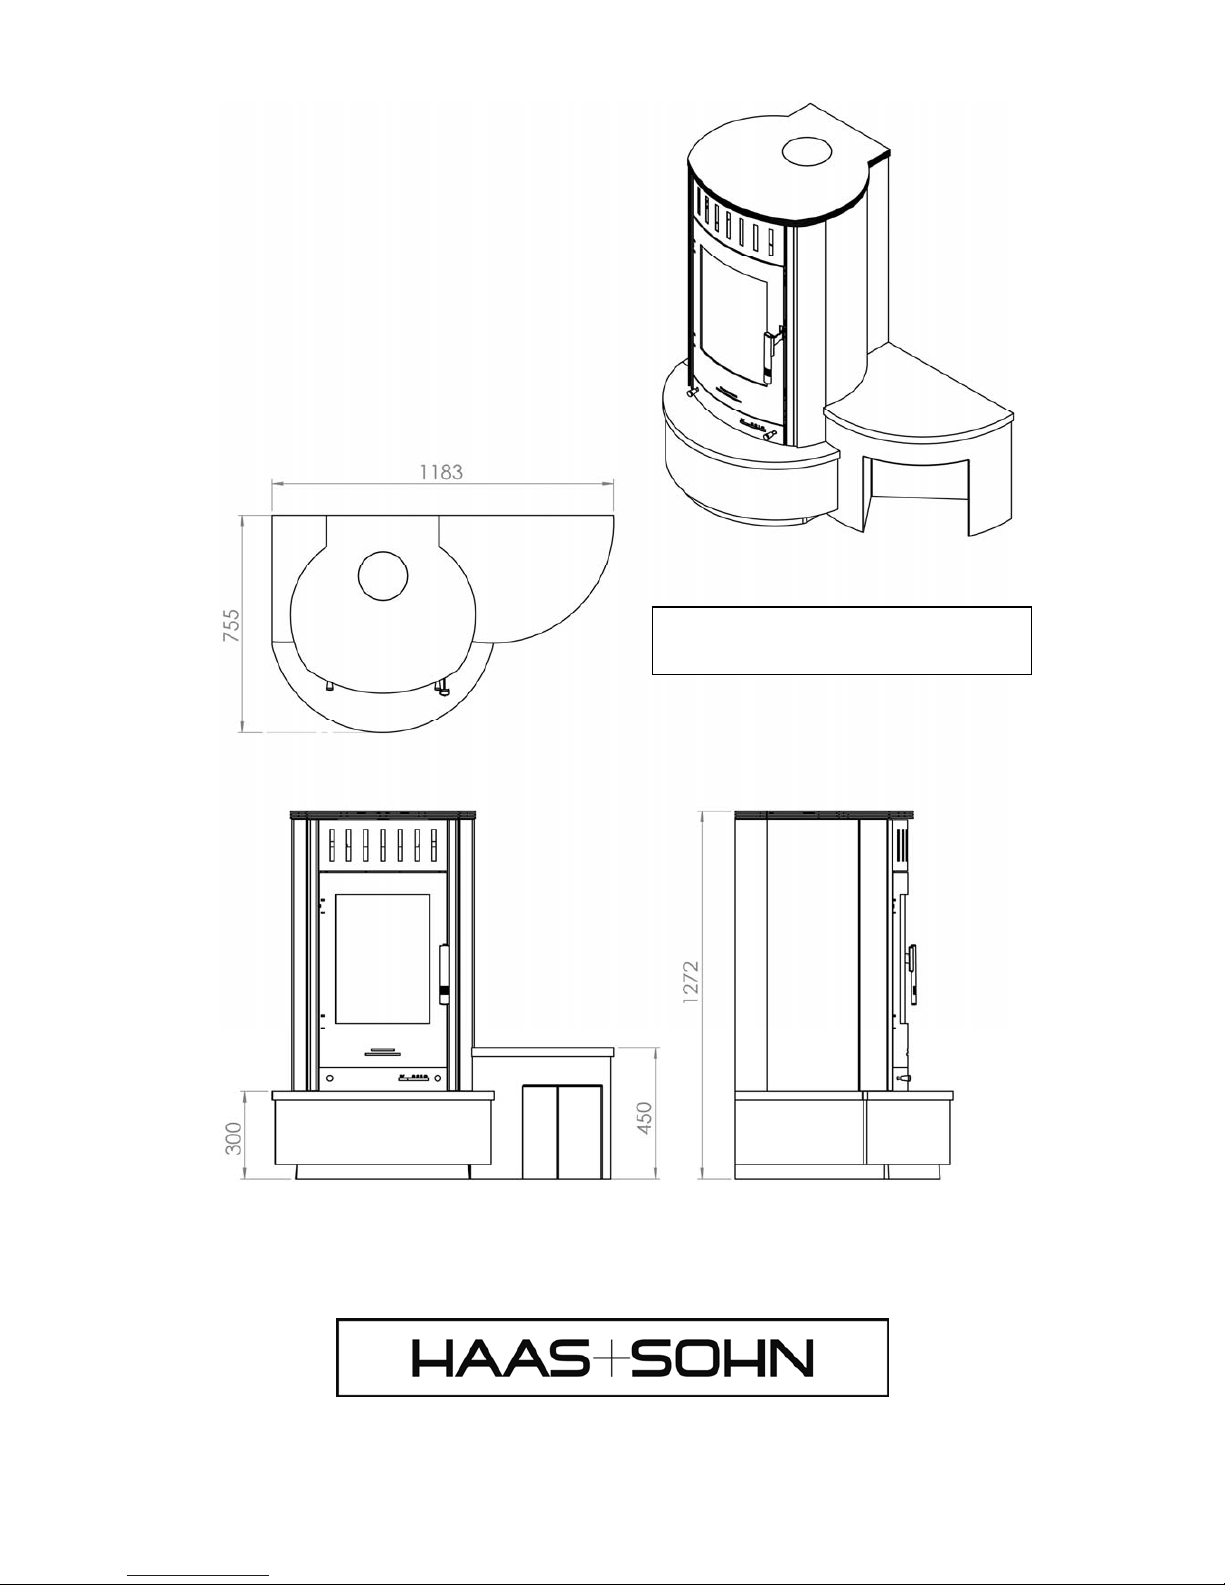
Figure 9 : Dimensions
Indice
Altri manuali Haas+Sohn Camino da interno

Haas+Sohn
Haas+Sohn ROMA Manuale di istruzioni

Haas+Sohn
Haas+Sohn Opus 186.18/1-AL Manuale utente

Haas+Sohn
Haas+Sohn KUOPIO 265.17-PD Paradiso Manuale utente

Haas+Sohn
Haas+Sohn Uppsala 269.15-ST Manuale utente

Haas+Sohn
Haas+Sohn Treviso II Documento tecnico

Haas+Sohn
Haas+Sohn Exquisit 182.18-AL Manuale utente

Haas+Sohn
Haas+Sohn DK LAUSITZ easy Manuale di istruzioni

Haas+Sohn
Haas+Sohn EN13229-W Manuale utente

Haas+Sohn
Haas+Sohn SKARNES 0434818700000 Documento tecnico

Haas+Sohn
Haas+Sohn FIREPLACE INSERT Manuale di istruzioni


