Heat Genius Genius Hub Manuale utente

Hello.
User Guide
The Genius Hub
R2.8

2
Welcome to the Genius Hub
We’d like to show you around
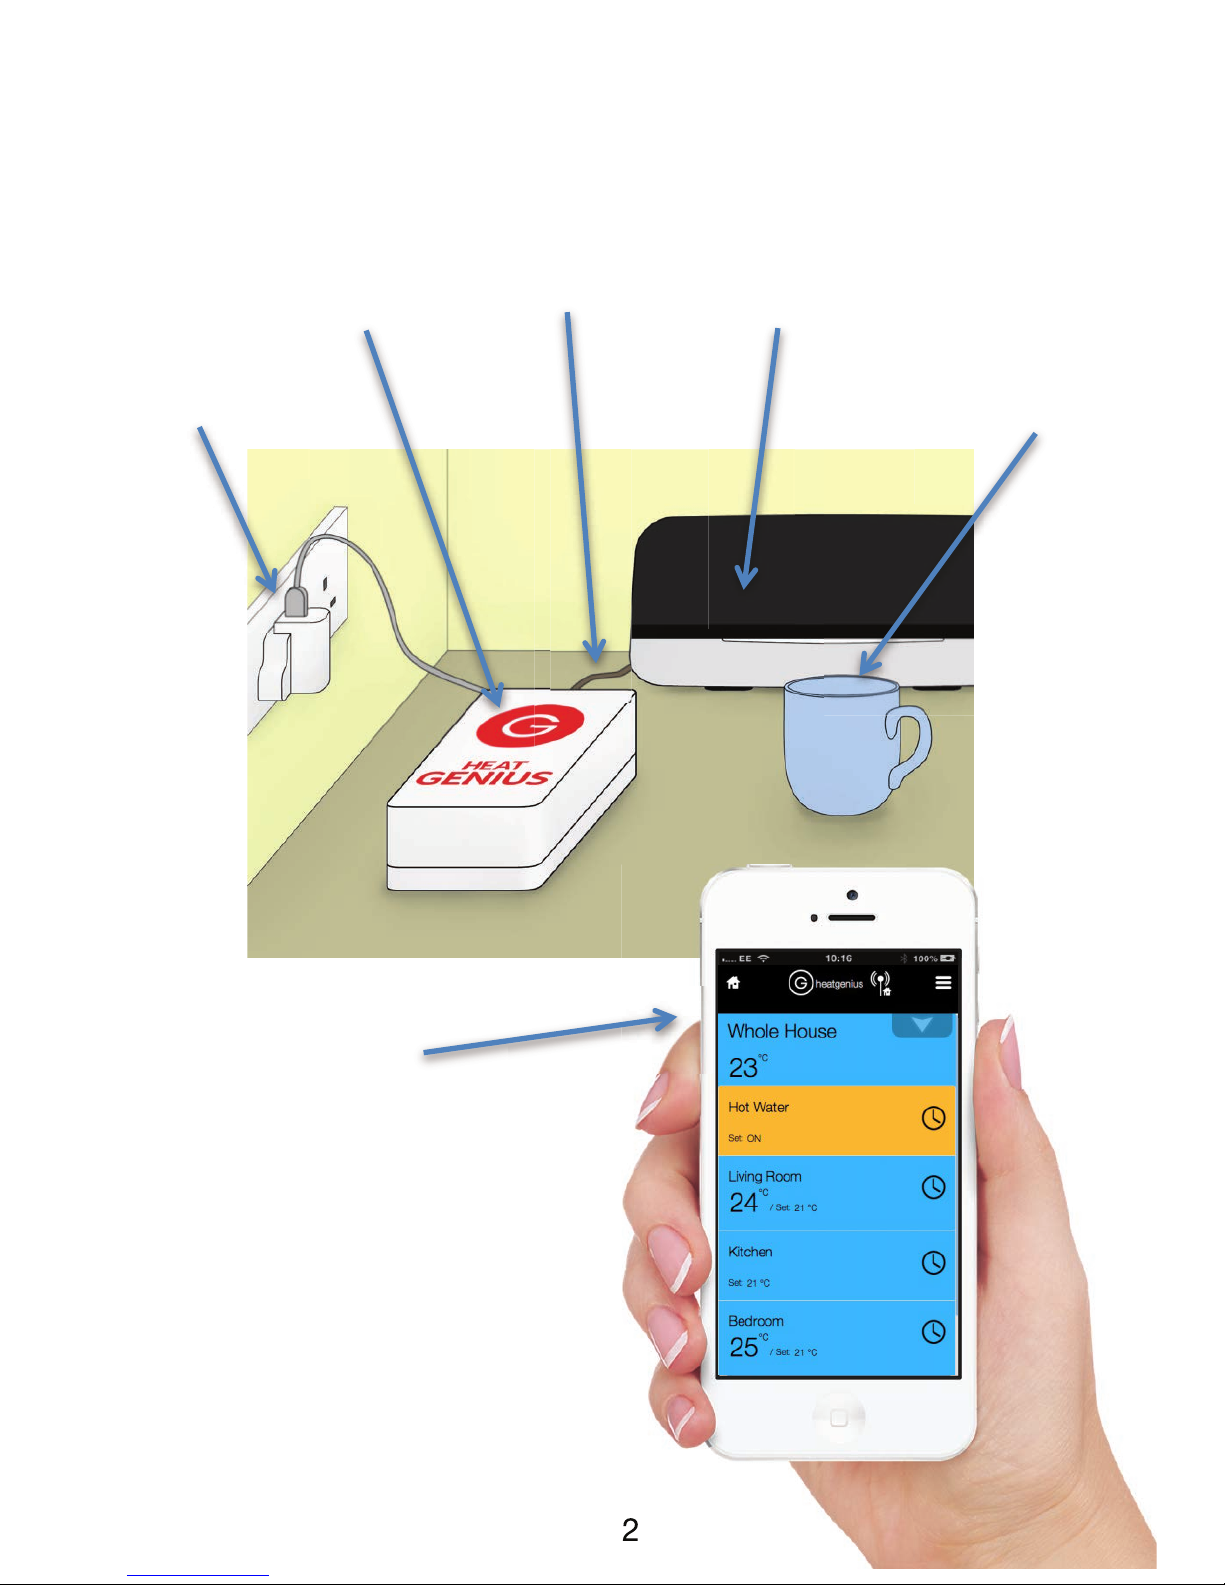
Genius Hub
(supplied)
Broadband
Internet Router
(not supplied)
Power Plug
(supplied)
Cup of Tea
(sadly not
supplied)
2
Cables
(supplied)
App
Free to download
from the App Store
or Google Play

3
Let’s&get&connected&..............................................................................................&4
Logging&in&................................................................................................................&5!
Registering&your&Genius&Hub&...................................................................................&5!
Logging&in&to&your&account&and&connecting&the&Genius&Hub&.........................&6!
Logging&out&of&your&account&.....................................................................................&6!
Introducing&the&modes&.......................................................................................&8!
Timer&........................................................................................................................&9!
Setting&up&........................................................................................................................&9!
Using&Timer&to&control&hot&water&........................................................................&12!
Using&Timer&to&control&devices&connected&to&smart&plugs&..........................&13!
Footprint&..............................................................................................................&14!
Setting&up&Footprint&.................................................................................................&15!
Extra&settings&for&Footprint&...................................................................................&16!
Override&...............................................................................................................&17!
The&home&page&...........................................................................................................&21!
The&menu&.....................................................................................................................&22!
Settings&for&the&rooms&.....................................................................................&23!
Linking&rooms&............................................................................................................&23!
Primary&Zone&..............................................................................................................&25!
Enabling&preQheat&.....................................................................................................&26!
The&other&parts&of&your&system&....................................................................&28!
The&Boiler&Controller&(Single)&..............................................................................&28!
Boiler&Controller&(Dual)&(Optional)&....................................................................&29!
The&Thermostat&.........................................................................................................&30!
Advanced&setting&for&Footprint&Mode:&...............................................................&32!
Thermostat&.................................................................................................................&34!
Radiator&Valve&...........................................................................................................&34!
Room&Sensor&...............................................................................................................&35!
Important&Safety&and&Handling&Information&...........................................&36!
Troubleshooting&................................................................................................&37!
European&Compliance&Statement&................................................................&39!
Heat&Genius&Two&(2)&Year&Limited&Warranty&–&Genius&Hub.&..............&40!
An&Important&Note&............................................................................................&43!


4
Let’s get connected
The Genius Hub will automatically log into our servers within about 5
minutes of starting up. Once it has checked in it will be waiting for you
to login to it on your smart phone, tablet or computer.
If you have not already done so, you will need to download the Heat
Genius app.
If you don’t have a smart phone then visit the Heat Genius website
and tap on the ‘my hub’ in the top right hand corner.
www.heatgenius.co.uk
You must leave your Genius Hub powered on all of the time. It is
always listening to and talking to the radiator valves and room
sensors. If it is turned off, not only will your heating not work
correctly, but also the battery life of the radiator valves and room
sensors will be significantly shortened.

5
Logging in
Registering your Genius Hub
Once your Genius Hub is installed you must register it to make it
secure. Registration is sometimes completed by the installer but if this
is not the case you will need to complete this yourself. Through either
the Heat Genius app or through the ‘my hub’ link on the Heat Genius
website follow the following steps:
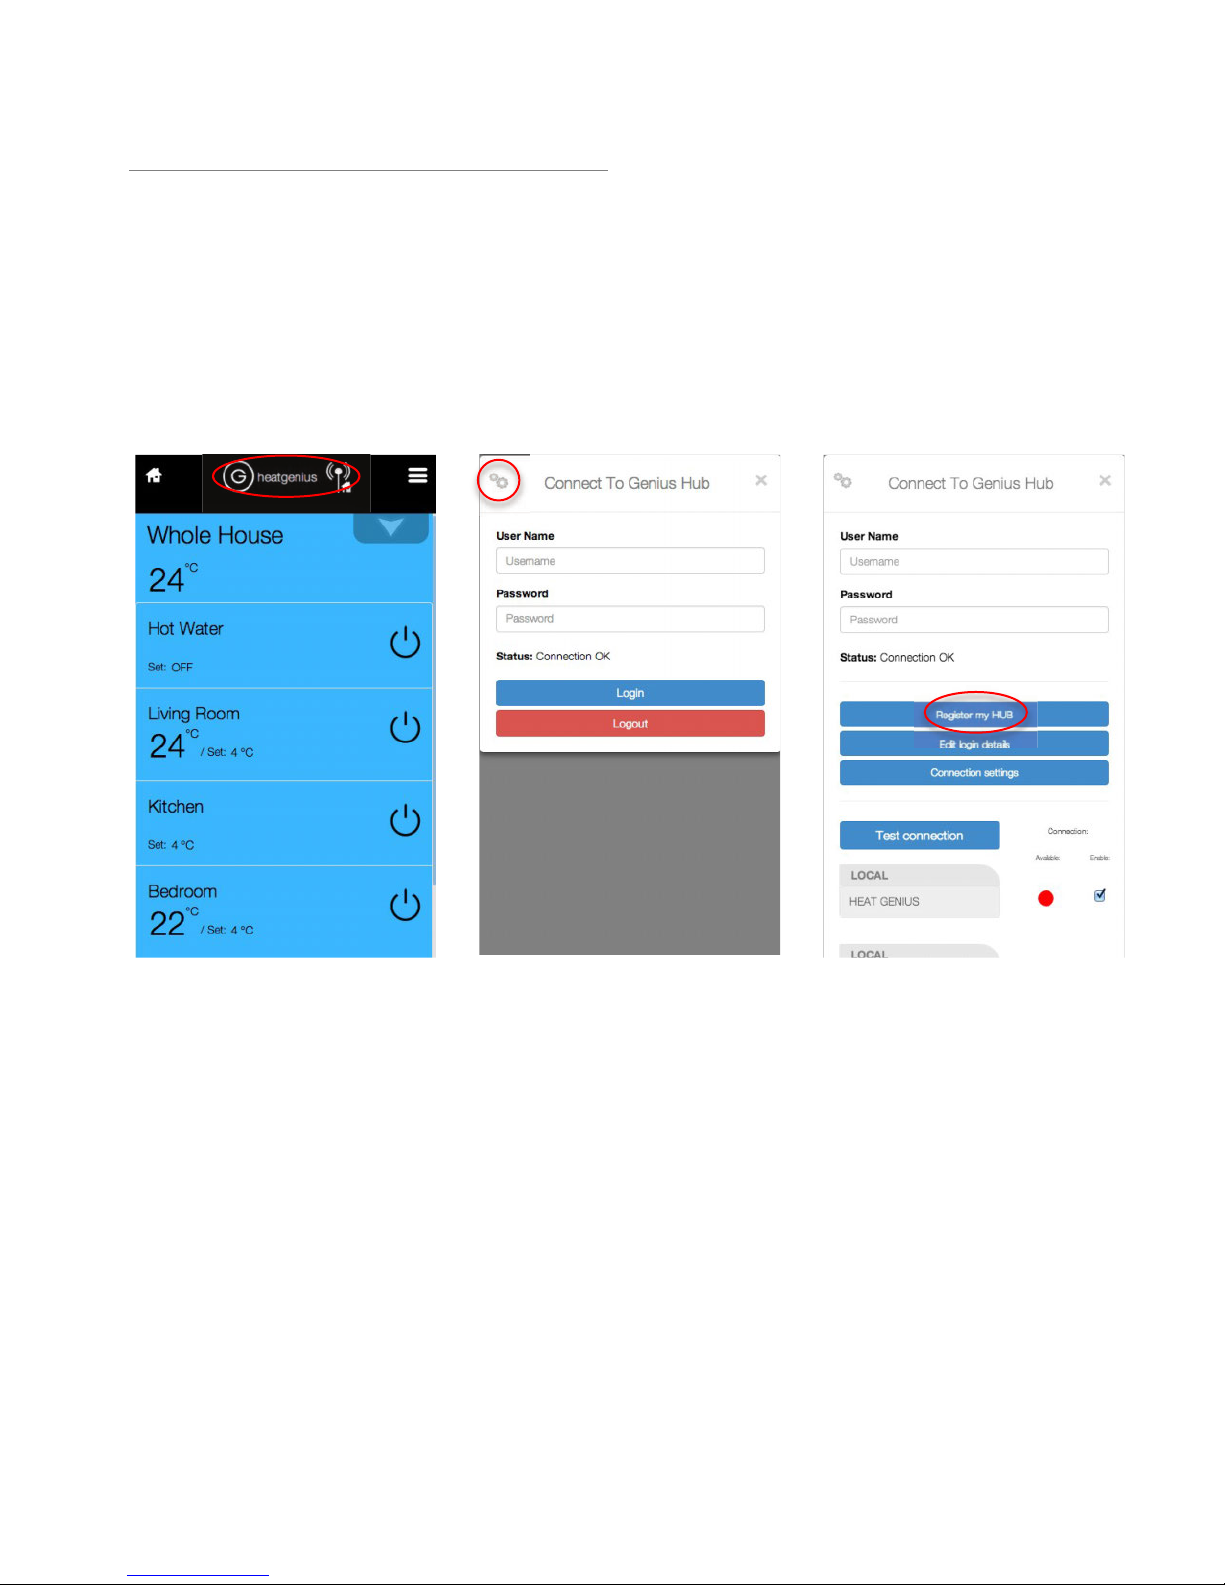
When you first open the
app you will be prompted
to enter your username
and password. If are
already logged in this is
accessed by tapping your
username at the top of the
page.
On this page tap the
‘settings’ (two cogs) icon
in the top left.
This will open additional
options from which you
should select ‘Register my
HUB’.
This will open the registration page on the Heat Genius website. To
complete the process follow the on screen instructions.

6
Logging in to your account and connecting the Genius Hub
Launch the app or the ‘My Hub’ link on the
website. Type in the same use
rname and
password you set up during hub registration. If
your hub is not yet registered please follow the
steps above.
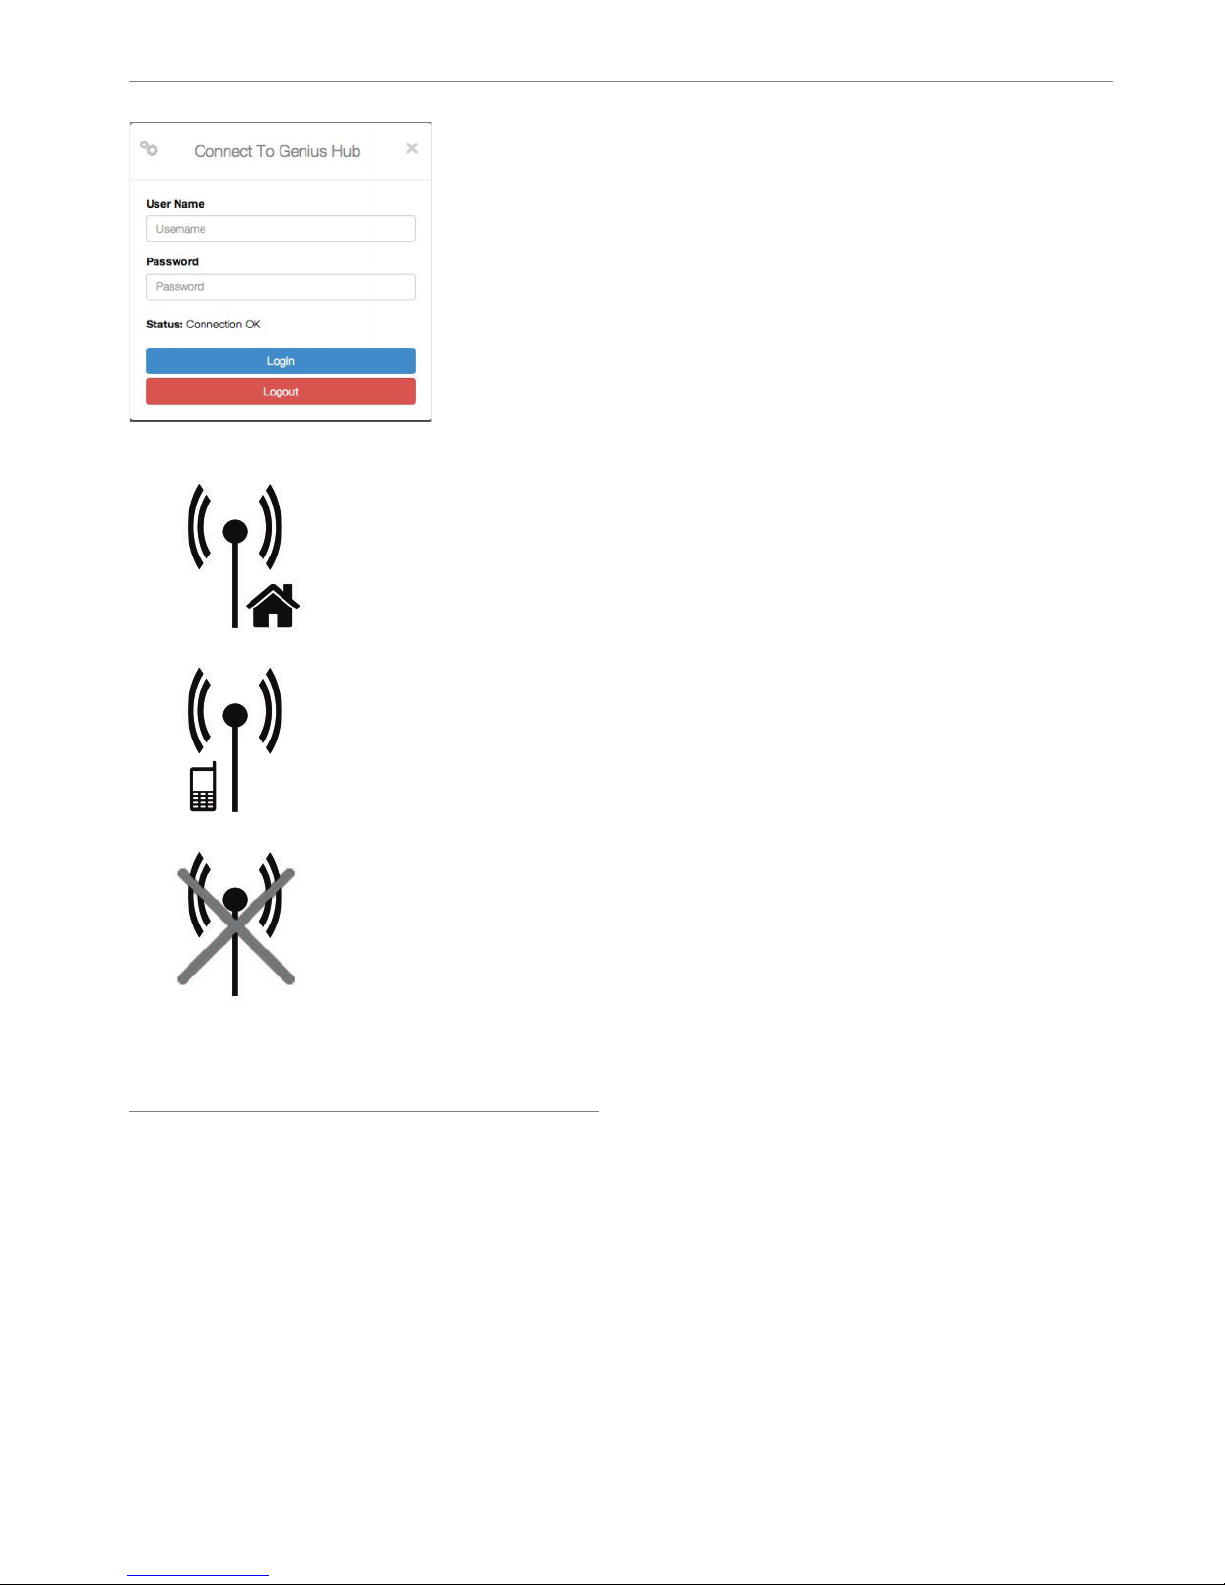
Once logged in the icon to the right of your
username describes your connection status:
Your device is connected to your hub through Wi-Fi
and is functioning normally.
Your device is connected to your hub remotely and is
functioning normally.
Your device was unable to connect. See
troubleshooting for fixes to this problem.
Logging out of your account
While minimised the app won’t use any data so there is no need to log
out. However, logging out is recommended if you are to lend your
device to anyone.

7
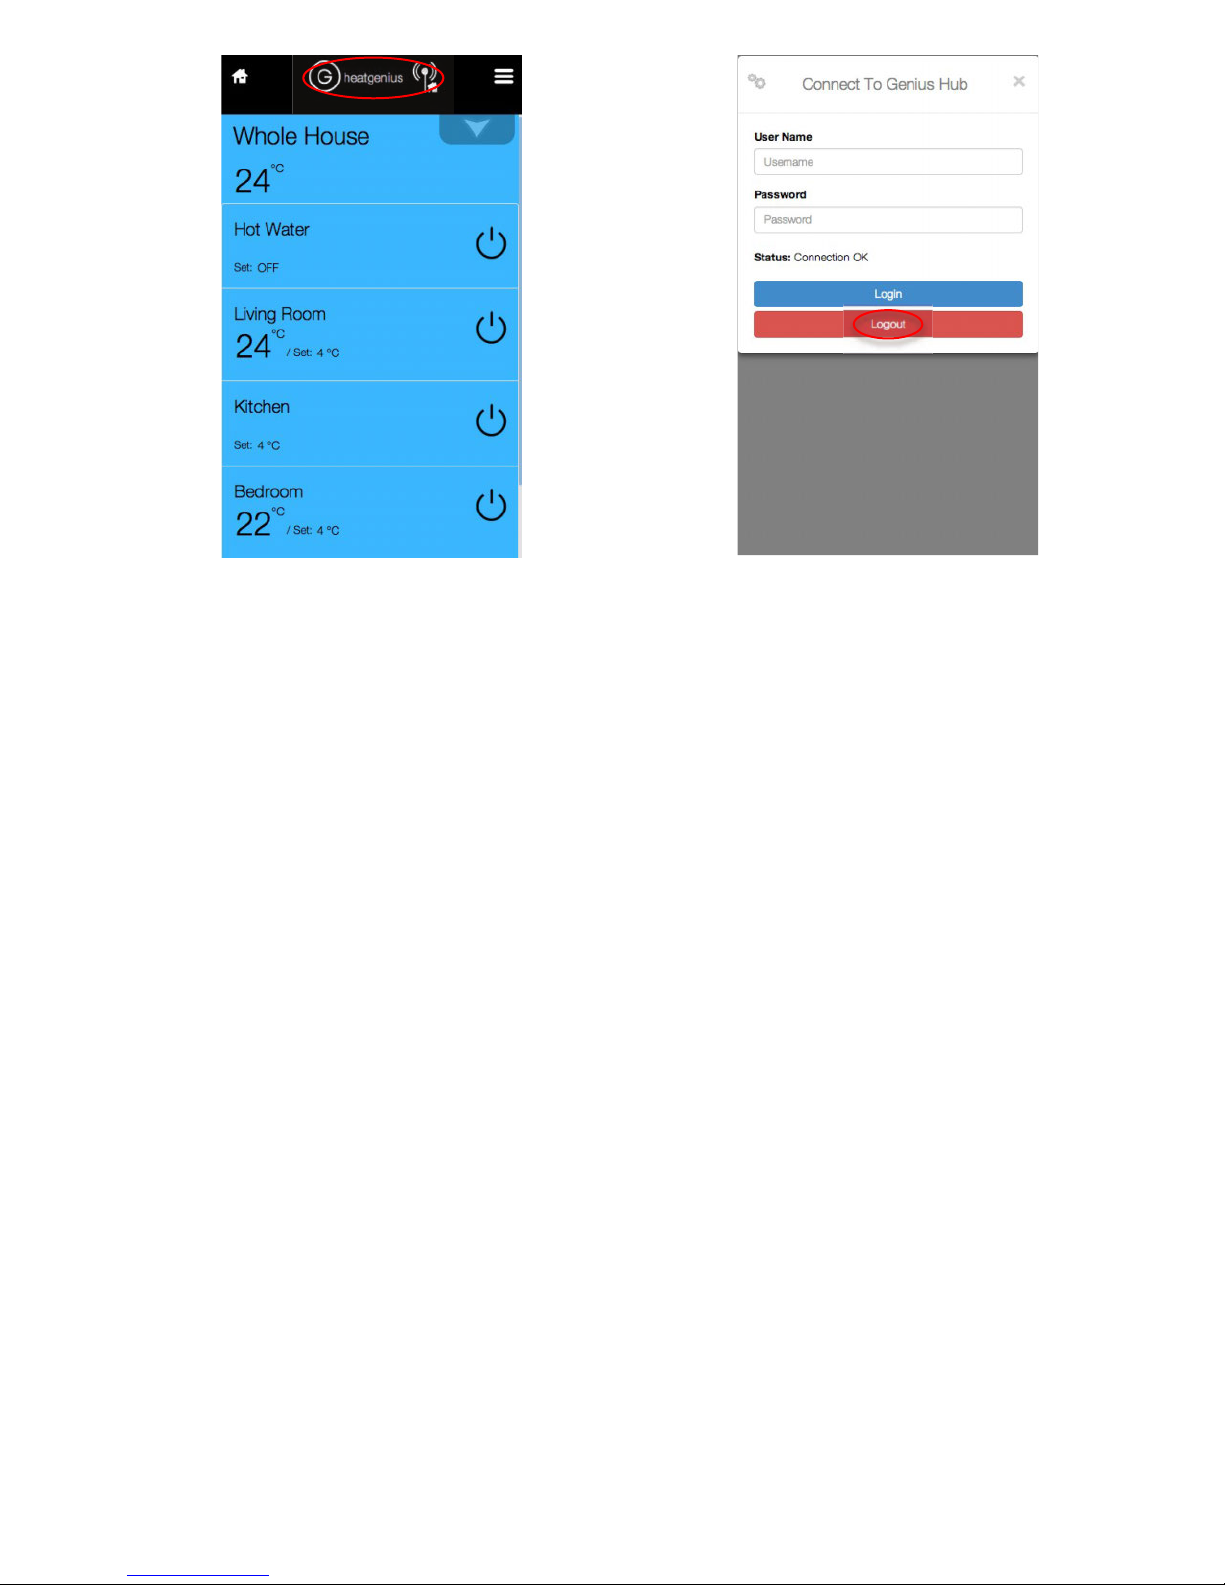
To log out first open the ‘Connect to
Genius Hub’ page by tapping your
username at the top of the app.
Just tap ‘Logout’

8
Introducing the modes
You will see the following symbols on the Heat Genius app home
page, or the Heat Genius my hub webpage…
- OFF -
This shows the individual room is set to ‘OFF’.
When the rooms are off they are still monitored,
if the temperature in the room drops below 4oC
the boiler will be called on as part of frost
protect.
- TIMER -
When in timer mode you have full control of the
temperature in each room. You can set the
time of day rooms are used, as well as the
individual temperatures. See ‘Setting up Timer’
for more information.
- FOOTPRINTTM -
FootprintTM lets the Genius Hub do the thinking.
The Genius Hub will learn when you use each
room of the house that has a smart sensor.
You just have to set up 3 temperatures for
each room. This helps the Genius Hub know
how you like the rooms when you are there and
when you’re away.
•Active Temp – When you are home
•Away Temp – When you’re not in the house
•Night Temp – When you will be sleeping
- OVERRIDE -
Override is used to control the temperature of
rooms for a short amount of time.
You simply
pick a temperature and duration and leave the
rest to Heat Genius. The system will
automatically restore the previous mode once
the time expirers.

9
Timer
Setting up
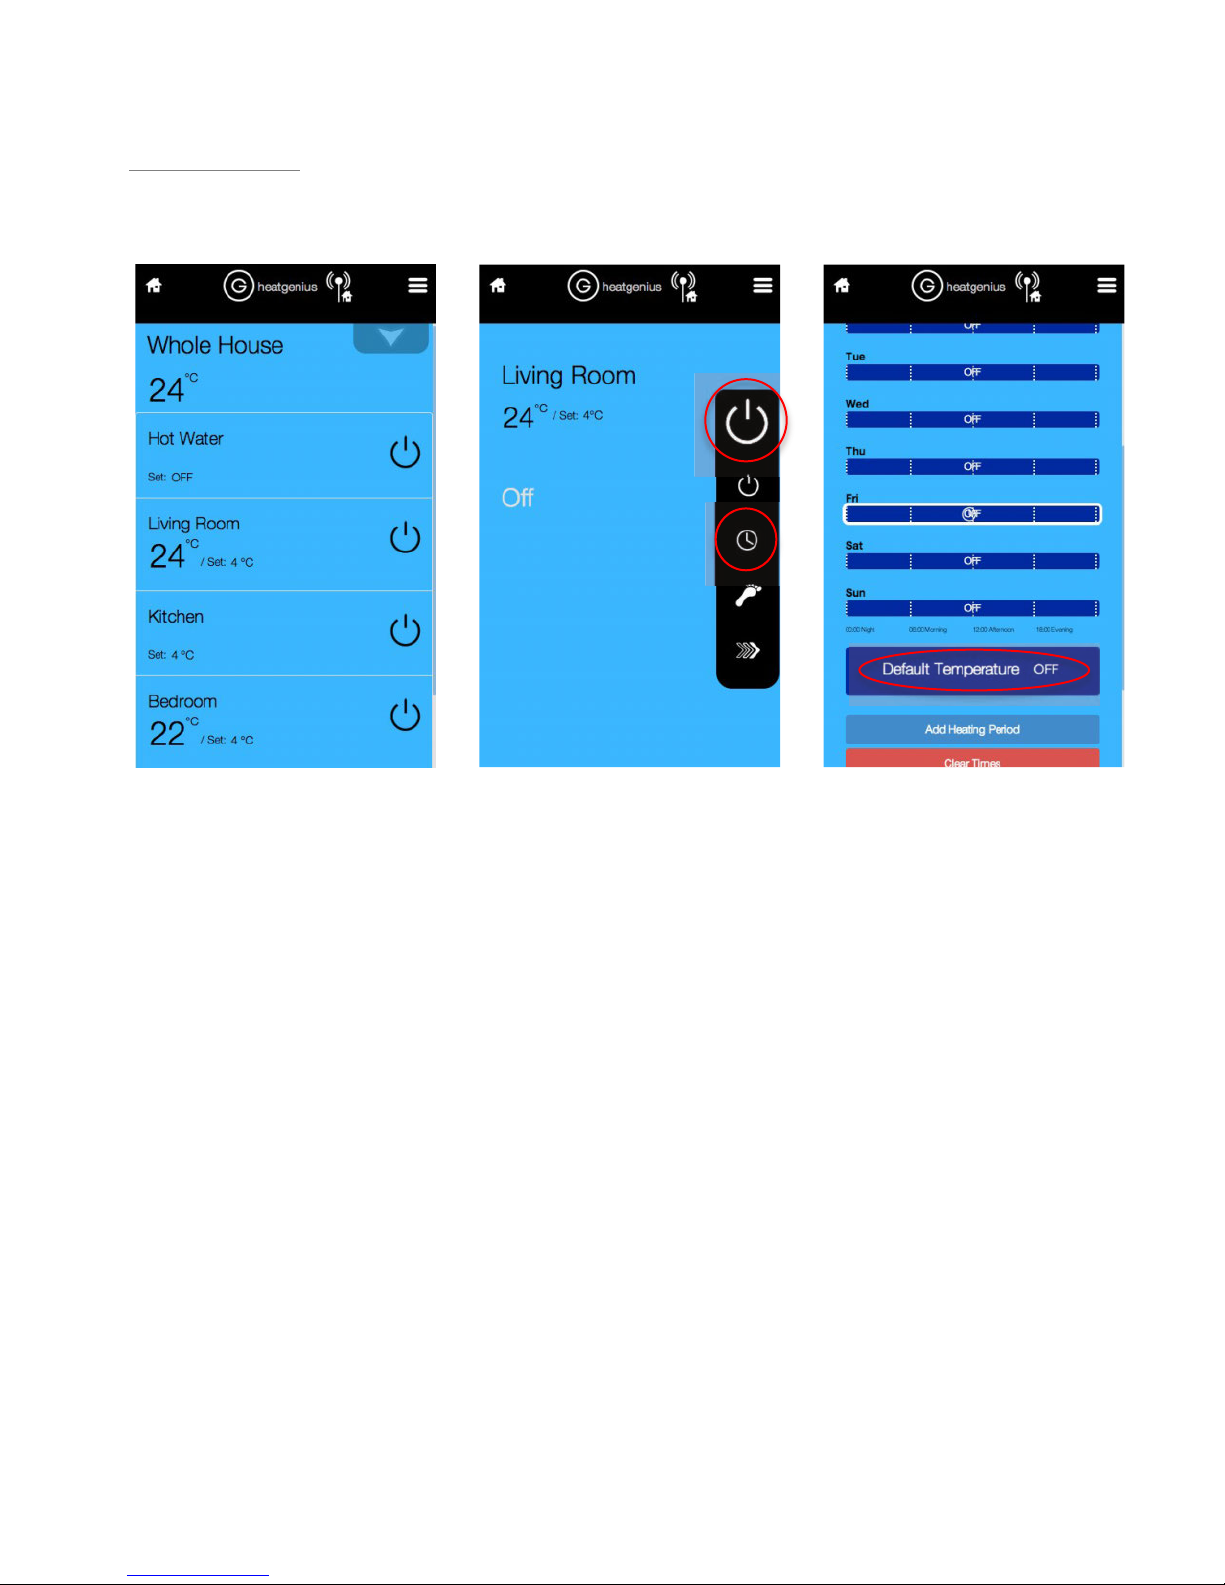
Tap on the room that you
want to setup times and
temperatures for.
Tap on the mode icon to
show the four modes (Off,
Timer, Footprint &
Override). Then tap the
timer icon (clock) to
change the room into
‘timer mode’.
To set a default
temperature which the
room will go to during the
times of the day that you
don’t set other
temperatures to, tap ‘Set
Default Temperature’ and
select a temperature.
When you set up times you can either choose the time that you want
the heating to come on, or the time that you want
to have the room
warm by. See ‘Enabling pre-heat’ later in this guide for the explanation
of how to set this up.

10
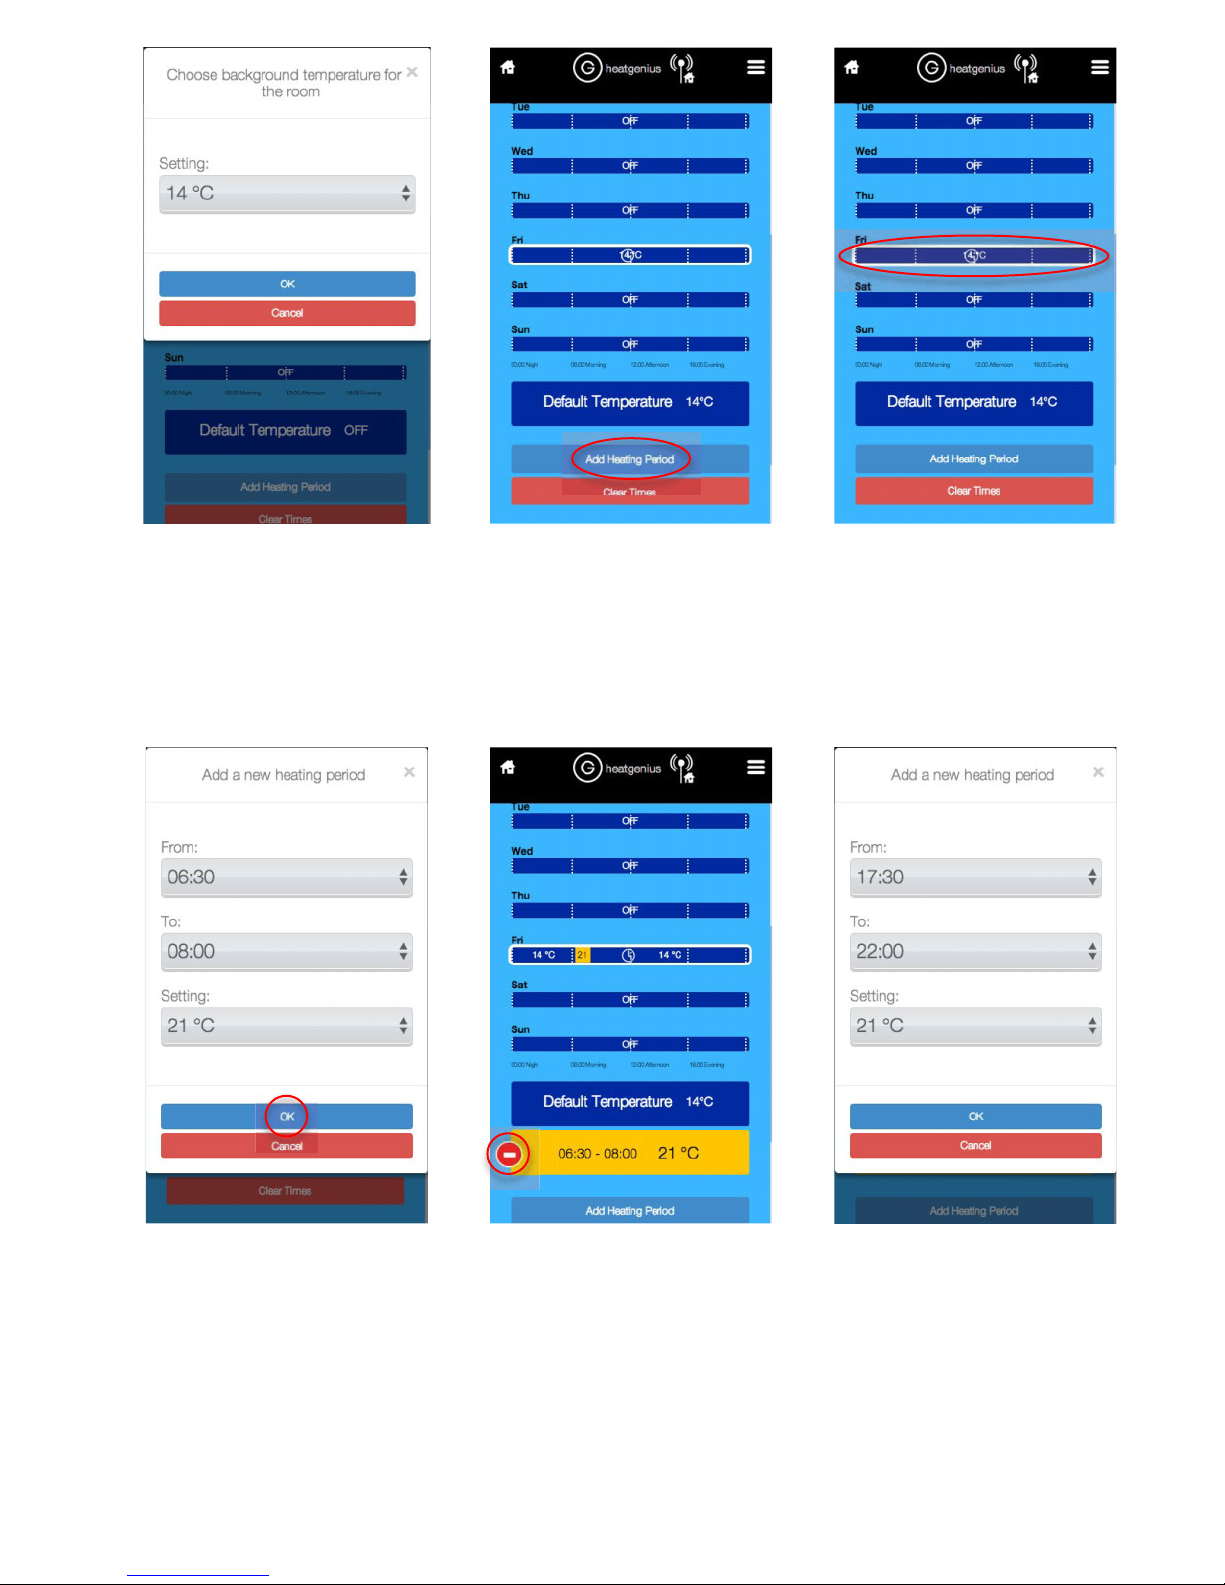
The default temperature
can be ‘Off’ i.e. frost
protect, or any other
temperature. Here we
chose 14ofor the default
temperature.
Tap on ‘Add Heating
Period’ to set a time of the
day when you want the
room to be warmer.
Alternatively you can tap
the schedule display to add
a heating period at the time
tapped.
Select the start time you
want the room to be warm
by, the end time when you
expect to leave the room,
and the temperature you
want that heating period to
hold. Tap ‘OK’.
If you want to delete the
heating period you just
created tap on the red
delete icon. Otherwise add
the next heating period.
Set up the times and
temperatures for another
heating period. This time
we’ve setup the afternoon.
Questo manuale è adatto per i seguenti modelli
1
Indice