HeimVision HM241 Manuale utente

Network Video Recorder
System
HM241
User Manual • Uživatelský manuál •
Užívateľský manuál • Használati utasítás •
Benutzerhandbuch

2
Dear customer,
Thank you for purchasing our product. Please read the following instructions carefully
before first use and keep this user manual for future reference. Pay particular attention
to the safety instructions. If you have any questions or comments about the device,
please contact the customer line.
✉www.alza.co.uk/kontakt
✆+44 (0)203 514 4411
Importer
Alza.cz a.s., Jankovcova 1522/53, Holešovice, 170 00 Praha 7, www.alza.cz

3
SAFETY CAUTIONS
•Please do not place any container with liquid on the NVR.
•Please use the product in an open space and do not block the air vents.
•For your safety, please use the original power supply provided.
•If the NVR starts or works abnormally, please unplug the power adapter and clean
the dust on the mainboard in the NVR device, then restart the NVR.
•Please obey the regulations and policies in your country and area when installing
the product.
PACKING LIST
NVR x1 (Hard Disk Drive IP Camera x4 Quick Guide x1
optional)
Ethernet Cable x1 DC 12V/2A Power DC 12V/1A
Adapter x1 (for NVR) Power Adapter x4
(for IP Camera)
USB Mouse x1 Screw for Hard Disk 5DB Antenna x4
Drive x4 (Optional) (for IP Camera)

4
PRODUCT OVERVIEW
VGA Ethernet
Output Port
Antenna HD Output USB Port Antenna
Installation Hole
Stand
LED
Ethernal Port Antenna Night Vision
(optional)

5
INSTALLATIONS AND CONNECTIONS
Hard Disk Drive Installation
IMPORTANT:
1. To record video and play the historical video, the installation of the Hard Disk
Drive is a must. Otherwise, you can only watch the live picture.
2. Please check whether you purchased the NVR kit with a Hard Disk Drive or
without a Hard Disk Drive. If with a Hard Disk Drive, you may refer to the steps
below to replace your Hard Disk Drive; while if without a Hard Disk Drive, you can
purchase one, then install it following the instructions below.
3. This NVR system works with a 3.5” SATA Hard Disk Drive. The Hard Disk Drive
should be formatted if it’s installed.
Step 1:
Unscrew and remove the top cover of
the NVR.
Step 2:
Connect the SATA power and data
cables of the NVR to the
corresponding ports of the Hard Disk
Drive.
Step 3:
Hold the Hard Disk Drive and the NVR
together, carefully turn them over,
then align the screw holes on the Hard
Disk Drive with the screw holes on the
NVR housing.
Step 4:
Using a Phillips screwdriver to tight the
Hard Disk Drive and NVR housing with
the provided screws, then assemble
the top cover of the NVR.

6
System Connections
Do not fix the IP Camera with the screws before you can see the image on the
monitor and know the ideal position to install it.
1. Unwind the antennas of the NVR;
2. Install and tighten the antennas on the IP cameras;
3. Plug the power adapter (12V/2A) into the NVR and the socket;
4. Plug the power adapter (12V/1A) into the IP Camera and the socket;
5. Connect the NVR to your router with the Ethernet Cable.

7
Camera Installation
Step 1:
Drill 3 holes on the wall/ceiling according to the holes on the camera base, then insert 3
green plastic expansion pipes into the holes.
Step 2:
Fix the base of the camera into the expansion pipes with 3 metal screws.
Expansion pipes
Metal screws

8
Step 3:
Loosen the screws on the camera to adjust the angle of the camera and tighten the
screws after the adjustment.
Tips:
1. For getting the best image, please don’t point the camera towards a light source.
2. Pointing the camera towards a window to see outside is not recommended, which
may result in poor image due to glare, reflection and other reasons.
3. Clean the lens of the camera regularly.
4. The camera can be used outdoors, but cannot be soaked in water. Please make sure
the waterproof connector is used correctly and the port of DC In is protected from
water.

9
OPERATE SYSTEM WITH A MONITOR
Live Picture
After connecting the NVR and cameras to power, connect a monitor to the NVR through
the HDMI or VGA port (HDMI and VGA cable are not included) and wait for 2-3 minutes,
then the live pictures from the cameras (main interface) will be displayed on the
monitor. Connect the mouse to start operating the NVR system.
Notes:
1. The default Username for the NVR system is admin, and the default Password is
empty (no need to enter anything);
2. This NVR system can be only connected to the network by the Ethernet cable
currently;
3. To protect your privacy, please set the password at your earliest convenience.
Right click on the main interface, then go to System setup > System Admin > User >
Set password to set a password;
4. If you do not have a monitor, you can operate the NVR system on PC.

10
Hard Disk Drive Formatting
Install the Hard Disk Drive first, then right click on the main interface and go to System
setup > General setup > HDD setup to check its status. If it’s not Formatted, check the
box to select the right Hard Disk Drive, then click Format.
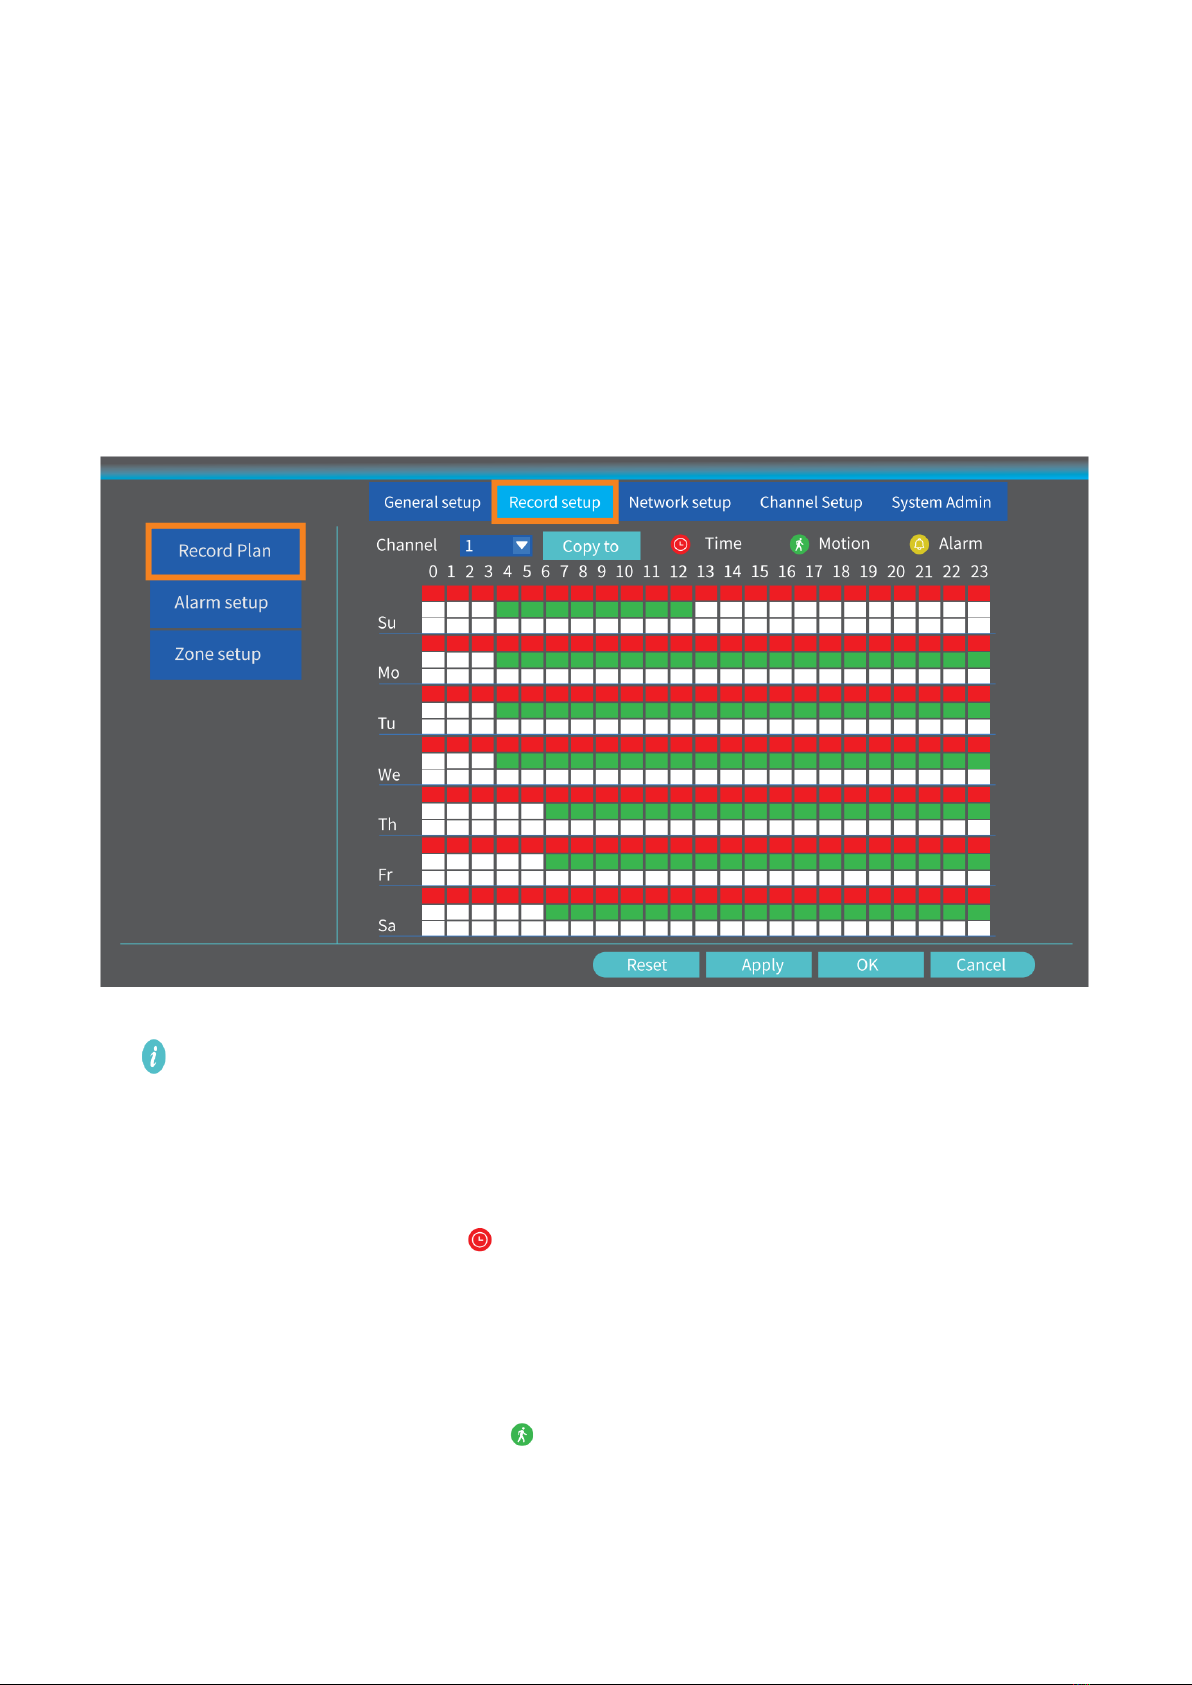
Video Recording
Right click on the main interface, then select System setup > Record setup > Record Plan
to set the recording mode. The default recording mode of the NVR is 24/7 all time
recording.
Tip:
You can click Reset to erase all the recording settings, then set the recording plan for
each mode as needed.
Record videos according to schedules
After reset, select Channel click Time to start setting schedules. Left click and hold to
select the day and hour you plan for recording. The area selected will turn Red and click
Apply to save the setting. The system will start recording at a specific time on a
daily/weekly schedule.
Record videos when motion detected
After reset, select Channel and click Motion to start setting recording schedules for
motion detection. Left click and hold to select the day and hour you plan for recording.
Indice
Lingue:
Altri manuali HeimVision Hardware di rete
Manuali Hardware di rete popolari di altre marche

Matrix Switch Corporation
Matrix Switch Corporation MSC-HD161DEL Manuale utente

B&B Electronics
B&B Electronics ZXT9-IO-222R2 Manuale utente

Yudor
Yudor YDS-16 Manuale utente

D-Link
D-Link ShareCenter DNS-320L Manuale utente

Samsung
Samsung ES1642dc Istruzioni per l’uso

Honeywell Home
Honeywell Home LTEM-PV Istruzioni per il montaggio


