HP 600R Series Manuale utente

600R Series Remote Access Points | Installation Guide 1
600R Series Remote Access Points
Installation Guide
The 600R Series access points are dual-radio tri-band 802.11ax Wi-Fi 6E remote access points that provide
connectivity for both wired and wireless client devices.
Package Contents
The following materials are included with this product:
nAP-605R access point x 1
nAC-to-DCpower adapter (with power cord) x 1
n(For AP-605R bundle only) AP-605CM12 LTE CAT12 cellular module (pre-installed) x 1
To simplify the ordering, Aruba offers the AP-605Rbundle that combines an AP-605R access point, a power adapter
(with power cord) and a AP-605CM12 LTE CAT12 cellular module (pre-installed)
Hardware Overview
Figure 1 AP-605R Front View
1 System Status LED
2 LCD Panel
3 LCDButton

2| Rev 03|August 2023
Figure 2 AP-605R Bundle Front View
1 System Status LED
2 LCD Panel
3 LCDButton
The antennas of the LTEmodule are in a folded position when taken out of the package. To ensure the antennas
function well, put the antennas in a vertical position as shown in .
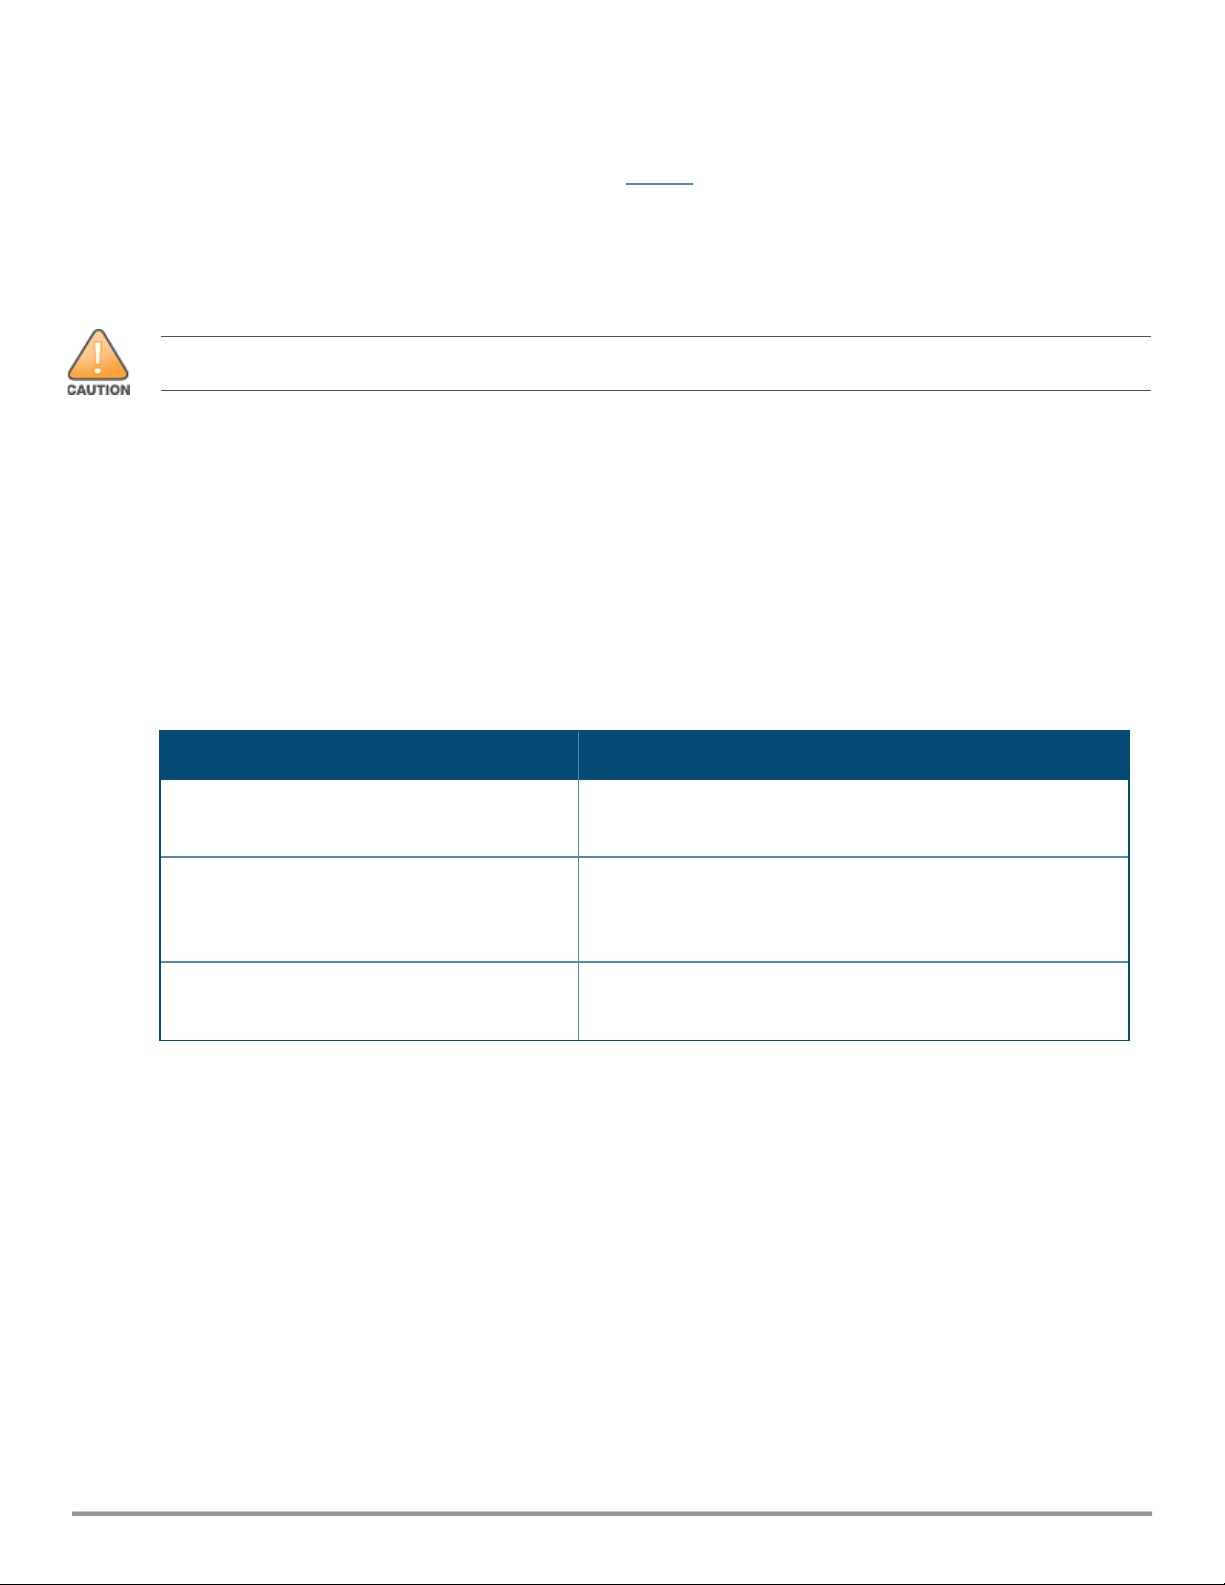
System Status LED
The system status LED is located on the top panel of the access point indicates the system status of the
access point.
Color/State Meaning
Off Access point powered off
Green - blinking 1Access point booting, not ready
Green - solid Access point ready, fully functional
Red System error condition or thermal shutdown engaged - Immediate atten-
tion required
Table 1: System Status LED
1. Blinking: one second on, one second off, 2 seconds cycle.
LED Display Settings
The LEDs have three operating modes that can be selected in the system management software:
nNormal mode: default after power on. Refer to Table 1.
nOff mode: the LED is off
nBlink mode: the LED blinks green
Pressing the reset button for less than 10 seconds during normal operation will toggle the LED mode
between “normal” (default after power on) and “off” mode.
Pressing the reset button for longer than 10 seconds may cause the accesspoint to reset and return to the factory
default state.
LCD Panel
The LCD panel is located on the front panel of the access point that displays the access point's bootup and
system status information.
The LCD button is located on the right side of the LCDpanel and used to operate the LCD panel:
nWhen booted up, the LCD will display the home page, which is Aruba logo by default, but it is
configurable by the system management software. Short pressing the LCD button will scroll through the
pages on the LCD screen. The LCD display will return to the home page after 10 seconds of inactivity.
nLong pressing the LCD button will adjust the LCD's backlight brightness.
Acess PointState LCDDisplays
During access pointboot (system status
LEDblinking green)
Display bootup status information, such as "APpowering
up...", "Connecting to network" and etc.
Access pointis up and running (system status
LED solid green)
Display logo (home page) and system status information.
Short pressing the LCD button on the right of the LCDscreen
will scroll through pages.
Access point is in error condition or thermal
shutdown mode (system status LEDsolid red)
Display relevant information about the error condition.
Table 2: LCD Panel Displays
Rev 03 | August 2023 | 3

4| Rev 03|August 2023
Figure 3 600R Series Rear and Side View
1 Reset Button
2 Micro-B Console Port
3 E0 Ethernet Port (Orange)
4 E1 Ethernet Port (Orange and Blue)
5E2 Ethernet Port (Blue)
6E3 Ethernet Port (Blue)
7E4 Ethernet Port (Red)
8 USB Interface
9 Kensington Lock Slot
Reset Button
The reset button can be used to reset the access point to factory default settings or turn off/on the LED
display.
Use one of the following methods to reset the access point to factory default settings:
nTo reset during normal operation:
lHold the reset button for more than 10 seconds while the access point is running.
lRelease the reset button.
nTo reset during power up, hold the reset button while the access point is powering up.
The system status LED will flash again within 15 seconds indicating that the reset is completed. The access
point will now continue to boot with the factory default settings.
To toggle the system status LED between “normal” (default after power on) and “off” mode, during the
normal operation of the access point, shortly press the reset button for less than 10 seconds.

Micro-B Console Port
To create a console connection to the access point, follow these steps:
1. Connect the console port on the access point to the serial port on the computer using the proprietary
Aruba AP-CBL-SERU cable or AP-MOD-SERU module, which need to be purchased separately.
2. Start the terminal emulation software on the computer and configure a new serial session with the
following settings:
nSpeed: 9600 bps
nData bits:8
nStop bits: 1
nParity: None
nFlow control: None
3. Start the terminal emulation session.
4. Press Enter once. If the connection is sucessful, you are prompted to login.
For this console port pin-out details, refer to Figure 4.
Figure 4 Micro-B Console Port Pin-out
1: NC
2: RXD
3: TXD
4: GND
5: GND
If needed, the AP console driver can be found at the Aruba support portal.
When the access point is in factory default state the console interface (both physical port and BLE) is
enabled with default credentials (username is “admin” and password is the serial number of the unit).
Once the AP has established a connection with its management platform, the console port state
(enabled/disabled) and access credentials are updated to match what’s configured there. State and
credentials are maintained if the AP is power-cycled or rebooted.
Ethernet Ports
The 600R Series access point has five Ethernet ports (E0 - E4), shown in Figure 3.
nThe E0 port is a 100/1000Base-T auto-sensing MDI/MDIX uplink port .
nThe E1 port is a 100/1000/2500Base-T auto-sensing MDI/MDIX port, which can be configured as a
secondary uplink port or downlink port by system management software.
nThe E2- E4 ports are 100/1000Base-T auto-sensing MDI/MDIX downlink ports. E4 port is the PoE out port
and capable to supply PoE power to a 802.3af-compliant device that is phisically connected to the E4
port by Ethernet cable.
Ethernet Port LEDs
Each of the E0-E3 ports has one LED located on the left side, indicating the network status or activity on the
port.
The E4 port has two LEDs located on both sides, the left LEDindicating the network status or activity on the
port, while the right LEDindicating the PoE powering status when the access point is operating as a Power
Sourcing Equipment (PSE). See Figure 3 and Table 3
Rev 03 | August 2023 | 5

6| Rev 03|August 2023
LED Color/State Meaning
Left Off Meet one of the following conditions:
naccess point is powered off
nport is disabled
nno link established
Green - blinking Activity detected on the port
Green - solid Link established at optimum speed (1Gbps or 2.5Gbps)
Amber - solid Link established at reduced speed (100Mbps)
Right (E4 only) Off Meet one of the following conditions:
naccess point is powered off
naccess point is not supplying PoE power
Green - blinking Access point is negotiating PoE power with the device con-
nected to this port.
Green - solid Access point is supplying PoE power to the device
connected to this port.
Table 3: Ethernet Port LEDs
USB interface
The USB 2.0 USB-A interface is compatible with selected cellular modems and other peripherals. When
active, this USB interface can supply up to 5W/1A to a connected device.
When the access point is in factory default state the USB host interface is powered and enabled, assuming
the AP is not in a restricted power mode. On some AP models the USB port may be disabled when a POE
source with insufficient power budget is used. Once the AP has established a connection with its
management platform, the USB host interface state is updated to match what’s configured there. This
state is maintained if the AP is power-cycled or rebooted.
BLE Radio Default State
When the access point is in factory default state the integrated BLE radio is enabled. This applies to the
non-TAA product SKUs only. On the TAA products, the BLE radio is disabled when the unit is in factory
default conditions. Once the AP has established a connection with its management platform, the BLE radio
state is updated to match what’s configured there. This state is maintained if the AP is power-cycled or
rebooted.
Kensington Lock Slot
The access point is equipped with a Kensington lock slot for additional physical security.
DC Power Port
The DCpower port is designed for use with the Aruba AP-AC2-48C power adapter (included in the
package).
After inserting the L-shape DC connector into the DCpower port, users can rotate the DCconnector by 90
degrees and route the power cord to the left of the DC power port. See Figure 5 and Figure 6.

Figure 5 Connecting Power Adapter to DC Power Port
Figure 6 Routing Power Cord
Access Point Installation
All Aruba access points should be professionally installed by a professional installer. The installer is responsible for
meeting applicable national and electrical codes. Failure to properly install this product may result in physical injury
and/or damage to property.
Tous les points d'accès Aruba doivent impérativement être installés par un professionnel agréé. Ce dernier doit
s'assurer que l'appareil est mis à la terre et que le circuit de mise à la terre est conforme aux codes électriques
nationaux en vigueur. Le fait de ne pas installer correctement ce produit peut entraîner des blessures corporelles et
/ ou des dommages matériels.
For indoor use only. The access point, power adapter, and all connected cables are not to be installed outdoors. This
stationary device is intended for stationary use in partly temperature controlled weather-protected environments
(class 3.2 per ETSI 300 019).
You can put the 600R Series access point on any flat surface such as a desktop.
Installing the SIM Card (For AP-605R Bundle Only)
To use the AP-605CM12 cellular module, you need to install a SIM card to the SIMcard tray on the AP-
605CM12 cellular module. The SIM card tray has two SIMcard slots - SIM slot 1 and SIM slot 2. At any given
Rev 03 | August 2023 | 7

8| Rev 03|August 2023
time, only one SIM card is active and functional, the SIM slot 1 and SIM slot 2 can not be used
simultaneously. If you have only one SIM card, it is recommended to insert your SIM card to the SIM slot 1.
To install a SIM card into the SIM tray, perform the following steps:
1. Remove the AP-605CM12 cellular module from the AP-605R access point.
a. Unfasten the two M3 captive screws using a Phillips screwdriver
b. Press the mounting tab on the cellular module, and pull the cellular module out. See Figure 7.
Figure 7 Removing Cellular Module from the Access Point
1 Captive screws
2 Mounting tab
2. Find the SIMejector needle at the bottom of the cellular module. See 2
Figure 8 SIM Ejector Needle Location

3. Insert the SIM ejector needle into the small hole on the SIM card tray. The SIM card tray will pop open.
See Figure 9.
Figure 9 Opening the SIM Card Tray
4. Pull out the SIM card tray and insert a SIMcard into the SIM tray.
5. Push the SIMcard tray back into the slot. See Figure 10.
Figure 10 Inserting a SIM Card
6. Align the AP-605CM12 cellular module with the opening in the access point.
7. Insert the AP-605CM12 cellular module into the access point and tighten the two M3 captive screws
using a Phillips screwdriver. See Figure 11.
Rev 03 | August 2023 | 9

10 | Rev 03|August 2023
Figure 11 Installing Cellular Module onto Access Point
Software
For instructions on choosing operating modes and initial software configuration, refer to the AP Software
Quick Start Guide.
Aruba access points are classified as radio transmission devices, and are subject to government regulations of the
host country. The network administrator(s) is/are responsible for ensuring that configuration and operation of this
equipment is in compliance with their country’s regulations. For a complete list of approved channels in your
country, refer to the Aruba Downloadable Regulatory Table at
https://www.arubanetworks.com/techdocs/DRT/content/home.htm.
Verifying Post-Installation Connectivity
The integrated LEDs on the access point can be used to verify that the access point is receiving power and
initializing successfully. See Table 1,Table 1 and Table 3.
Electrical and Environmental Specifications
Electrical
nEthernet:
lE0 port:100/1000Base-T auto-sensing MDI/MDX wired RJ45 network connectivity port
lE1 port:100/1000/2500Base-T auto-sensing MDI/MDX wired RJ45 network connectivity port
lE2 port:100/1000Base-T auto-sensing MDI/MDX wired RJ45 network connectivity port
lE3 port:100/1000Base-T auto-sensing MDI/MDX wired RJ45 network connectivity port
lE4 port:100/1000Base-T auto-sensing MDI/MDX wired RJ45 network connectivity port, supporting
PoE-PSE to a 802.3af-compliant device.
nPower
l48V DC power interface, support powering through AC-to-DC power adapter
lMaximum power consumption:Refer to datasheet
Questo manuale è adatto per i seguenti modelli
1
Indice
Altri manuali HP Punto di accesso wireless

HP
HP 650 Series Manuale utente

HP
HP MSM320-R Manuale utente

HP
HP MSM422 Manuale utente

HP
HP E-MSM466 Istruzioni per il montaggio

HP
HP ProCurve 420 Manuale utente

HP
HP M330 Manuale utente

HP
HP 527 Manuale utente

HP
HP JH306A Manuale utente

HP
HP Pavilion 501 Manuale utente

HP
HP MSM313 Guida di riferimento rapido

HP
HP Aruba 570 Series Manuale utente

HP
HP MSM466-R Manuale utente

HP
HP MSM422 Manuale utente

HP
HP J9467A Manuale utente

HP
HP MSM410 Manuale utente

HP
HP ProCurve MSM317 Guida di riferimento rapido

HP
HP Aruba 310 Series Manuale utente

HP
HP V-M200 Manuale del proprietario

HP
HP MSM422 Manuale utente

HP
HP MSM310 Come usare


 Manuale utente")
