Hummer 2004 H2 Manuale utente

Overview ........................................................ 1-1
Overview .................................................. 1-2
Features and Controls ..................................... 2-1
Features and Controls ................................ 2-2
Navigation Audio System ................................ 3-1
Navigation Audio System ............................ 3-2
Index ................................................................ 1
2004 HUMMER H2 Navigation System M

GENERAL MOTORS, GM, the GM Emblem, Hummer
and the name Hummer are registered trademarks
and H2 is a trademark of General Motors Corporation.
The information in this manual supplements the
owner manual. This manual includes the latest
information available at the time it was printed. We
reserve the right to make changes in the product after
that time without notice.
Please keep this manual with the owner manual in your
vehicle, so it will be there if you ever need it while
you are on the road. If you sell your vehicle, leave this
manual and the owner manual with the vehicle.
Part No. 15200265 A First Edition ©Copyright General Motors Corporation 08/01/03
All Rights Reserved
ii

Overview .........................................................1-2
Introduction ...................................................1-2
Screen Setup .................................................1-4
Section 1 Overview
1-1
Overview
Introduction
1-2

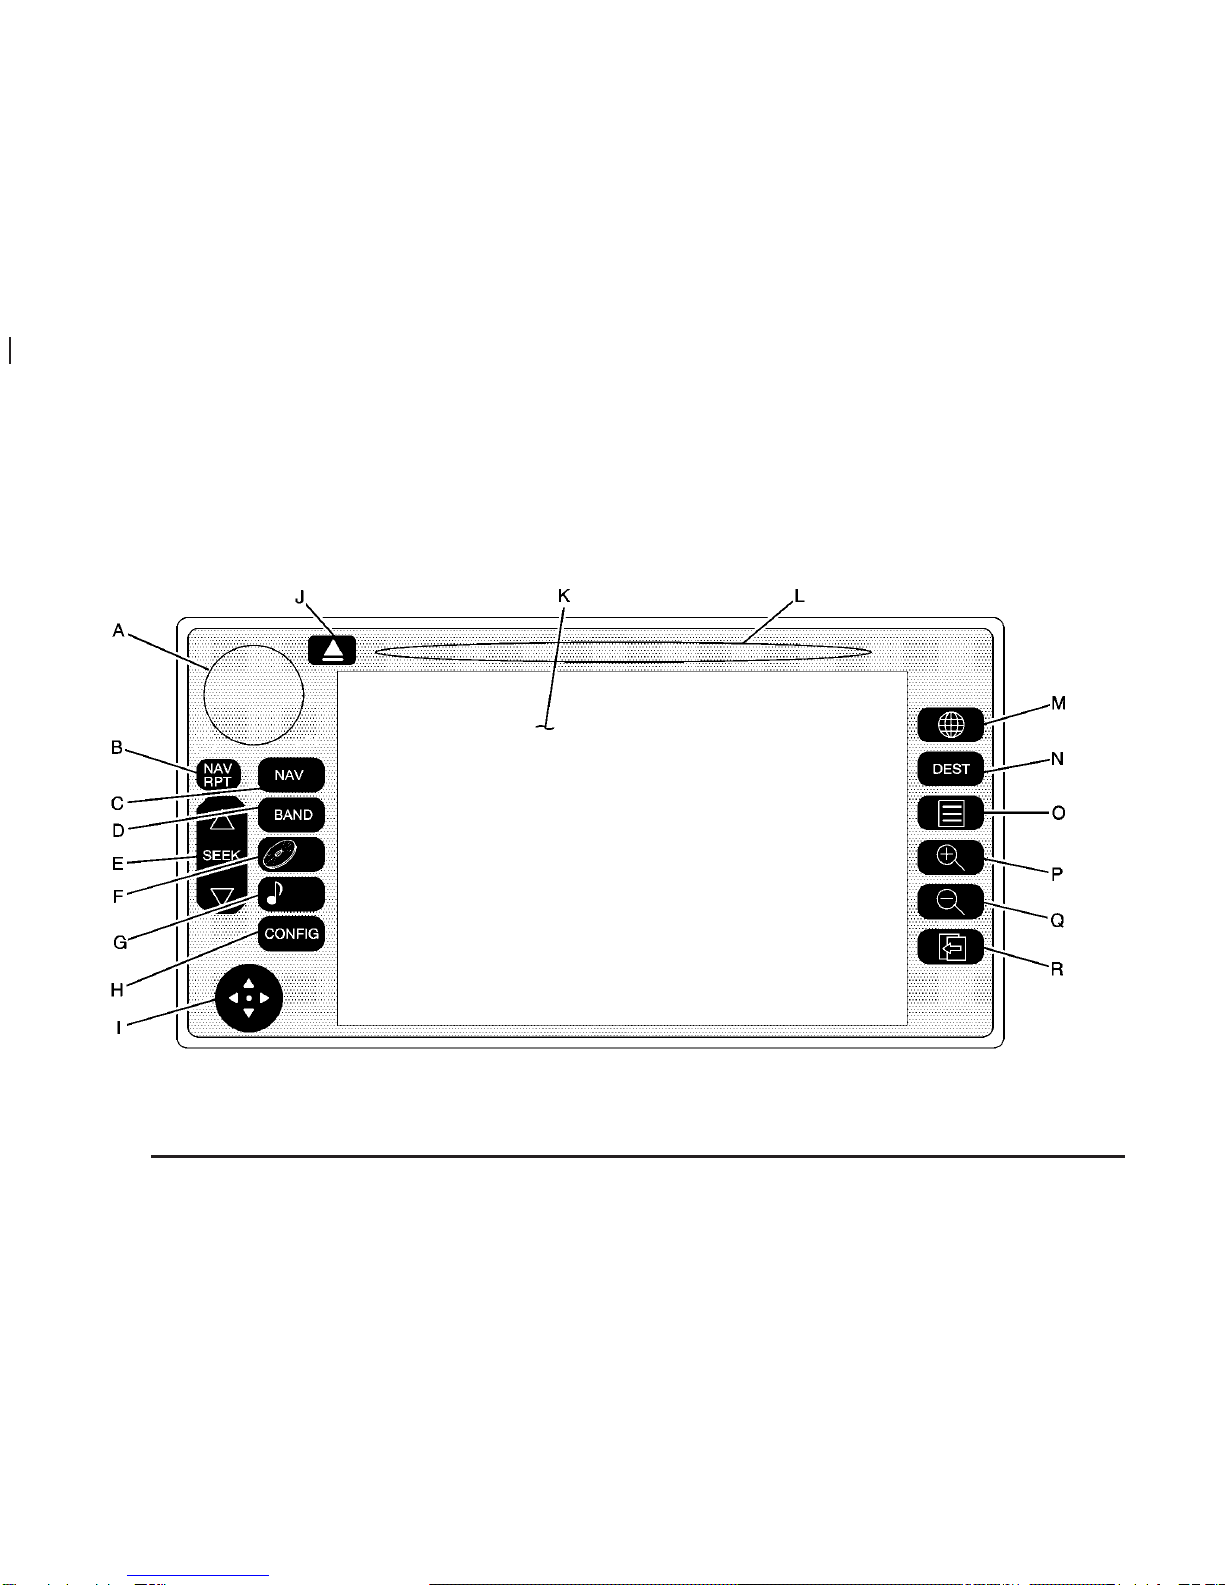
A. Power/Volume Knob. See Navigation System
Screen on page 2-4.
B. NAV RPT (Navigation Repeat) Key. See Navigation
System Screen on page 2-4.
C. NAV (Navigation) Key. See Navigation System
Screen on page 2-4.
D. BAND Key. See “Playing the Radio” under
Navigation Audio System on page 3-2.
E. SEEK Key. See “Finding a Station” under Navigation
Audio System on page 3-2.
F. CD Key. See “Playing CDs” under Navigation Audio
System on page 3-2.
G. Audio Key. See “Audio Screen” under Navigation
Audio System on page 3-2.
H. CONFIG (Configuration) Key. See Screen Setup
on page 1-4.
I. Navigation Joystick. See “Navigation Joystick”
following in this section.
J. DVD/CD Eject Button. See “Playing CDs” under
Navigation Audio System on page 3-2.
K. Navigation Screen. See Screen Setup on page 1-4
and Navigation System Screen on page 2-4.
L. DVD/CD Loading Slot
M. Map Key. See “Hard Keys” under Using the
Navigation System on page 2-2.
N. DEST (Destination) Key. See “Hard Keys” under
Using the Navigation System on page 2-2.
O. Menu Key. See “Hard Keys” under Using the
Navigation System on page 2-2.
P. Zoom In Key. See “Hard Keys” under Using the
Navigation System on page 2-2.
Q. Zoom Out Key. See “Hard Keys” under Using the
Navigation System on page 2-2.
R. Back Key. See “Hard Keys” under Using the
Navigation System on page 2-2.
Before you begin to operate the navigation system, read
this manual thoroughly to become familiar with it and
to understand how the system works.
The navigation system allows you to do the following:
•Plan a route with provided turn-by-turn route
and map guidance with voice prompts.
•Select a destination using various methods and
choices.
•Receive broadcast announcements on traffic and
emergency alert communications.
The information in the system may not always be
complete. Road conditions such as prohibited turns,
detours, and construction zones, change frequently. It is
important to consider whether you can follow the
directions given by the system for the current conditions.
1-3
Navigation Joystick
The navigation joystick, located on the bottom left
corner of the navigation system, is used to make
selections in the navigation system. See the navigation
system overview shown previously for more information
on location.
Move the joystick to the left, right, up, down, or
diagonally to move around the screens, and press the
center of the joystick to enter a selection.
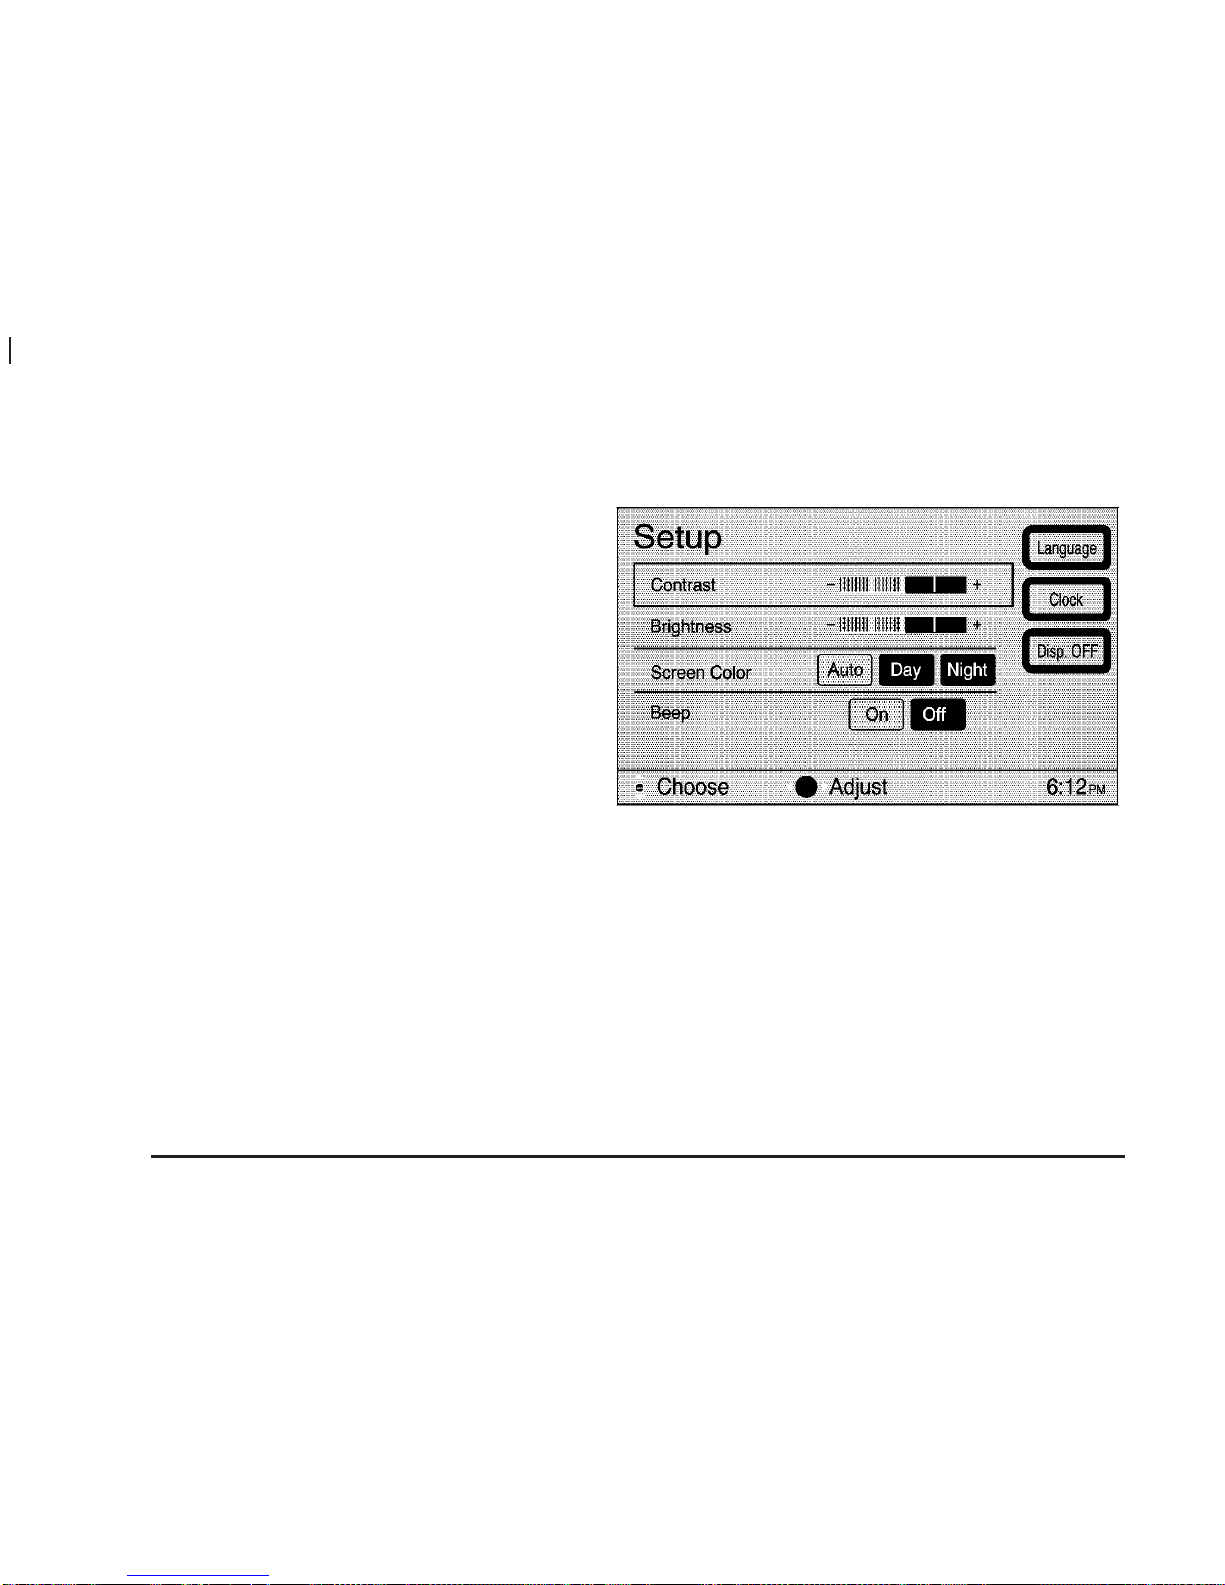
Screen Setup
CONFIG (Configuration) Key: Press the CONFIG key
located to the left of the navigation screen, to access
the Setup menu.
The Setup menu allows you to adjust such things as
screen color, appearance, and language of the display
for the navigation system.
See “Hard Keys” under Using the Navigation System on
page 2-2 for more information on hard key functions.
1-4

Contrast/Brightness
To adjust the contrast or brightness of the navigation
screen, choose the desired option by selecting it with the
joystick. Use the joystick to raise or lower the contrast
or brightness to the desired level. You will see the
screen change as you adjust the contrast or brightness.
Screen Color
When the headlamp switch is turned off, the navigation
screen will change to a lighter background and
change colors, for better viewing in the daytime. At
night, the screen will go to a darker background. You
can select Auto for automatic adjustment.
You can also select day or night mode regardless of the
lighting conditions. The Day setting leaves the system
in the day mode. The Night setting leaves the system in
the night mode.
Beep
With this feature On, a beep will sound every time a key
is pressed on the navigation system. Choose Off if
you do not want to hear a beep whenever a key
is pressed.
Language
Your vehicle has been set for the English language, but
you may also select French for all instructional text
and voice prompts. However, names on the location
map when using the navigation functions will not
change.
If your vehicle is equipped with a Driver Information
Center (DIC), the navigation system will use the
language selected through the vehicle’s DIC.
If you wish to change the language, the map DVD must
be inserted. Then, do the following:
1. Press the Language key under the Setup Menu.
A caution will display.
2. Using the joystick, scroll to the desired language
and press the joystick to select it.
3. Select NEXT to change the display back to the map
screen.
If the language is changed from English, the menu
screens will not match word-for-word as they appear in
this manual.
Every 50 ignition cycles a language screen will
automatically appear prompting you to choose a
language. Select a language, then press NEXT.
1-5
Display Off
To turn the navigation screen off, press the Disp. OFF
key. To turn the screen back on, press any hard
key to the left of the navigation screen.
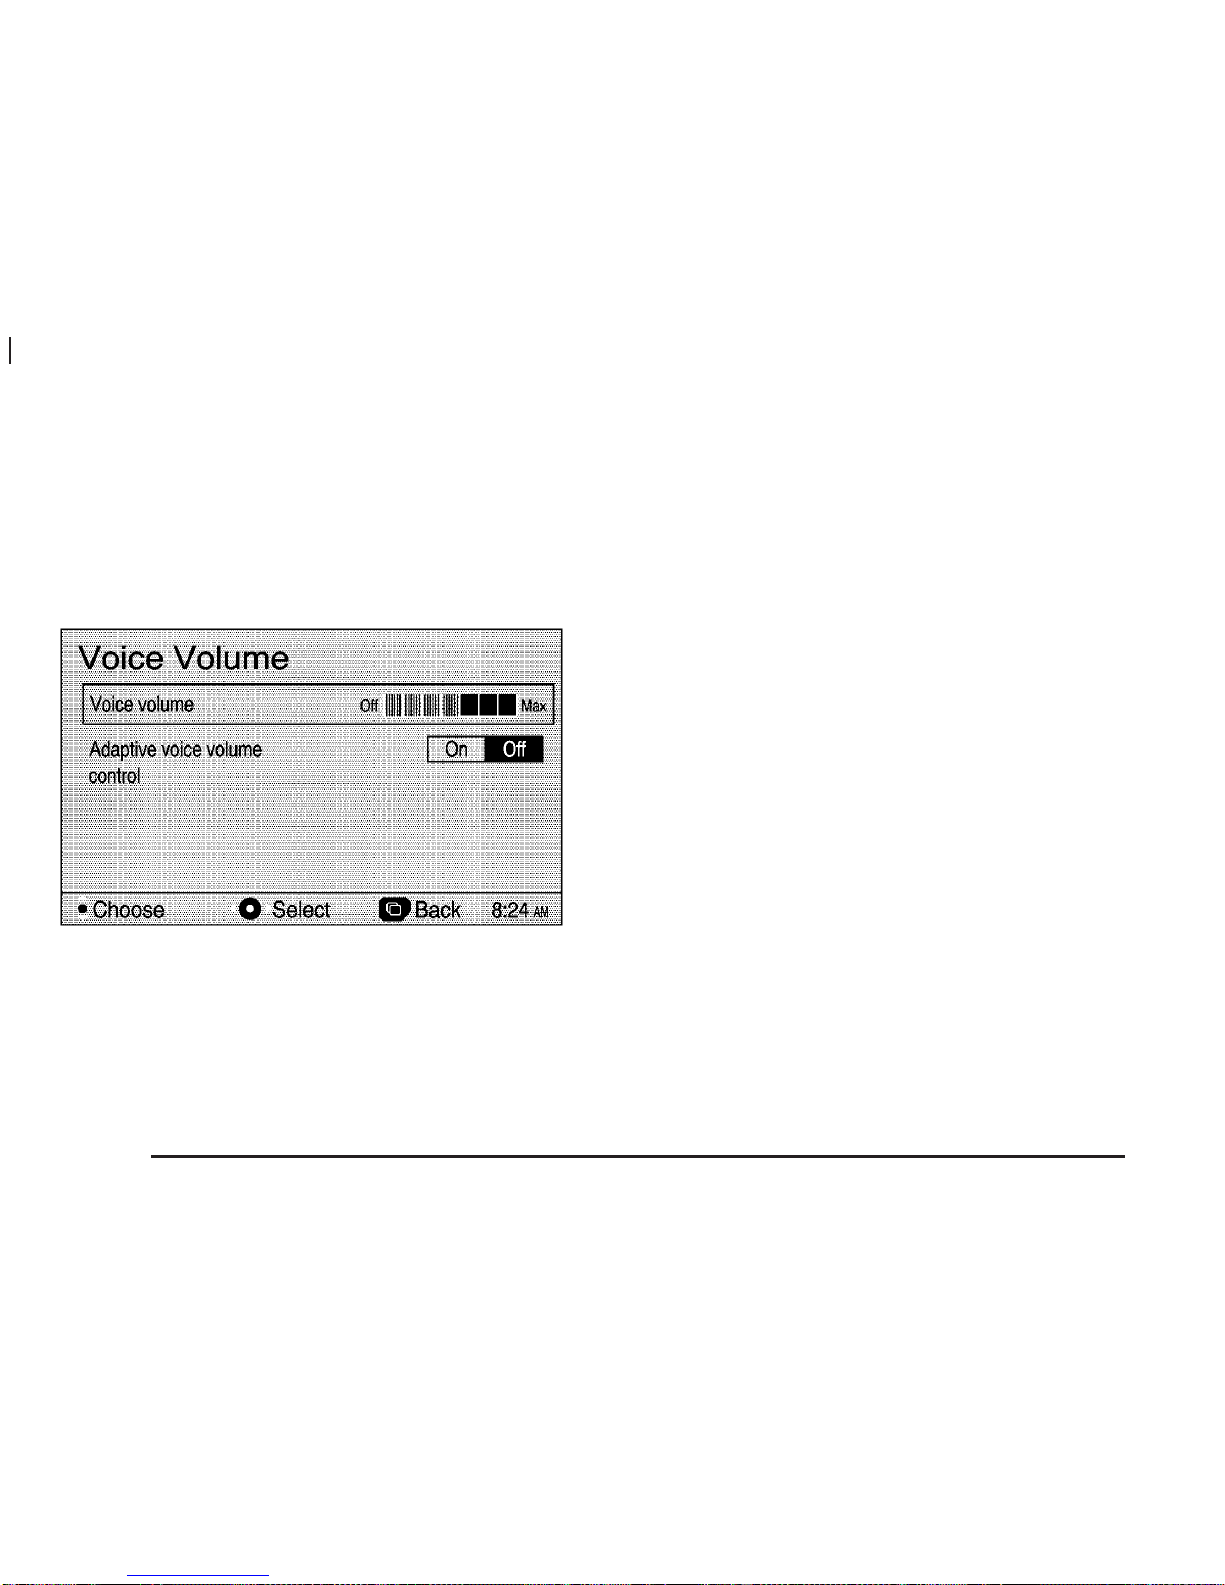
Voice Volume
This system has voice guidance prompts that provide
various messages as you approach points where
you need to maneuver your vehicle, such as an
intersection.
To adjust the volume of the voice prompts you receive
from the system, do the following:
1. Press the menu key.
2. Select Voice Volume.
3. Use the joystick to raise or lower the volume. The
voice prompt will come on with each adjustment to
give you an idea of the volume at each level.
4. Once you have reached the desired volume level,
press the back key to return to the previous screen.
With Adaptive voice volume control, the volume of voice
prompts will increase automatically once the vehicle
exceeds 50 mph (80 km/hr). Select On to activate this
feature.
If you do not need voice guidance, you may also select
Off to turn the prompts off.
1-6

Adjust Clock
To adjust the time displayed at the lower right corner of
the navigation screen, as well as other time options,
you must first reach the Adjust Clock screen. To get to
the Adjust Clock screen, do the following:
1. Press the CONFIG key to access the Setup menu.
2. Select the Clock option.
To change the hours/minutes on the clock, do the
following:
1. Using the joystick, highlight the time, and press the
joystick to select it.
2. Move the joystick up or down to adjust the hour.
3. Once the desired hour is reached, move the joystick
to the right to highlight the minutes.
4. Move the joystick up or down to adjust the minutes.
5. When the desired minutes have been reached,
press OK to save the change, or select Enter to
adjust other time options before you press OK
to save.
12Hr/24Hr: This feature allows you to choose whether
the time is displayed in standard or military time.
Using the joystick, choose 12Hr for standard time, or
24Hr for military time.
Auto GPS Update: With this feature ON, the navigation
system time will be set to match the current GPS
time. The time will be updated with the GPS time when
the ignition is turned to ACCESSORY or RUN. Using
the joystick, you may also choose OFF to turn this
feature off.
1-7

Daylight Savings: With this feature ON, the navigation
system will automatically adjust the time for Daylight
Savings. Using the joystick, you may also choose OFF
to turn this feature off.
Time Zone: This feature allows you to choose
from four different time zones: P.S.T. (Pacific),
M.S.T. (Mountain), C.S.T. (Central) and
E.S.T. (Eastern). Use the joystick to choose the
desired zone.
Remember that you must press OK after making the
desired adjustments to any of the time options.
This allows your changes to be saved and will return
you to the Setup menu. If you hit the back key without
pressing OK, you will return to the Setup menu, but
none of your changes will be saved.
English/Metric Units
This option allows you to select either English or metric
measurements to appear for distances on the map.
If your vehicle is equipped with a Driver Information
Center (DIC), the navigation system will use the metric
measurement selected through the vehicle’s DIC.
To change between English and metric measurements,
do the following:
1. Press the menu key.
2. Using the joystick, select Nav Setup.
3. Use the joystick to choose the measurement option
you desire. Choose miles to display measurements
in English, or km (kilometers) to display metric
measurements.
4. Press the back key to return to the previous screen.
5. To return to the main navigation screen, or to see
the map, press the NAV or map keys.
See “Nav (Navigation) Setup” under Navigation Menu
on page 2-7 for more information.
1-8
Altri manuali per 2004 H2
3
Indice
Altri manuali Hummer Sistema di navigazione per auto


