
Husky 44602 Manuale utente

THANK YOU
We appreciate the trust and condence you have placed in Husky through the purchase of this Husky Wall Storage Rack. We strive to
continually create quality products designed to enhance your home. Visit us online to see our full line of products available for your home
improvement needs. Thank you for choosing Husky!
USE AND CARE GUIDE
WALL STORAGE RACK
Questions, problems, missing parts?
Before returning to the store, call
Husky Customer Service
8 a.m. – 7 p.m., EST, Monday – Friday,
9 a.m. – 6 p.m., EST, Saturday
1-888-HD-HUSKY
HUSKYTOOLS.COM
Item # 1002332673
Model # 44602
2
Table of Contents
Safety Information . . . . . . . . . . . . . . . . . . . . . . . . . . . . . . . . . . 2
Warranty . . . . . . . . . . . . . . . . . . . . . . . . . . . . . . . . . . . . . . . . . . 2
What is covered . . . . . . . . . . . . . . . . . . . . . . . . . . . . . . . . . . . 2
What is not covered . . . . . . . . . . . . . . . . . . . . . . . . . . . . . . . . 2
Pre-Installation. . . . . . . . . . . . . . . . . . . . . . . . . . . . . . . . . . . . . 3
Planning Installation . . . . . . . . . . . . . . . . . . . . . . . . . . . . . . . 3
Tools Required . . . . . . . . . . . . . . . . . . . . . . . . . . . . . . . . . . . . 3
Hardware Included. . . . . . . . . . . . . . . . . . . . . . . . . . . . . . . . . 3
Package Contents . . . . . . . . . . . . . . . . . . . . . . . . . . . . . . . . . 4
Assembly. . . . . . . . . . . . . . . . . . . . . . . . . . . . . . . . . . . . . . . . . . 5
For one Wall Storage Rack. . . . . . . . . . . . . . . . . . . . . . . . . . . 5
For multiple Wall Storage Racks . . . . . . . . . . . . . . . . . . . . . . 9
Care and Cleaning . . . . . . . . . . . . . . . . . . . . . . . . . . . . . . . . . 14
Service and parts . . . . . . . . . . . . . . . . . . . . . . . . . . . . . . . . . . 14
Operation. . . . . . . . . . . . . . . . . . . . . . . . . . . . . . . . . . . . . . . . . 14
Maintenance . . . . . . . . . . . . . . . . . . . . . . . . . . . . . . . . . . . . . . 14
Safety Information
HUSKY WALL STORAGE RACK
It is the responsability of the installer to ensure that wall mounting
surface and structure are sufcient in strength and capacity to
support Husky Wall Storage Rack weight and its contents. Failure to
observe these conditions may result in injury or death.
□For optimum performance, Wall Storage Rack must be mounted
to vertical wall studs spaced to 48 in. apart.
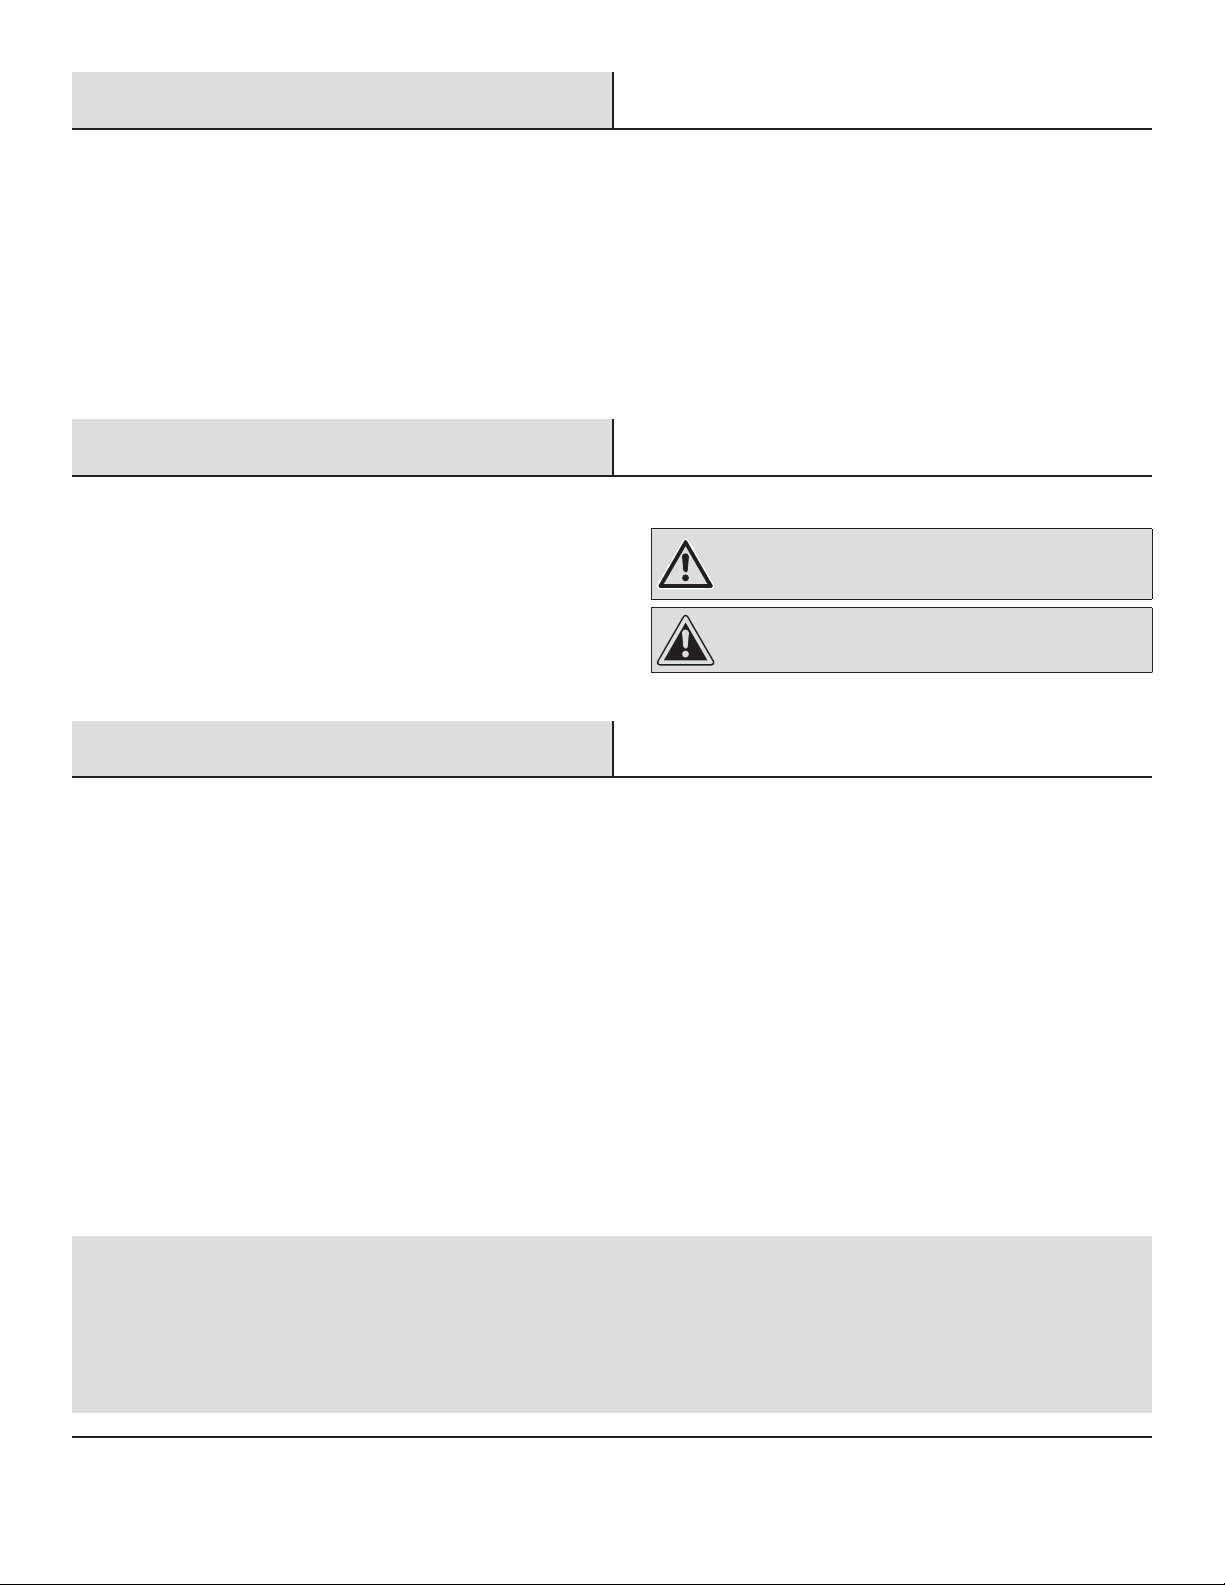
WARNING: Ensure that wall mounting surface and
structure are sufcient in strength and capacity to support
storage rack weight and its contents.
CAUTION: For optimum performance, Wall Storage Rack
must be mounted to vertical wall studs spaced to 48 in. apart.
Warranty
WHAT IS COVERED:
□Only the storage rack in possession of the rst retail purchaser
□Defects in material or workmanship guaranteed forever
WHAT IS NOT COVERED:
□Product failure that results from improper installation, misuse or abuse, alteration, or any other failure not related to defects in
materials or workmanship
□Damage due to acts of God, re, or accident
□Damage created by non-Manufacturer developed accessories such as, but not limited to, hooks or baskets
□Damage that results from loading the storage rack beyond the stated maximum weight capacity
□Corrosion, rust or discolouration of paint
□The cost of return, labour, or accessory materials
QUESTIONS, PROBLEMS, MISSING PARTS?
Before returning to the store, call Husky Customer Service
8 a.m. – 7 p.m., EST, Monday – Friday, 9 a.m. – 6 p.m., EST, Saturday
1-888-HD-HUSKY • HUSKYTOOLS.COM
3 HUSKYTOOLS.COM
Please contact 1-888-HD-HUSKY for further assistance.
Pre-Installation
PLANNING INSTALLATION
1. Decide where and how high you would like the storage rack installed. It must start and nish on studs.
Studs should be centered 48 in. apart in order to support 800 lbs.
NOTE: In order to support 800 lbs, your studs must be a
maximum of 48in.apart.
2. Open the carton. Then lay out and organize parts.
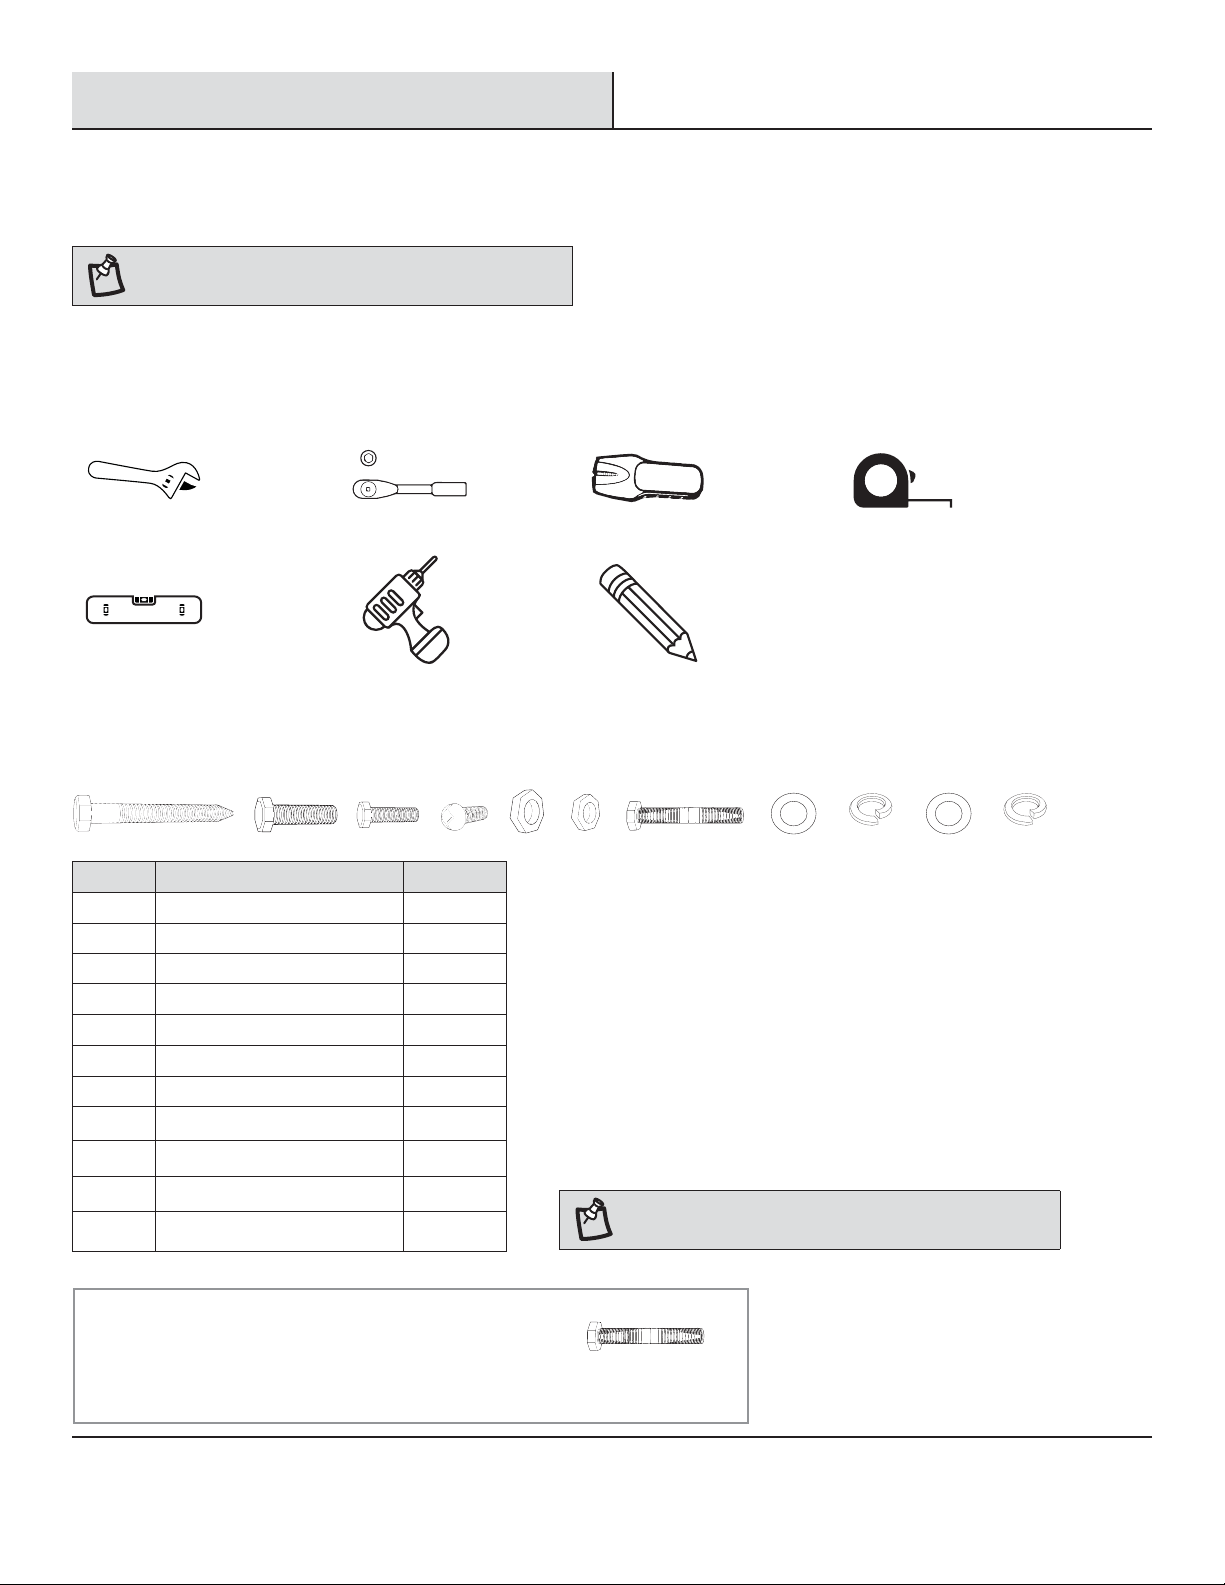
TOOLS REQUIRED
Adjustable
wrench Ratchet Stud nder Measuring
tape
Level Drill Pencil
HARDWARE INCLUDED
Part Description Quantity
AA Lag Bolt 6
BB Large Bolt 10
CC Medium Bolt 11
EE Mushroom Head Screw 3
FF Large Nut 13
GG Medium Nut 11
II Long Bolt * 3
KK Large Washer 10
LL Large Lock Washer 10
MM Medium Washer 11
NN Medium Lock Washer 11
AA BB CC EE FF GG
* For use only if you have purchased multiple Wall Storage
Racks and want to connect them together. II
NOTE: Hardware shown not to scale.
II KK LL NNMM
4
Pre-Installation (continued)
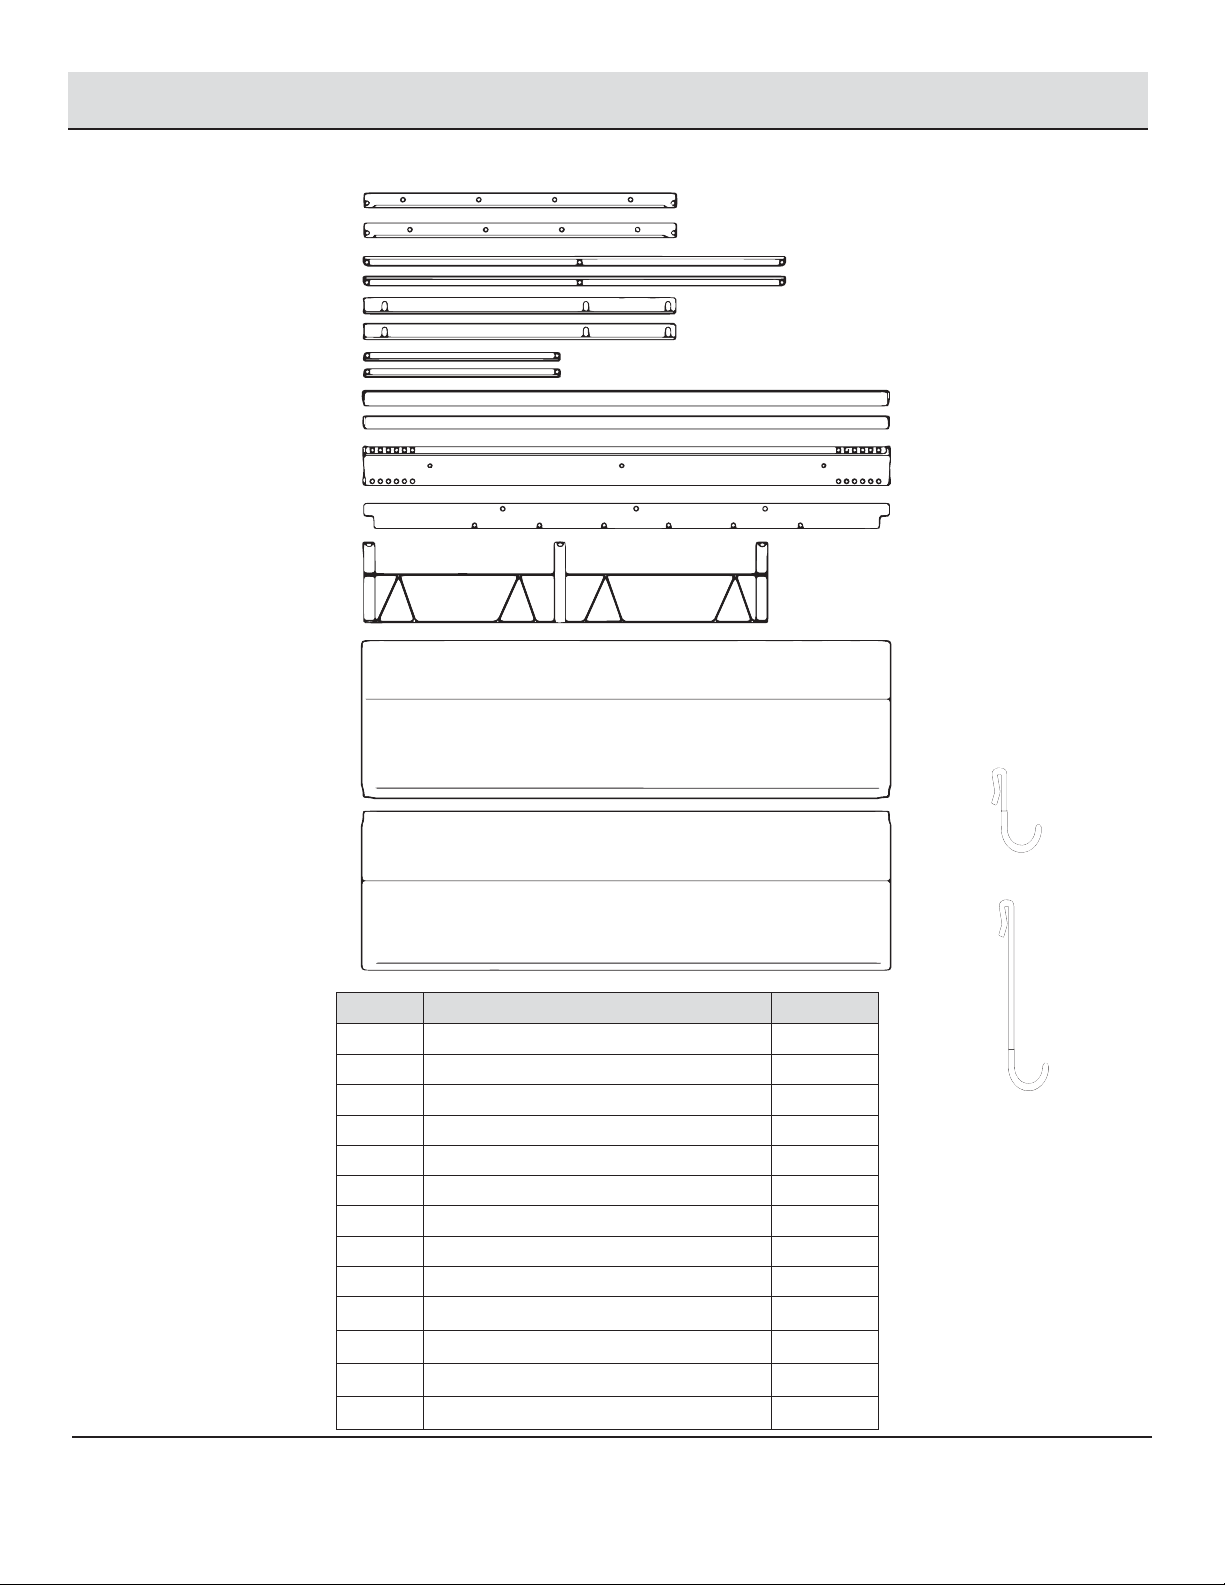
PACKAGE CONTENTS
Part Description Quantity
A1 Horizontal Shelf Support Left 1
B1 Horizontal Shelf Support Right 1
C1 Diagonal Shelf Support Brackets 2
D1 Vertical Base Assembly Brackets 2
E1 Short Diagonal Support Brackets 2
F1 Front Shelf Bracket 1
G1 Base Assembly, Bottom Bracket 1
H1 Wall Mount Base Assembly – Top Bracket 1
I1 Shelf Joining Support 1
J1 Organizer Unit 1
K1 Shelf Front and Back 2
L1 5 in. S hooks 2
M1 12 in. S hooks 2
A1
C1
D1
F1
E1
H1
I1
J1
K1
L1
M1
B1
G1

5 HUSKYTOOLS.COM
Please contact 1-888-HD-HUSKY for further assistance.
Assembly (for one Wall Storage Rack)
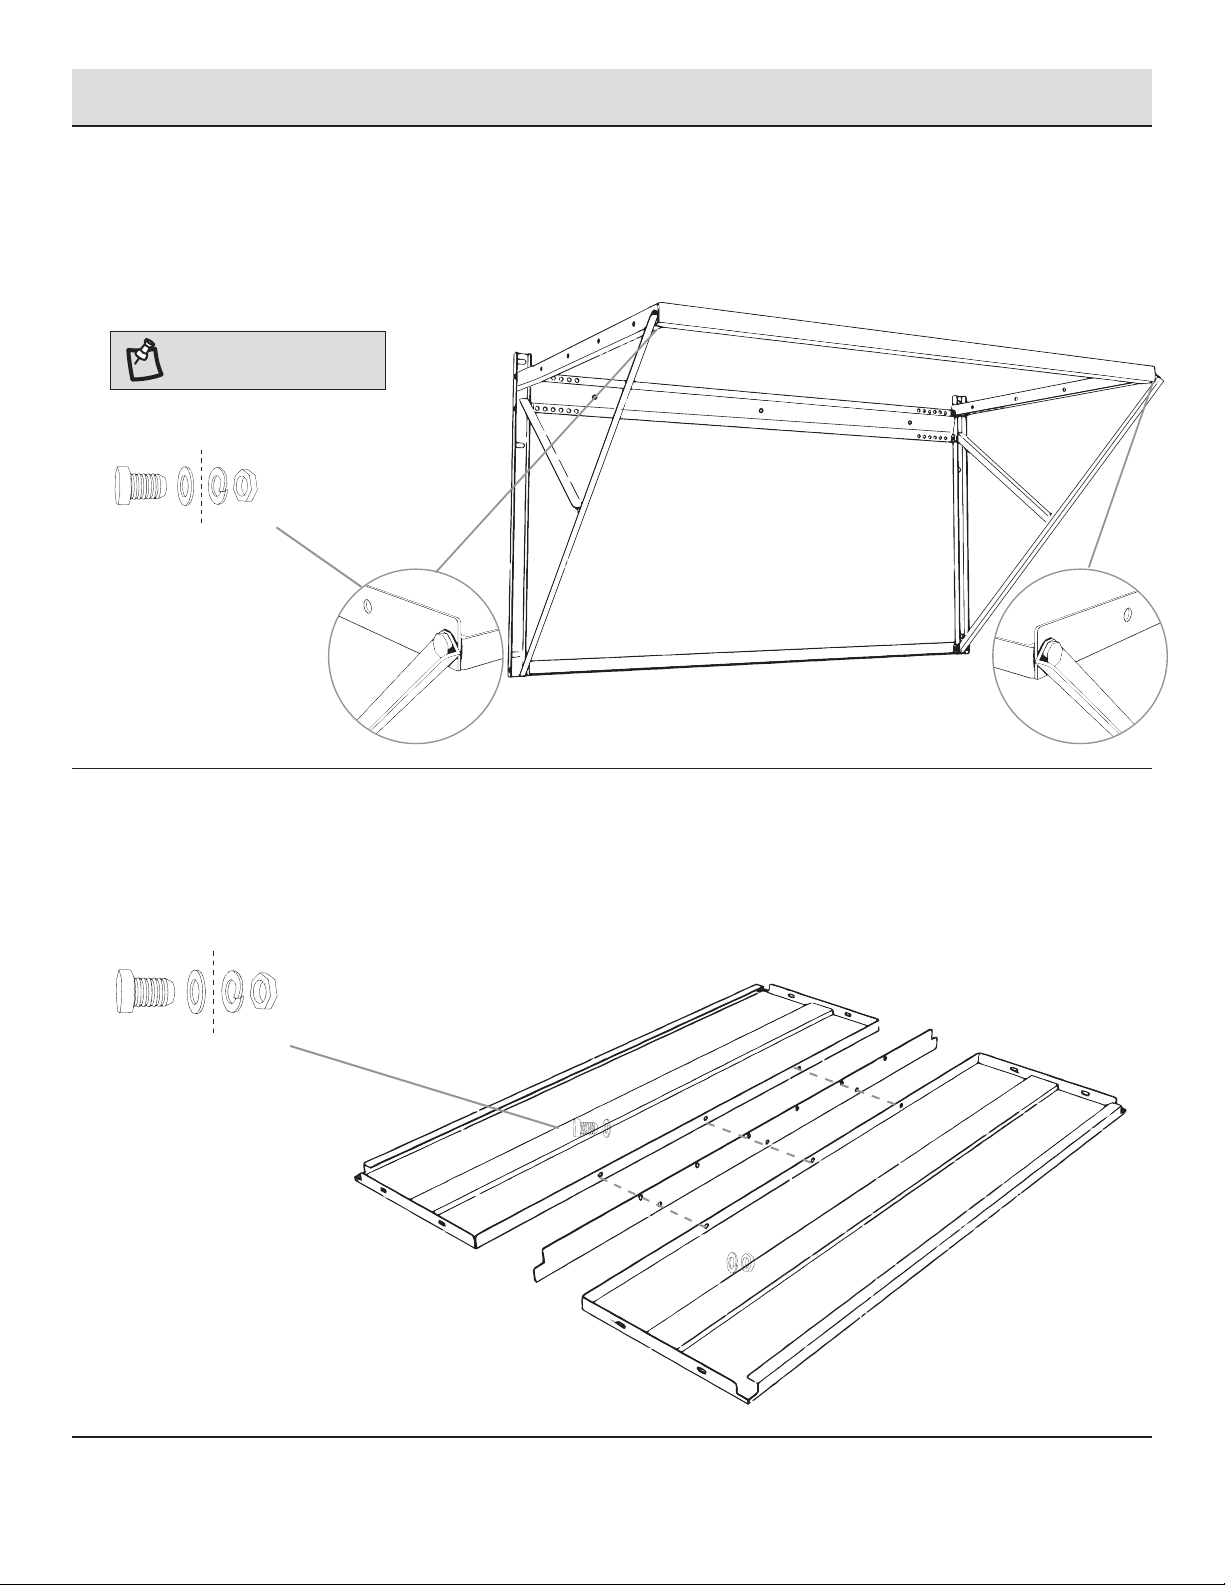
1 Assemble the base
□Attach the wall mount top bracket (H1) and
base assembly bottom bracket (G1) to the
vertical base assembly brackets (D1) using
large bolts (BB), large nuts (FF), large washers
(KK), and large lock washers (LL).
Hand-tighten only as you will be removing
these parts later to add additional items.
2 Fix the base to the wall
□Find your studs and predrill one top hole (use 5/32 in. drill bit).
□Use lag bolts (AA) to mount the assembled base unit from step 1 to wall studs.
□Level, predrill and install the other side. Continue with four other bolts (AA), mounting to studs (as indicated by arrows below).
H1
D1
G1
D1
x 6
AA
x 4
x 4
BB
FF
NOTE: Use these holes
to install to your studs if
they are not located exactly
48in. apart.
up
down
x 4
x 4
KK
LL
Left side Right side

6
Assembly (for one Wall Storage Rack)
3 Install left side
□Loosen the large bolts (BB) that join the vertical base
brackets (D1) to the top wall mount base assembly (H1).
Add horizontal shelf support (A1) to the inside of the
U-channel in the vertical base brackets (D1).
Hand tighten. See inset A.
□Add a large bolt (BB) through the second hole in the vertical
base assembly bracket (D1). Add the short support bracket
(E1) to the inside of the top wall mount base assembly (H1)
and hand-tighten the large nut (FF). See inset A.
□Loosen the large bolt (BB) that joins the vertical base assembly
bracket (D1) and the base assembly bottom bracket (G1)
at the bottom of the bracket (D1). Add the diagonal shelf
support bracket (C1) to the inside of the U-channel on (D1).
Hand tighten. See inset B.
□Add a large bolt (BB) through the hole in the center
of the diagonal shelf support bracket (C1) to secure
the short diagonal support bracket (E1) to the inside
of (C1). Hand tighten. See inset C.
4 Install right side
□Repeat step 3 for the right side. B1
E1
D1 C1
H1
G1
D1
E1
A1
H1
C1
G1
D1
ABC
BB KK LL FF
x 2
Exterior Interior
FF LL KK BB
Interior Exterior
x 2
FF, LL
FF, LL
KK, BB
BB, KK
BB, KK
BB, KK
LL, FF
LL, FF
LL, FF
KK, BB FF, LL
7 HUSKYTOOLS.COM
Please contact 1-888-HD-HUSKY for further assistance.
I1
K1
K1
Assembly (for one Wall Storage Rack)
5 Connect F1 bar
□Connect the front shelf bracket (F1) to the left horizontal shelf support (A1) and the diagonal shelf support bracket (C1)
using a large bolt (BB), nut (FF), and washers (KK and LL).
□Repeat this process on the other side using the right
horizontal shelf support (B1).
6 Assemble steel solid shelf parts
□Lay the front and back shelves (K1) on at side with perpendicular sides facing one another. Fasten the shelves (K1) together, with the
shelf joining support (I1) between them using bolts (CC) and nuts (GG). Securely tighten the bolts (CC).
NOTE: Tighten all bolts
A1
E1 E1
B1
F1
G1
D1
C1
C1
H1
D1
BB KK LL FF
x 2
Exterior Interior
CC MM NN GG
x 3
Exterior Interior
CC, MM
NN, GG
BB, KK BB, KK
LL, FF LL, FF

8
Assembly (for one Wall Storage Rack)
7 Attach shelf to the frame
□Attach the shelf to the frame as indicated with arrows using bolts (CC), nuts (GG), and washers (MM and NN).
8 Install accessories
□Connect the organizer unit (J1) to the top wall mount assembly (H1) using screws (EE).
□Attach the S-hooks (L1 and M1) to the assembly in your desired locations.
A1
B1
EE x 3
x 2 x 2
CC MM NN GG
Exterior Interior
x 8
CC, MM
NN, GG
EE EE
J1
J1
EE
H1
M1
L1

9 HUSKYTOOLS.COM
Please contact 1-888-HD-HUSKY for further assistance.
Assembly (for two or more consecutive Wall Storage Racks)
1 Choose which side you wish to expand your Husky®Wall Storage Rack
The Husky®Wall Storage Rack is a modular system that allows you to add more racks even once your
rst rack is installed. The rack is designed to provide maximum storage without loss of oor space.
10
H1
G1
Assembly (for two Wall Storage Racks)
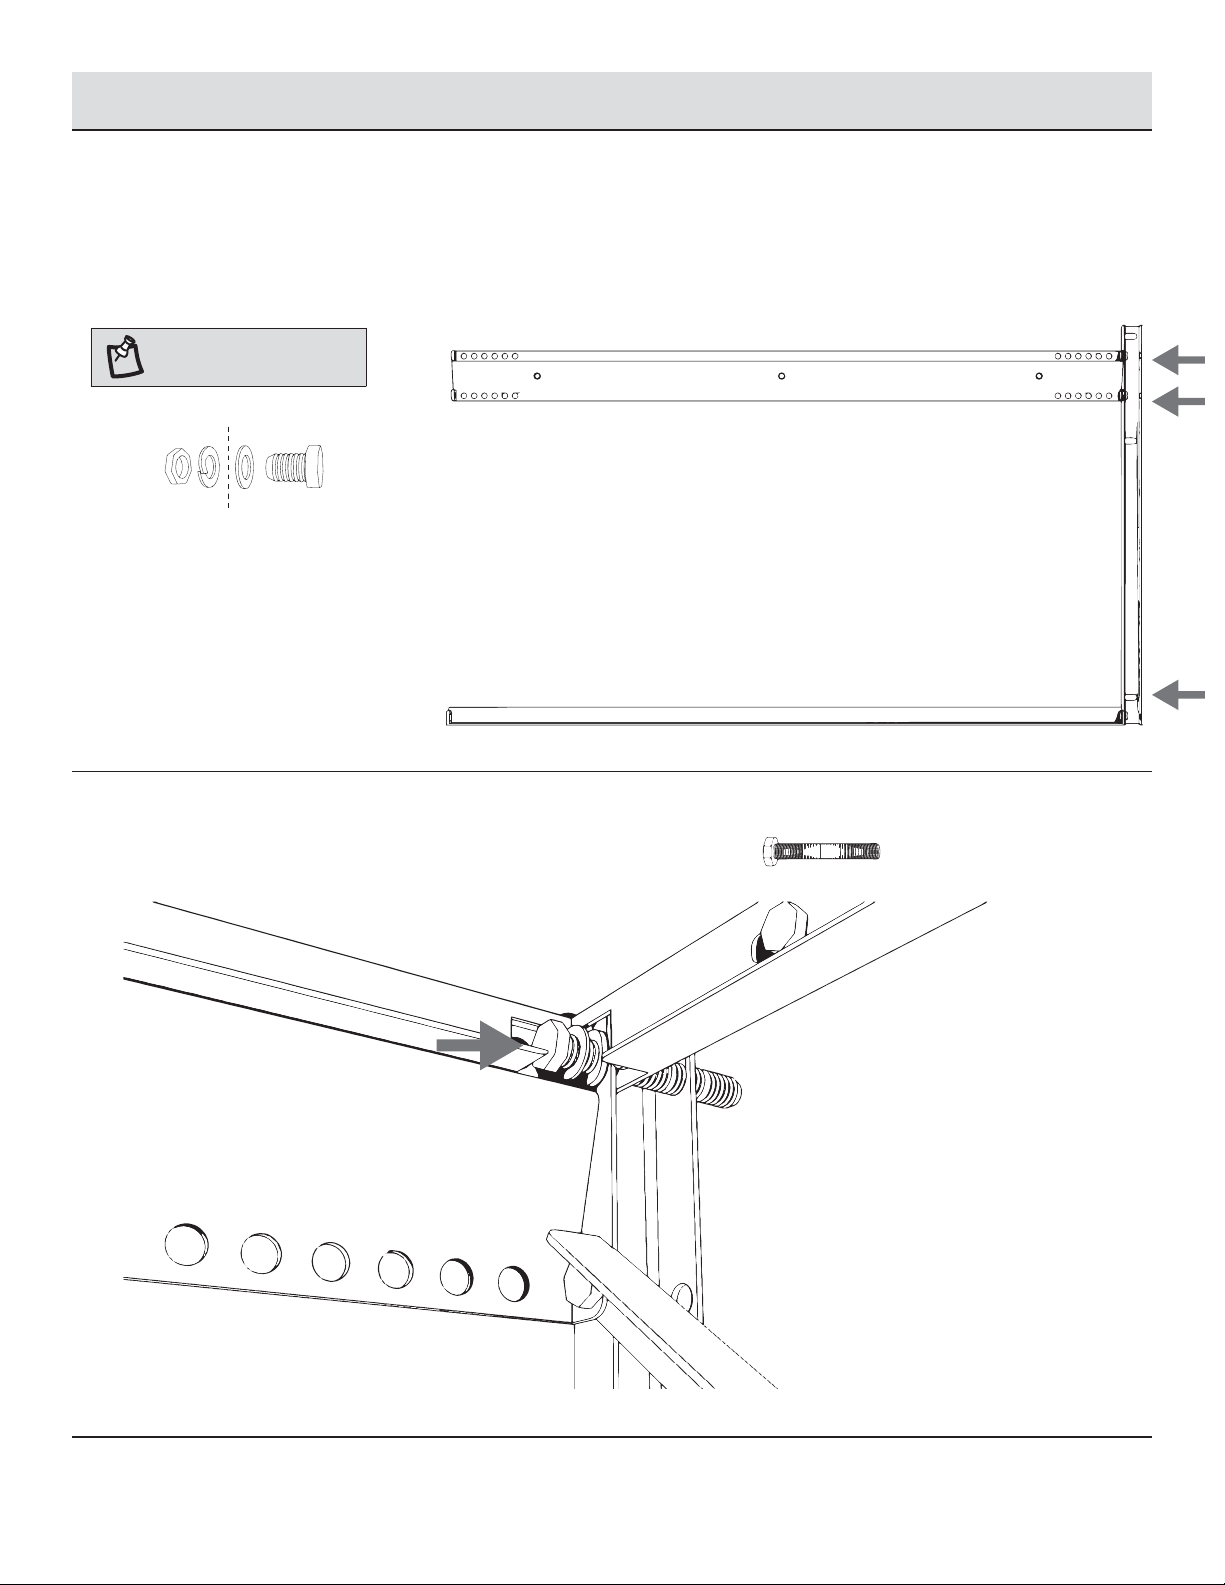
2 Connect H1, D1 and G1 on the oor.
□Connect the wall wount base assembly (H1) to the vertical base assembly bracket (D1) using bolts (BB),
nuts (FF), and washers (KK and LL).
□Connect the base assembly bottom bracket (G1) to the vertical base assembly bracket (D1) using bolts (BB),
nuts (FF), and washers (KK and LL).
3 Replace bolt
□Replace the indicated bolt with a long bolt (II) without using the nut. x 1
II
NOTE: Hand tighten all
bolts until rack is complete.
Figure 1
H1
G1
D1
FF LL KK BB
Interior Exterior
x 3
Questo manuale è adatto per i seguenti modelli
1
Indice
Lingue:
Altri manuali Husky Rack e supporto

Husky
Husky ACR3296B Manuale utente

Husky
Husky BR15WF Manuale utente

Husky
Husky ACR4896B Manuale utente

Husky
Husky ERZ782478W4B Manuale utente

Husky
Husky N2W902490W5B Manuale utente

Husky
Husky 90500HWSK Manuale utente

Husky
Husky N2W772478W4B Manuale utente

Husky
Husky HBR652454W3-R Manuale utente

Husky
Husky MR482478W5-B Manuale utente

Husky
Husky HBR652454W3C Manuale utente


