Idis NK-1100 Istruzioni operative

Powered by
Network
Keyboard
Operation Manual
NK-1100

2
This operation manual contains basic instructions on installing and using the network keyboard.
Users who are using this product for the first time, as well as users with experience using comparable products,
must read this operation manual carefully before use and pay heed to the warnings and precautions contained
herein while using the product. Safety warnings and precautions contained in this operation manual are intended
to promote proper use of the product and thereby prevent accidents and property damage and must be followed
at all times.
Once you have read this operation manual, keep it at an easily accessible location for future reference.
•The manufacturer will not be held responsible for any product damage resulting from the use of unauthorized parts
and accessories or from the user's failure to comply with the instructions contained in this operation manual.
•It is recommended that first-time users of the product and individuals who are not familiar with its use seek technical
assistance from their retailer regarding product installation and use.
•If you need to disassemble the product for functionality expansion or repair purposes, you must contact your retailer
and seek professional assistance.
•Both retailers and users should be aware that this product has been certified as being electromagnetically compatible
for commercial use. If you have sold or purchased this product unintentionally, please replace with a consumer
version.
Safety Precautions
CAUTION
RISK OF ELECTRIC SHOCK
DO NOT OPEN
CAUTION: TO REDUCE THE RISK OF ELECTRIC SHOCK,
DO NOT REMOVE COVER (OR BACK).
NO USER-SERVICEABLE PARTS INSIDE.
REFER SERVICING TO QUALIFIED SERVICE PERSONNEL.
The lightning flash with arrowhead symbol, within an equilateral triangle, is intended to alert the user to the
presence of uninsulated "dangerous voltage" within the product’s enclosure that may be of sufficient magnitude
to constitute a risk of electric shock.
The exclamation point within an equilateral triangle is intended to alert the user to the presence of important
operating and maintenance (servicing) instructions in the literature accompanying the appliance.
Before reading this manual

Before reading this manual
3
Important Safeguards
In-Text
Symbol Type Description
Caution Important information concerning a specific function.
Note Useful information concerning a specific function.
1. Read Instructions
All the safety and operating instructions should be read before the
appliance is operated.
2. Retain Instructions
The safety and operating instructions should be retained for future
reference.
3. Cleaning
Unplug this equipment from the wall outlet before cleaning it. Do not
use liquid aerosol cleaners. Use a damp soft cloth for cleaning.
4. Attachments
Never add any attachments and/or equipment without the approval
of the manufacturer as such additions may result in the risk of fire,
electric shock or other personal injury.
5. Water and/or Moisture
Do not use this equipment near water or in contact with water.
6. Placement and Accessories
Do not place this equipment on an unstable cart, stand or table. The
equipment may fall, causing serious injury to a child or adult, and
serious damage to the equipment.
This equipment and cart combination should be moved with care.
Quick stops, excessive force, and uneven surfaces may cause the
equipment and cart combination to overturn.
Do not place this equipment in an enclosed space. Sufficient
ventilation is required to prevent an increase in ambient temperature
which can cause malfunction or the risk of fire.
7. Power Sources
This equipment should be operated only from the type of power
source indicated on the marking label. If you are not sure of the
type of power, please consult your equipment dealer or local power
company.
8. Power Cords
Operator or installer must remove power and TNT connections before
handling the equipment.
9. Lightning
For added protection for this equipment during a lightning storm, or
when it is left unattended and unused for long periods of time, unplug
it from the wall outlet and disconnect the antenna or cable system.
This will prevent damage to the equipment due to lightning and
power-line surges.
10. Overloading
Do not overload wall outlets and extension cords as this can result in
the risk of fire or electric shock.
11. Objects and Liquids
Never push objects of any kind through openings of this equipment
as they may touch dangerous voltage points or short out parts that
could result in a fire or electric shock. Never spill liquid of any kind on
the equipment.
12. Servicing
Do not attempt to service this equipment yourself. Refer all servicing
to qualified service personnel.
13. Damage requiring Service
Unplug this equipment from the wall outlet and refer servicing to
qualified service personnel under the following conditions:
A. When the power-supply cord or the plug has been damaged.
B. If liquid is spilled, or objects have fallen into the equipment.
C. If the equipment has been exposed to rain or water.
D. If the equipment does not operate normally by following the
operating instructions, adjust only those controls that are covered by
the operating instructions as an improper adjustment of other controls
may result in damage and will often require extensive work by a
qualified technician to restore the equipment to its normal operation.
E. If the equipment has been dropped, or the cabinet damaged.
F. When the equipment exhibits a distinct change in performance ─ this
indicates a need for service.
14. Replacement Parts
When replacement parts are required, be sure the service technician
has used replacement parts specified by the manufacturer or that
have the same characteristics as the original part. Unauthorized
substitutions may result in fire, electric shock or other hazards.
15. Safety Check
Upon completion of any service or repairs to this equipment, ask the
service technician to perform safety checks to determine that the
equipment is in proper operating condition.
16. Field Installation
This installation should be made by a qualified service person and
should conform to all local codes.
17. Tmra
A manufacturer’s maximum recommended ambient temperature
(Tmra) for the equipment must be specified so that the customer and
installer may determine a suitable maximum operating environment for
the equipment.

Before reading this manual
4
FCC Compliance Statement
THIS EQUIPMENT HAS BEEN TESTED AND FOUND TO COMPLY WITH THE LIMITS FOR A CLASS A DIGITAL DEVICE,
PURSUANT TO PART 15 OF THE FCC RULES. THESE LIMITS ARE DESIGNED TO PROVIDE REASONABLE PROTECTION
AGAINST HARMFUL INTERFERENCE WHEN THE EQUIPMENT IS OPERATED IN A COMMERCIAL ENVIRONMENT. THIS
EQUIPMENT GENERATES, USES, AND CAN RADIATE RADIO FREQUENCY ENERGY AND IF NOT INSTALLED AND USED IN
ACCORDANCE WITH THE INSTRUCTION MANUAL, MAY CAUSE HARMFUL INTERFERENCE TO RADIO COMMUNICATIONS.
OPERATION OF THIS EQUIPMENT IN A RESIDENTIAL AREA IS LIKELY TO CAUSE HARMFUL INTERFERENCE, IN WHICH
CASE USERS WILL BE REQUIRED TO CORRECT THE INTERFERENCE AT THEIR OWN EXPENSE.
WARNING: CHANGES OR MODIFICATIONS NOT EXPRESSLY APPROVED BY THE PARTY RESPONSIBLE FOR
COMPLIANCE COULD VOID THE USER’S AUTHORITY TO OPERATE THE EQUIPMENT.
WEEE (Waste Electrical & Electronic Equipment)
Correct Disposal of This Product
(Applicable in the European Union and other European countries with separate collection systems)
This marking shown on the product or its literature, indicates that it should not be disposed with other
household wastes at the end of its working life. To prevent possible harm to the environment or human health
from uncontrolled waste disposal, please separate this from other types of wastes and recycle it responsibly to
promote the sustainable reuse of material resources.
Household users should contact either the retailer where they purchased this product, or their local
government office, for details of where and how they can take this item for environmentally safe recycling.
Business users should contact their supplier and check the terms and conditions of the purchase contract.
This product should not be mixed with other commercial wastes for disposal.
Copyright
© 2013 IDIS Co., Ltd.
IDIS Co., Ltd. reserves all rights concerning this operation manual.
Use or duplication of this operation manual in part or whole without the prior consent of IDIS Co., Ltd. is strictly
prohibited.
Contents of this operation manual are subject to change without prior notice for reasons such as functionality
enhancements.
Registered Trademarks
IDIS is a registered trademark of IDIS Co., Ltd.
Other company and product names are registered trademarks of their respective owners.
The information in this manual is believed to be accurate as of the date of publication. We are not responsible for any
problems resulting from the use thereof. The information contained herein is subject to change without notice. Revisions or
new editions to this publication may be issued to incorporate such changes.
The software included in this product contains some Open Sources. You may obtain the complete corresponding source
code from us. See the Open Source Guide on the software CD (OpenSourceGuide\OpenSourceGuide.pdf) or as a printed
document included along with the User's Manual.

5
Table of Contents
1
2
3
Part 1 – Introduction .................................7
Product Features ...............................................7
Compatible Devices .....................................................7
Accessories ...................................................7
Typical Applications .............................................8
Controls for PTZ Cameras ................................................8
Controls for NVR Systems ................................................8
Controls for Video Management System......................................9
Overview ....................................................10
Rear Panel ...........................................................10
Bottom Panel .........................................................12
Top Panel ............................................................13
Part 2 - Installation .................................14
PTZ Camera Registration ........................................14
Basic Mode ..........................................................14
Advanced Mode.......................................................15
NVR System Registration ........................................16
Video Management System Registration. . . . . . . . . . . . . . . . . . . . . . . . . . . . . 18
Part 3 - Operations .................................19
Overview ....................................................19
LCD Display ..........................................................19
Locking Buttons .......................................................20
Cancelling a Command .................................................20
Controls for PTZ Camera ........................................21
Controls for NVR System ........................................21
Controlling a PTZ Camera ...............................................21
Controlling a NVR......................................................21
Controls for Video Management System.............................22
Monitoring Video ......................................................22
Playing Recorded Video .................................................23

Table of Contents
6
Part 4 - LCD Menu Configuration .....................24
Buttons for LCD Menu Configuration ...............................24
Entering or Exiting LCD Menu.....................................24
Setup Menu ..................................................25
System..............................................................25
Device ..............................................................26
Part 5 - Remote Setup ..............................27
System ......................................................27
General .............................................................27
Button ..............................................................28
LCD ................................................................28
Audio ...............................................................29
Network .....................................................29
IP Address ...........................................................29
FEN ................................................................30
Devices. . . . . . . . . . . . . . . . . . . . . . . . . . . . . . . . . . . . . . . . . . . . . . . . . . . . . . 30
General .............................................................30
Setup ...............................................................30
Functions ....................................................33
Macro...............................................................34
Button ..............................................................34
Part 6 - Appendix...................................35
Troubleshooting ...............................................35
Buttons. . . . . . . . . . . . . . . . . . . . . . . . . . . . . . . . . . . . . . . . . . . . . . . . . . . . . . 35
Operation Commands ..................................................36
Controls for PTZ Camera ................................................37
Controls for Video Management System, NVR and Network Camera ...............39
PTZ Camera Model Numbers .....................................41
System Upgrade Error Codes.....................................42
Specifications .................................................43
Map of Screens (Remote Setup) ...................................44
4
5
6

7
Product Features
This manual provides information for use and control of the network keyboard on a network environment.
This network keyboard controls Network Video Recorders (NVRs), network cameras and Video Management
System remotely via network connection. Also, the network keyboard controls PTZ cameras connected via RS485
connection. The network keyboard can be accessed, configured, and managed by the IDIS Discovery (integrated
network installation tool) program with the following features:
•Remote controls for NVRs, network cameras, and Video Management System via network connection
•Controls for various models of PTZ cameras via RS485 connection
•Two-way audio communication
•Convenient firmware upgrades via either the USB port or Ethernet
•Firmware duplication and auto recovery to enhance the system stability
•Management for multiple network keyboards via network connection
•Recalls for a maximum of 100 macros and a maximum of 8 mapping functions
•Programmable by the LCD screen
•Controls for NVRs by using a USB mouse via network connection
Compatible Devices
•Video Management System (IDIS Solution Suite)
•NVR (Network Video Recorder)
•Network Camera
•PTZ Camera
Accessories
•Network Keyboard Body
•Joystick (Removable) and Joystick Cable
•DC Adapter (5V)
•Power Cord
•Installation CD (IDIS Discovery)
•Operation Manual
Part 1 – Introduction

Part 1 – Introduction
8
Typical Applications
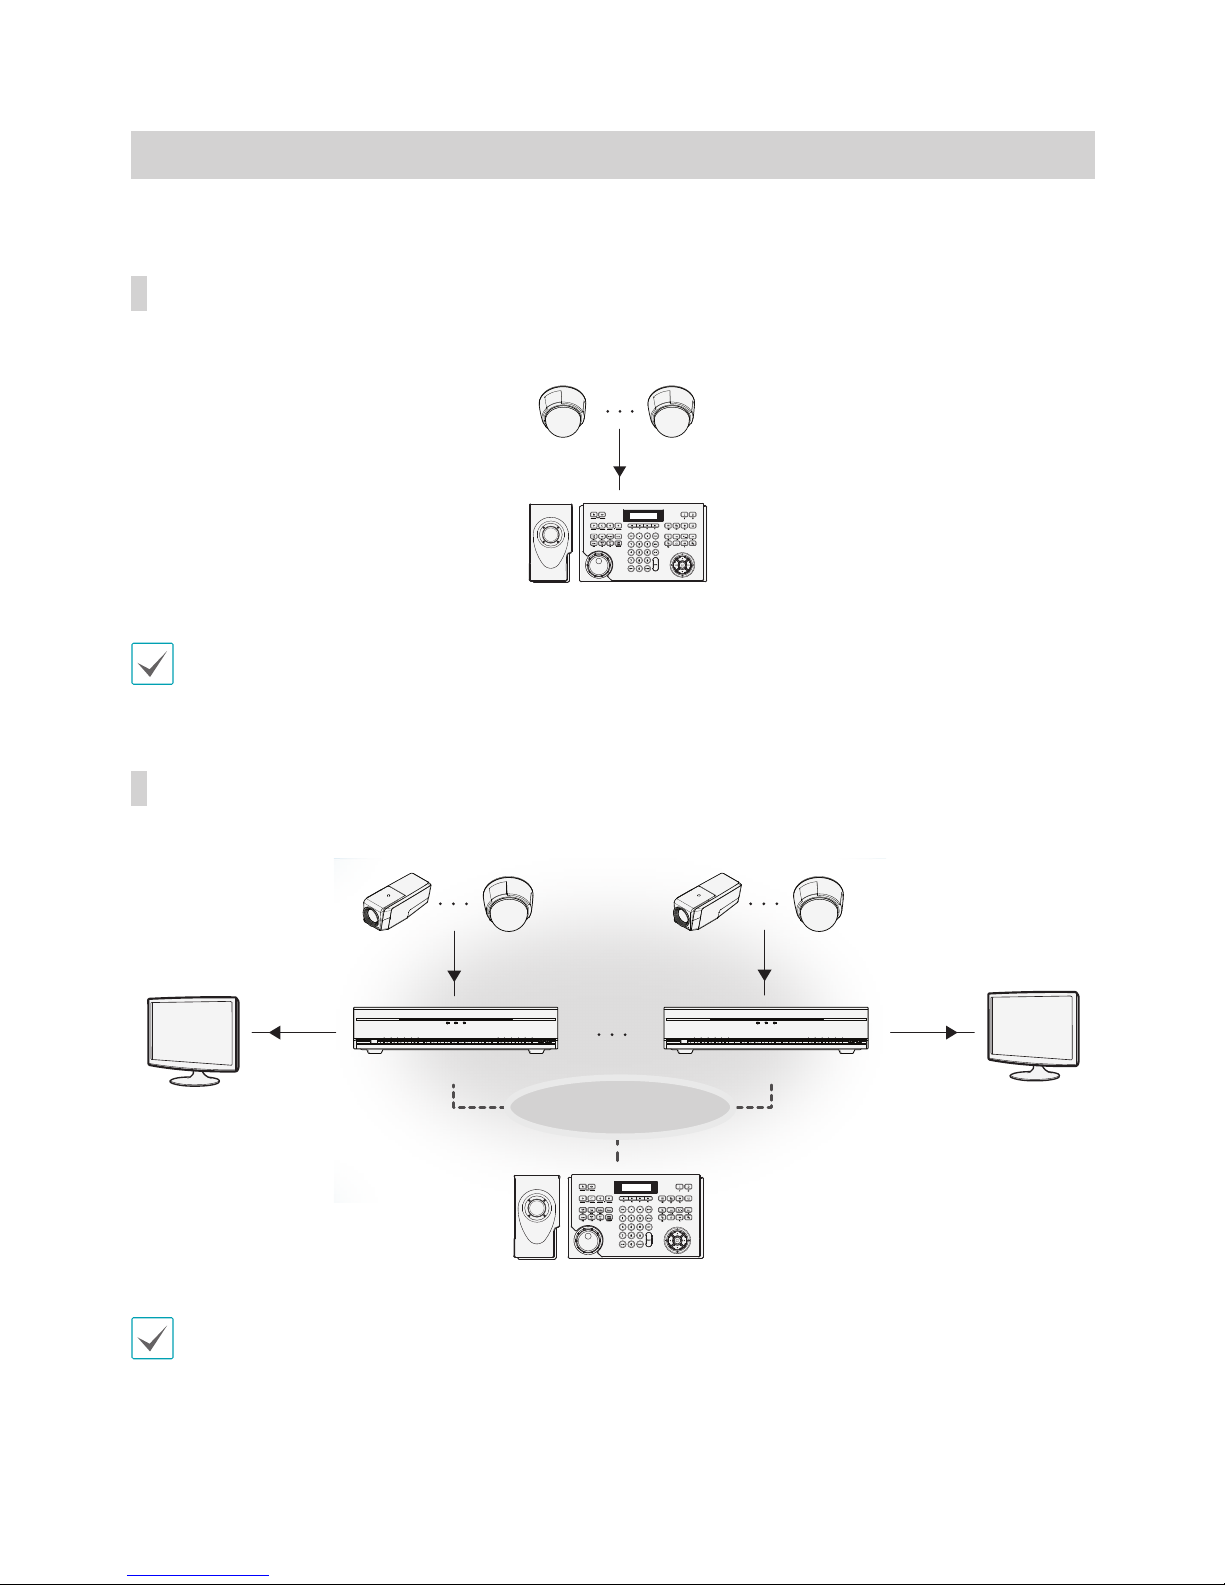
Controls for PTZ Cameras
Network Keyboard
PTZ Cameras
RS485
You can control PTZ cameras via RS485 connection. For more information, see Part 2 - Installation, PTZ Camera
Registration.
Controls for NVR Systems
Network Cameras Network Cameras
Monitor
Network Keyboard
NVR NVR
NETWORK Monitor
You can control NVRs and PTZ cameras connected to the NVRs via a network. For more information, see Part 2 -
Installation > NVR System Registration and Part 3 - Operations > Controls for NVR System.

Part 1 – Introduction
9
Controls for Video Management System
NVRs
Network
Network
Network
Network keyboard
Recording
Update
Administration,
Monitoring
Streaming
Video Analytics
Network
Cameras
Client
You can control Video Management System via a network. For more information, see Part 2 - Installation > Video
Management System Registration and Part 3 - Operations > Controls for Video Management System.

Part 1 – Introduction
10
Overview
Rear Panel
1 2 3 4 5 6 7 8
1Speaker 2MIC 3USB Port
4Network Port 5RS485 PTZ Port 6RS485 DVR Port
7Power In 8Joystick Port
•The network connector is not designed to directly connect a cable or wire for outdoor use.
•Do NOT connect or disconnect the joystick cable while the network keyboard is on. The network keyboard must be
off before connecting or disconnecting the joystick cable; otherwise, it may affect the network keyboard or cause it to
malfunction.
ROUTE POWER CORDS SO THAT THEY MAY NOT FORM A TRIPPING HAZARD. MAKE SURE THE POWER CORD
WILL NOT BE PINCHED OR ABRADED BY FURNITURE. DO NOT INSTALL POWER CORDS UNDER RUGS OR
CARPET. THE POWER CORD HAS A GROUNDING PIN. IF YOUR POWER OUTLET DOES NOT HAVE A GROUNDING
PIN RECEPTACLE, DO NOT MODIFY THE PLUG. DO NOT OVERLOAD THE CIRCUIT BY HAVING TOO MANY
DEVICES PLUGGED IN.
Indice