IFM Efector 200 OM Manuale utente

Bedienungsanleitung
Operating instructions
Notice pour utilisateurs
Reflexlichttaster OM
Diffuse reflection
sensor OM
Système réflexion
directe OM
DEUTSCHENGLISHFRANÇAIS
R
Sachnr. 701870/00 10/2004
Bestimmungsgemäße Verwendung
Der Reflexlichttaster erfaßt berührungslos Gegenstände und Materiali-
en und meldet sie durch ein Schaltsignal.
Reichweite ("range"): 3,5m.
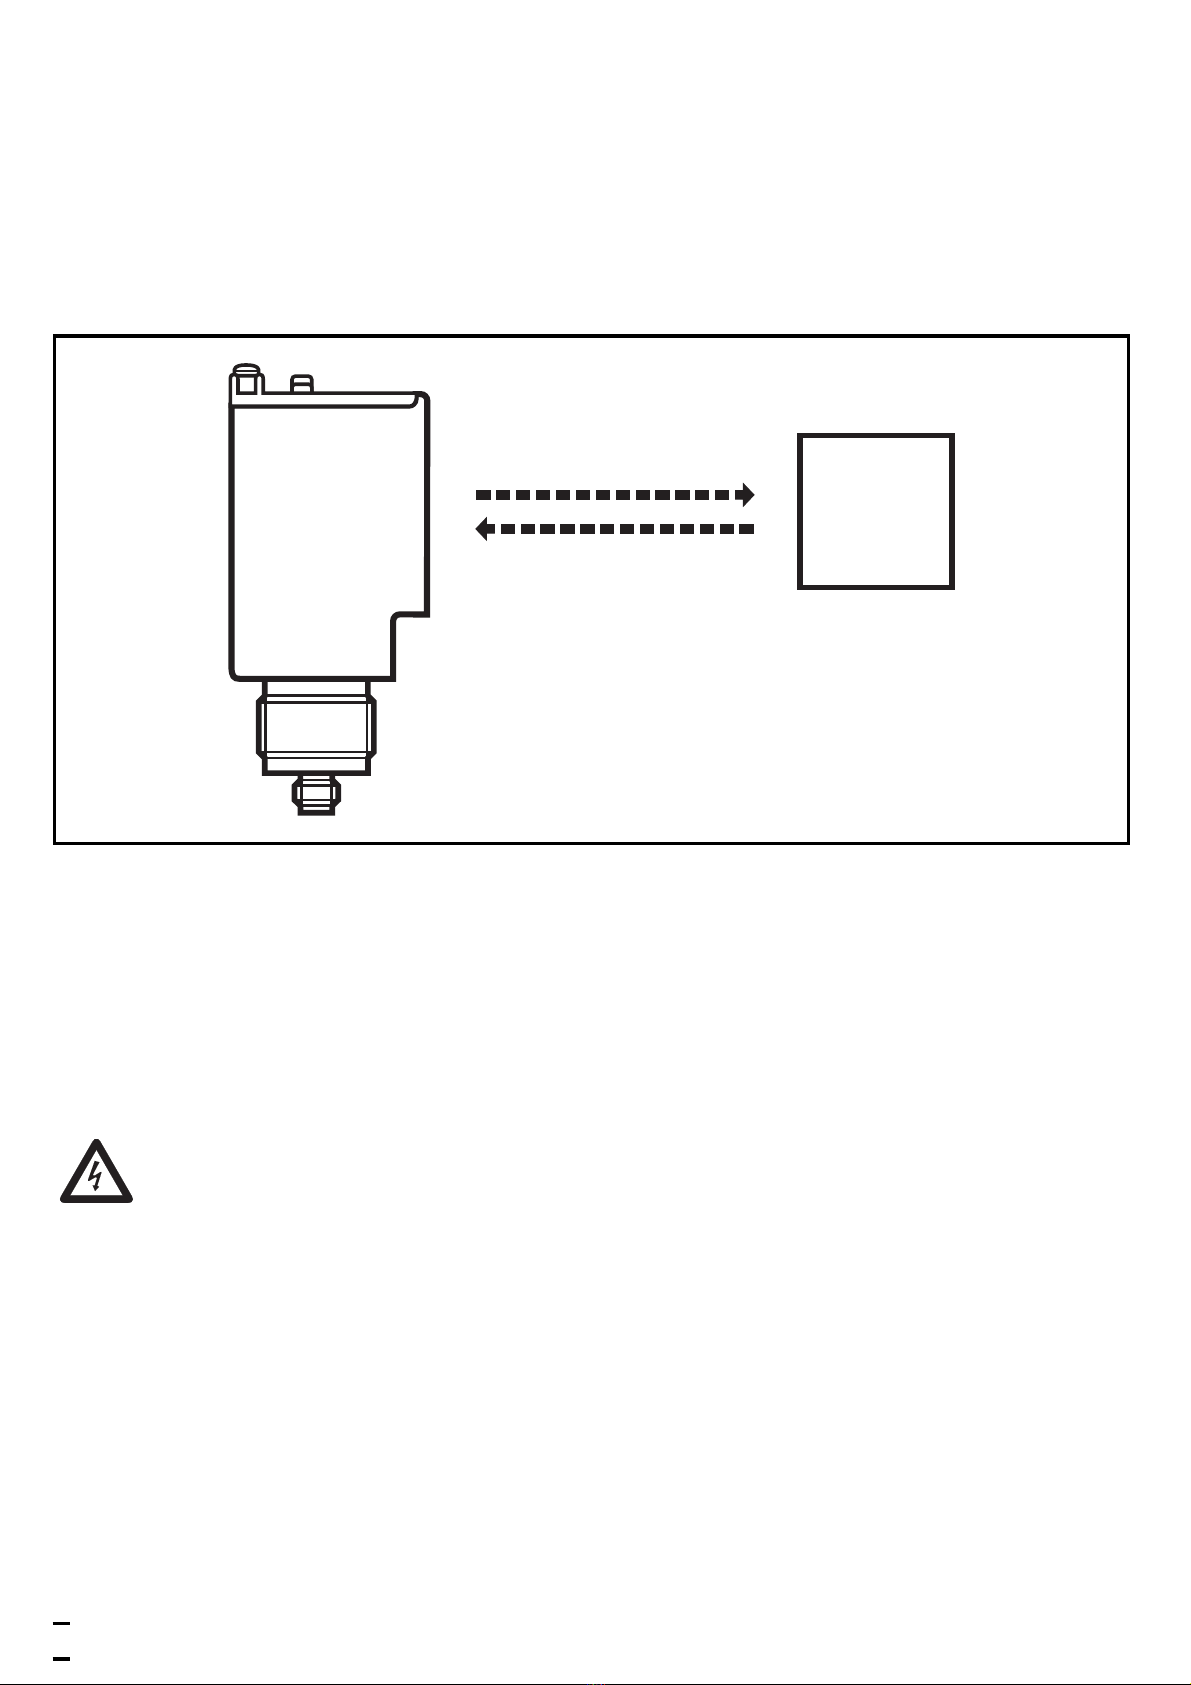
Montage
Richten Sie den Reflexlichttaster auf das zu erfassende Objekt aus und
befestigen Sie ihn über die Montagebohrungen im Gerätegehäuse
oder über den Gewindesockel M30 x 1,5mm mit dem mitgelieferten
Montagezubehör.
Elektrischer Anschluß
Schalten Sie die Anlage spannungsfrei. Schließen Sie das Gerät
nach den Angaben auf dem Typenschild an.
Nach dem elektrischen Anschluß richten Sie den Reflexlichttaster mit
Hilfe der roten LED auf das Objekt aus.
• Die rote LED leuchtet bei genauer Ausrichtung;
• sie blinkt bei ungenauer Ausrichtung.
2
Objekt

DEUTSCH
Einstellen der Empfindlichkeit
Reflexlichttaster werden überlicherweise in Hellschaltung eingesetzt.
Ein Objekt reflektiert den Lichtstrahl zum Reflexlichttaster und schaltet
den Ausgang. In den meisten Applikationen kann mit maximaler Emp-
findlichkeit gearbeitet werden. Die nachfolgend beschriebenen Ein-
stellungen sind nur erforderlich, wenn ein Objekt vor einem stark
reflektierenden Hintergrund erfaßt werden soll.
• Stellen Sie die Empfindlichkeit auf Minimum, indem Sie das Poten-
tiometer ”Range” nach links drehen bis es klickt. Plazieren Sie das
zu erfassende Objekt vor den Sensor.
• Drehen Sie das Potentiometer für die Empfindlichkeitseinstellung
nach rechts bis die gelbe LED (Ausgang) gerade leuchtet.
• Entfernen Sie das zu erfassende Objekt.
• Drehen Sie das Potentiometer für die Empfindlichkeitseinstellung
nach rechts bis die gelbe LED (Ausgang) gerade leuchtet und zählen
Sie dabei die Anzahl der Umdrehungen.
• Drehen Sie das Potentiometer für die Empfindlichkeitseinstellung
um die Hälfte der vorher gezählten Umdrehungen nach links
zurück.
• Stellen Sie zur Auswahl der Hell- oder Dunkelschaltung den Schiebe-
schalter auf den gewünschten Betriebsmodus.
Wenn die gelbe LED nicht ausgeht, ist der Kontrast in der Applikation
unzureichend. Gehen Sie wie folgt vor:
• Winkeln Sie den Reflexlichttaster um einige Grad ab.
• Dunkeln Sie den Hintergrund ab, um störende Reflexionen zu redu-
zieren.
3

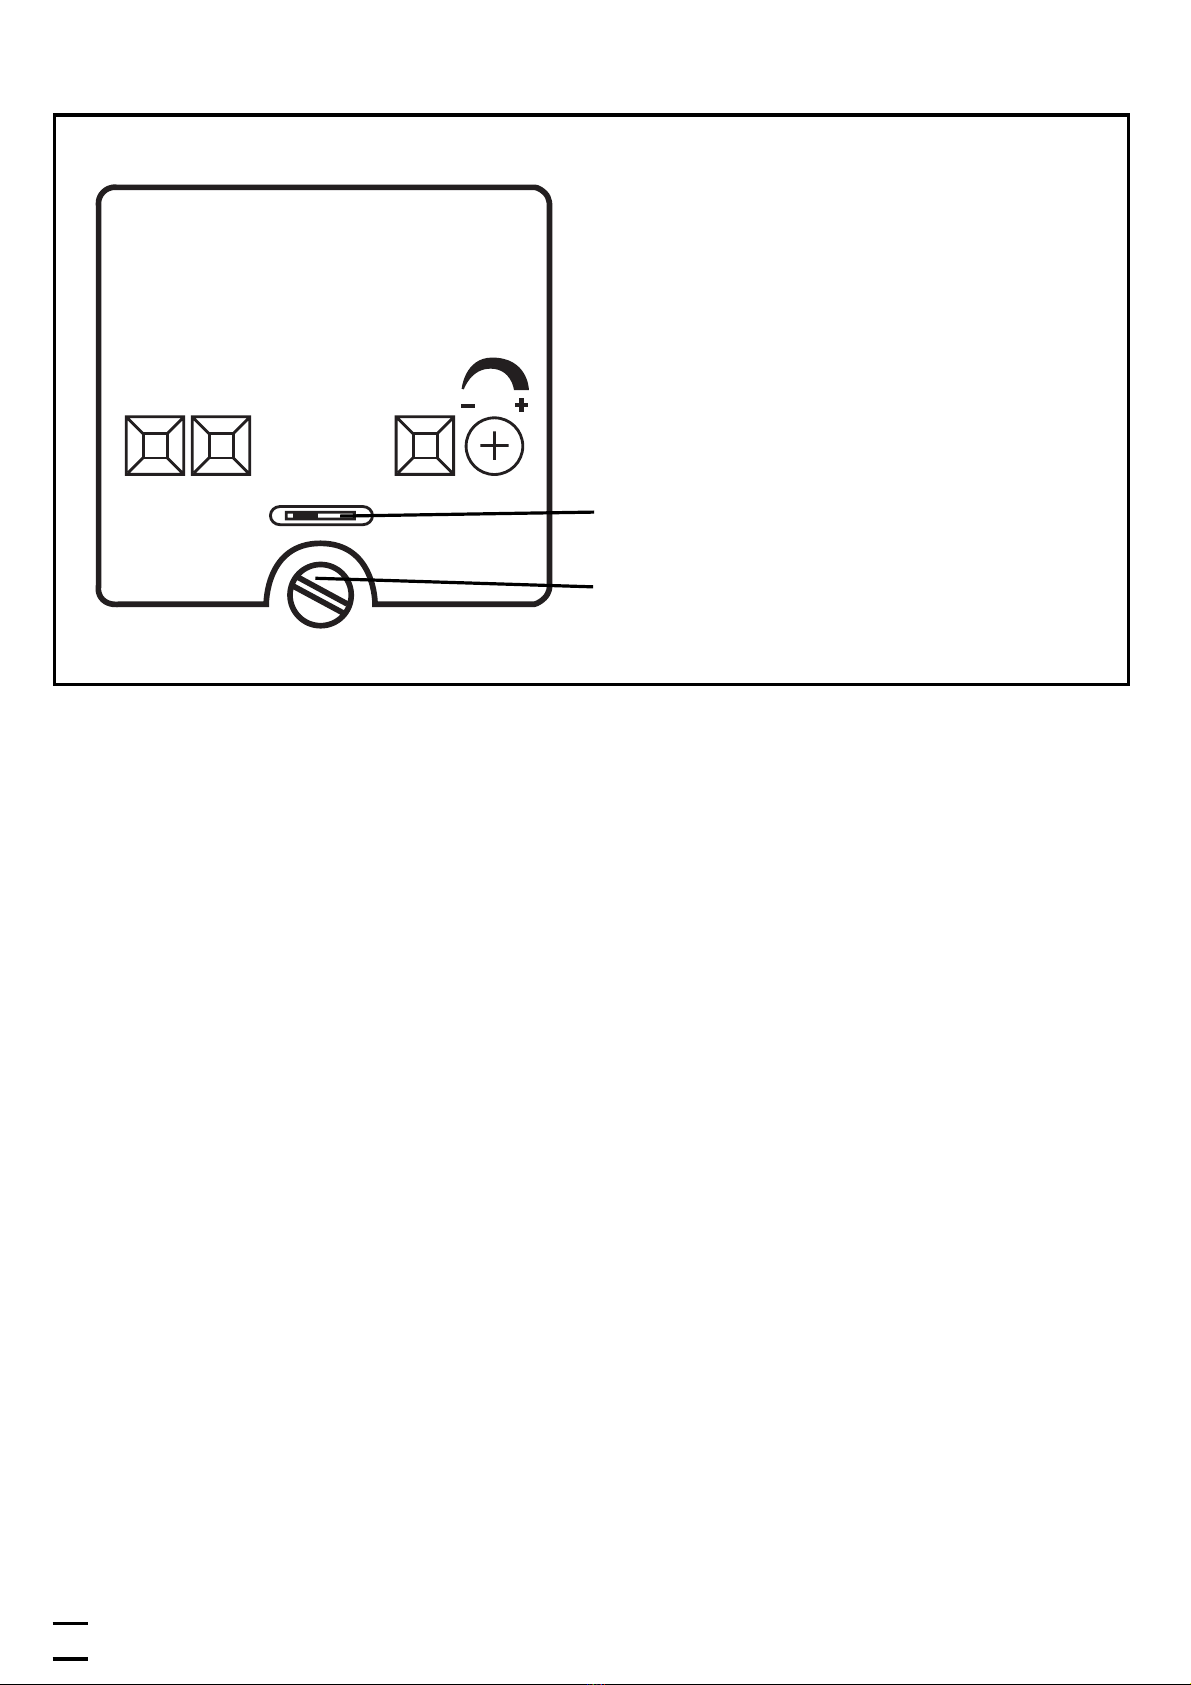
Bedien- und Anzeigeelemente
Betrieb
Öffnen Sie den Gehäusedeckel nur zum Einstellen. Schließen Sie ihn
nach der Einstellung wieder, um Schutzart IP 67 zu erhalten.
Prüfen Sie, ob das Gerät sicher funktioniert.
• Hellschaltung – Der Ausgang ist durchgeschaltet, wenn das Objekt
vorhanden ist. Die gelbe LED leuchtet.
• Dunkelschaltung – Der Ausgang ist durchgeschaltet, wenn das
Objekt nicht vorhanden ist. Die gelbe LED leuchtet.
• Die grüne LED leuchtet bei Betriebsbereitschaft.
• Die rote LED leuchtet bei Lichtempfang (Objekt erkannt)
• sie blinkt bei Verschlechterung des Empfangs (z. B. durch Ver-
schmutzung der Linsen oder durch Dejustage). Wenn zwei Sekun-
den lang ein unsicheres Signal ansteht, schaltet der Funktionskon-
trollausgang und bleibt solange geschaltet, bis ein sicheres Signal
empfangen wird.
Wartung
Halten Sie die Linsen des Geräts von Verschmutzung frei.
Verwenden Sie zur Reinigung keine Lösungsmittel oder Reiniger, die
die Kunststofflinsen beschädigen könnten.
4
Output
On
Light Dark
Function Check
Range
Funktionsanzeige
Output LED gelb
Schaltzustand
Function Check LED rot
Funktionskontrollausgang
On LED grün
Betrieb
Range
Potentiometer für Empfindlichkeits-
einstellung
Schiebeschalter für Betriebsmodus
Hell- oder Dunkelschaltung
Zur Einstellung die Schraube lösen
und den Gehäusedeckel öffnen

ENGLISH
Functions and features
The diffuse reflection sensor detects objects and materials without
contact and indicates their presence by a switched signal.
Range: 3.5m.
Installation
Align the diffuse reflection sensor to the object to be detected and fix
it via the mounting holes in the unit housing or via the M30 x 1.5mm
thread using the mounting accessories supplied.
Electrical connection
Disconnect power before connecting the sensor.
Connection strictly to the indications on the type label.
After electrical connection align the diffuse reflection sensor to the
object by means of the red LED.
• The red LED is lit with exact alignment;
• it is flashing with inexact alignment.
5
Object

Sensitivity setting
Diffuse reflection sensors are usually operated in the light-on mode. An
object reflects the light beam to the diffuse reflection sensor and
switches the output. In most applications maximum sensitivity can be
used for operation. The settings described below will only become nec-
essary if an object is to be detected against a highly reflective back-
ground.
• Set the sensitivity to its minimum by turning the "Range" poten-
tiometer "counter-clockwise until you hear a click. Place the object
to be detected in front of the sensor.
• Turn the potentiometer for the sensitivity setting clockwise until the
yellow LED (output) is just lit.
• Remove the object to be detected.
• Turn the potentiometer for the sensitivity setting clockwise until the
yellow LED (output) is just lit and count the number of revolutions.
• Turn the potentiometer for the sensitivity setting back counter-
clockwise by half of the revolutions counted before.
• For selecting the light-on or dark-on mode, set the slide switch to
the requested operating mode.
If the yellow LED does not go out, the contrast in the application is not
sufficient. Proceed as follows:
• Change the angle of the diffuse reflection sensors by a few degrees.
• Darken the background to reduce interfering reflections.
6

ENGLISH
Controls and indicators
Operation
Only open the cover to make adjustments. Close it after the adjust-
ment has been made in order to maintain the protection IP67.
Check whether the unit functions properly.
• Light-on mode – the output is switched when the object is present.
The yellow LED is lit.
• Dark-on mode – the output is switched when the object is not pre-
sent. The yellow LED is lit.
• The green LED is lit when the sensor is ready for operation.
• The red LED is lit when the light is received (object detected)
• it flashes when reception is impaired (e.g. due to soiling of the lens-
es or maladjustment). If an unsafe signal is present for two seconds,
the function check output switches and remains switched until a
safe signal is received.
Maintenance
Keep the lens of the sensor free from soiling. For cleaning do not use
any solvents or cleaning agents which could damage the plastic lenses.
7
Output
On
Light Dark
Function Check
Range
Function display
Output Yellow LED
Function Check Red LED
On Green LED
Range
Potentiometer for sensitivity setting
Slide switch for the light-on or dark-
on operating modes
For setting loosen the screw and
open the housing cover

Fonctionnement et caractéristiques
Le système réflexion directe détecte des objets et matières sans contact
et indique leur présence par un signal de commutation.
Portée ("range"): 3,5m.
Montage
Orienter le système réflexion directe vers l'objet à détecter et fixer le
via les trous de montage dans le boîtier de la cellule ou via le filetage
M30 x 1,5 mm en utilisant les accessoires de montage fournis.
Raccordement électrique
Mettre l’installation hors tension avant le raccordement de la
cellule optoélectronique.
Raccordement strictement selon les indications de l’étiquette.
Après le raccordement électrique, orienter le système réflexion directe
en direction de l'objet à l'aide de la LED rouge.
• La LED rouge est allumée avec une orientation précise;
• elle clignote avec une orientation non précise.
8
objet

FRANÇAIS
Réglage de la sensibilité
D'habitude, les cellules à réflexion directe sont utilisées en mode éclai-
rement (NO). Un objet réfléchit le faisceau au système réflexion direc-
te et commute la sortie. Dans la plupart des applications on peut utili-
ser la sensibilité maximale. Les réglages décrits ci-dessous ne sont
nécessaires que si un objet est à détecter avant un arrière-plan à haute
réflexion.
• Régler la sensibilité à sa valeur minium en tournant le potentiomètre
"Range" à gauche jusqu'à ce que vous entendiez un click. Placer
l'objet à détecter devant la cellule.
• Tourner le potentiomètre pour le réglage de la sensibilité à droite
jusqu'à ce que la LED jaune (sortie) soit juste allumée.
• Enlever l'objet à détecter.
• Tourner le potentiomètre pour le réglage de la sensibilité à droite
jusqu'à ce que la LED jaune (sortie) soit juste allumée et compter le
nombre de tours.
• Retourner le potentiomètre pour le réglage de la sensibilité à gauche
par la moitié des tours comptés précédemment.
• Pour sélectionner le mode éclairement (NO) ou obscurcissement
(NF), régler le sélecteur au mode de fonctionnement désiré.
Si la LED jaune ne s'éteigne pas, le contraste dans l'application est
insuffisant. Procéder comme suit:
• Changer l'angle de la cellule réflexion directe de quelques degrés.
• Obscurcir l'arrière-plan afin de réduire les réflexions perturbantes.
9
Eléments de service et d’indication
Fonctionnement
Ouvrir le couvercle de la cellule seulement pour le réglage. Fermer ce
couvercle après le réglage pour garantir la protection IP 67.
Vérifier le bon fonctionnement de le cellule.
• Eclairement (NO) – La sortie est commutée, quand l'objet est pré-
sent. La LED jaune est allumée.
• Obscurcissement (NF) – La sortie est commutée, quand l'objet n'est
pas présent. La LED jaune est allumée.
• La LED verte est allumée quand la cellule est alimentée.
• La LED rouge est allumée avec une bonne réception de la lumière
(objet détecté)
• La LED rouge clignote en cas de détérioration de la réception (par
ex. à cause d'encrassement des lentilles ou de désalignement). Si
pendant deux secondes il y a un signal non sûr, la sortie contrôle
commute et reste commutée jusqu'à ce qu'un signal sûr soit reçu.
Entretien
Les lentilles de la cellule doivent être dégagées de tout encrassement.
Pour le nettoyage ne pas utiliser de solvants ou de produits qui pour-
raient abîmer les lentilles en plastique.
10
Output
On
Light Dark
Function Check
Range
Indicateurs d’état
LED " Output " jaune
Etat de commutation
LED " Function Check " rouge
Sortie contrôle
LED " On " verte
Fonctionnement
Range
Potentiomètre pour le réglage de la
sensibilité
Sélecteur pour le mode de fonction-
nement éclairement ou obscurcisse-
ment
Pour le réglage, desserrer la vis et
ouvrir le capot du boîtier
Indice
Lingue:
Altri manuali IFM Accessori

IFM
IFM OJ51 Series Manuale utente

IFM
IFM O5H5 Series Manuale utente

IFM
IFM O5D10 Series Manuale utente

IFM
IFM Efector600 TN2531 Manuale utente

IFM
IFM DTI424 Manuale utente

IFM
IFM PI16 Series Manuale utente

IFM
IFM PI28 Series Manuale utente

IFM
IFM O8H2 Manuale utente

IFM
IFM UGR500 Manuale utente

IFM
IFM EC2061 Manuale utente

IFM
IFM OID25 Series Manuale utente

IFM
IFM Efector 100 GG712S Manuale utente

IFM
IFM OID20 Series Manuale utente

IFM
IFM Efector 500 PF2652 Manuale utente

IFM
IFM O3D300 Manuale utente

IFM
IFM KI0058 Manuale utente

IFM
IFM Efector 300 SM8100 Manuale utente

IFM
IFM PI22 Series Manuale utente

IFM
IFM Efector 200 O5 Manuale utente

IFM
IFM O2D50 Series Manuale utente


