iHome iH120 Manuale utente

Model iH120
Alarm Clock For Your iPod
Questions? Visit www.ihomeaudio.com
Model:iH120(Costdownversion)
InstructionManual
Date:Fen10,2009
Printcolor:Blacktextonwhitepaper
Size:178Wx178Hmm
Now Playing
Keith LuBrant
1:03
-2:30
All I Want To Be

Table of Contents
1
2
3
3
4
5
6
6
7
7
7
8
8
9
10
11
12
Quick Start
Controls and Indicators
iH120 Display
Install Clock Backup Battery
Using The Remote Control Unit
Install/Replace the Remote Control Battery
To check for iPod compatibility
Setting Up the iH120
Setting Time and Calendar
Using the Alarm
Charging your iPod
Listening to iPod
Listening to non-docking iPod or other portable audio devices
Dimmer Operation
Sleep Operation
Click Sound Operation
A Consumer Guide to Product Safety
Trouble Shooting
Solución De Problemas
Warranty Information

• Place the unit on a level surface away from sources of direct sunlight or excessive heat.
• Protect your furniture when placing your unit on a natural wood and lacquered finish. A cloth or other protective material
should be placed between it and the furniture.
• Clean your unit with a soft cloth moistened only with mild soap and water. Stronger cleaning agents, such as Benzene,
thinner or similar materials can damage the surface of the unit.
Maintenance
This device complies with Part 15 of the FCC Rules, operation is subject to the following two conditions: (1) This device may not cause
harmful interference, and (2) this device must accept any interference received, including interference that may cause undesired operation.
This equipment complies with the limits for a Class B digital device as specified in Part 15 of FCC Rules. These limits
provide reasonable protection against radio and TV interference in a residential area.
However, your equipment might cause TV or radio interference even when it is operating properly. To eliminate interference
you can try one or more of the following corrective measures:
• Reorient or relocate the receiving antenna.
• Increase the distance between the equipment and the radio or TV.
• Use outlets on different electrical circuits for the equipment and the radio or TV.
Consult your dealer or an experienced radio/television technician if the problem still exists.
Modifying or tampering with your system’s internal components can cause a malfunction and might invalidate the system’s
warranty and void your FCC authorization to operate it.
This Class B digital apparatus complies with Canadian ICES-003.
A Consumer Guide to Product Safety

Quick Start
2:inserts
Select the dock insert for your
iPod model from the table below
and place insert in dock.
Never dock an iPod without
an insert in place.
3:iPod
Insert iPod into dock with proper insert
(iPod must not be in a skin or case).
iPod will charge while docked. Press the
Play Button on the iH120 to play iPod.
1:power
Attach AC adaptor cable to DC jack
on back of the iH120 and plug the
other end into a wall socket.
nano 4G
insert 17
nano 4G
thin iPod with video (30 GB)
Insert 9
thin (30 GB) iPod with video
thin (80/120 GB) iPod classic iPod touch 2G
iPod touch 2G
insert 16
For this iPod
Use this insert
NOTE: If you do not have an insert for your iPhone/iPod,
please visit www.ihomeaudio.com or call iHome toll free at
800-288-2792 to purchase one.
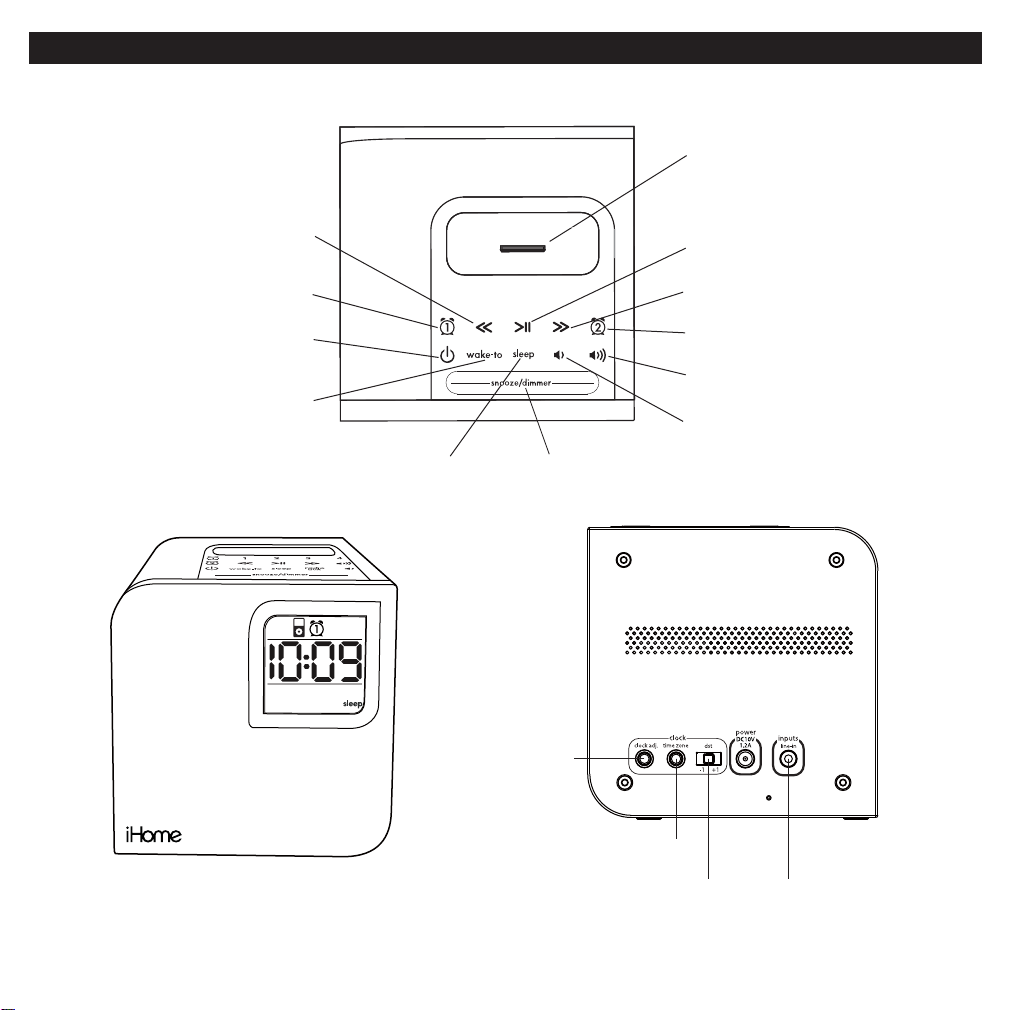
Controls and Indicators
2
Front panel
Top panel
Alarm-1 Button
<< Button
Wake-to Button
Alarm Reset /
Power Button
Volume + Button
Volume - Button
iPod Dock
Sleep Button
>> Button
iPod Play/Pause Button
Snooze/Dimmer Button
Alarm-2 Button
Back panel
Clock Adj Button
Line-in JACK
Time Zone Button
DST Switch
3
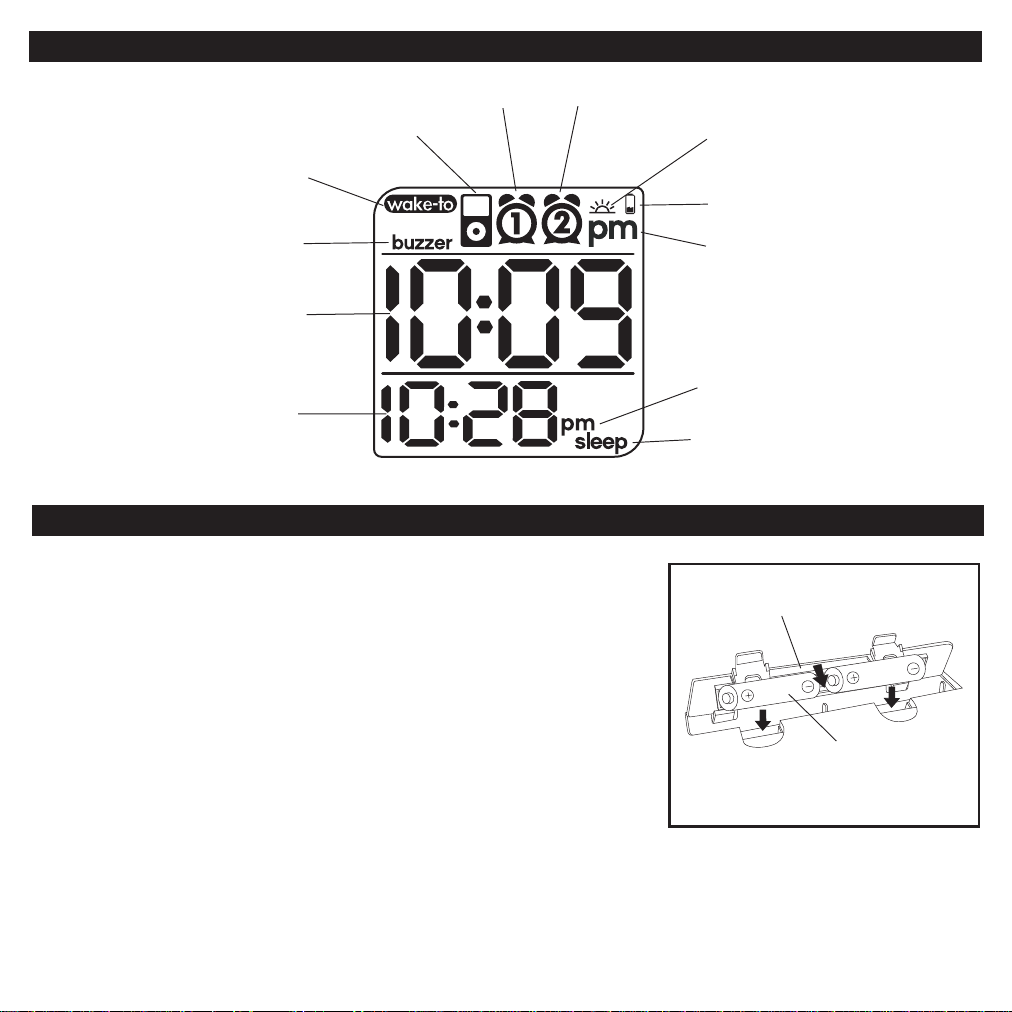
iH120 Display
Install Clock Backup Batteries
The iH120 uses 2 alkaline “AA” batteries to provide continuous alarm operation
and clock settings in the event of a power failure. If the backup batteries have
been installed and a power failure occurs or the AC cord is accidentally discon-
nected, the display backlight will not remain lit, but current time and alarm time
settings will be temporarily maintained. Otherwise, you must reset the time and
alarm settings.
1. Please make sure the AC adaptor is connected. Otherwise all settings may
be lost during battery replacement.
2. Open backup battery compartment door located on the bottom of the unit.
3. Insert 2 AA batteries, checking that the polarity (+ and – ends of the battery)
matches the drawing near the battery compartment. Close the compart-
ment door.
Note: Make sure you dispose of batteries properly (see your local regulations).
Installing Backup Batteries
PM Indicator
Wake-to Buzzer Indicator
Daylight Saving Time
Indicator
Time Display
Wake-to Indicator
Sleep Indicator
Alarm 1 Indicator Alarm 2 Indicator
iPod Indicator
Battery Low Indicator
Alarm Time Indicator
(PM) Alarm Time Indicator

Pressing and holding FWD/REW while iPod is docked will scan forward/reverse
within currently playing track.
4
Install/Replace the Remote Control Battery
The remote control battery is already installed at the factory. When the
remote control stops operating or its range seems reduced, it is time
to replace the battery with a new one.
1. The battery door is located on the back end of the remote control.
2. Pull the battery door to release the battery door latch and take out
the battery.
3. Insert a CR2032 battery, checking that the + and – sides of the
battery matches the drawing inside the battery compartment.
4. Replace the battery door.
Note: Make sure you dispose of batteries properly (see your local regulations).
The Remote Control controls basic functions on the iH120 and certain iPod functions when the iPod is docked in the iH120.
For best results, aim remote control towards the remote sensor on the upper left corner of the unit.
To check for iPod compatibility
iH120 is an advanced system and supports most updated iPod features. To ensure your iPod works properly with the iH120,
please update your iPod firmware with the latest version, available via iTunes.
Installing Remote Battery
Install/Replace the Remote Control Battery
Using the Optional Remote Control
Power Button turns unit OFF or Reset Alarm.
Pressing Play/Pause from power off mode will play iPod.
Pressing Play/Pause while iPod is docked and playing will pause iPod.
Press again to resume play.
Remote not included
with all iH120
models.
To order a remote,
please visit
www.ihomeaudio.com
Volume Buttons raise and lower volume on the unit.
Pressing the sleep mode function same as on main unit.
Pressing the snooze/dimmer mode function same as on main unit.
Pressing the mute button will mute unit.
Pressing FWD/REW while iPod is inserted will FWD/REV to next/previous track

This unit is a PRESET Clock: the clock is preset for the correct Eastern Standard Time at the factory. Please follow the steps
below to match settings to your location.
1. Depending on your location and whether or not Daylight Saving Time (DST) is in effect, set the DST Switch located on
the back of the unit to +1 to add 1 hour or to -1 to subtract 1 hour. When set to +1 a DST icon will appear on the display,
indicating DST mode.
2. Press and hold the Time Zone Button located on the back of the unit until the current time zone at the lower part of the
display blinks. If needed, press the or Button to select your time zone.
3. Press the Time Zone Button again (or no button within 10 seconds) to exit the setting mode.
4. If the time showing is not correct, please see Setting Time and Calendar to set the clock.
Setting Time and Calendar
1. Press and hold the Clock Adj Button located on the back of the unit until the time display blinks. Press the or
Button until the current time is displayed. Holding the button for a few seconds will advance or reverse rapidly. Remem-
ber to set the correct AM or PM. An icon in the upper right hand corner of the time digits is the PM Indicator; there is
no AM indicator.
2. Press the Clock Adj Button again to accept the current time setting and set current year. Press the or Button
until the current year is displayed. Press the Clock Adj Button to confirm year setting after adjustment.
3. The display will change to show the date blinking. Press the or Button until the current date is displayed. Holding
the button for a few seconds will advance or reverse rapidly.
4. Press the Clock Adj Button again (or if no button is pressed within 10 seconds) to exit the time and date setting mode.
Two beeps will confirm clock setting is completed.
5
Setting Up the iH120

Setting the Alarms
1. Press and hold the or Button until the alarm icon and alarm time blink. Press the or Button to set the
alarm time. Holding the button for a few seconds will advance or reverse rapidly.
Remember to set the correct AM or PM time.
2. Press the Wake-to Button to select iPod or Buzzer alarm source. You can set different alarm sources for each alarm.
The wake to icon will blink for 5 seconds, followed by the alarm icon and time.
3. Press the Alarm Button again or wait for 5 seconds. Alarm is now armed, indicated by the numbered alarm clock icon.
Review, Arming and Disarming Alarm (Turn Alarm Function On and Off)
1. Press the or Button once. The unit will show the alarm time on the bottom part of the display for alarm time review.
2. During alarm review, press the or button again to arm or disarm the alarm. When the alarm is armed, the related
alarm icon appears in display.
Resetting the Alarm to Come on the Next Day
1. When the alarm is sounding, press the Button to stop the alarm and reset it to come on the following day at the
same time.
Snooze
1. Press the Snooze/Dimmer Button after the alarm sounds. The alarm will be silenced and come on again 9 minutes
later. Snooze can be press several times during the 1 hour alarm cycle.
Sure Alarm
The iH120 has a sure alarm feature. If backup batteries are installed (see page 3) the buzzer alarm will still sound in the event
of a power failure.
6
Using the Alarms
Note: Please make sure you are using the correct insert for your iPod (see Install iPod Insert) and that it is properly docked
into the iH120. Failure to do so may damage your iPod.
1. While your iPod is docked in the unit and the unit is connected to AC power, it recharges (until fully charged). Note that
non-docking iPods will NOT charge.
Charging your iPod

During normal operation, press the Snooze/Dimmer Button to control the brightness of the LCD display.
1. Dock the already playing iPod. The iH120 will automatically turn on and you will hear the music playing from your iPod.
Note: If the playing song/music loudness is too low on the iPod itself, iH120 may not detect iPod is in play mode. Press
the Play/Pause Button on main unit or remote control twice to play it.
2. When the iPod is docked and in standby mode, press the Button on the iH120 or on the remote control to play it.
The iPod Icon will appear on the display, showing iPod playing mode.
3. Press the Button again to pause play; press again to resume it.
4. Press the and Button on the iH120 or on the remote control to adjust the system volume.
5. Press or Button on the iH120 or on the remote control to go to the next or previous track. Press and hold while
track is playing for high speed forward or reverse music search of the current track.
6. To turn off the unit, press the Alarm Reset/Power On/Off Button on the iH120 or on the remote control to turn it off.
Your iPod will continue charging while in the dock.
7
Listening to iPod
If you are using an iPod without a docking port or other MP3 player or portable audio device, you can play it through the iH120
via the Line-in Jack.
1. Plug one end of an audio patch cord (available at www.ihomeaudio.com) into the headphone or line-out jack on
your device and the other end of the patch cord into the iH120 Line-in Jack, located on the back of the unit.
2. Press the Button on the iH120 or on the remote until the iPod Icon appears on the top part of the display, indicating
Line-in playing mode.
Note: If iPod and line-in device are both playing at the same time, both sound sources will play.
3. Turn on and play your device.
4. Press the and Button on the iH120 or on the remote control to adjust the system volume. You may need to adjust
your device volume, too.
5. To turn off the unit, press the Button on main unit or remote control to turn it off. Please remember to turn off your
device, too.
Listening to non-docking iPod or other portable audio devices
Dimmer Operation
Indice
Altri manuali iHome Sveglia

iHome
iHome IP23 Manuale utente

iHome
iHome iH402 Manuale utente

iHome
iHome iBTW38N Manuale utente

iHome
iHome iP40 Manuale utente

iHome
iHome iA5 Manuale utente

iHome
iHome iKN95 Manuale utente

iHome
iHome HWL83 Manuale utente

iHome
iHome iBT18 Manuale utente

iHome
iHome iHM46 Manuale utente

iHome
iHome iPL10 Manuale utente

iHome
iHome iBT290 Manuale utente

iHome
iHome iH11 Manuale utente

iHome
iHome iBT22A Manuale utente

iHome
iHome POWERCLOCK iBT235 Manuale utente

iHome
iHome iBT22A Manuale utente

iHome
iHome iP11 Manuale utente

iHome
iHome iWBT400 Manuale utente

iHome
iHome IP21 Manuale utente

iHome
iHome POWERVALET iW18 Manuale utente

iHome
iHome IP43 Manuale utente


