
JDW EQ751 Manuale utente

1
Hand Push Mower (EQ751)
Assembly Instructions
Please Read All Instructions Thoroughly Before Starting Assembly
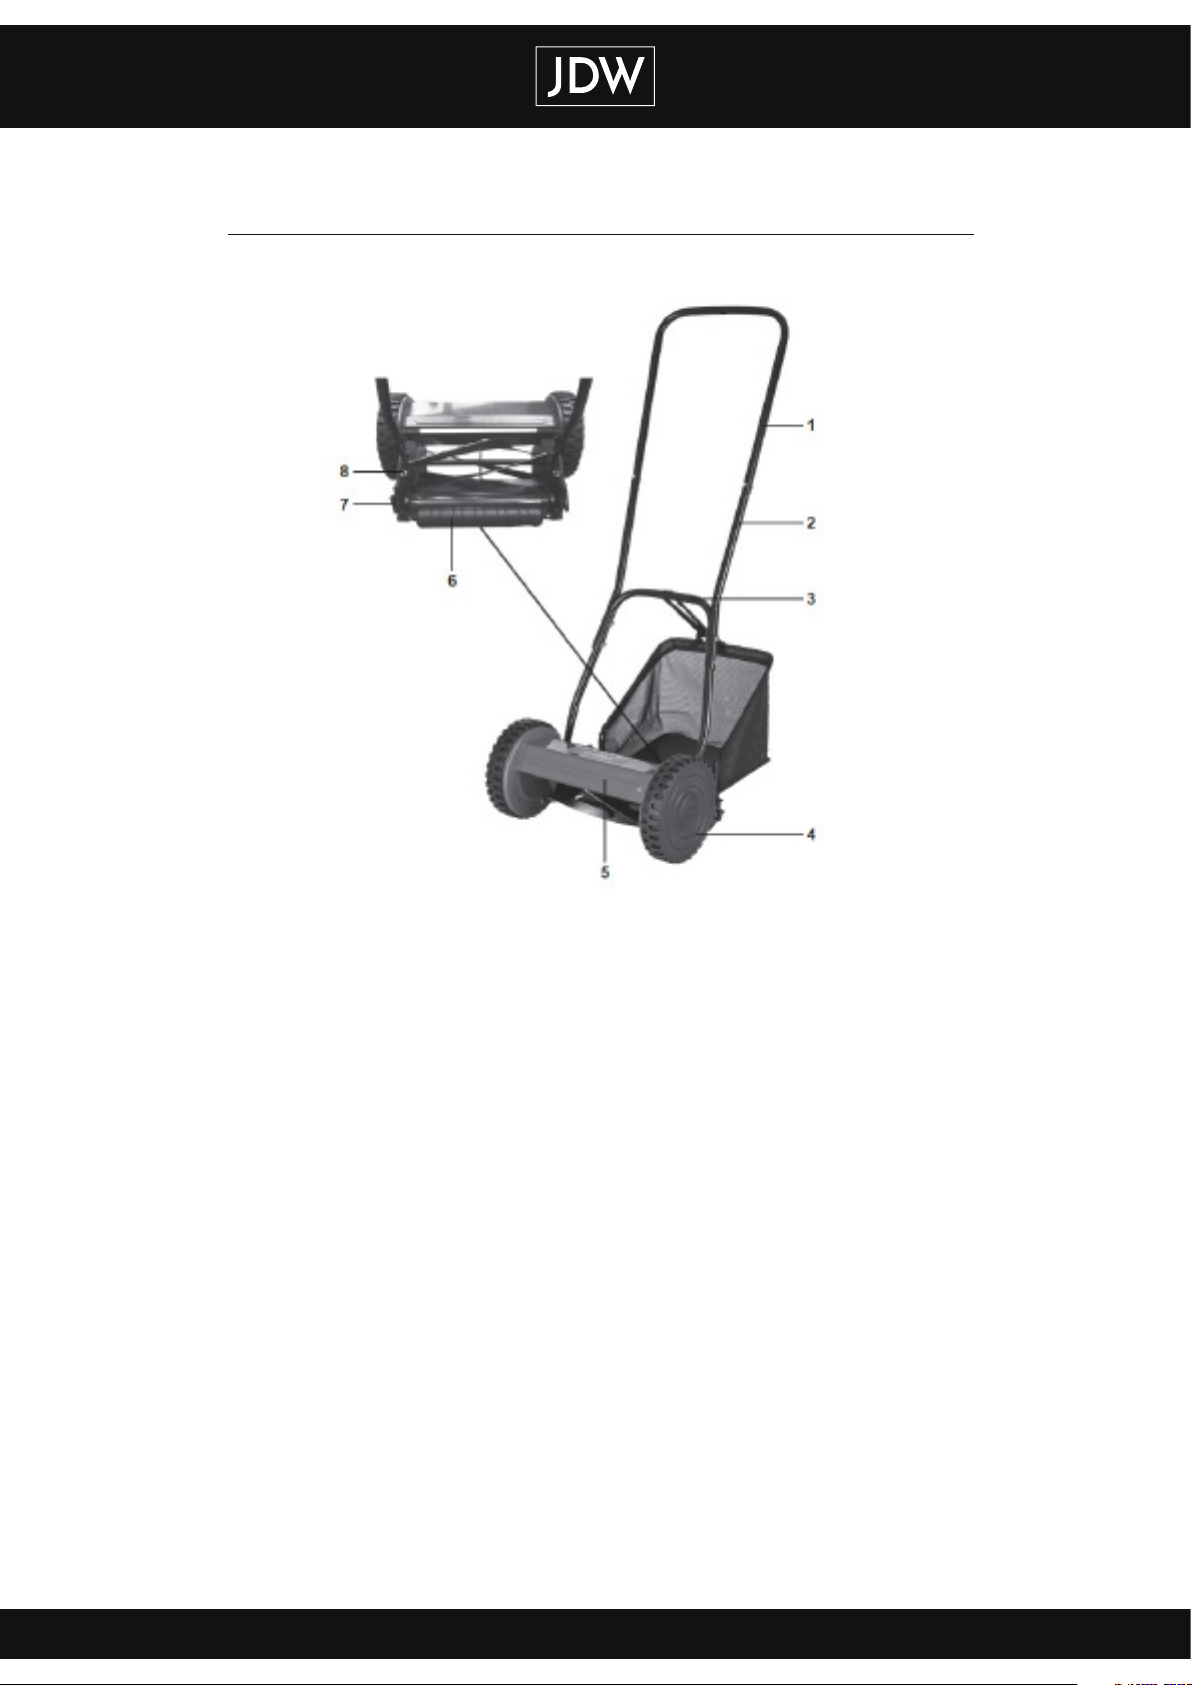
2
Components
1) Upper Handle 5) Blade Guard
2) Handle Uprights 6) Rear Roller
3) Lower Handle 7) Height Adjustment Knobs
4) Wheels 8) Cutting Bar Adjustment Nuts

3
Cutting Widtch: 30cm
Grass Collector Capacity: 18L
Cutting Height Adjustment: 14 - 47mm
Machine Weight: 6.4kg
(Specifications are subject to change without notice)
Technical Specifications
Symbols
Read this instruction manual carefully before using the hand push mower.
Keep bystanders away.
Always use protective goggles when mowing.
Always wear safety footwear when mowing.
Always wear protective gloves when mowing.

4
Saftey Instructions
WARNING! When using this product basic safety precautions should always be
followed. Failure to follow all instructions listed below may result in personal injury.
Read all these instructions before attempting to operate this product and SAVE THESE
INSTRUCTIONS.
1) KEEP OUT OF THE REACH OF CHILDREN.
2) This product contains a functional sharp edge which may cause injury if misused.
3) Please take care when handling. Always wear thick gloves when handling blades or
working near blades.
4) Please make sure blade is securely affixed on mower before used.
5) Never allow children or people unfamiliar with these instructions to use the mower.
6) Only use the mower in the manner and for the functions described here in.
7) Never operate the mover when you are tired, ill or under the influence of drugs, alcohol or
medicine.
8) The operator or user is responsible for accidents or hazards occurring to other people
or their property.
9) Use the mover only in daylight or good artificial light.
10) Avoid operating your mower in wet grass, where feasible.
11) Take care in wet grass, you may loose your footing.
12) On slopes be extra careful of your footing and wear non-slip footwear.
13) Mow across the face of slopes, never up and down.
14) Exercise extreme caution when changing direction on slopes. Walk, never run.
15) Mowing on banks and slopes can be dangerous. Do not mow on banks or steep slopes.
16) Do not walk backwards when mowing, you could trip.
17) Never cut grass by pulling the mower towards you.
18) Never operate the mower with damaged guards or without guards in place.
19) Keep hands and feet away from the blade at all times and especially when the mower is in
use
20) Don’t put hands near the blades during operation.
Training
1) Read the instructions carefully. Be familiar with the controls and the proper use of the
product.
2) Never allow children or people unfamiliar with these instructions to use the product.
Local regulations can restrict the age of the operator.
3) Never operate the product while people, especially children, or pets are nearby.
4) Keep in mind that the operator or user is responsible for accidents or hazards
occurring to other people or their property.
General Saftey Rules

5
General Saftey Rules
Preparation
1) While using the hand push mower always wear substantial footwear and long trousers. Do
not operate the product when barefoot or wearing open sandals. Avoid wearing clothing
that is loose fitting or that has hanging cords or ties.
2) Always use protective gloves and goggles when mowing.
3) Make sure the lawn is clear of sticks, stones, wire and debris that could be thrown by
the blades.
4) Before using the mower and after any impact, check for signs of wear or damage and
repair as necessary.
5) Sharpen worn or damaged blades.
Operation
1) Operate the product only in daylight or in good artificial light.
2) Avoid operating the equipment in wet grass.
3) Always be sure of your footing on slopes.
4)Walk, never run.
5) Mow across the face of slopes, never up and down.
6) Exercise extreme caution when changing direction on slopes.
7) Do not mow excessively steep slopes.
8) Use extreme caution when reversing or pulling the lawn mower towards you.
9) Make sure the blade(s) should be stopped rotating if the product has to be tilted for
transportation when crossing surfaces other than grass, and when transporting the
product to and from the area to be used.
10) Never operate the product with defective guards, or without safety devices, for example
grass collector, in place.
11) Do not put hands or feet near or under rotating parts. Keep clear of the mower blades at all
times.
12) After striking a foreign object. Inspect the lawnmower for damage and make repairs before
restarting and operating the product.

6
The Hand Push Mower is designed for small to medium sized gardens and intended for
household lawn mowing use only. The product comes partly pre-assembled, only the
handle and grass collector require assembly.
Please read all instructions carefully and keep outer packaging to refer to photograph of
finished product in case of difficulty. Check all holes are clear of paint before assembly.
Please use a screw driver to clear the blocked hole if you find any blockage.
Tools required: screwdriver (not included) and spanner (included).
Assemble For Handle
To assemble the handle, find the U-shaped bar (Part 1 – Upper handle) with the open
(circular) ends and insert the two handle uprights (Part 2) into the ends. Ensure the
uprights curve outwards once inserted.
Using two sets of nuts (Part 12) and bolts (Part 11), line up the holes to enable you to
insert a bolt, all the way through both bars and fasten with nut. [Do not tighten all bolts
and nuts until all these parts are in place and below assembly completed] (See Fig.
A, B, C)
Assembly

7
Find the U-shape bar (Part 3 – Lower handle) with flattened ends with large holes. Insert the
bent end of the bar between the two protruding ends of the section just assembled.
Line up the two holes on both sides and insert a bolt (Part 10) all the way through both
bars and fasten with a nut (Part 12). Do the same with the remaining 3 sets of holes.
(See Fig. D, E)
Fix The Handle On Mower Head
Now the handle is fully assembled, and ready to be attached to the mower head. To attach
the handle to the mower head, locate the two metal lugs found forward of the cutting bar
adjustment knobs. To attach the handle, insert one of the large holes in the handle arm
over the lug, then repeat the same process with the other side. It may be required to use
some force to squeeze the two arms together to allow room for locating the second arm
over the remaining metal lug. (See Fig. F, G)
Assembly

8
Assemble For Grass Collector
1) Locate the fixing holes of grass collector (Part 9) and hang on the hooks at the back of
mower head. (See Fig. H,I)
2) Make sure the grass collector (Part 9) is securely fixed on mower head.
3) Attach the grass collector strap (Part 13) to hold the grass collector on lower handle
(Part 3). (See Fig. J)
Cutting Height Adjustments
Changing The Cutting Height
Changing the cutting height is quick, easy, and requires no tools. Simply unscrew the
height adjustment knobs on each side of the rear roller. This enables the roller assembly
to slide up or down to place the cutting bar at a different height level. Make sure the
height is the same on both sides. Re-tighten the height adjustment knobs until the roller
assembly is secured in position. (See Fig. K)
NOTE: It is essential that the height is the same on both sides of the hand lawn mower.
Assembly

9
How To Mow
Walk at a Good, Steady Pace
With a hand lawn mower, the rotation of the wheels turns the blade reel. The mower will tend
to bind up and skid if it is moving at too slow a pace. The faster the wheels are traveling, the
faster the blade reel turns. Therefore, moving at a comfortably quick walking pace will achieve
the best results.
Overlapping Rows
When mowing a lawn, slightly overlap the row that has already been mowed. This will
make the force required to move the mower easier because less grass is being mowed at
one time. Overlapping rows will also ensure a neat cut by removing grass that may have
been missed on the previous row. (See Fig. N)
Don’t Let The Grass Get Too Tall
Hand lawn mowers are harder to push when the
grass gets too tall, therefore it is recommended
to mow on a weekly basis.
Hand Lawn Mower - Don’t Mow Tall Weed
The hand lawn mower will tend to roll over tall weeds
without cutting them. This includes tall weeds that are
more than six inches, and things like dandelions and docs.
If the designed lawn to be mowed has a significant weed infestation, enquire at your local
Bunning store how to rectify the problem, or as an alternative, rent a petrol powered mower to
gain control of the lawn. Hand lawn mowers are designed to cut lawns in responsible condition.
The Metal Guard Protects Your Garden
The metal guard does not only protect your hand and feet, but also the garden. The hand
lawn mower can be pushed right up to flowers and shrubs without damaging them. This
feature means the hand lawn mower can cut the edges of the lawn where garden plants
exist minimizing any potential damage.
Proper Usage

10
WARNING! KEEP OUT OF THE REACH OF CHILDREN.
This product contains a functional sharp edge which may cause injury if misused. Please
take care when handling. Always wear thick gloves when handling blades or working
near blades. Please make sure blade is securely affixed on mower before used.
WARNING! It is strongly recommended the blade sharpening should be arranged by the
service agent or similarly qualified persons in order to avoid a safety hazard.
Before taking the time and effort to sharpen the blades, make sure that it needs sharpening.
Most of all issues can be solved by ensuring the blades are properly adjusted.
1) Prop up the hand lawn mower so that the blade reel can be rotated by turning the wheels.
2) Check the blades for nicks and burrs. If any damage is found, it usually can be removed by
holding a file flat against the blade and pushing away from the edge.
3) Examine the cutting bar. It should just meet the blades along their entire length. (To make
sure the cutting bar is located correctly, grasp a wheel and turn it forward; you should hear
a whispery sound as the blades pass the cutting bar.)
4) If the bar is out of alignment, adjust using the adjustment knobs on the ends of the bar.
5) Using a soft paintbrush, cover the blades with a thin, even coat of automotive valve14
grinding compound (available at automotive stores).
6) Grasp a wheel and turn it slowly backward so the grinding compound is squeezed between
the blades and the cutting bar, thereby sharpening both cutting edges as they pass each
other. Be sure that each blade touches the bar as the wheel is rotated.
7) Make about a dozen turns, applying more grinding compound when necessary.
8) Examine the blade edges. If they look sharp, wash off all the valve compound with soapy
water and rinse thoroughly.
9) Test for sharpness. Insert a sheet of newspaper between the blades and the cutting bar, and
rotate the reel forward. When the blades cut the paper as easily and as cleanly as a sharp
pair of scissors would, the task is complete.
NOTE: After each use clean the mower and keep it dry Wipe all the metal parts with a thin film
of WD-40 or mineral oil.
WARNING! Sharpen blades only by hand. The heat generated by a power grinder or an electric
drill with a grinding wheel attached can destroy the temper of the metal. Wear thick leather
gloves when handling the blade reel and cutter bar and make slow, precise movements to avoid
cutting or jamming your fingers.
Sharpening The Blade
Indice
Altri manuali JDW Taglia erba

Manuali Taglia erba popolari di altre marche


TALEN TOOLS
TALEN TOOLS AVR HGM30 Manuale utente

DEWEZE
DEWEZE ATM-725 Manuale operativo

Weed Eater
Weed Eater 180083 Manuale utente

Husqvarna
Husqvarna Poulan Pro PP185A42 Manuale utente

Better Outdoor Products
Better Outdoor Products Quick Series Manuale utente

Cub Cadet
Cub Cadet 23HP Z-Force 60 Manuale operativo


