JUKI LK-1900B/IP-420 Manuale utente

* "CompactFlash(TM)" is the registered trademark of SanDisk Corporation, U.S.A.
ENGLISH
INSTRUCTION MANUAL
LK-1900B / IP-420

i
CONTENTS
1. NAME OF EACH SECTION OF THE OPERATION PANEL............................................1
1-1 Body......................................................................................................................................................1
1-2 Buttons to be used in common ..........................................................................................................3
2. BASIC OPERATION OF IP-420.......................................................................................4
3. LCD DISPLAY SECTION AT THE TIME OF SEWING SHAPE SELECTION .................5
3-1 Sewing shape data input screen ........................................................................................................5
3-2 Sewing screen......................................................................................................................................8
4. PERFORMING SEWING SHAPE SELECTION............................................................. 11
5. SEWING SHAPE LIST...................................................................................................14
5-1 LK-1900B / LK-1901B / LK-1902B .....................................................................................................14
5-2 LK-1903B ............................................................................................................................................16
7. CHECKING PATTERN SHAPE .....................................................................................19
8. CHANGING THREAD TENSION COMMAND AT EVERY NEEDLE ENTRY POINT....21
8-1 Adding or changing thread tension command at every needle entry point.................................21
8-2 Deleting thread tension command at every needle entry point ....................................................23
9. PERFORMING RELEASE OF GREASE-UP ERROR...................................................25
10. USING TEMPORARY STOP........................................................................................26
10-1 To continue performing sewing from some point in sewing .......................................................27
10-2 To perform re-sewing from the start ..............................................................................................28
11. WINDING BOBBIN THREAD.......................................................................................29
12. USING COUNTER .......................................................................................................30
12-1 Setting procedure of the counter ...................................................................................................30
12-2 Count-up releasing procedure........................................................................................................33
12-3 How to change the counter value during sewing .........................................................................33
13. PERFORMING NEW REGISTER OF USERS' PATTERN...........................................34
14. PERFORMING NEW REGISTER OF PATTERN BUTTON.........................................35
15. LCD DISPLAY SECTION AT THE TIME OF PATTERN BUTTON SELECTION.........36
15-1 Pattern button data input screen....................................................................................................36
15-2 Sewing screen..................................................................................................................................39
16. PERFORMING PATTERN BUTTON No. SELECTION ...............................................42
16-1 Selection from the data input screen.............................................................................................42
16-2 Selection by means of the shortcut button...................................................................................43
17. CHANGING CONTENTS OF PATTERN BUTTON......................................................44
18. NAMING PATTERN .....................................................................................................46
19. COPYING PATTERN BUTTON....................................................................................47
20. CHANGING SEWING MODE.......................................................................................49
21. LCD DISPLAY SECTION AT THE TIME OF COMBINATION SEWING......................50

ii
21-1 Pattern input screen ........................................................................................................................50
21-2 Sewing screen..................................................................................................................................52
22. PERFORMING COMBINATION SEWING ...................................................................55
22-1 How to create combination data.....................................................................................................55
22-2 Selection of combination data........................................................................................................56
22-3 How to delete combination data.....................................................................................................57
22-4 How to delete combination data step ............................................................................................58
23. CHANGING MEMORY SWITCH DATA .......................................................................59
23-1 How to change memory switch data..............................................................................................59
23-1-1 Level 1.........................................................................................................................................................59
23-1-2 Level 2.........................................................................................................................................................61
23-2 Memory switch data list ..................................................................................................................62
23-2-1 Level 1.........................................................................................................................................................62
23-2-2 Level 2.........................................................................................................................................................68
24. ERROR CODE LIST ....................................................................................................73
25. MESSAGE LIST...........................................................................................................81
26. USING COMMUNICATION FUNCTION ......................................................................84
26-1 Handling possible data....................................................................................................................84
26-2 Performing communication by using the media...........................................................................85
26-3 Performing format............................................................................................................................88
26-4 Performing communication ............................................................................................................89
26-5 Take-in of the data ...........................................................................................................................90
26-6 Taking in plural data together.........................................................................................................92
27. INFORMATION FUNCTION.........................................................................................94
27-1 Observing the maintenance inspection information....................................................................94
27-2 Inputting the inspection time..........................................................................................................96
27-3 Releasing procedure of the warning..............................................................................................97
27-4 Observing the production control information.............................................................................98
27-4-1 When displaying from the information screen........................................................................................98
27-4-2 When displaying from the sewing screen .............................................................................................100
27-5 Performing setting of the production control information ........................................................101
27-6 Observing the working measurement information.....................................................................105
28. TRIAL SEWING FUNCTION......................................................................................109
28-1 Performing trial sewing.................................................................................................................109
29. THREAD TENSION VALUE DISPLAY COLOR LIST................................................ 112
30. SETTING APPROVAL/DISAPPROVAL OF CALLING OF PATTERN DATA............ 113
31. PERFORMING ADJUSTMENT OF ORIGIN OF PRESSER...................................... 114
32. PERFORMING KEY LOCK........................................................................................115
33. DISPLAYING VERSION INFORMATION................................................................... 117
34. USING CHECK PROGRAM.......................................................................................118
34-1 To display the check program screen..........................................................................................118

iii
34-2 Performing compensation of touch panel...................................................................................120
34-3 Performing LCD check ..................................................................................................................123
34-4 Performing sensor check..............................................................................................................124
34-5 Number of rotations of main motor check ..................................................................................127
34-6 Performing output check ..............................................................................................................128
34-7 Performing X/Y motors/origin sensors check.............................................................................130
34-8 Performing presser/thread trimmer motor/origin sensor check ...............................................131
34-9 Performing thread clamp motor/origin sensor check ................................................................132
34-10 How to carry out the continuous operation ..............................................................................133
35. COMMUNICATION SCREEN OF MAINTENANCE PERSONNEL LEVEL...............134
35-1 Data which are possible to be handled........................................................................................134
35-2 Displaying maintenance personnel level.....................................................................................135
35-3 Performing rewriting of program..................................................................................................136
36. INFORMATION SCREEN OF THE MAINTENANCE PERSONNEL LEVEL.............138
36-1 Display of error record ..................................................................................................................138
36-2 Display of the cumulative working information..........................................................................140
– 1 –
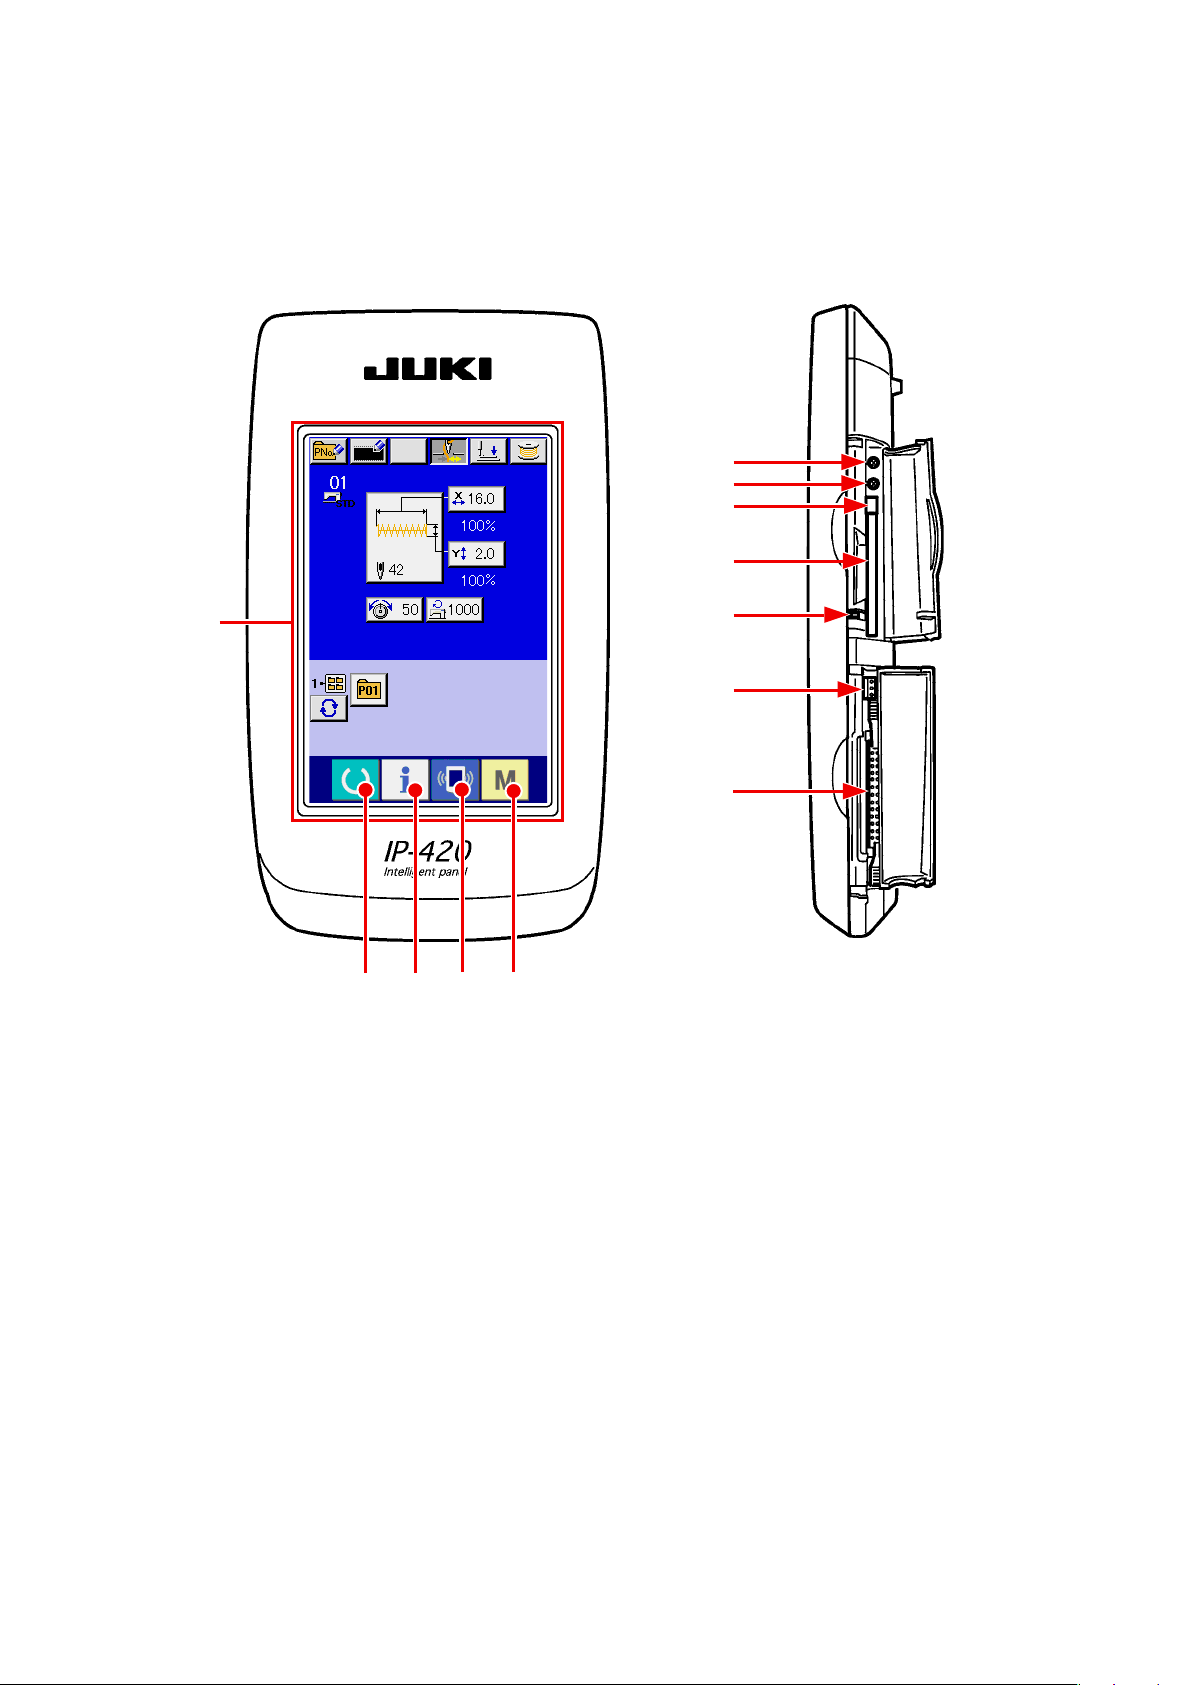
1. NAME OF EACH SECTION OF THE OPERATION PANEL
1-1 Body
(Front) (Right side)
②④ ⑤
①
⑧
⑦
⑥
⑨
⑩
⑪
⑫
③

– 2 –
①Touch panel • LCD display section
②READY key →Changeover of the data input screen and the
sewing screen can be performed.
③INFORMATION key →Changeover of the data input screen and the
information screen can be performed
④COMMUNICATION key →Changeover of the data input screen and the
communication screen can be performed.
⑤MODE key →Changeover of the data input screen and the
mode changeover screen which performs various
detail settings can be performed.
⑥Contrast control
⑦Brightness control
⑧CompactFlash (TM) eject button
⑨CompactFlash (TM) slot
⑩Cover detection switch
⑪Connector for external switch
⑫Connector for control-box connection
– 3 –
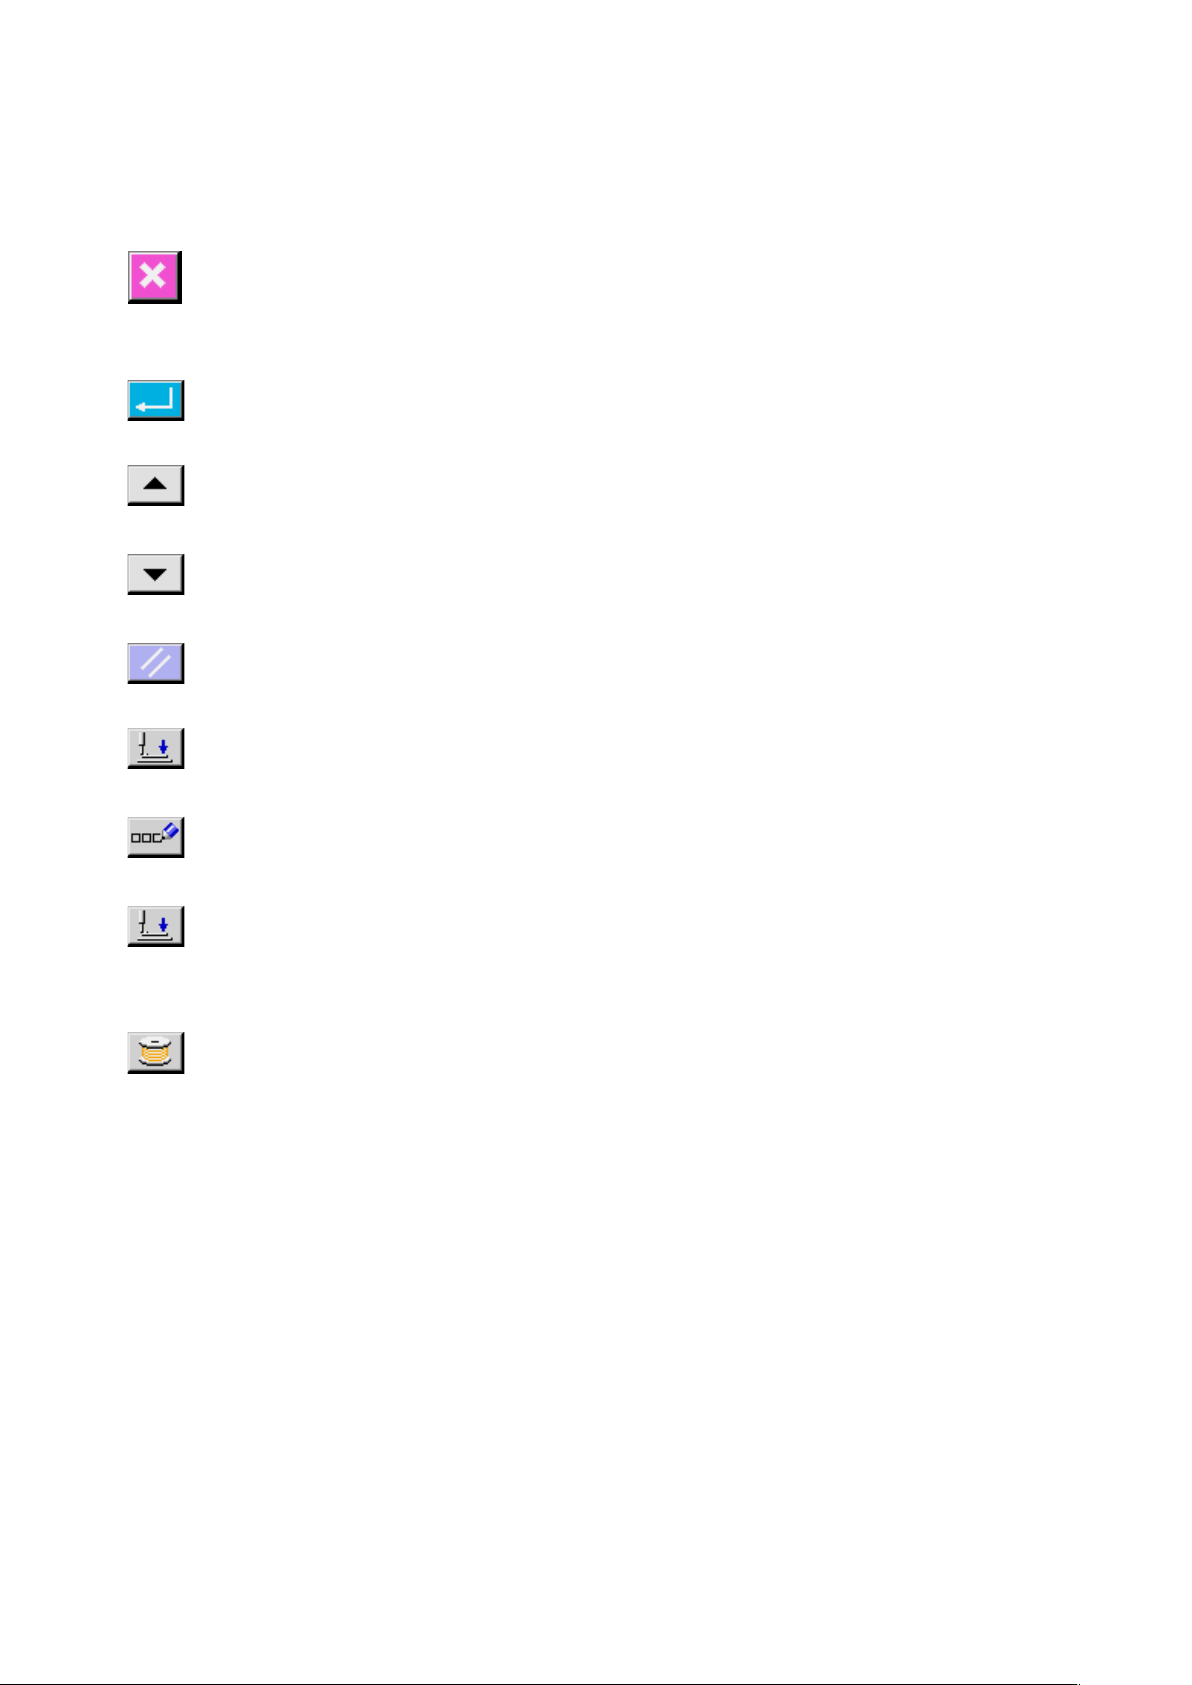
1-2 Buttons to be used in common
CANCEL button →This button closes the pop-up screen.
In case of the data change screen, the data being changed can
be cancelled.
ENTER button →This button determines the changed data.
UP SCROLL button →This button scrolls the button or the display in the upward
direction.
DOWN SCROLL button →This button scrolls the button or the display in the downward
direction.
RESET button →This button performs the release of error.
NUMERAL INPUT button →This button displays ten keys and input of numerals can be
performed.
CHARACTER INPUT
button
→This button displays the character input screen.
→ Refer to "18. NAMING PATTERN" p.46 .
PRESSER DOWN button →
This button lowers the presser and displays the presser down screen.
To raise the presser, press PRESSER UP button displayed in the
presser down screen.
BOBBIN WINDER button →This button performs bobbin thread winding.
→ Refer to "11. WINDING BOBBIN THREAD" p.29 .
The buttons which perform common operations in each screen of IP-420 are as follows :
– 4 –
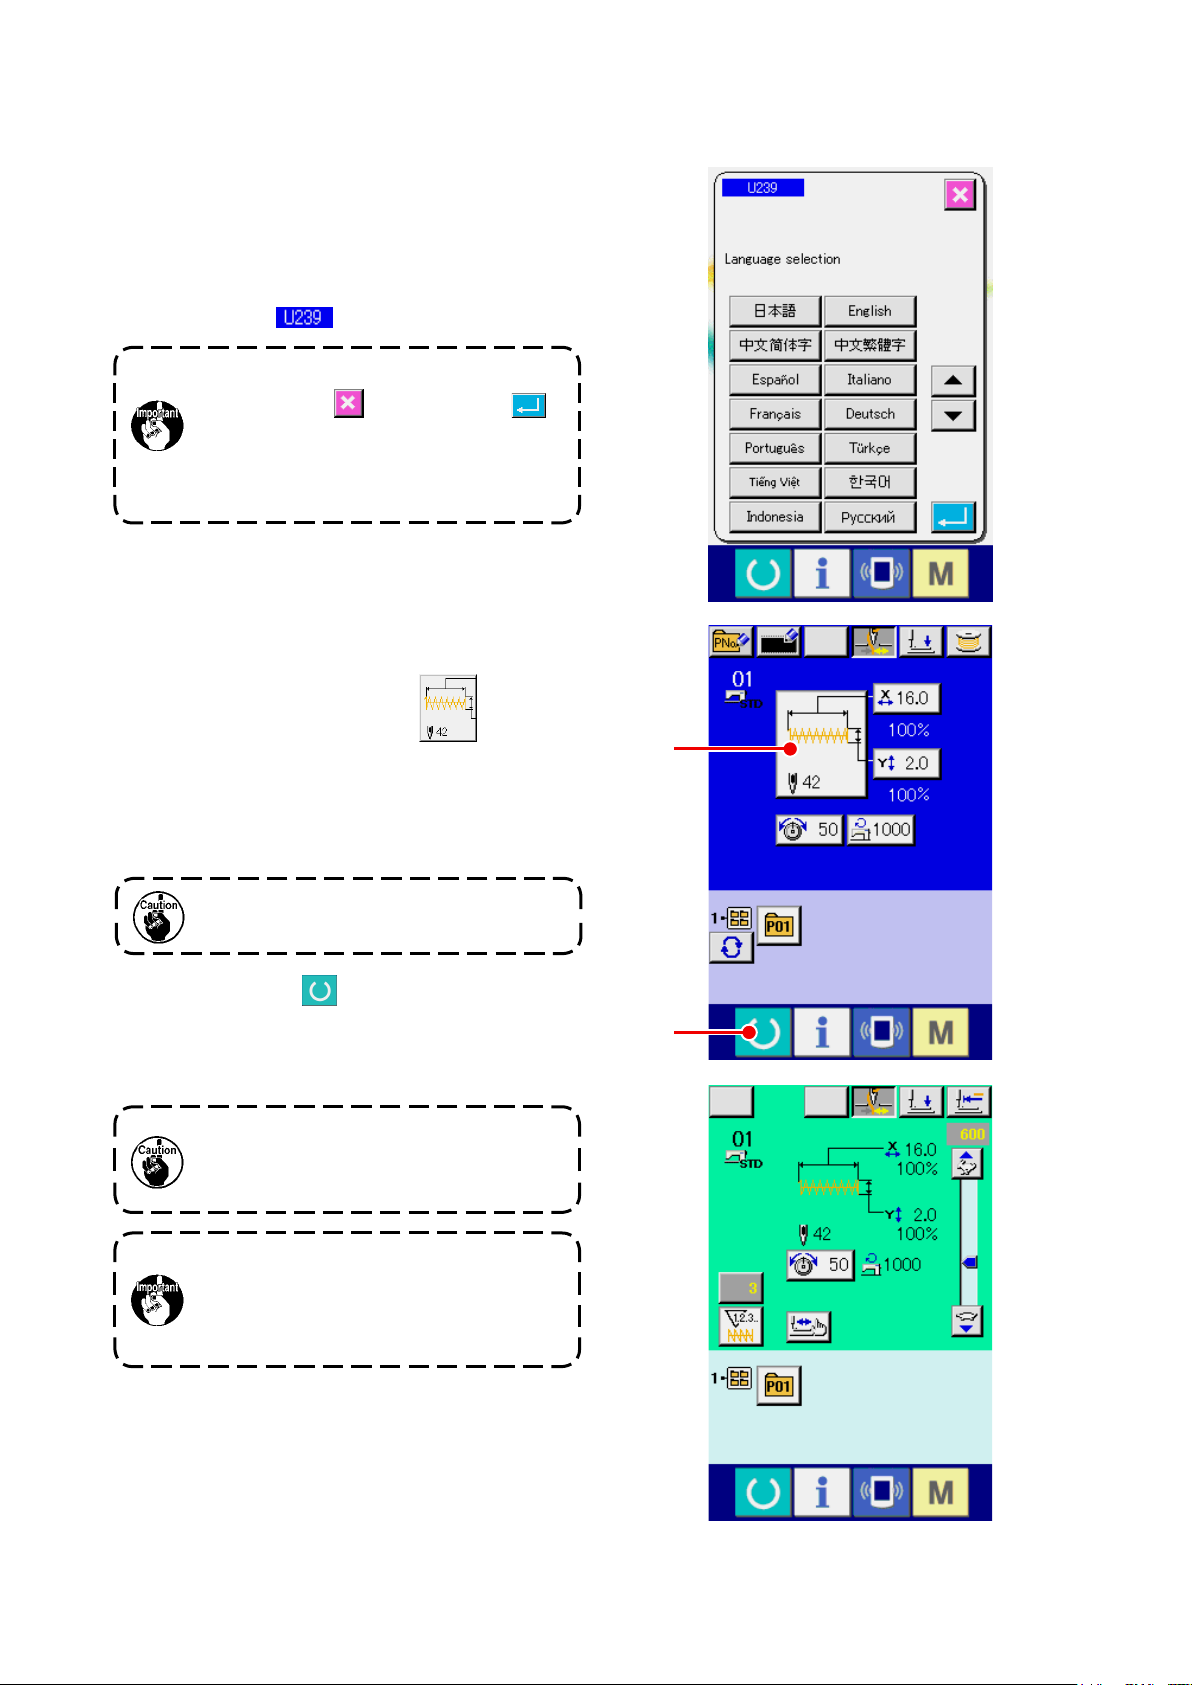
2. BASIC OPERATION OF IP-420
①Turn ON the power switch
When the power is turned ON rst, the selection
screen of the language is displayed. Set the
language used. (It is possible to change with
memory switch
.)
②Select the pattern No. you desire to sew.
When the power is turned ON , the data input
screen is displayed. The shape which is selected
at present in the center of the screen is displayed
on SHAPE SELECTION button A and the
selection of the sewing shape can be performed
when pressing the button. For selecting procedure
of the sewing shape, refer to "4. PERFORMING
SEWING SHAPE SELECTION" p.11 .
For the pattern No., refer to the sewing
shape list.
When the presser is raised, be careful that
ngers are notcaught in the presser since
the presser moves after havinglowered.
When READY key B is pressed, the back color
of LCD display is changed to green, and the sewing
machine is set to the sewing possible state.
When ending the selection screen with
CANCEL button or ENTER button
without selecting the language, the selection
screen of the language is again displayed
when turning ON the power next.
LK-1900B is explained as the standard in this Instruction Manual.
When turning OFF the power without
pressing READY key, the setting of
"Pattern No . " , "XY scale" and "number
of max. rotation" are not memorized.
③Start sewing.
Set the sewing product to the presser portion, and
operate the pedal to start the sewing machine,
and sewing starts.
* For the screen, refer to "3. LCD DISPLAY
SECTION AT THE TIME OF SEWING SHAPE
SELECTION" p.5 .
A
B
– 5 –
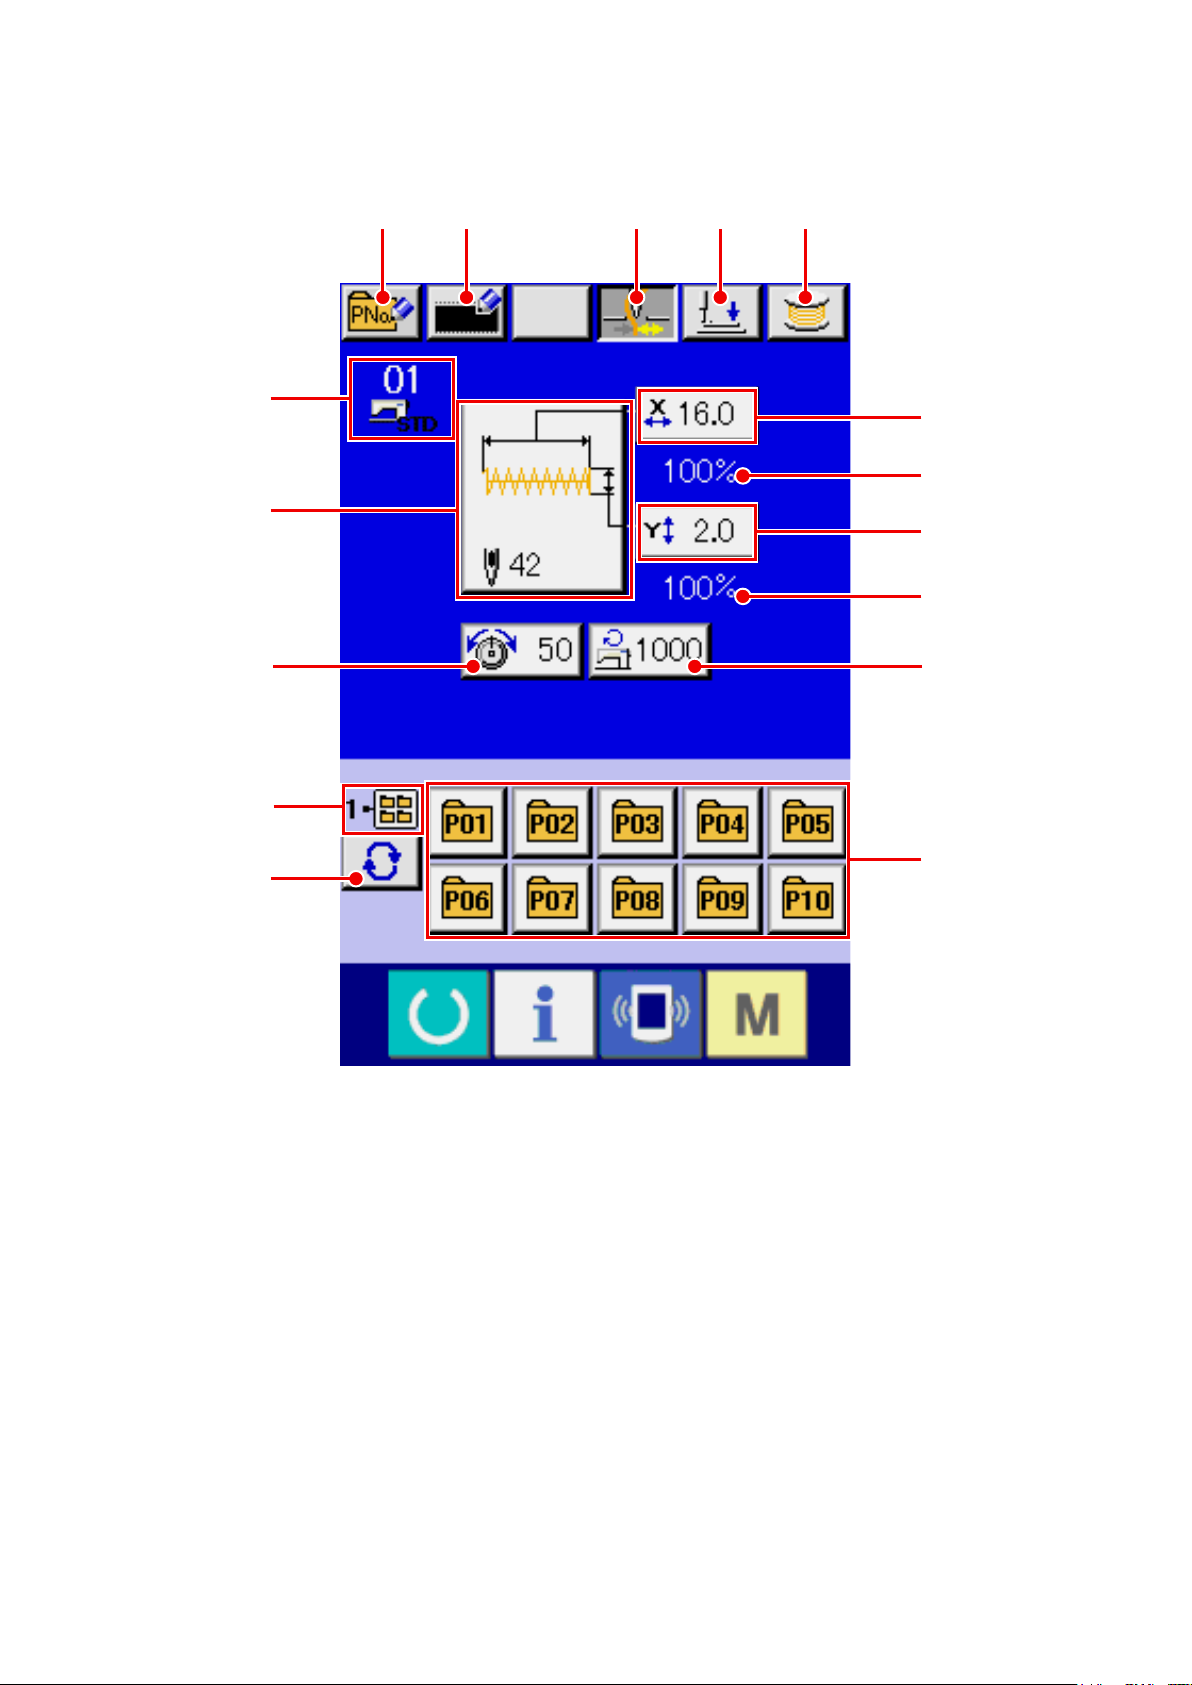
3. LCD DISPLAY SECTION AT THE TIME OF SEWING SHAPE SELECTION
3-1 Sewing shape data input screen
A B C D E
F
G
H
J
I
L
K
M
P
N
O
– 6 –
Button and display Description
APATTERN BUTTON NEW
REGISTER button
Pattern button new register screen is displayed.
→Refer to "14. PERFORMING NEW REGISTER OF PATTERN BUTTON"
p.35 .
BUSERS' PATTERN NEW
REGISTER button
Users' pattern new register screen is displayed.
→Refer to
"13. PERFORMING NEW REGISTER OF USERS' PATTERN"
p.34
.
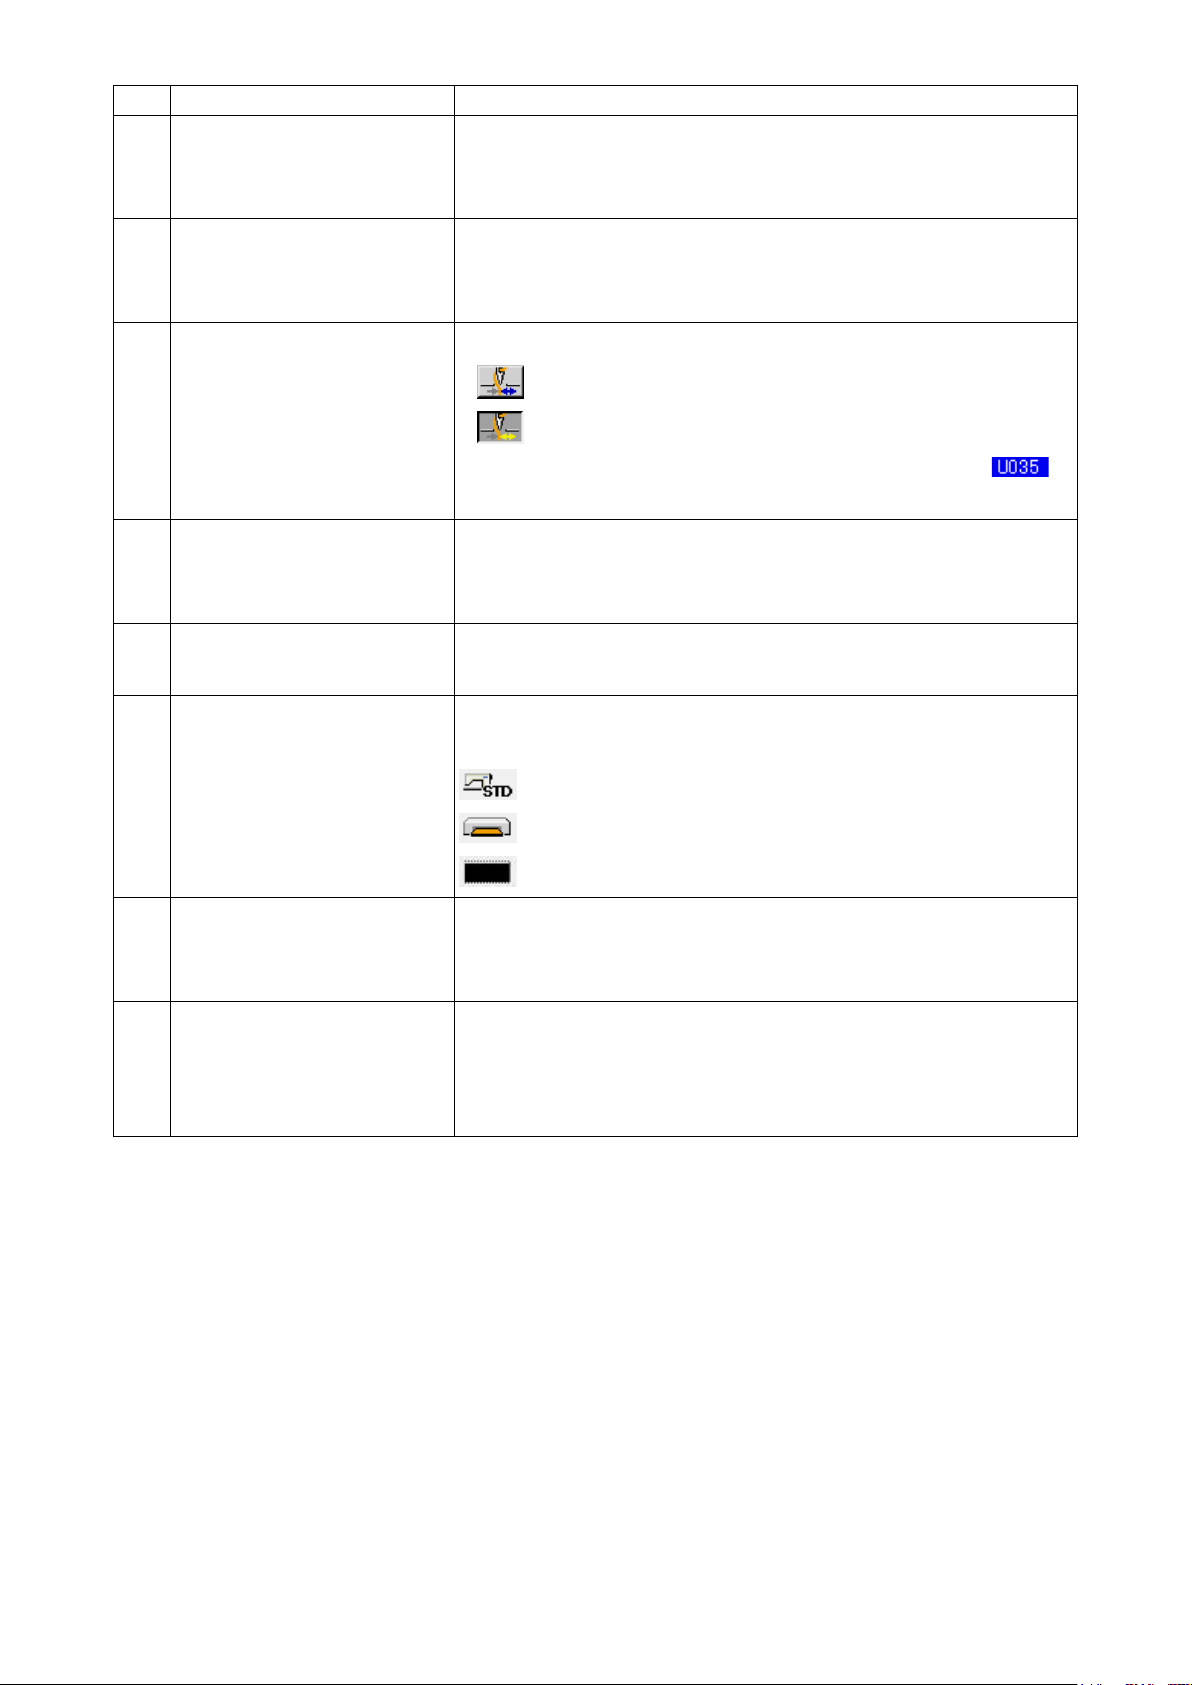
CTHREAD CLAMP button Effective/ineffective of thread clamp is selected.
: Thread clamp ineffective
: Thread clamp effective
*When the prohibition of thread clamp is set with memory switch ,
the thread clamp button is not displayed.
DPRESSER DOWN button Presser can be lowered and the presser down screen is displayed.
To raise the presser, press the presser up button which is displayed in the
presser down screen.
EBOBBIN WINDER button Bobbin thread can be wound.
→Refer to "11. WINDING BOBBIN THREAD" p.29 .
FSEWING SHAPE No. display Kind and No. of the sewing shape being selected at present are displayed.
There are three kinds of sewing shapes below.
: Standard pattern
: Media pattern
: Users' pattern
GSEWING SHAPE SELECTION
button
Sewing shape being selected at present is displayed on this button and
when the button is pressed, the sewing shape selection screen is displayed.
→Refer to "4. PERFORMING SEWING SHAPE SELECTION" p.11 .
HNEEDLE THREAD TENSION
SETTING button
Needle thread tension value which is set to the pattern data being selected
at present is displayed on this button and when the button is pressed, the
item data change screen is displayed.
→Refer to "6. PERFORMING ITEM DATA CHANGE" p.17 .
Indice
Altri manuali JUKI Macchina da cucire

JUKI
JUKI LZ-2290CS Manuale utente

JUKI
JUKI MO-6704D Manuale utente

JUKI
JUKI AB-1351 Manuale utente

JUKI
JUKI SADE Manuale utente

JUKI
JUKI SC-922 Guida rapida

JUKI
JUKI DDL-900A Manuale utente

JUKI
JUKI AMS-221EN Series Guida rapida

JUKI
JUKI MS-1190/V045 Manuale utente

JUKI
JUKI DLU-5494N-7 Manuale utente

JUKI
JUKI DDL-8700 Manuale utente

JUKI
JUKI MO-6900R Series Manuale utente

JUKI
JUKI LU-562 Manuale utente

JUKI
JUKI DDL-5550N Manuale utente

JUKI
JUKI MO-104 Manuale utente

JUKI
JUKI APW-896N/IP-420 Manuale utente

JUKI
JUKI AP-876/IP-420 Manuale utente

JUKI
JUKI APW-896/IP-420 Manuale utente

JUKI
JUKI DLN-9010A-SH Manuale utente

JUKI
JUKI HZL-E80 Manuale utente

JUKI
JUKI CP-180 Manuale utente


