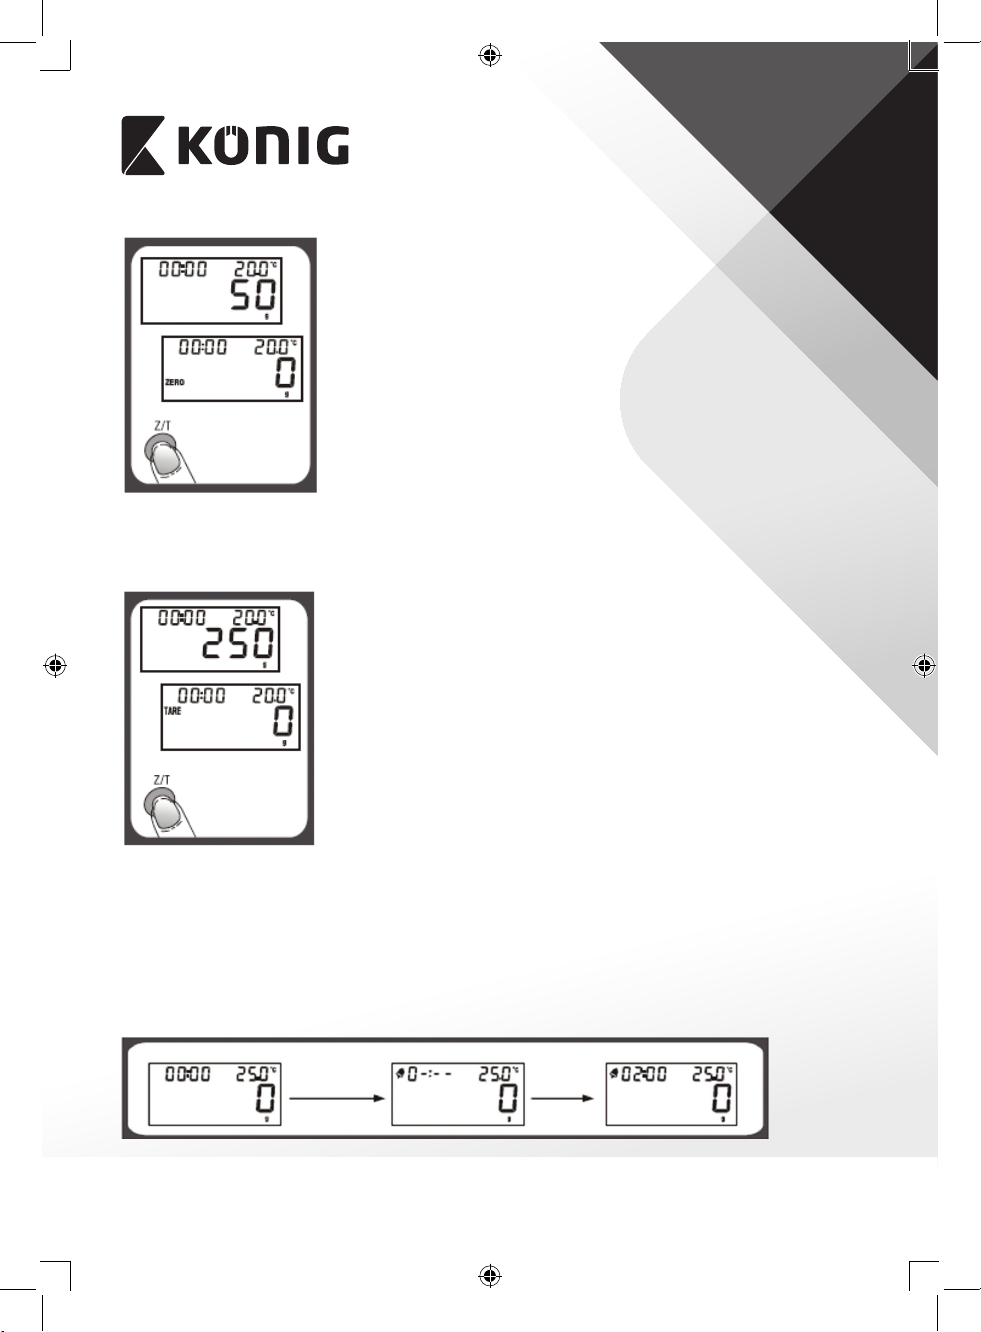
König HC-KS32N Manuale utente

HC-KS32N
MANUAL (p. 2)
ANLEITUNG (S. 7)
MODE D’EMPLOI (p. 12)
GEBRUIKSAANWIJZING (p. 17)
MANUALE (p. 22)
MANUAL DE USO (p. 27)
MANUAL (p. 32)
HASZNÁLATI ÚTMUTATÓ (o. 37)
KÄYTTÖOHJE (s. 42)
BRUKSANVISNING (s. 47)
NÁVOD K POUŽITÍ (s. 52)
MANUAL DE UTILIZARE (p. 57)
ΕΓΧΕΙΡΙΔΙΟ XPHΣHΣ (σελ. 62)
BRUGERVEJLEDNING (s. 67)
VEILEDNING (s. 72)
ИНСТРУКЦИЯ (77 стр.)
KILAVUZ (s. 82)
KASUTUSJUHEND (lk. 87)
NÁVOD (s. 92)
ROKASGRĀMATA (lpp. 97)
NAUDOJIMO VADOVAS (102 p.)
PRIRUČNIK (str. 107)
РЪКОВОДСТВО (p. 112)
INSTRUKCJA OBSŁUGI (str. 117)
PRIROČNIK (str. 122)
Kitchen Scale

2
ENGLISH
AUTO SHUT-OFF
Auto shut-o occurs if the display shows “0” or shows the same weight reading for 2 minutes.
MANUAL SHUT-OFF
To maximize battery life, always press ON/OFF again to turn o the scale after using.
WARNING INDICATORS
1) Replace battery.
2) Scale overload. Remove item to avoid damage.
Maximum weight capacity is indicated on the scale.
:Alarm kg: Kilograms
TARE:Tare weight g:Grams
:Negative value lb: Pounds
ZERO:Zero weight oz: Ounces
:Alarm timer °C/°F: Temperature

3
ENGLISH
CLEANING AND CARE
1. Clean the scale with a slightly damp cloth. DO NOT immerse the scale in water or use
chemical/abrasive cleaning agents.
2. All plastic parts should be cleaned immediately after contact with fats, spices, vinegar
and strongly avored/colored foods. Avoid contact with acids and citrus juices.
3. Always use the scale on a hard, at surface. DO NOT use on carpets.
BATTERY
1x 9 V (not included)
TO REPLACE THE BATTERY
Remove the battery compartment cover and attach a new battery onto the 9-volt battery
snaps. Please observe the polarity.
TO OPERATE THE SCALE
1. Please put the scale on a hard and at surface.
2. Place the bowl (if used) on the scale before turning on the unit.
3. Press and release the ON/OFF button to turn on the unit.
4. Wait until the LCD shows all information.

4
ENGLISH
TO CONVERT THE WEIGHT UNIT
If the scale has both Metric (kilograms, grams) and Imperial (pounds, ounces) measuring
systems, you can press UNIT to convert between the two systems during the course of
weighing.
“ZERO” OR “TARE” FUNCTION
To weigh dierent loads consecutively without removing loads from the scale, put the rst
load on the scale and get the weight reading. Press the Z/T button to reset the LCD reading
to “0” before adding the next load. You can repeat this operation.
The LCD will show “----” or “0g” each time Z/T is pressed. “----” means not stable, please wait
for a moment. “0g” and a “ZERO” icon on the lower left corner of the LCD means the “ZERO”
function is active. Maximum capacity remains unchanged.

5
ENGLISH
The LCD will show “----” or “0g” each time Z/T is pressed. “----” means not stable, please wait
for a moment. “0g” and a “TARE” icon on the upper left corner of the LCD means the “TARE”
function is active. Maximum capacity is reduced by the total weight of all loads.
TO SET THE ALARM TIMER
1. Press T-SET to conrm and go to the next digit.
2. After setting the time span, press T-SET to start counting down.
3. Press any key to stop counting down.
4. Press T-SET to clear the time span.
5. When the timer counts down to “00:00”, the alarm will start beeping 60times and the
scale will automatically shut o.
6. Maximum time span: 99:59.
Press ON/OFF Press A, Vto set time span
Press T-SET

6
ENGLISH
TEMPERATURE SENSOR
1. Current temperature is shown on the upper right corner of the LCD.
2. Temperature range: 0–40 °C.
3. Division: 0.5 °C.
CAUTION
RISK OF ELECTRIC SHOCK
DO NOT OPEN
Safety precautions:
To reduce risk of electric shock, this product should ONLY be opened by an authorized
technician when service is required.
Disconnect the product from mains and other equipment if a problem should occur.
Do not expose the product to water or moisture.
Maintenance:
Clean only with a dry cloth.
Do not use cleaning solvents or abrasives.
Warranty:
No guarantee or liability can be accepted for any changes and modications of the product or damage caused due to incorrect use
of this product.
General:
Designs and specications are subject to change without notice. All logos, brands and product names are trademarks or registered
trademarks of their respective holders and are hereby recognized as such.
This manual was produced with care. However, no rights can be derived. König Electronic can not accept liability for any errors in this
manual or their consequences.
Keep this manual and packaging for future reference.
Attention:
This product is marked with this symbol. It means that used electrical and electronic products should not be mixed with
general household waste. There is a separate collections system for these products.
This product has been manufactured and supplied in compliance with all relevant regulations and directives, valid for all member
states of the European Union. It also complies to all applicable specications and regulations in the country of sales.
Formal documentation is available upon request. This includes, but is not limited to: Declaration of Conformity (and product
identity), Material Safety Data Sheet, product test report.
Please contact our customer service desk for support:
via website: http://www.nedis.com/en-us/contact/contact-form.htm
via telephone: +31 (0)73-5993965 (during oce hours)
NEDIS B.V., De Tweeling 28, 5215 MC ’s-Hertogenbosch, THE NETHERLANDS

7
DEUTSCH
AUTOMATISCHES AUSSCHALTEN
Das Gerät wird automatisch ausgeschaltet, wenn im Display„0“ oder für 2Minuten das
gleiche Gewicht angezeigt wird.
MANUELLES AUSSCHALTEN
Schonen Sie die Batterie und schalten Sie die Waage nach Gebrauch immer mit der Taste ON/
OFF aus.
WARNANZEIGEN
1) Batterie austauschen.
2) Überladung. Entnehmen Sie Zutaten, um Schäden zu vermeiden.
Das Höchstgewicht ist auf der Waage angegeben.
:Wecker kg: Kilogramm
TARE:Taragewicht g:Gramm
:Negativer Wert lb: Pfund
ZERO:Kein Gewicht oz: Unze
:Kurzzeitwecker °C/°F: Temperatur

8
DEUTSCH
REINIGUNG UND PFLEGE
1. Reinigen Sie die Waage mit einem feuchten Tuch. Tauchen Sie die Waage NICHT in Wasser
ein und benutzen Sie keine chemischen oder scheuernden Reinigungsmittel.
2. Reinigen Sie alle Plastikteile umgehend nach dem Kontakt mit Fett, Gewürzen, Essig und
stark gewürzten/gefärbten Lebensmitteln. Vermeiden Sie den Kontakt mit Säuren und
Zitrussäften.
3. Verwenden Sie die Waage nur auf einer harten, achen Oberäche. NICHT auf Teppichen
verwenden.
BATTERIE
1x 9 V Block-Batterie (nicht im Lieferumfang enthalten)
BATTERIE WECHSELN
Entfernen Sie die Abdeckung des Batteriefachs und verbinden Sie eine neue Batterie mit den
Batteriekontakten im Batteriefach. Beachten Sie die Polarität.
BETRIEB DER WAAGE
1. Stellen Sie die Waage auf eine harte, ebene Oberäche.
2. Stellen Sie die Schüssel (falls Sie diese verwenden) vor dem Einschalten auf die Waage.
3. Drücken Sie kurz auf die Taste ON/OFF, um das Gerät einzuschalten.
4. Warten Sie, bis im LCD-Display alle Informationen angezeigt werden.

9
DEUTSCH
GEWICHTSEINHEITEN UMRECHNEN
Da die Waage mit den metrischen (Kilogramm, Gramm) und den nicht-metrischen (Pfund,
Unze) Maßeinheiten programmiert ist, können Sie durch Drücken der Taste UNIT während
des Wiegens zwischen beiden Systemen umrechnen.
FUNKTIONEN„ZERO“ (NULL) UND„TARE“ (TARA)
Um unterschiedliche Zutaten nacheinander zu wiegen, ohne Zutaten von der Waage zu
nehmen, stellen Sie die erste Menge auf die Waage und lesen das Gewicht ab. Drücken
Sie die Taste Z/T, um das LCD-Display auf„0“ zurückzusetzen, bevor Sie die nächste Menge
hinzufügen. Sie können diesen Vorgang wiederholen.
Jedes Mal, wenn Sie die Taste Z/T drücken, zeigt das Display„----“ oder„0g“ an.„----“ bedeutet
nicht stabil, bitte warten Sie einen Moment.„0g“ und die Einblendung„ZERO“ (NULL) links
unten im LCD-Display geben an, dass die„ZERO“ (NULL)-Funktion aktiviert ist. Die maximale
Traglast bleibt unverändert.

10
DEUTSCH
Jedes Mal, wenn Sie die Taste Z/T drücken, zeigt das Display „----“ oder „0g“ an. „----“ bedeutet
nicht stabil, bitte warten Sie einen Moment. „0g“ und die Einblendung „TARE“ (TARA) links
oben im LCD-Display geben an, dass die „TARE“ (TARA)-Funktion aktiviert ist. Die maximale
Traglast wird um das Gesamtgewicht aller Mengen reduziert.
KURZZEITWECKER EINSTELLEN
1. Drücken Sie die Taste T-SET, um zu bestätigen und zur nächsten Zier zu springen.
2. Nach dem Einstellen der Zeitspanne drücken Sie T-SET, um den Countdown zu starten.
3. Drücken Sie jede beliebige Taste, um den Countdown abzubrechen.
4. Drücken Sie T-SET, um die Zeitspanne zu löschen.
5. Wenn die Uhr bis auf„00:00“ heruntergezählt hat, piept der Wecker 60 Mal und die Waage
schaltet sich automatisch aus.
6. Maximale Zeitspanne: 99:59.
ON/OFF drücken A, Vdrücken, um Zeitspanne einzustellen
T-SET drücken
Indice
Lingue:
Altri manuali König Scala


