LG PQRCUCS0C Guida rapida

ENGLISH ITALIANO ESPAÑOL FRANÇAIS DEUTSCH
êìëëäàâ
LG
Simple Wired Remote Controller
LG
IMPORTANT
• Please read this installation manual completely
before installing the product.
• Installation work must be performed in
accordance with the national wiring standards
by authorized personnel only.
• Please retain this installation manual for future
reference after reading it thoroughly.
Owner's & Installation Manual
Visit us at : http://www.lgservice.com
Models: PQRCUCS0C

2Simple Wired Remote Controller
Simple Wired Remote Controller Owner’s & Installation Manual
TABLE OF CONTENTS
■Safety Precautions..............................................................3~4
■Part Description ..................................................................5~6
■Wired remote controller switch information .........................7
■Installation Method .................................................................8
■Necessary functions before using .................................9~11
• Trial Operation..........................................................................................9
• Celsius/Fahrenheit Switching ...............................................................10
• Setting the Central Control Address ....................................................11
• ESP Function ..........................................................................................12
■How to use the Mode Selection Button.........................13~19
• Cooling Operation ..................................................................................13
• Heating Operation ..................................................................................14
• Auto-Operation .......................................................................................15
• Dry(Dehumidification) Operation ..........................................................16
• Fan Operation .........................................................................................16
• Fan Speed Selection ..............................................................................17
• Indoor Temperature Display..................................................................18
• Auto Swing..............................................................................................18
• Child Lock ...............................................................................................19
• Different Mode Operation .....................................................................20
Note) Please, refer to indoor's manual for product's detail information of subfunction

Safety Precautions
Owner’s & Installation Manual 3
ENGLISH
■Installation
Safety Precautions
• The installation requires expert skills, and it should be installed by the service center or other shops specialized
in the installation and recognized by our company.
• For all the problems arising after installation by someone who has no relevant qualifications, LG will not provide
free service.
• The following safety cautions are provided to prevent unexpected dangers or losses.
: If the user does not follow the mandatory items, it may result in serious injury or death.
: If the user does not follow the mandatory items, it may cause personal injury or property
damage.
: Warning and Caution are to call the user’s attention to the possible danger. Read and follow
them carefully in order to prevent a safety accident.
: Warning and Caution are indicated in this guide and the product itself to help protect the users
from danger.
WARNING
CAUTION
WARNING
Entrust installation of the
product to the service center
because improper installation
may cause fire, an electric
shock, explosion, and physical
injury.
Use the original parts in
order to prevent fire, an
electric shock, explosion,
and product breakdown.
Keep combustible and/or
inflammable materials away
from the product in order to
prevent fire or product
breakdown.
Do not disassemble, repair, or
modify the product at your
discretion in order to prevent fire
or an electric shock.
Do not install the product in wet
and humid areas in order to
prevent product breakdown.
Do not expose the product to the
sun in order to prevent product
breakdown.
Do not modify or lengthen the
power cable at your discretion.
It may cause fire or an electric
shock.
Do not place a heating device
near the product. It may cause
fire.
Do not drop water on to the
product. It may cause an electric
shock or product breakdown.
Do not place something heavy on
the power cable. It may cause fire
or an electric shock.
Do not place a heavy thing on the
product. It may cause product
breakdown.
If the product was submerged
under water, ask the service
center for instruction. It may
cause fire or an electric shock
unless you do that.
■In-use

Safety Precautions
4Simple Wired Remote Controller
■In-use
Make sure children or senor
citizens use the product under
proper observation in order to
prevent safety accident.
Do not subject the product to
shock. It will cause product
breakdown.
Do not pick the product with a
sharp tool. It may cause
product breakdown with the
damage to its parts.
Do not clean the product with strong cleanser such
as solvent. Use soft clothes in order to prevent fire
or product deformation.
Do not touch the product with a wet hand. Do not
pull the lead cable. It may cause product breakdown
or an electric shock.
CAUTION

Part Description
Owner’s & Installation Manual 5
ENGLISH
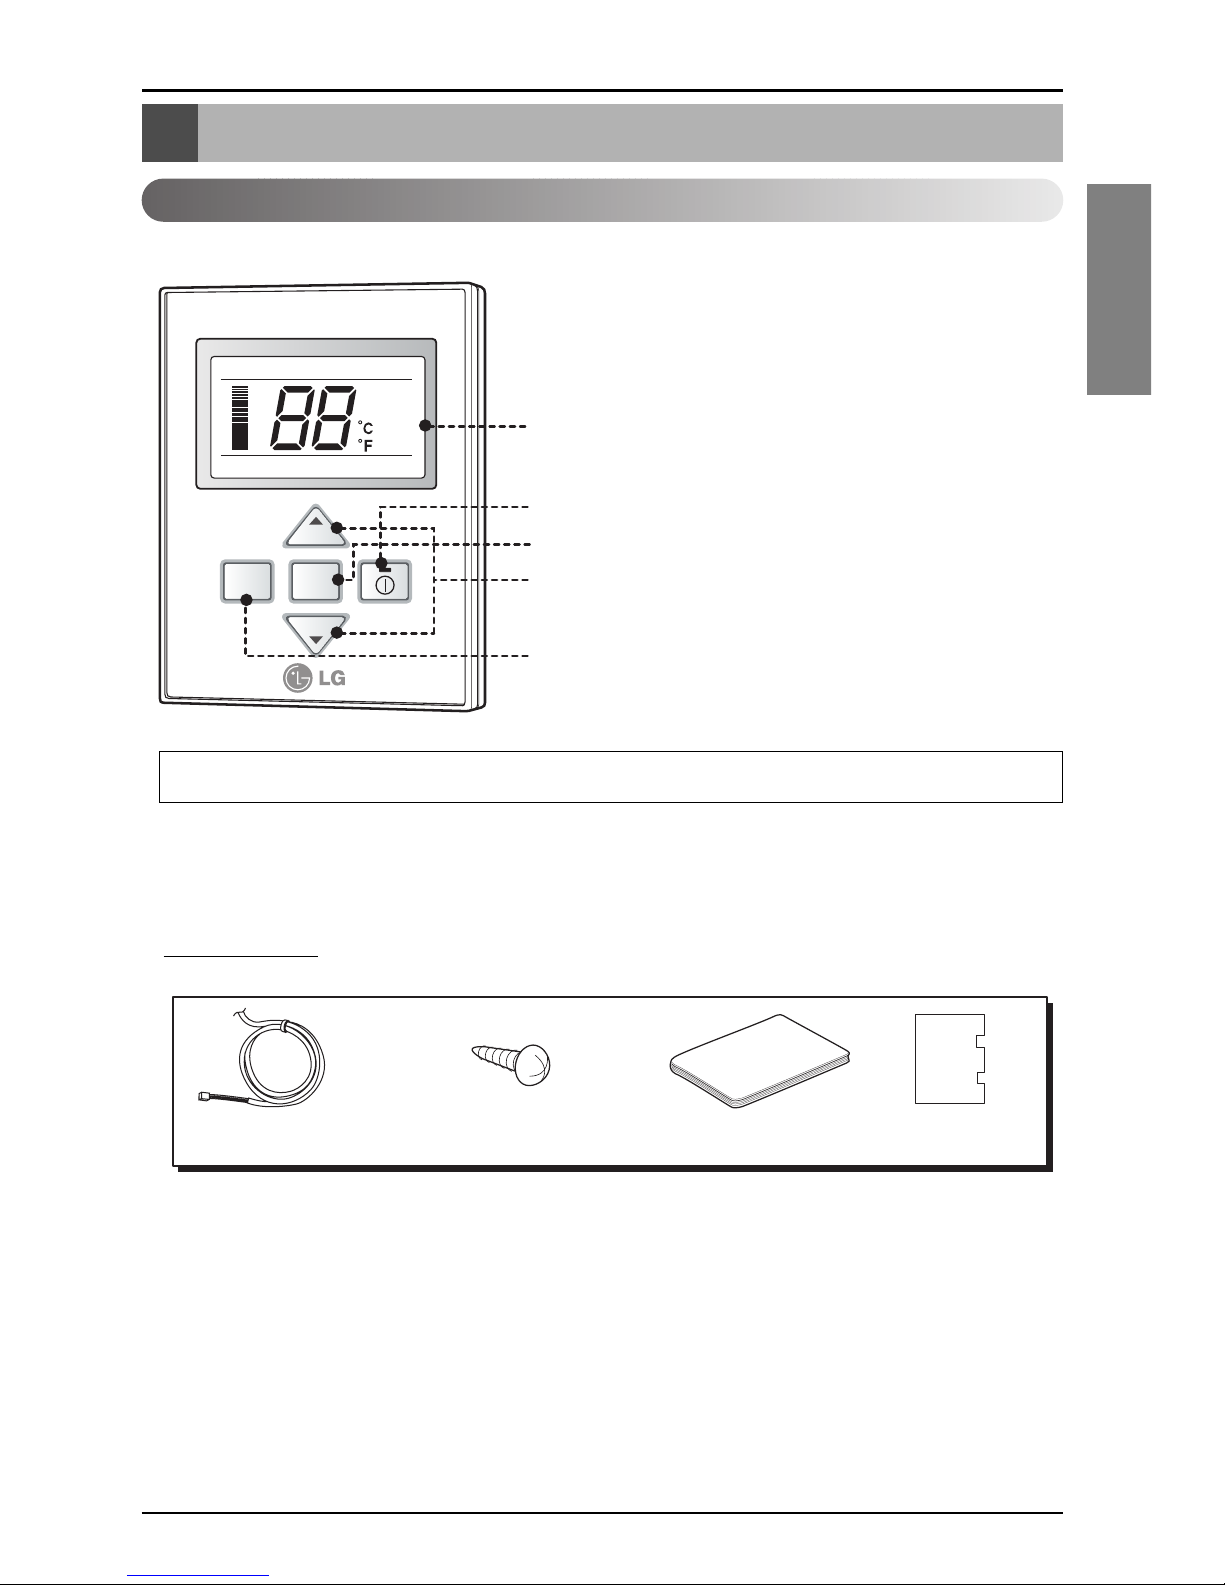
Part Description
PQRCUCS0C
FAN
SPEED
MODE
TEMP
TEMP
Cooling Heating Auto Dry Fan
Defrost Preheat Out door
Slo
Lo
Med
Hi
Po
Room Temp
Total on
Central Run
1
2
3
4
5
Accessory
Connecting Cable
(1EA)
Fixing Screw (2EA) Owner / Installation
Manual
Installation Paper
1. Operation Display Panel
2. On/Off Button
3. Fan Speed Button
4. Temperature Control Button
5. Mode Selection Button
Simple Wired Remote Controller
Each function will be shown on the display panel for three seconds or so when the power is applied at first.

Wired remote controller switch information
6Simple Wired Remote Controller
Wired remote controller switch information
S/W 1
SW±GR
SW±HI
Room Temp. Sensing
Ceiling Height/Default E.S.P
Group Control
3
1
2
2
SW±PD
SW±TH
Select Product
2
1
1
321
Group control switch
1. For individual control/Master use
2. For group control/Slave use
Ceiling height selection switch
1. Low ceiling
2. Standard ceiling
3. High ceiling
Product selection switch
1. Cooling Only product
2. Heat Pump product
Indoor temperature sensor
selection switch
1. Use the temperature sensor on the remote
controller.
2. Use the temperature sensor on the product.
3. Use the sensors on the product and remote
controller.
• When changing the product selection switch and group control switch, the power must be reconnected to reflect
the changes.
• The central control could operate inappropriately depends on indoor unit type, when the remote controller is set
as slave.

Installation Method
Owner’s & Installation Manual 7
ENGLISH
CN-REMO
LO2K
J15
LO1K
LO1D C07D
C01K
J14
CN-DISP
CN-M CN-ZONEC
IC01A
The position of the fixing screws
Side of
remote Controller
Side of
Indoor Unit
Main
indoor unit
Red Yellow Brown
Main frame
Fixing the
remote controller
2cm
1
Put the installation paper on the place and determine the
position and height of the fixing screws of the wired remote
controller.
• Refer to the printed side of the installation paper.
2
Plug the connecting cable into the indoor unit.
• The product is being shipped with the cable
connected only to the remote controller.
Fix the connecting cable with the cable rack.
3
Remove the installation paper before installing
the remote controller so that it can fit at the right
place.
* Do not embed the remote controller into the wall. (It may cause the breakdown of the temperature
sensor.)
* If you want to install a number of remote controller at the same place in a vertical line, install them at
regular intervals of 2cm. (It may cause the breakdown of the temperature sensor.)
* Do not install the cable with a distance of 50 m or longer. (This can cause communication error.)
* When installing the cable, check whether the connector between the remote controller and the product is
installed properly. The connector will not be connected when installed in opposite sides.
❏Supply the power after connecting wired remote controller.
When you need to change wired remote controller, switch off the main power and change it.
If the wired remote controller is changed before switching off the main power, the option function of the indoor
unit can't be used. (option function like "slo" fan speed selection)
Installation Method

8Simple Wired Remote Controller
Installation Method
GND
12V
B Y R B Y R
MASTER SLAVE
Signal wire GND
12V
Signal wire
PQRCUCS0C
FAN
SPEED
MODE
TEMP
TEMP
Cooling Heating Auto Dry Fan
Defrost Preheat Out door
Slo
Lo
Med
Hi
Po
RoomTemp
Totalon
CentralRun
PQRCUCS0C
FAN
SPEED
MODE
TEMP
TEMP
Cooling Heating Auto Dry Fan
Defrost Preheat Out door
Slo
Lo
Med
Hi
Po
RoomTemp
Totalon
CentralRun
Group control
1. When installing more than 2 units of air conditioner to one wired remote
controller, please connect as the below picture.
2. When installing more than 2 wired remote controllers to one air conditioner,
please connect as the below picture.
• When installing more than 2 units of wired
remote controller to one air conditioner, set
one wired remote controller as master and
the others all as slaves, as shown in the right
picture.
• Refer to Switch information section on how to
set master/slave.
❈In case of this, you should set the slide
switch of two remote controller as same
value.
Ex) 1. Master Remote controller
- SW_TH : 3
- SW_HI : 2
2. Slave Remote controller
- SW_TH : 3
- SW_HI : 2
❈In case of using the event
communication indoor units please set
the remote controller as Master.
❈In case of using the non-event
communication indoor units please set
the remote controller as Slave.
<When simultaneously connecting
2 sets of wired remote controller>
❈In this case, please use below cable.
- Model Name : PZCWRCG3
❊
Some products can not connect 2 wired remote controllers to one air conditioner.
It depends on the product type. For more detail, refer to the product manual.
GND
GND
12V
Signal wire
MASTER SLAVE
Signal wire
GND
GND
12V
Signal wire
Signal wire
PQRCUCS0C
FAN
SPEED
MODE
TEMP
TEMP
Cooling Heating Auto Dry Fan
Defrost Preheat Out door
Slo
Lo
Med
Hi
Po
RoomTemp
Totalon
CentralRun
PQRCUCS0C
FAN
SPEED
MODE
TEMP
TEMP
Cooling Heating Auto Dry Fan
Defrost Preheat Out door
Slo
Lo
Med
Hi
Po
RoomTemp
Totalon
CentralRun
Indoor units applied event communication Indoor units unapplied event communication

Owner’s & Installation Manual 9
ENGLISH
Necessary functions before using
Out door
Room Temp
Total on
Central Run
Defrost Preheat
PQRCUCA0
FAN
SPEED
MODE
The trial operation is to check the installation status of the product. The temperature will not be controlled during
trial operation. Instead the product will operate in several modes such as cooling, strong wind, comp-on.
* This function might not be available for Multi Product like Multi V system.
1
If you want to set the trial operation mode, press the
mode button and the Fan speed button same time for
three seconds.
2
Then the product will begin the trial operation and the
display will be like as shown on left side picture.
3
If you want to cancel the trial operation mode, just
press the On/Off button.
4
The trail operation will be shut down automatically
after 18 minutes and system will go to the standby
mode.
Trial Operation

Necessary function before using
10 Simple Wired Remote Controller
PQRCUCS0C
FAN
SPEED
MODE
Room Temp
Total on
Central Run
Defrost Preheat Out door
Out door
Room Temp
Total on
Central Run
Defrost Preheat
Room Temp
Total on
Central Run
Defrost Preheat Out door
Out door
Room Temp
Total on
Central Run
Defrost Preheat
<Setting as Celsius> <Setting as Fahrenheit>
TEMP
TEMP
1
If you want to change the temperature unit as the
Celsius or Fahrenheit, press the Temperature control
button( ) and the Fan speed button same time for
three seconds to enter the setting Mode.
2
Press the temperature control button to change the
unit.
Ex) Setting unit as Fahrenheit.
3
After setting, press the Temperature control button( )
and the Fan speed button same time for three seconds
to exit the setting Mode.
The system will automatically release without input
after 30 seconds.
Celsius/Fahrenheit Switching
Indice
Altri manuali LG Telecomando

LG
LG AN-MR18BA Manuale operativo

LG
LG PQRCUSA0 Manuale utente

LG
LG AN-SP700 Manuale operativo

LG
LG PQRCUSA0 Guida rapida

LG
LG Magic Remote AN-MR650 Manuale utente

LG
LG PVRCUSZ0 Guida rapida

LG
LG PQRCVSL0 Guida rapida

LG
LG MR20GA Manuale utente

LG
LG AKB732955 Manuale operativo

LG
LG Magic Remote Manuale operativo

LG
LG AKB730354 Manuale utente

LG
LG PQWRCDF0 Manuale utente

LG
LG AN-PM19BA Manuale operativo

LG
LG MR20PJTR Manuale operativo

LG
LG Magic Remote AN-MR19BA Manuale utente

LG
LG AN-MR650A Manuale utente

LG
LG PREMTTB101 Guida rapida

LG
LG AN-MR18BA Manuale utente

LG
LG MR21GA Manuale operativo

LG
LG PQRCFCS0 Guida rapida