LITEMAX SLD0835 Series Manuale utente

LITEMAX
SLD0835 & SLO0835
Series
Sunlight Readable 8.4” LCD Display
(2nd Edition 7/8/2009 )
All information is subject to change without notice.
Approved by Checked by Prepared by
Ming Hank Jacky
LITEMAX Electronics Inc.
8F-2, No.133, Lane 235, Bau-chiau Rd.,
Shin-dian City, Taipei County, Taiwan R.O.C.
Tel : 886-2-8919-1858
Fax: 886-2-8919-1300
Homepage: http://www.litemax.com.tw
Page 1

RECORD OF REVISION
Version and Date Page Old Description New Description Remark
Page 2

CONTENT
RECORD OF REVISION .................................................................................................. 2
CONTENT......................................................................................................................... 3
INTRODUCTION............................................................................................................... 4
PACKING LIST.................................................................................................................. 4
INSTALLATION................................................................................................................. 4
VIDEO INPUT PIN ASSIGNMENT.................................................................................... 5
THE DISPLAY TIMING...................................................................................................... 6
THE DISPLAY CONTROLS.............................................................................................. 7
THE SCREEN ADJUSTMENT.......................................................................................... 8
QUICK INSTALLATION................................................................................................... 14
TROUBLESHOOTING TIPS........................................................................................... 15
LCD SPECIFICATION..................................................................................................... 16
TECHNICAL DRAWING.................................................................................................. 17
PRODUCT SAFETY PRECAUTIONS............................................................................. 19
Page 3

INTRODUCTION
Welcome to enjoy the fantastic sightseeing world. This new technology will bring you the
whole new feeling about the “monitor”. We show here some of the major advantages of
the LCD monitor. You will really find some other advantages when you use it.
PACKING LIST
After you unpack your LCD Monitor, please make sure that the following items are
included in the carton and in good condition. If you find that any of these items are
damaged or missing, please contact your dealer immediately.
One LCD Monitor
15-pin D-sub Video cable (Option)
AC/DC adapter with 12V DC output (Option)
AC power cord (Option)
Quick installation Guide
INSTALLATION
This analog LCD display does not require any special drivers. Necessary drivers are
supplied by the video card manufacturer and may be found on the diskettes supplied with
the video card that came with your computer. Windows 98/2000/XP drivers for both the
display and the video card are supplied on the Windows 98/2000/XP CD or diskettes.
Unfortunately, Microsoft did not provide a complete listing of the displays on the initial
retail release. You may use the SVGA 800x600 as the display type. The video card
must also be set up correctly in Windows 98/2000/XP and make sure the video output of
the VGA card is on list in Section 6.1 or check your Video Card manual or Windows
98/2000/XP Read me file for further information on Video Card. After the question listed
above is solved, we continue the setup procedure as below.
1. Turn power off both Computer and Display before making any connection.
2. Install Display on the solid horizontal surface such as a table or desk.
3. Connect the power cable and the AC/DC adapter, then connect adapter toe the back
of the LCD monitor.
4. The LCD monitor comes with a 15-pin video cable; you may use this cable for both
IBM PC’s & compatibles and Macintosh.
5. Tighten the screws of the Display cable until the connectors are fastened securely.
6. Switch on power to the Computer system, then to the monitor.
Page 4

VIDEO INPUT PIN ASSIGNMENT
This section describes the pin assignment of the LCD’s video connector. It is called
15pin Mini D-sub connector.
110 6
1
1
5
1
5
Pin No. Signal Connector
1 Red Video Signal
2 Green Video Signal
3 Blue Video Signal
4 N.C.
5 Ground
6 Ground for red video signal
7 Ground for green video signal
8 Ground for blue video signal
9 N.C.
10 Ground
11 N.C.
12 DDC data
13 Horizontal sync signal
14 Vertical sync signal
15 DDC clock
Page 5

THE DISPLAY TIMING
The following table displays optimum quality modes that the LCD monitor provides. If the
other video modes are used, the monitor will stop working or display a poor quality picture.
TIMMING
MODE RESOLUTION
640x480@60Hz
640x480@72Hz
VGA
640x480@75Hz
800x600@56Hz
800x600@60Hz
800x600@72Hz
SVGA
800x600@75Hz
1024x768@60Hz
1024x768@70Hz
XGA
1024x768@75Hz
1280x1024@60Hz
1280x1024@70Hz
SXGA
1280x1024@75Hz
WXGA 1366x768@60Hz
WSXGA+ 1680x1050@60Hz
1400x1050@60Hz(Pixel f 101.000MHz)
1400x1050@60Hz(Pixel f 121.750MHz)
SXGA+
1400x1050@75Hz
1600X1200@60Hz
1600x1200@65Hz
UXGA
1600x1200@75Hz
Page 6

THE DISPLAY CONTROLS
Membrane Control Button
POWER SWITCH: Pushing the power switch will turn the monitor on. Pushing it again
to turn the monitor off.
Power LED: Power ON-Green / Power off-No.
Up Key >: Increase item number or value of the selected item.
Menu Key: Enter to the OSD adjustment menu. It also used for go back to previous
menu for sub-menu, and the change data don’t save to memory.
Down Key <: Decrease item number or item value when OSD is on.
When OSD is off, it is hot key for input switch between VGA,AV, and S-video.
Screen Adjustment Operation Procedure
1. Entering the screen adjustment
The setting switches are normally at stand-by. Push the Menu Key once to display
the main menu of the screen adjustment. The adjustable items will be displayed in
the main menu.
2. Entering the settings
Use the Down Key < and Up Key > buttons to select the desired setting icon and
push the SELECT button to enter sub-menu.
3. Change the settings
After the sub-menu appears, use the Down Key < and Up Key > buttons to change
the setting values.
4. Save
After finishing the adjustment, push the SELECT button to memorize the setting.
5. Return & Exit the main menu
Exit the screen adjustment; push the “MENU” button. When no operation is done
around 30 sec (default OSD timeout), it goes back to the stand-by mode and no
more switching is accepted except MENU to restart the setting.
Page 7

THE SCREEN ADJUSTMENT
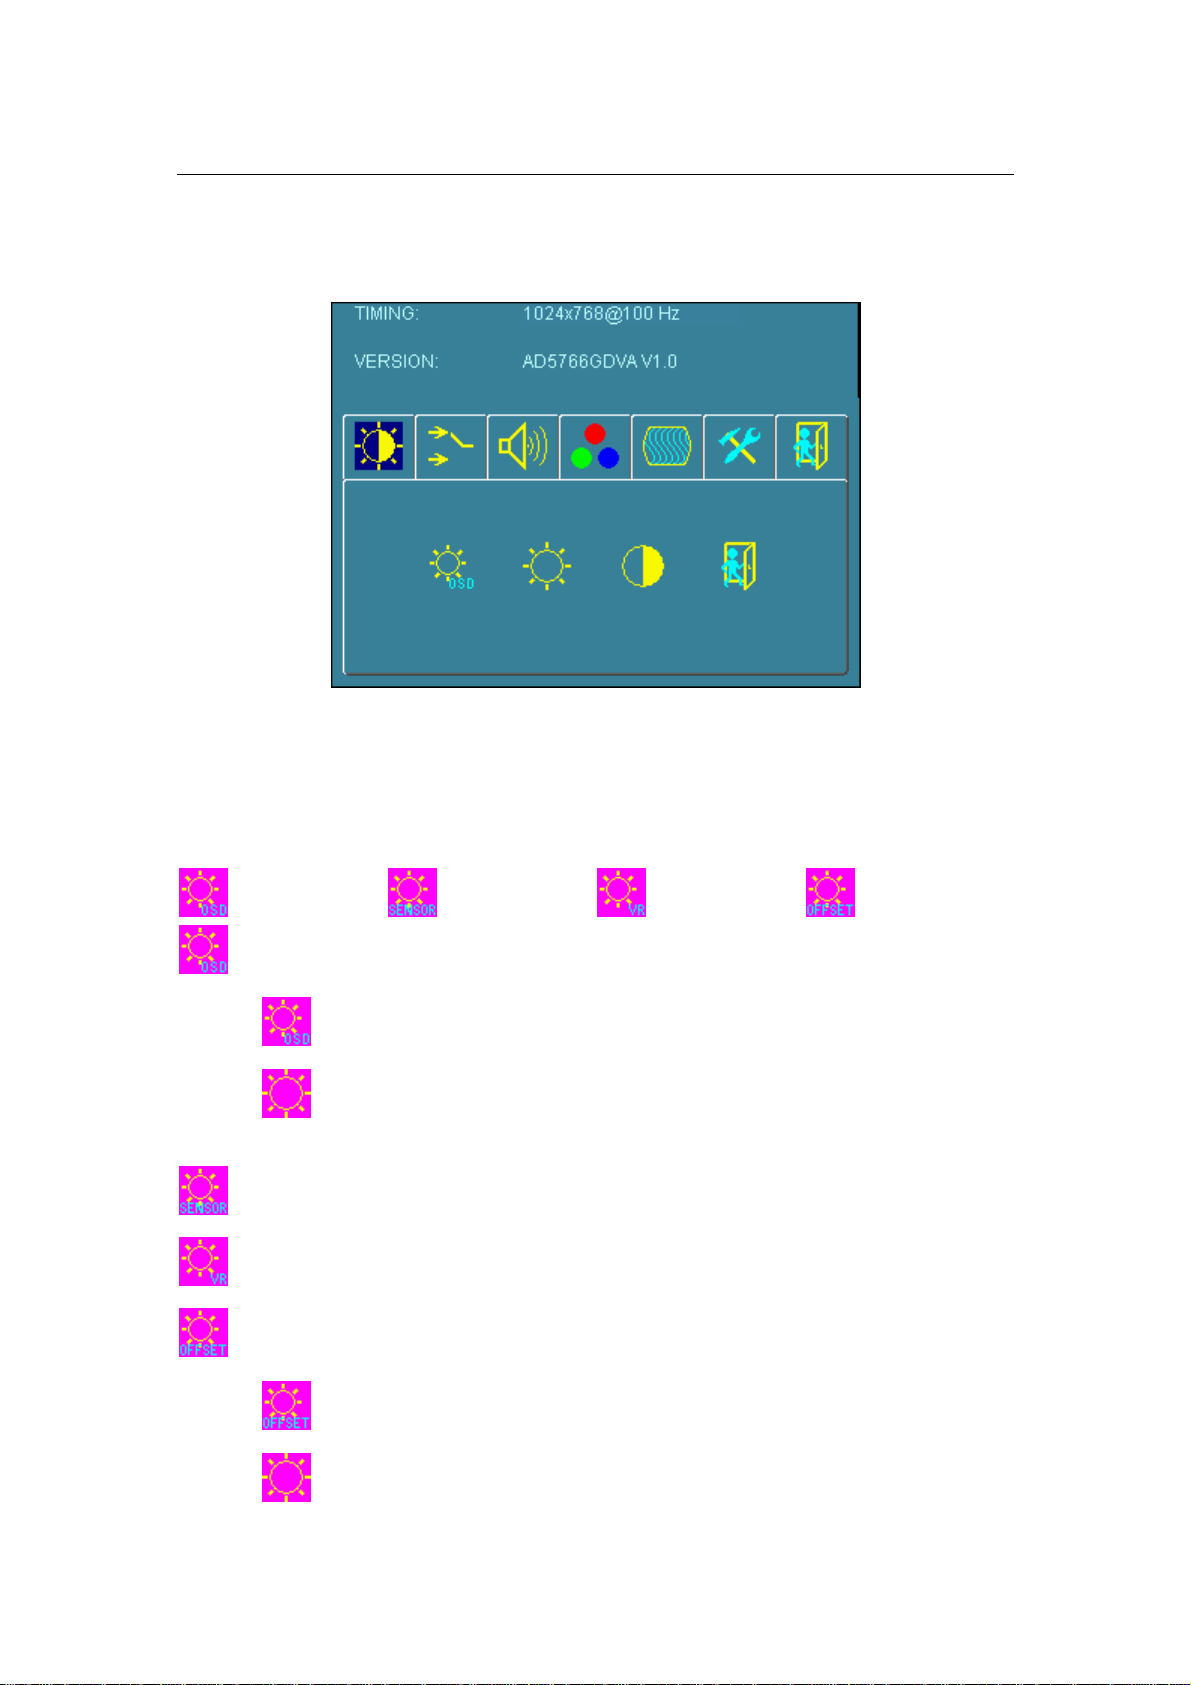
By pressing the “menu” button, you will see the below picture. Across from timing you will
see resolution, frequency, and V-frequency of the panel. Version shows the firmware
control version. These cannot be altered by the user.
There are 7 sub menus within the OSD user interface: Brightness, Signal Select, Sound,
Color, Image, Tools, and Exit.
When you press the “menu” button, you enter the “Brightness” sub directory. In this
directory, you will see 4 selections:

press ’’menu’’ press ’’menu press ’’menu’’ press ’’menu’’
OSD Brightness:
press ’’right’’ key
Press the “menu” once, to adjust the brightness. Press “left” to dim
down the brightness to “0”, press “right” to increase the brightness to
“100”
Ambient light sensor: Press this Icon for auto dimming. (OPTION) To use this
option, the Litemax ambient light sensor needs to have been installed
Potentiometer: Navigate to this icon to adjust the VR function. (OPTION)
Ambient light sensor with OSD offset: To set minimum brightness level
based on ambient light.
Press ’’right’’ key
Press ’menu’’ once, to adjust minimum luminance to fit your application
(OPTION)
Page 8

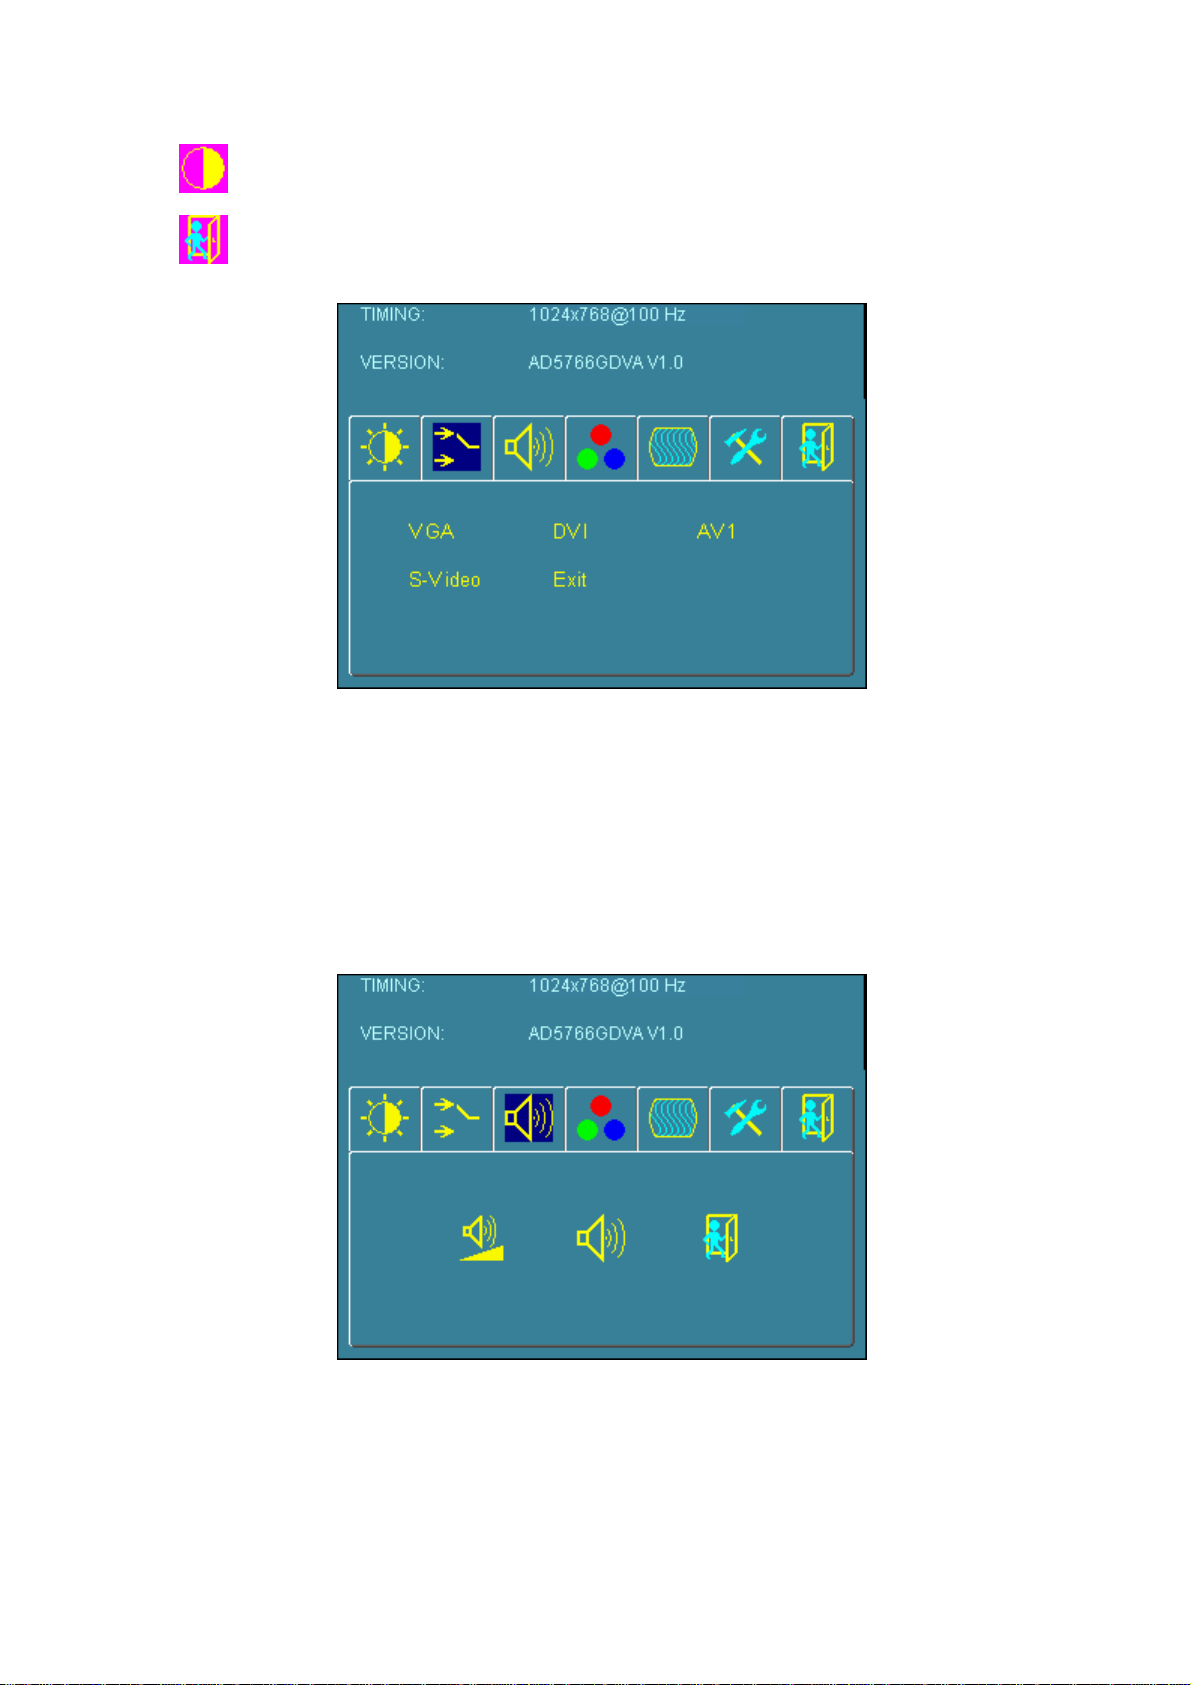
Contrast: Press “menu” and “right” buttons to adjust the contrast from “0” to
“100”. To adjust from “100” to “0”, press “menu” and the “left” buttons.
Exit: You can exit this sub menu back to normal screen.
VGA
Analog: RGB/VGA input
DVI
Digital: DVI input
AV1
AV1: Composite input
S-Video
S-Video: S-Video input
Exit
Exit: You can exit this sub menu back to the beginning
Page 9

There are 3 options for “Sound” sub page.
Audio Volume: Audio volume adjustment.
/UnMute/Mute: You can mute the speaker by pressing this option.
Exit: back to the beginning menu.
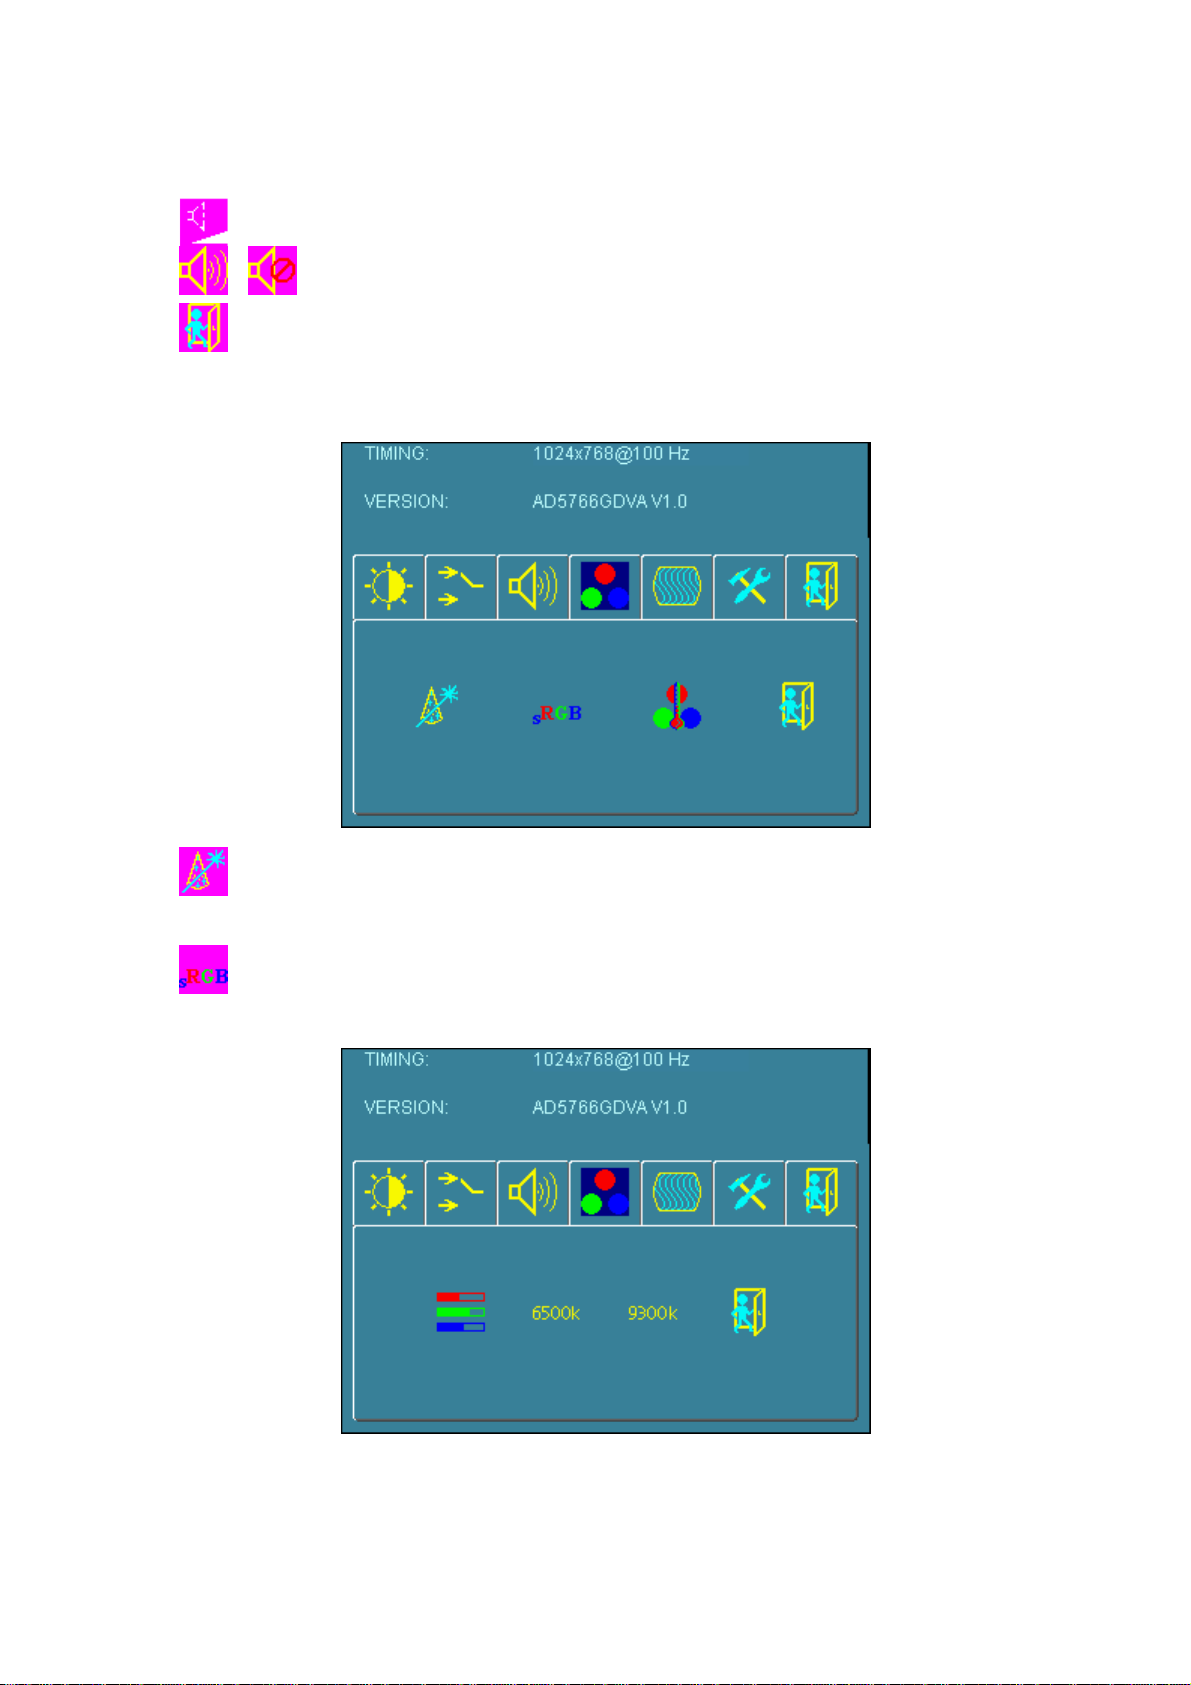
Auto Color: By navigating over to the “Auto Color” option, optimal color
performance is invoked.
SRGB: Windows standard color setting
Page 10
Questo manuale è adatto per i seguenti modelli
1
Indice
Altri manuali LITEMAX Monitor

LITEMAX
LITEMAX SSF2825 V2 Manuale utente

LITEMAX
LITEMAX SLO1941 Manuale utente

LITEMAX
LITEMAX SSD1505 V2 Manuale utente

LITEMAX
LITEMAX SSF 0822 Manuale utente

LITEMAX
LITEMAX ALF/ALH1548 Manuale utente

LITEMAX
LITEMAX SLO1742 Manuale utente

LITEMAX
LITEMAX SSD1505 Manuale utente

LITEMAX
LITEMAX DLF1858-A Manuale utente

LITEMAX
LITEMAX SLD1968 V1 Manuale utente

LITEMAX
LITEMAX SLD2415 Manuale utente