LRS T9100 Manuale utente

Installation, Warranty and Service Information
Long Range Systems, In .
4550 Excel Parkway, Suite 200
Addison, TX 75001
800.437.499 •www.pager.net
T9100 &
Cancel Panel
Paging System Transmitter
USER MANUAL

Table Of Contents
The T9100 . . . . . . . . . . . . . . . . . . . . . . . . . . . . . . . . . . . . . . . . . . . . . . . . . . . . . . . . . . . . . . . . . . . . 3
Installation . . . . . . . . . . . . . . . . . . . . . . . . . . . . . . . . . . . . . . . . . . . . . . . . . . . . . . . . . . . . . . . . . . . 3
Hardware Provided . . . . . . . . . . . . . . . . . . . . . . . . . . . . . . . . . . . . . . . . . . . . . . . . . . . 3
Optional Hardware . . . . . . . . . . . . . . . . . . . . . . . . . . . . . . . . . . . . . . . . . . . . . . . . . . . . 3
Hardware Setup Pro edure . . . . . . . . . . . . . . . . . . . . . . . . . . . . . . . . . . . . . . . . . . . . . 3
Overview of T9100 . . . . . . . . . . . . . . . . . . . . . . . . . . . . . . . . . . . . . . . . . . . . . . . . . . . . . . . . . . . . . 7
Keypad . . . . . . . . . . . . . . . . . . . . . . . . . . . . . . . . . . . . . . . . . . . . . . . . . . . . . . . . . . . . . 7
Antenna . . . . . . . . . . . . . . . . . . . . . . . . . . . . . . . . . . . . . . . . . . . . . . . . . . . . . . . . . . . . 8
Rest Terminals . . . . . . . . . . . . . . . . . . . . . . . . . . . . . . . . . . . . . . . . . . . . . . . . . . . . . . . 8
Status LED . . . . . . . . . . . . . . . . . . . . . . . . . . . . . . . . . . . . . . . . . . . . . . . . . . . . . . . . . . 8
System Spe ifi ations . . . . . . . . . . . . . . . . . . . . . . . . . . . . . . . . . . . . . . . . . . . . . . . . . 8
Using the T9100 . . . . . . . . . . . . . . . . . . . . . . . . . . . . . . . . . . . . . . . . . . . . . . . . . . . . . . . . . . . . . . . 9
Time and Date . . . . . . . . . . . . . . . . . . . . . . . . . . . . . . . . . . . . . . . . . . . . . . . . . . . . . . . 9
Paging . . . . . . . . . . . . . . . . . . . . . . . . . . . . . . . . . . . . . . . . . . . . . . . . . . . . . . . . . . . . . . 9
Can el Page . . . . . . . . . . . . . . . . . . . . . . . . . . . . . . . . . . . . . . . . . . . . . . . . . . . . . . . . . 9
User Preferences . . . . . . . . . . . . . . . . . . . . . . . . . . . . . . . . . . . . . . . . . . . . . . . . . . . . . . . . . . . . . 10
Display Current Settings . . . . . . . . . . . . . . . . . . . . . . . . . . . . . . . . . . . . . . . . . . . . . . . 10
Antitheft . . . . . . . . . . . . . . . . . . . . . . . . . . . . . . . . . . . . . . . . . . . . . . . . . . . . . . . . . . . . 10
Display Clo k . . . . . . . . . . . . . . . . . . . . . . . . . . . . . . . . . . . . . . . . . . . . . . . . . . . . . . . . 11
Vibe Level . . . . . . . . . . . . . . . . . . . . . . . . . . . . . . . . . . . . . . . . . . . . . . . . . . . . . . . . . . . 11
Keytone . . . . . . . . . . . . . . . . . . . . . . . . . . . . . . . . . . . . . . . . . . . . . . . . . . . . . . . . . . . . . 11
Preset Message . . . . . . . . . . . . . . . . . . . . . . . . . . . . . . . . . . . . . . . . . . . . . . . . . . . . . . 12
Repaging . . . . . . . . . . . . . . . . . . . . . . . . . . . . . . . . . . . . . . . . . . . . . . . . . . . . . . . . . . . . 13
Repeater Delay . . . . . . . . . . . . . . . . . . . . . . . . . . . . . . . . . . . . . . . . . . . . . . . . . . . . . . . 13
Duty Pager . . . . . . . . . . . . . . . . . . . . . . . . . . . . . . . . . . . . . . . . . . . . . . . . . . . . . . . . . . 13
Restaurant ID . . . . . . . . . . . . . . . . . . . . . . . . . . . . . . . . . . . . . . . . . . . . . . . . . . . . . . . . 13
Station ID . . . . . . . . . . . . . . . . . . . . . . . . . . . . . . . . . . . . . . . . . . . . . . . . . . . . . . . . . . . 14
POCSAG (FM) Start . . . . . . . . . . . . . . . . . . . . . . . . . . . . . . . . . . . . . . . . . . . . . . . . . . . 14
Edit Manager Pager Number . . . . . . . . . . . . . . . . . . . . . . . . . . . . . . . . . . . . . . . . . . . 14
Reset to Fa tory Default . . . . . . . . . . . . . . . . . . . . . . . . . . . . . . . . . . . . . . . . . . . . . . . 14
Server Statisti s . . . . . . . . . . . . . . . . . . . . . . . . . . . . . . . . . . . . . . . . . . . . . . . . . . . . . . 14
Range Test . . . . . . . . . . . . . . . . . . . . . . . . . . . . . . . . . . . . . . . . . . . . . . . . . . . . . . . . . . 16
Find ID . . . . . . . . . . . . . . . . . . . . . . . . . . . . . . . . . . . . . . . . . . . . . . . . . . . . . . . . . . . . . . 16
Three Digit POCSAG Paging . . . . . . . . . . . . . . . . . . . . . . . . . . . . . . . . . . . . . . . . . . . . 16
Pager Programming . . . . . . . . . . . . . . . . . . . . . . . . . . . . . . . . . . . . . . . . . . . . . . . . . . . . . . . . . . . 17
Long Range Systems 1T9100 User Manual

Long Range Systems 2T9100 User Manual
T9100 Cancel Panel . . . . . . . . . . . . . . . . . . . . . . . . . . . . . . . . . . . . . . . . . . . . . . . . . . . . . . . . . . . 18
Overview of T9100 Can el Panel . . . . . . . . . . . . . . . . . . . . . . . . . . . . . . . . . . . . . . . . 18
Keypad . . . . . . . . . . . . . . . . . . . . . . . . . . . . . . . . . . . . . . . . . . . . . . . . . . . . . . . . . . . . . 18
Using the T9100 Cancel Panel . . . . . . . . . . . . . . . . . . . . . . . . . . . . . . . . . . . . . . . . . . . . . . . . . . 19
Paging . . . . . . . . . . . . . . . . . . . . . . . . . . . . . . . . . . . . . . . . . . . . . . . . . . . . . . . . . . . . . . 19
Can el Page . . . . . . . . . . . . . . . . . . . . . . . . . . . . . . . . . . . . . . . . . . . . . . . . . . . . . . . . . 19
User Preferences . . . . . . . . . . . . . . . . . . . . . . . . . . . . . . . . . . . . . . . . . . . . . . . . . . . . . . . . . . . . . 20
Paging from Can el Panel . . . . . . . . . . . . . . . . . . . . . . . . . . . . . . . . . . . . . . . . . . . . . . 20
Associating the T9100 Cancel Panel to T9100 . . . . . . . . . . . . . . . . . . . . . . . . . . . . . . . . . . . . . 21
Changing Transmitters as 2.4 GHz Master . . . . . . . . . . . . . . . . . . . . . . . . . . . . . . . . . . . . . . . . 21
Service Questions and Answers . . . . . . . . . . . . . . . . . . . . . . . . . . . . . . . . . . . . . . . . . . . . . . . . 22
LRS PAGERS AVAILABLE FOR THE T9100 . . . . . . . . . . . . . . . . . . . . . . . . . . . . . . . . . . . . . . . . . 23
USING THE SP . . . . . . . . . . . . . . . . . . . . . . . . . . . . . . . . . . . . . . . . . . . . . . . . . . . . . . . . . . . . . . . 23
Charging . . . . . . . . . . . . . . . . . . . . . . . . . . . . . . . . . . . . . . . . . . . . . . . . . . . . . . . . . . . . 23
Menus . . . . . . . . . . . . . . . . . . . . . . . . . . . . . . . . . . . . . . . . . . . . . . . . . . . . . . . . . . . . . . 23
Settings . . . . . . . . . . . . . . . . . . . . . . . . . . . . . . . . . . . . . . . . . . . . . . . . . . . . . . . . . . . . . 25
Messages . . . . . . . . . . . . . . . . . . . . . . . . . . . . . . . . . . . . . . . . . . . . . . . . . . . . . . . . . . . 25
Time . . . . . . . . . . . . . . . . . . . . . . . . . . . . . . . . . . . . . . . . . . . . . . . . . . . . . . . . . . . . . . . . 25
Reprogramming and Reset . . . . . . . . . . . . . . . . . . . . . . . . . . . . . . . . . . . . . . . . . . . . . 25
USING THE LRS ALPHA E467 . . . . . . . . . . . . . . . . . . . . . . . . . . . . . . . . . . . . . . . . . . . . . . . . . . . 26
Menus . . . . . . . . . . . . . . . . . . . . . . . . . . . . . . . . . . . . . . . . . . . . . . . . . . . . . . . . . . . . . . 26
Power On/Off . . . . . . . . . . . . . . . . . . . . . . . . . . . . . . . . . . . . . . . . . . . . . . . . . . . . . . . . 26
Read Message . . . . . . . . . . . . . . . . . . . . . . . . . . . . . . . . . . . . . . . . . . . . . . . . . . . . . . . 27
Delete Messages . . . . . . . . . . . . . . . . . . . . . . . . . . . . . . . . . . . . . . . . . . . . . . . . . . . . . 27
Time/Date Set . . . . . . . . . . . . . . . . . . . . . . . . . . . . . . . . . . . . . . . . . . . . . . . . . . . . . . . . 27
Set Contrast . . . . . . . . . . . . . . . . . . . . . . . . . . . . . . . . . . . . . . . . . . . . . . . . . . . . . . . . . 27
Auto ON/OFF . . . . . . . . . . . . . . . . . . . . . . . . . . . . . . . . . . . . . . . . . . . . . . . . . . . . . . . . 27
Set Keytone On/Off . . . . . . . . . . . . . . . . . . . . . . . . . . . . . . . . . . . . . . . . . . . . . . . . . . . 27
Sele t Alert . . . . . . . . . . . . . . . . . . . . . . . . . . . . . . . . . . . . . . . . . . . . . . . . . . . . . . . . . . 28
USING THE STAR PAGER . . . . . . . . . . . . . . . . . . . . . . . . . . . . . . . . . . . . . . . . . . . . . . . . . . . . . . . 29
Charging . . . . . . . . . . . . . . . . . . . . . . . . . . . . . . . . . . . . . . . . . . . . . . . . . . . . . . . . . . . . 29
Messaging . . . . . . . . . . . . . . . . . . . . . . . . . . . . . . . . . . . . . . . . . . . . . . . . . . . . . . . . . . 29
Cleaning & Charging Instructions for LRS Paging Equipment . . . . . . . . . . . . . . . . . . . . . . 30
Warranty . . . . . . . . . . . . . . . . . . . . . . . . . . . . . . . . . . . . . . . . . . . . . . . . . . . . . . . . . . . . . . . . . . . . 31
THE T9100 Installation:
Hardware Provided
Ea h transmitter kit ontains the transmitter, Instru tion Booklet, two antenna, one 9VAC 1.5A power adap-
tor, one Staff Name board, and four mounting bra ket kits.
Optional Hardware
The T9100 and T9100 Can el Panel have the ability to print a server report to a POS Printer. Conta t LRS if
you wish to pur hase a printer.
Hardware Setup Procedure
1. Remove all items from their pa kaging.
2. Lo ate the silver onne tor on the top of the transmitter. Twist the antenna (about 3” long, BNC,
silver bottom) onto the onne tor.
3. Lo ate the gold onne tor on the top of the transmitter. Twist the antenna (about 4” long, SMA,
bends at right angle) onto the gold onne tor.
Note: Both antennas must be atta hed before turning on transmitter. Do not remove either an-
tenna at any time due to risk of damage.
4. Mount the power supply in onvenient lo ation with a ess to 110V power.
Mounting the Transmitter
The T9100 is designed to be mounted in various ways to a ommodate the kit hen environment: to a hori-
zontal surfa e (i.e. table, ounter, shelf), to a verti al surfa e, or hanging to a wall or stand.
Caution: Mounting with the antenna near any large metal objects will degrade the operating range.
To pla e on a wall or stand, lo ate the four slots on the mounting plate. Then align four wall an hors (5mm
diameter) into the wall to the mounting plate.
Long Range Systems 3T9100 User Manual
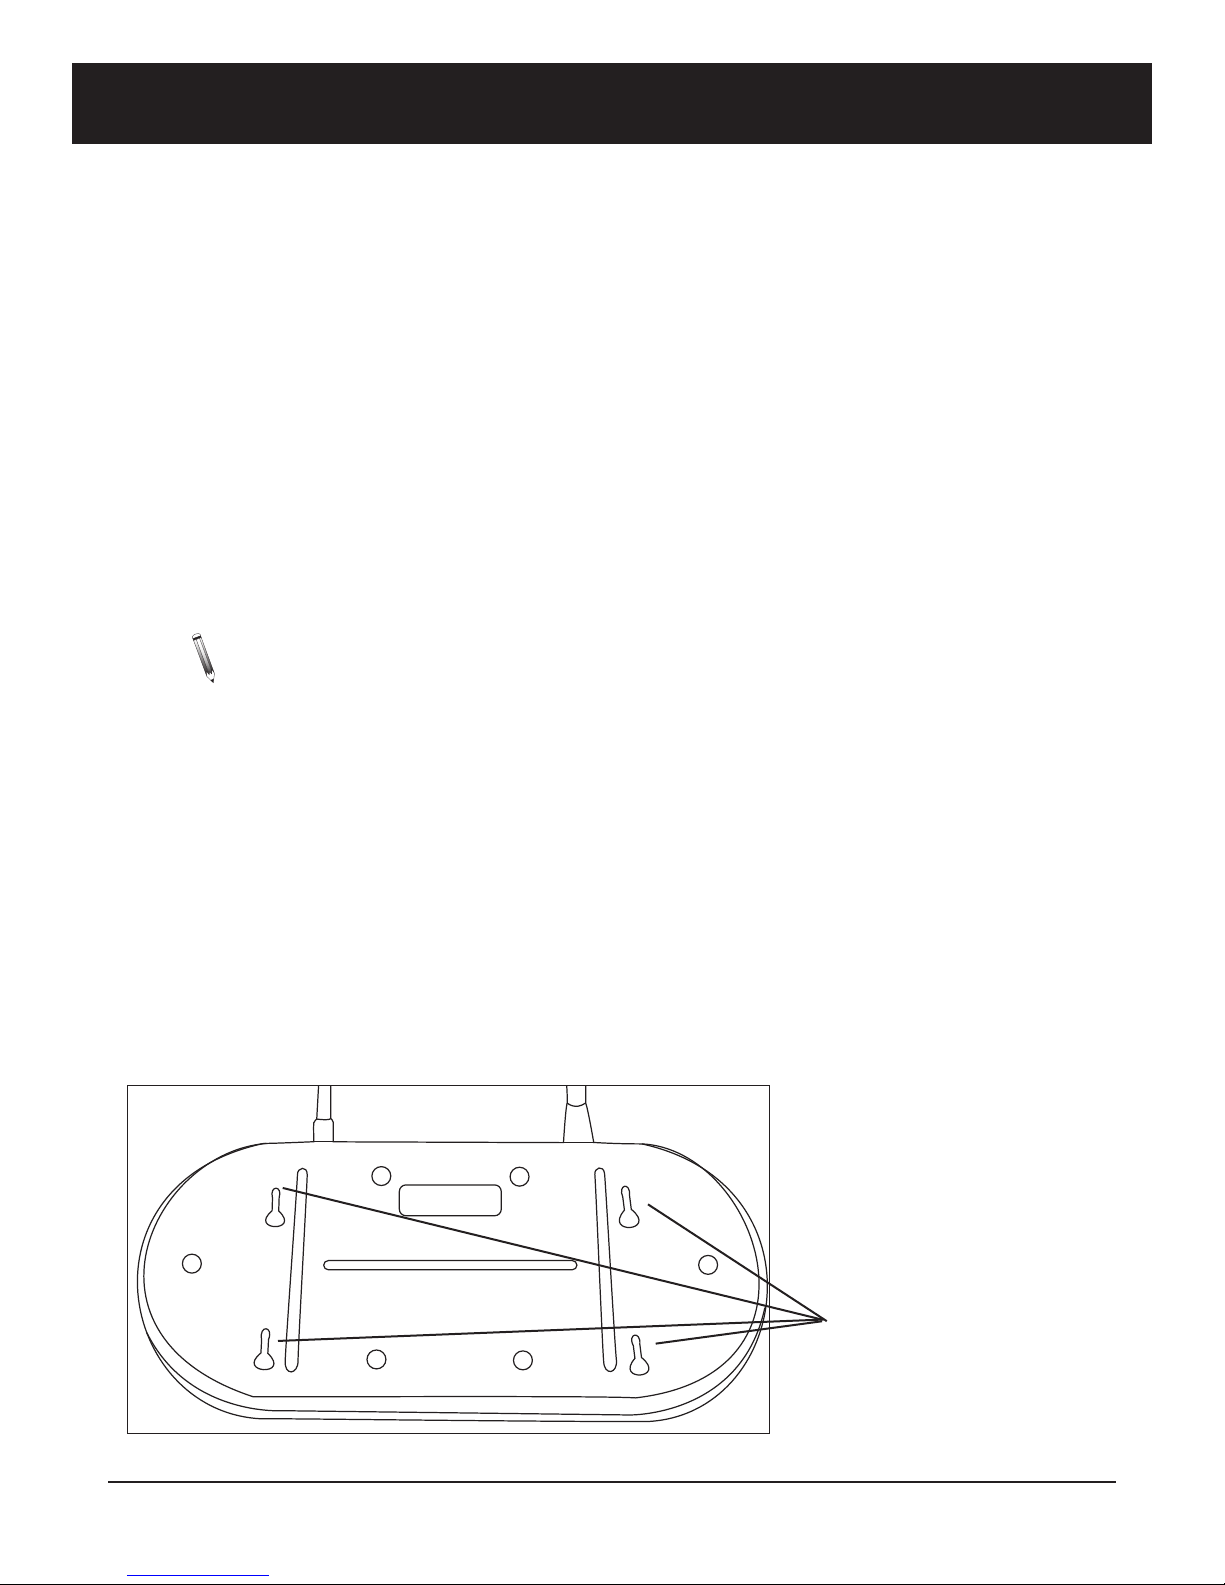
Panel and Wall Mount
Mounting Holes
For mounting to surfa es, pla e the mounting
bra kets into the aptive nuts for either horizontal
or verti al mounting. There are two sets of 4 ap-
tive nuts for mounting to horizontal surfa es, and
one set of aptive nuts for mounting to verti al
surfa es.
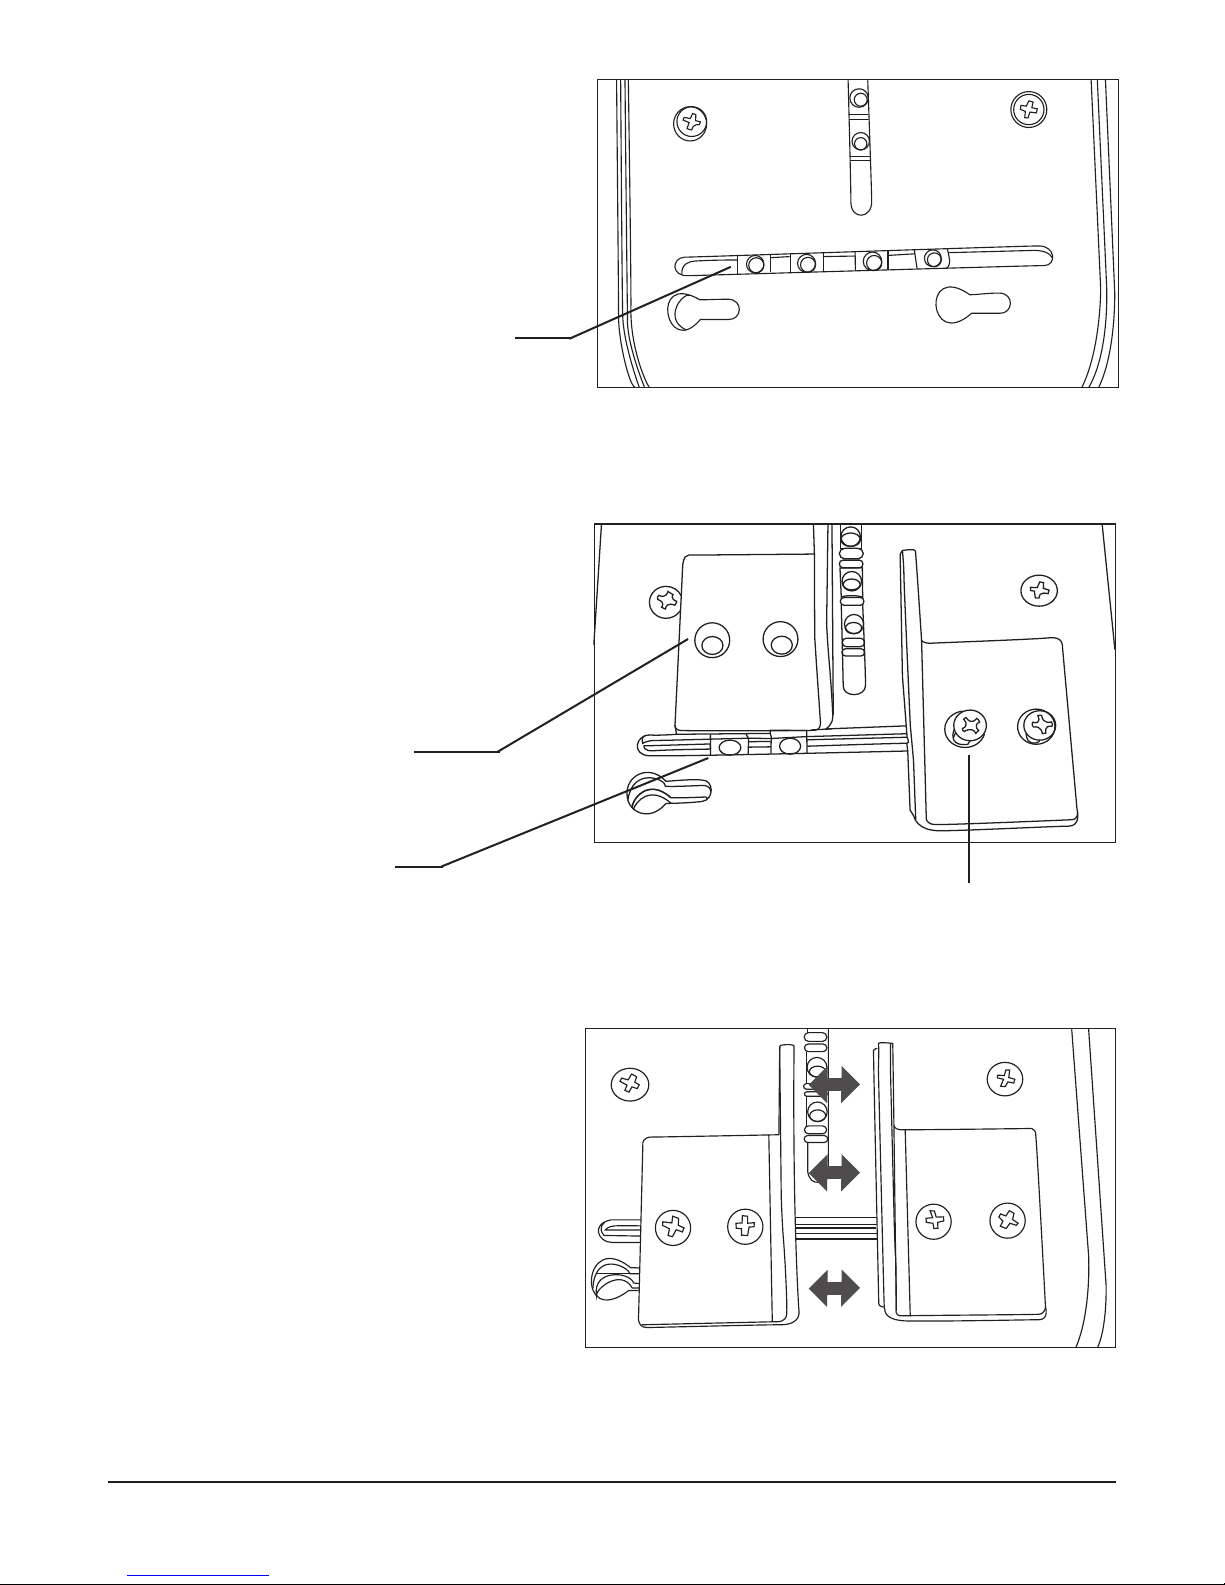
To attach the clamps:
1. Align the mounting nuts to the lamps.
2. Use the #10-32 x 3/8” s rews to hold
the lamps. Do not fully tighten
s rews.
3. Adjust the distan e between lamps
until fits to the mounting surfa e.
4. Tighten s rews.
Long Range Systems 4T9100 User Manual
Captive Nuts
Clamp
Captive Nuts
Screws
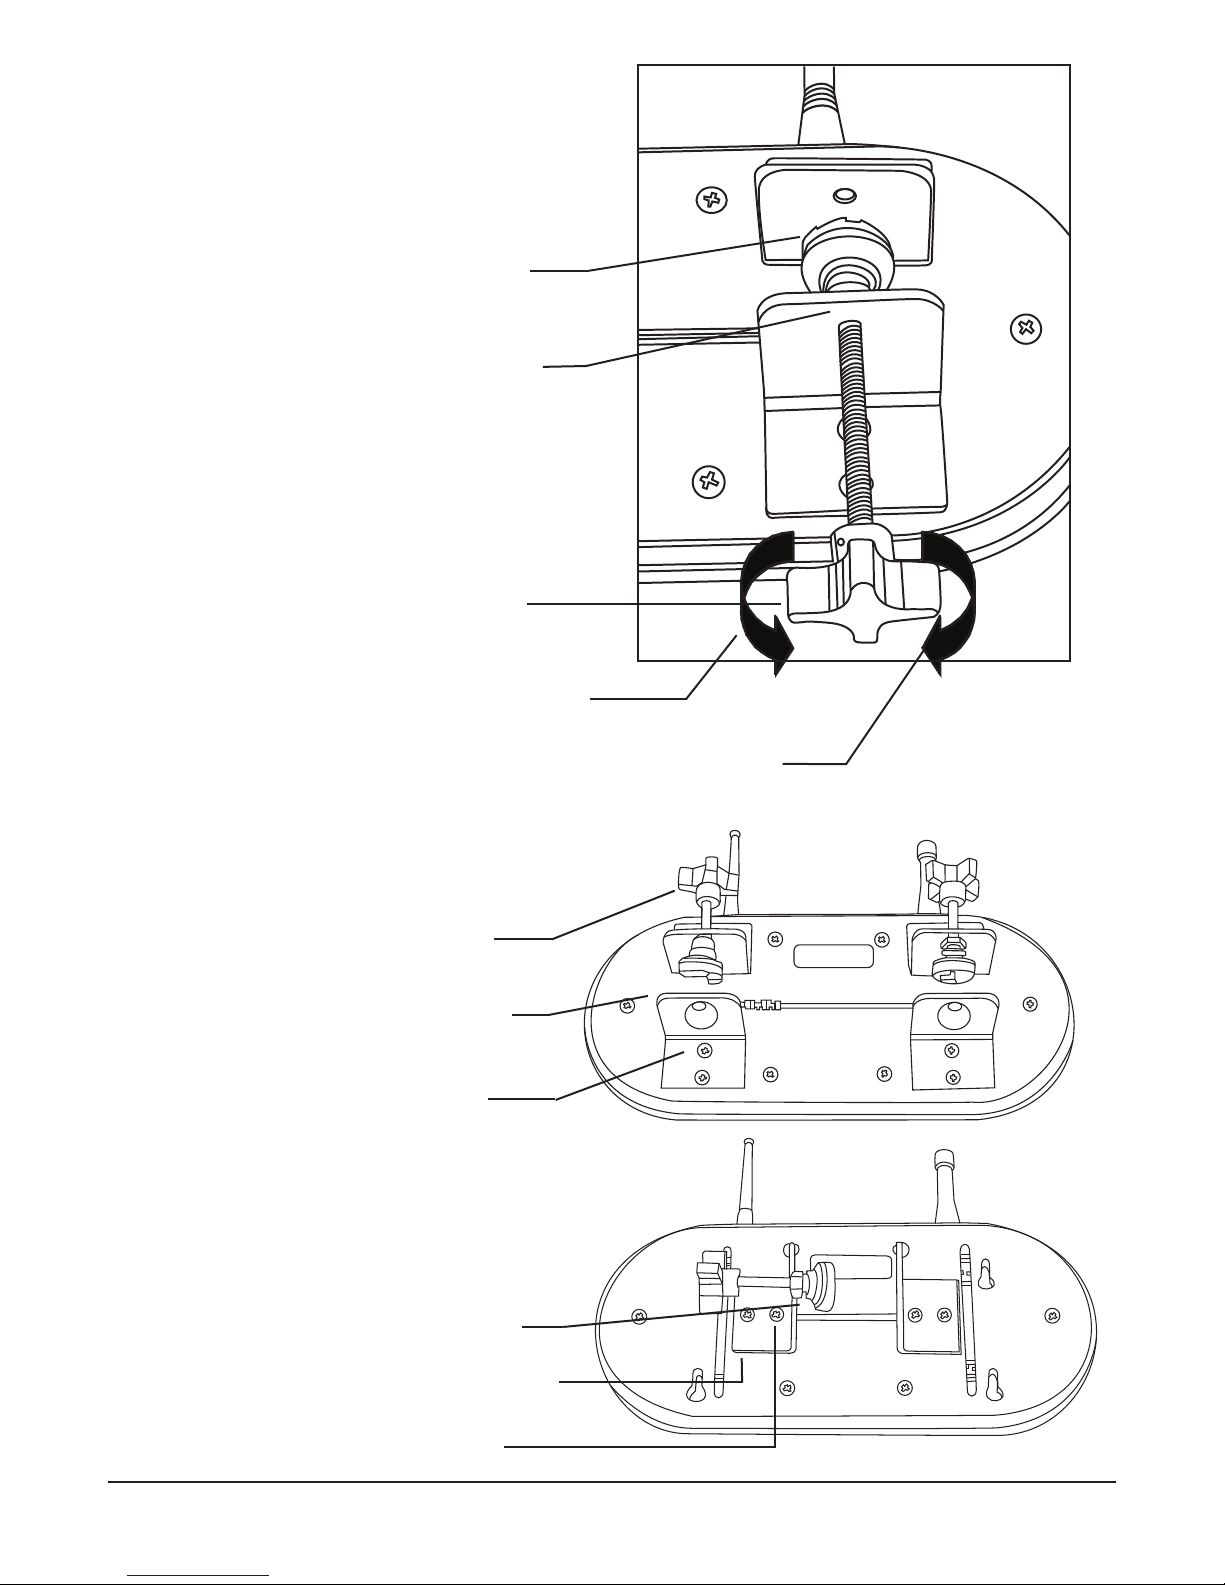
5. Pla e the thumbs rew into the lamp op-
posite the one with the foam pad.
6. Atta h the foot of the thumbs rew.
7. Adjust position of thumbs rew and tighten
to hold the transmitter in pla e.
Be ause the thumbs rews and bra kets an be
mounted in many ways, they an be adapted to
most lo ations is possible.
Horizontal Mount
Vertical Mount
Long Range Systems T9100 User Manual
Clamp with
Foam Pad
Thumbscrew
Foot
Thumbscrew
Turn clockwise
to tighten
Turn counter-
clockwise to
loosen
Thumbscrew
Mounting
Bracket
Mounting
Screws
Thumbscrew
Mounting
Bracket
Mounting
Screws

Long Range Systems 6T9100 User Manual
Power Connection
1. Plug the power supply into a standard 110V outlet and the barrel onne tor end into the ja k on
the side of the transmitter.
2. Upon ompletion of the setup, make sure pagers are fully harged.
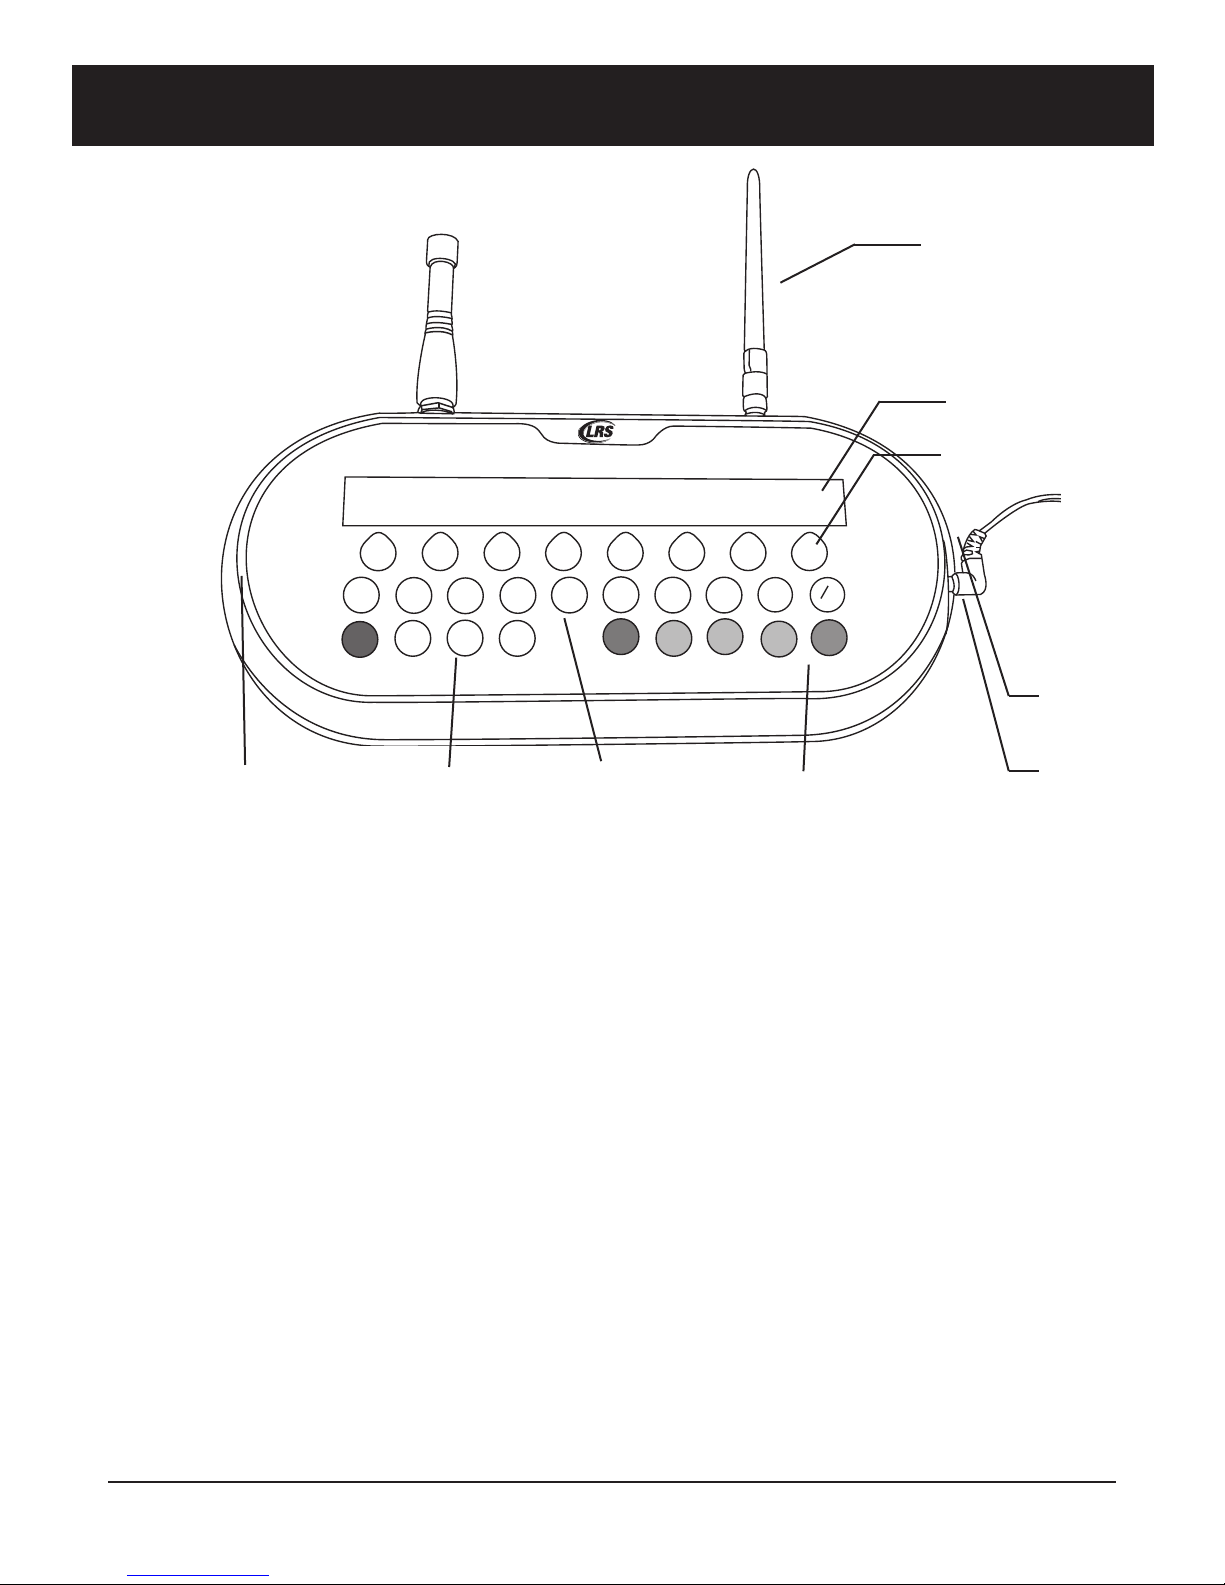
Overview of T9100
Keypad
Function Keys
The fun tion keys are lo ated along the bottom row of the T9100.
- M1 & M2 used to page and program Manager Pagers.
- 86 “All Call” button used to page all pagers.
- CLR used to lear an entry or to ba k up one menu level.
- PROG press on e to program pagers, press a se ond time to a ess the menu fun tions.
- ENT used to enter fun tions.
Vibration Keys
V1, V2 and V3 sele t the number of vibrations a pager will respond with. This button is pressed before pag-
ing a pager. Sends message 1, 2 or 3 to Alpha pagers.
Number Keys
Number keys 1 through 10 lo ated along the enter row. Number 10 is also 0 when Programming, using the
Menus, or paging pagers greater than 10.
1
234
5
67
89
10
M1
M2
86
CLR
PROG
ENT
V1V2
V3
www.pager.net
0
CANCEL PANEL
Long Range Systems 7T9100 User Manual
Antenna
Number Keys
Status LED
Power
Supply
Function Keys Vibration Keys
Reset Terminals
Cancel Keys
Printer
Port

Long Range Systems 8T9100 User Manual
Cancel Keys
The row of keys lo ated below the display. These keys will an el a all to the pager number shown on the
display immediately above the respe tive key. The Can el Keys also are used during menu sele tion.
Antenna
The T9100 utilizes 2 antennas when transmitting.
A UHF antenna, lo ated to the user’s left, is used to ommuni ate with the LRS pagers.
A 2.4 GHz antenna, lo ated to the user’s right, ommuni ates with the T9100 Can el Panel.
Reset Terminals
The Reset Terminals are lo ated to the user’s left side on the transmitter. These are used to reset a pager for
programming.
Status LED
This LED will light green to indi ate that the T9100 is sending information to the pagers or T9100 Can el
Panel.
System Specifications
Notice: Operation is subje t to the following:
• This devi e may not ause interferen e
• This devi e will a ept any interferen e in luding interferen e that may ause undesired oper-
ation of the unit.
Required Voltage: One 110/220V outlet for the T9100 transmitter
Operating Frequen y: 420-470 MHz
Radiated Power: < 4900 mi ro-volts/meter
Operating Range: Dependent upon pagers used

Using the T9100
Time and Date
Initial Power Up
During power up, to enter the time and date:
• At [enter time], enter the hh mm (hour, minute) using the number keys, and then press ENT.
• Press 2 for AM or 10 for PM.
• At [date], enter the mm dd yy (month, day, year) using the number keys, and then press ENT.
Clock Menu
The time and date an also be set from the Clo k menu by:
• Press PROG – PROG – 1 – ENT.
• Press the button under set.
• At [enter time], enter the hh mm (hour, minute) using the number keys, and then press ENT.
• Press the button under AM or PM.
• At [date], enter the mm dd yy (month, day, year) using the number keys, and then press ENT.
• If done, press Yes (button under Yes), if not, press No (button under No.)
Note: The transmitter will use a default sele tion of “Yes” after 30 se onds of ina tivity.)
Send Time
This feature will automati ally send the urrent time and date to the pagers every 15 minutes. The default
setting is OFF.
To enable:
• Press PROG – PROG – 1 – ENT.
• Press button under Send.
• At [Auto] sele t button under ON.
• If done, sele t Yes (button under Yes), if not, sele t No (button under No.)
To disable:
• Press PROG – PROG – 1 – ENT.
• Press button under Send.
• At [Auto] Press sele t button under OFF.
• If done, sele t Yes (button under Yes), if not, sele t No (button under No.)
Paging
To page pagers 1 through 99, enter the 2 digit pager number using the number keys. The 10 key also is used
as the 0 key.
All Call
If all staff pagers need to be alled at on e, press the 86 key.
Manager Pagers
To page the managers, press the M1 for the #1 manager pager or M2 for the #2 manager pager.
Cancel Page
To lear/ an el a pager to the server, press the Can el Key under the pager number.
Long Range Systems 9T9100 User Manual
Questo manuale è adatto per i seguenti modelli
1
Indice
Altri manuali LRS Trasmettitore

LRS
LRS T9601 Manuale utente

LRS
LRS T7400A Manuale utente

LRS
LRS T9601 Manuale utente

LRS
LRS Butler II TX-1605-5 Manuale del proprietario

LRS
LRS Freedom TX-7470 Manuale utente

LRS
LRS T7400A Manuale utente

LRS
LRS T7470 Manuale utente

LRS
LRS TX-7471-C232 Manuale utente

LRS
LRS T7400A Manuale utente

LRS
LRS TX-7471-C232 Manuale utente

LRS
LRS T9550 LCKG Manuale utente

LRS
LRS CurbAlert Manuale

LRS
LRS T9601 Manuale utente

LRS
LRS Table Genie Scheda tecnica

LRS
LRS TX-9601 Manuale utente

LRS
LRS TX-7470-C232 Manuale utente

LRS
LRS T7450A Manuale utente

LRS
LRS Butler XP Istruzioni operative

LRS
LRS T7400A Manuale utente

LRS
LRS Freedom T7460 Manuale utente


