Magewell USB Fusion Manuale utente


03 Product Overview
05 Getting to Know USB Fusion
09 Getting Started
09
Connecting Devices
14
Connecting to a Third-party Software
16
Producing a Presentation
18 App Tutorials
24 App Guide
25
Downloading the USB Fusion App
25
Connecting to a USB Fusion Device
27
Creating a Presentation
42
Creating Background Music
47
Producing a Presentation
66
Controlling Audio
70
Recording and Taking Screenshots
74
Others
75 Web UI Guide
75
Web UI Layout
77
Accessing the Web UI
84
Viewing Device Information
89
Setting General Functions
93
Viewing and Setting the Input
103
Viewing and Setting the Output
77
Accessing the Web UI
84
Viewing Device Information
89
Setting General Functions
93
Viewing and Setting the Input
103
Viewing and Setting the Output
108
Setting the Audio
115
Creating and Managing Presentations
123
Managing the Media Files
128
Setting the Device Name
129
Setting the System Time
132
Configuring Network
143
Updating Firmware
146
Managing Users
148
Managing Logs
149
Rebooting USB Fusion
150
Resetting USB Fusion
151 FAQs
162 Glossary and Abbreviations
164 Support
TABLE OF CONTENTS
2
Product Overview
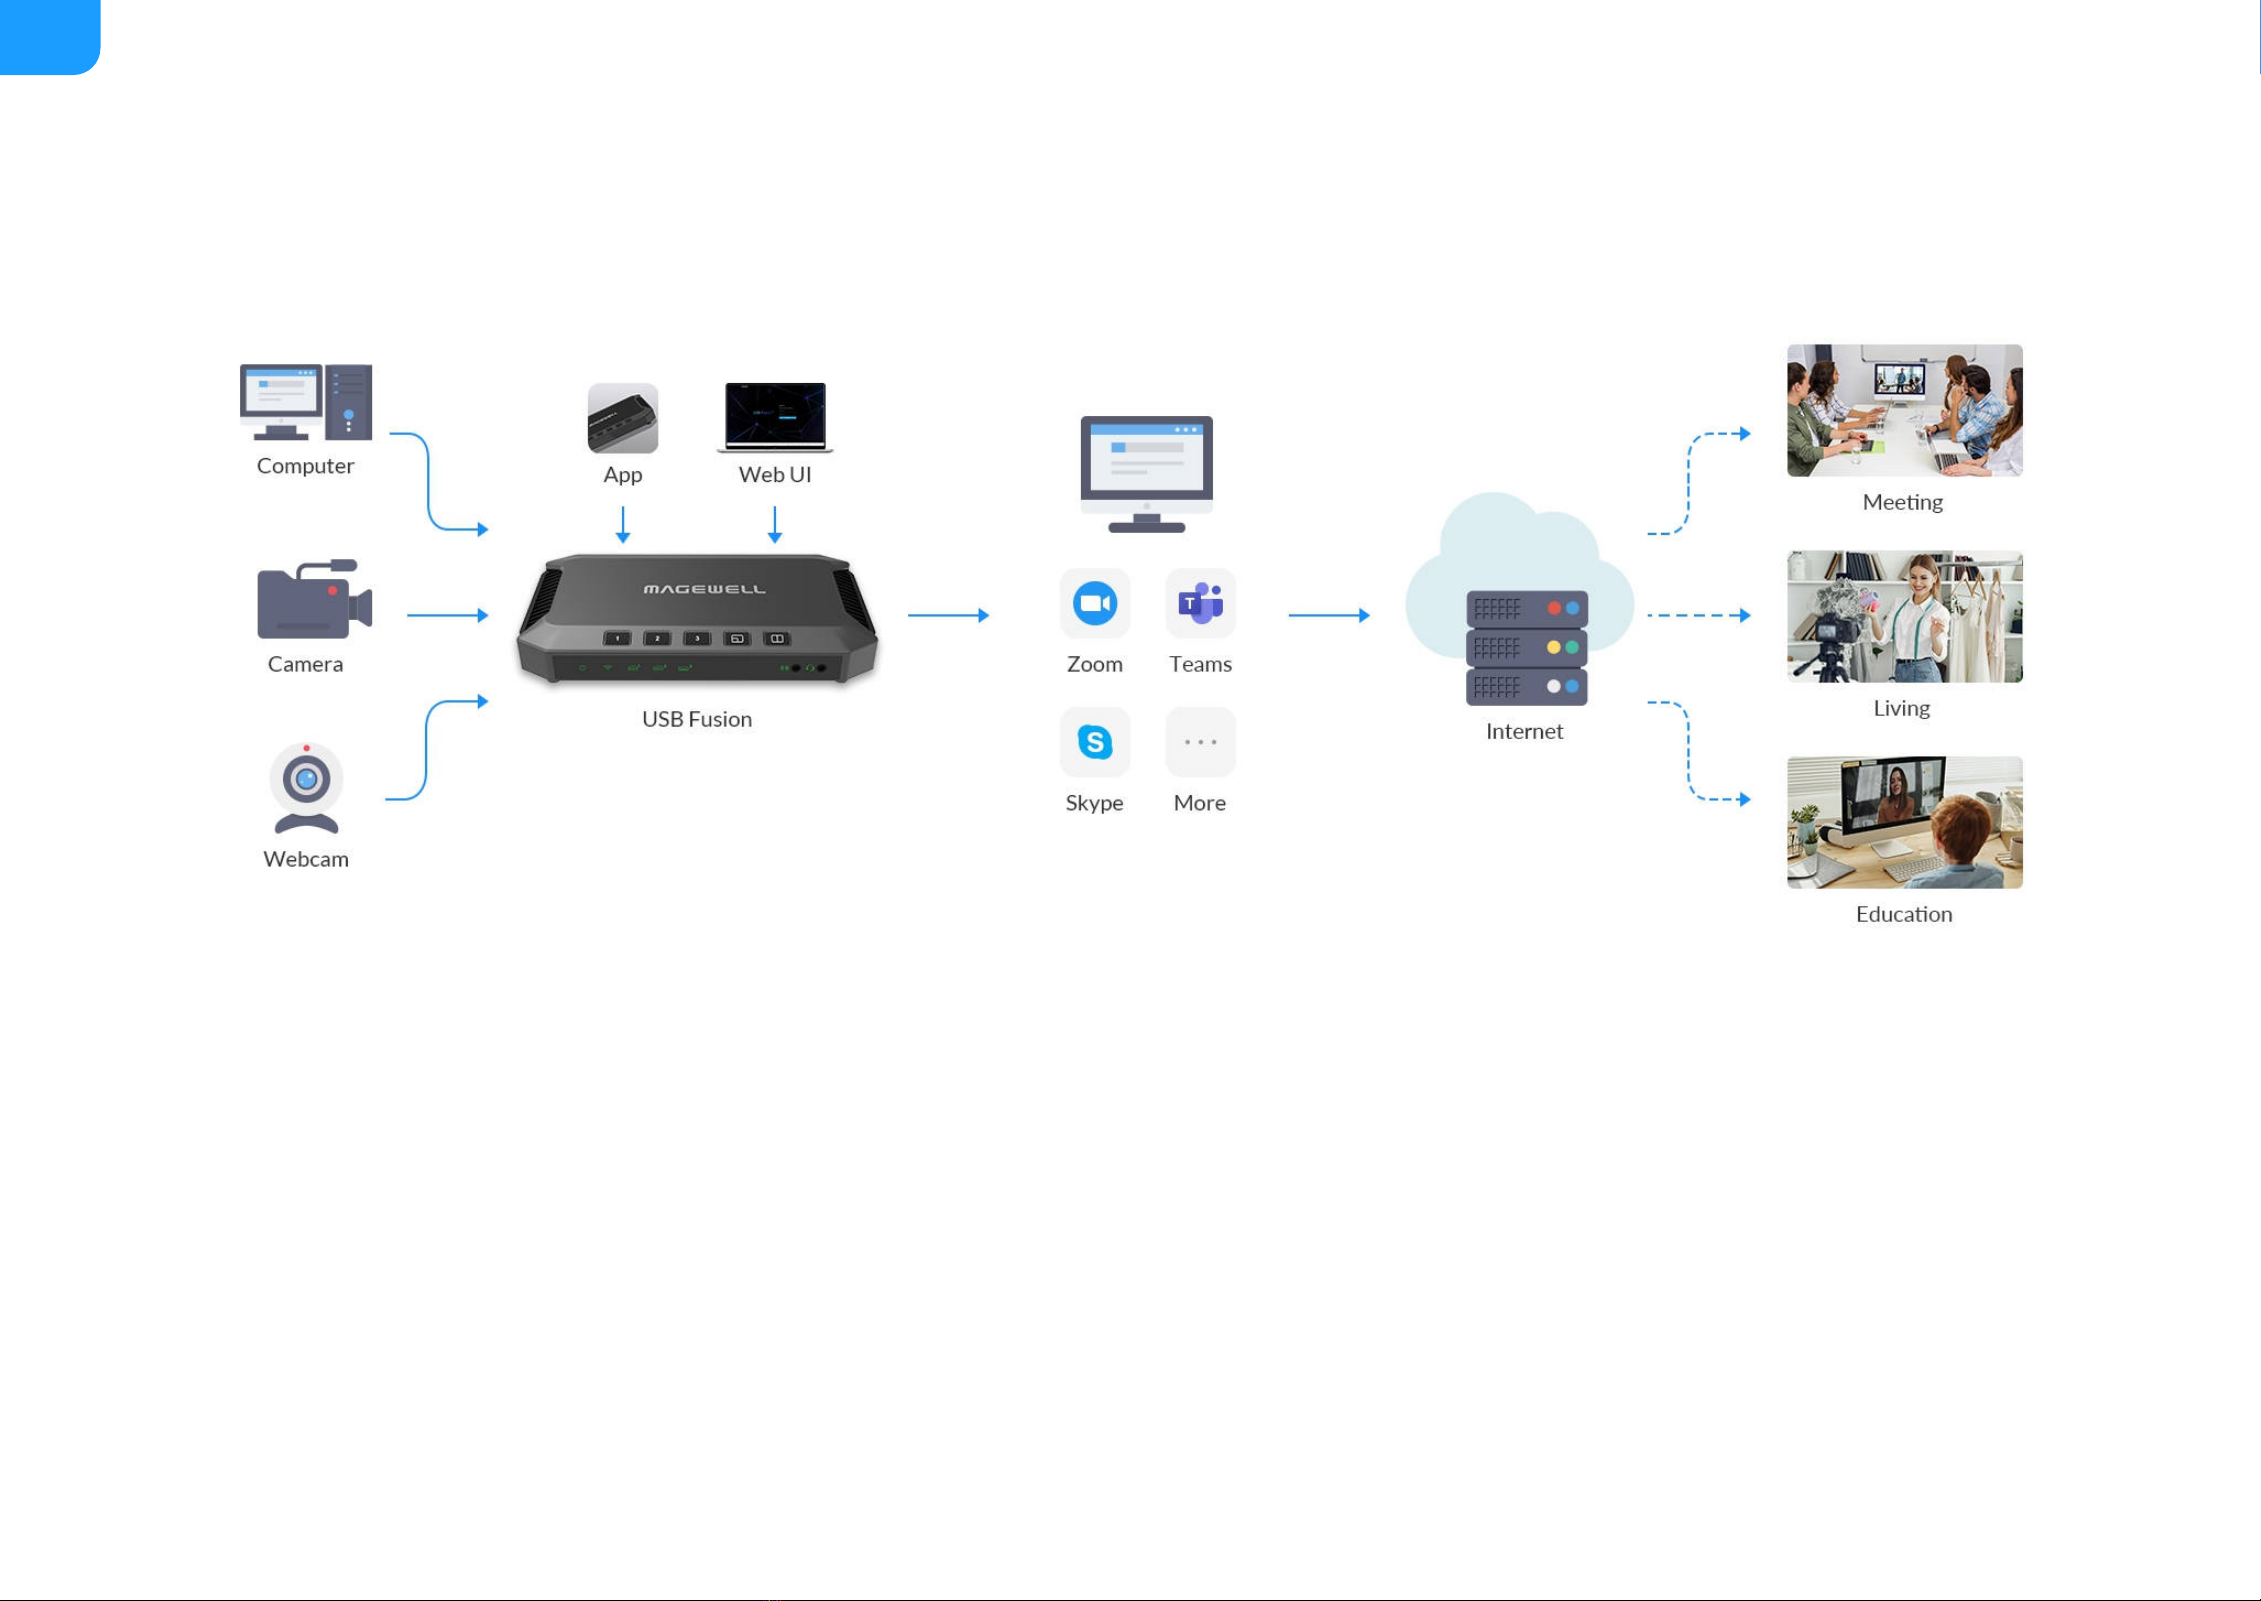
USB Fusion makes your online lectures and virtual events more engaging. Our USB Fusion hardware lets you combine camera and wired screenshare inputs into
attractive live presentations for remote education, webinars, live streaming and more.
USB Fusion is a multi-input USB video capture device with integrated source switching and layout control. Offering two HDMI inputs and one USB webcam input, USB
Fusion can switch between sources or combine two inputs simultaneously into one output (picture-in-picture or side-by-side) for capturing into popular software via
its USB 3.0 interface.
3

USB Fusion features the following:
As a standard UVC/UAC device with automatic, driver-free installation, USB Fusion is immediately compatible with a wide range of operating systems and software
applications. Users or administrators can configure and manage the hardware through its built-in web UI, while the free USB Fusion companion tablet App provides
additional features to augment your presentations.
Using the USB Fusion companion App, teachers and event hosts can create presentation playlists in advance and incorporate pre-recorded audio and other media
files into their sessions. The App’s annotation tools can be used to mark up presentation materials, and the annotations can be exported to a file for sharing after the
class or event. Sessions can also be recorded through the App to the USB Fusion hardware’s built-in storage for subsequent playback.
Two HDMI inputs and one USB webcam input with support for signals up to
1080p at 60fps
■
Support multiple scene display modes, such as single view, picture in
picture, and side by side
■
High-quality video processing with zero CPU usage
■
Support importing multimedia files to enrich presentations
■
Support more operations and settings through the companion App and
Web UI
■
Support USB 3.0 interface for high-speed data transferring
■
HDMI output for conveniently monitoring source or program
■
Standard UVC/UAC device offering broad compatibility with popular
software
■
Automatic, driver-free installation with support for Windows , Mac and
Linux operating systems
■® ®
®
4

Getting to Know USB Fusion
This chapter will introduce the indicators, buttons, and ports of USB Fusion, and tell you how get the App and log in the Web UI, as well as system requirements.
USB Fusion Device
5

6

USB Fusion App
With the USB Fusion App, you can create presentations, switch scenes, make
annotations, and record your presentation. You can make flexible presentations
easily. The USB Fusion App supports iOS 12 and later and Android 7.0 and
later. You can search for USB Fusion in the app store or scan the QR code to
download.
Web UI
USB Fusion provides a web UI for user to check device status, configure device
functions, create and manage presentations, and more.
1. On the computer connected to the USB OUT port, open a browser and
access 192.168.66.1.
2. Enter the default user name Admin and password Admin to log in.
Currently the App is available only on tablets.
7

Computer Configuration
Operating System Versions
Computer Port
To connect the USB OUT port of the USB Fusion, to receive PROGRAM scenes
output from the USB FUION
Tablet Version
To install the USB Fusion App for making presentations
Browsers Compatible with Web UI
To log in the Web UI for more advanced settings and presentation operating
Compatible Software
The software to connect the USB Fusion and use PROGRAM scenes output
from the USB Fusion for online classes, meeting or live streaming.
System Requirements
Windows
Windows 7 and later, Server 2008 and later (x86 & x64)
■
Linux
Linux system with kernel 2.6.35 and later (x86,x64 & ARM)
■
Mac
OS X 10.9 and later, macOS 10.12 and later
■
USB 3.0 port (recommended)
■
iOS 12 and later
■
Android 7.0 and later
■
Google Chrome version 49 and later
■
All Microsoft Edge versions
■
Mozilla Firefox version 61 and later
■
Apple Safari 11.1 and later
■
Opera 55.0.2994.44 and later
■
Skype
■
Zoom
■
Microsoft Teams
■
Other UVC/UAC-compliant software
■
8

Connecting Devices
To use USB Fusion, you need to first connect power, network and various
video/audio devices. USB Fusion supports the following connections:
Connecting to Power
Use the supplied power adapter to connect the power port on USB Fusion and
power supply. After connected, the power indicator lights up.
Getting Started
USB Fusion is easy to use. No complicated configuration is required to implement high-quality capture and production. This chapter tells you how to use USB Fusion
and App for your presentation.
The device starts working after connected to power.
9
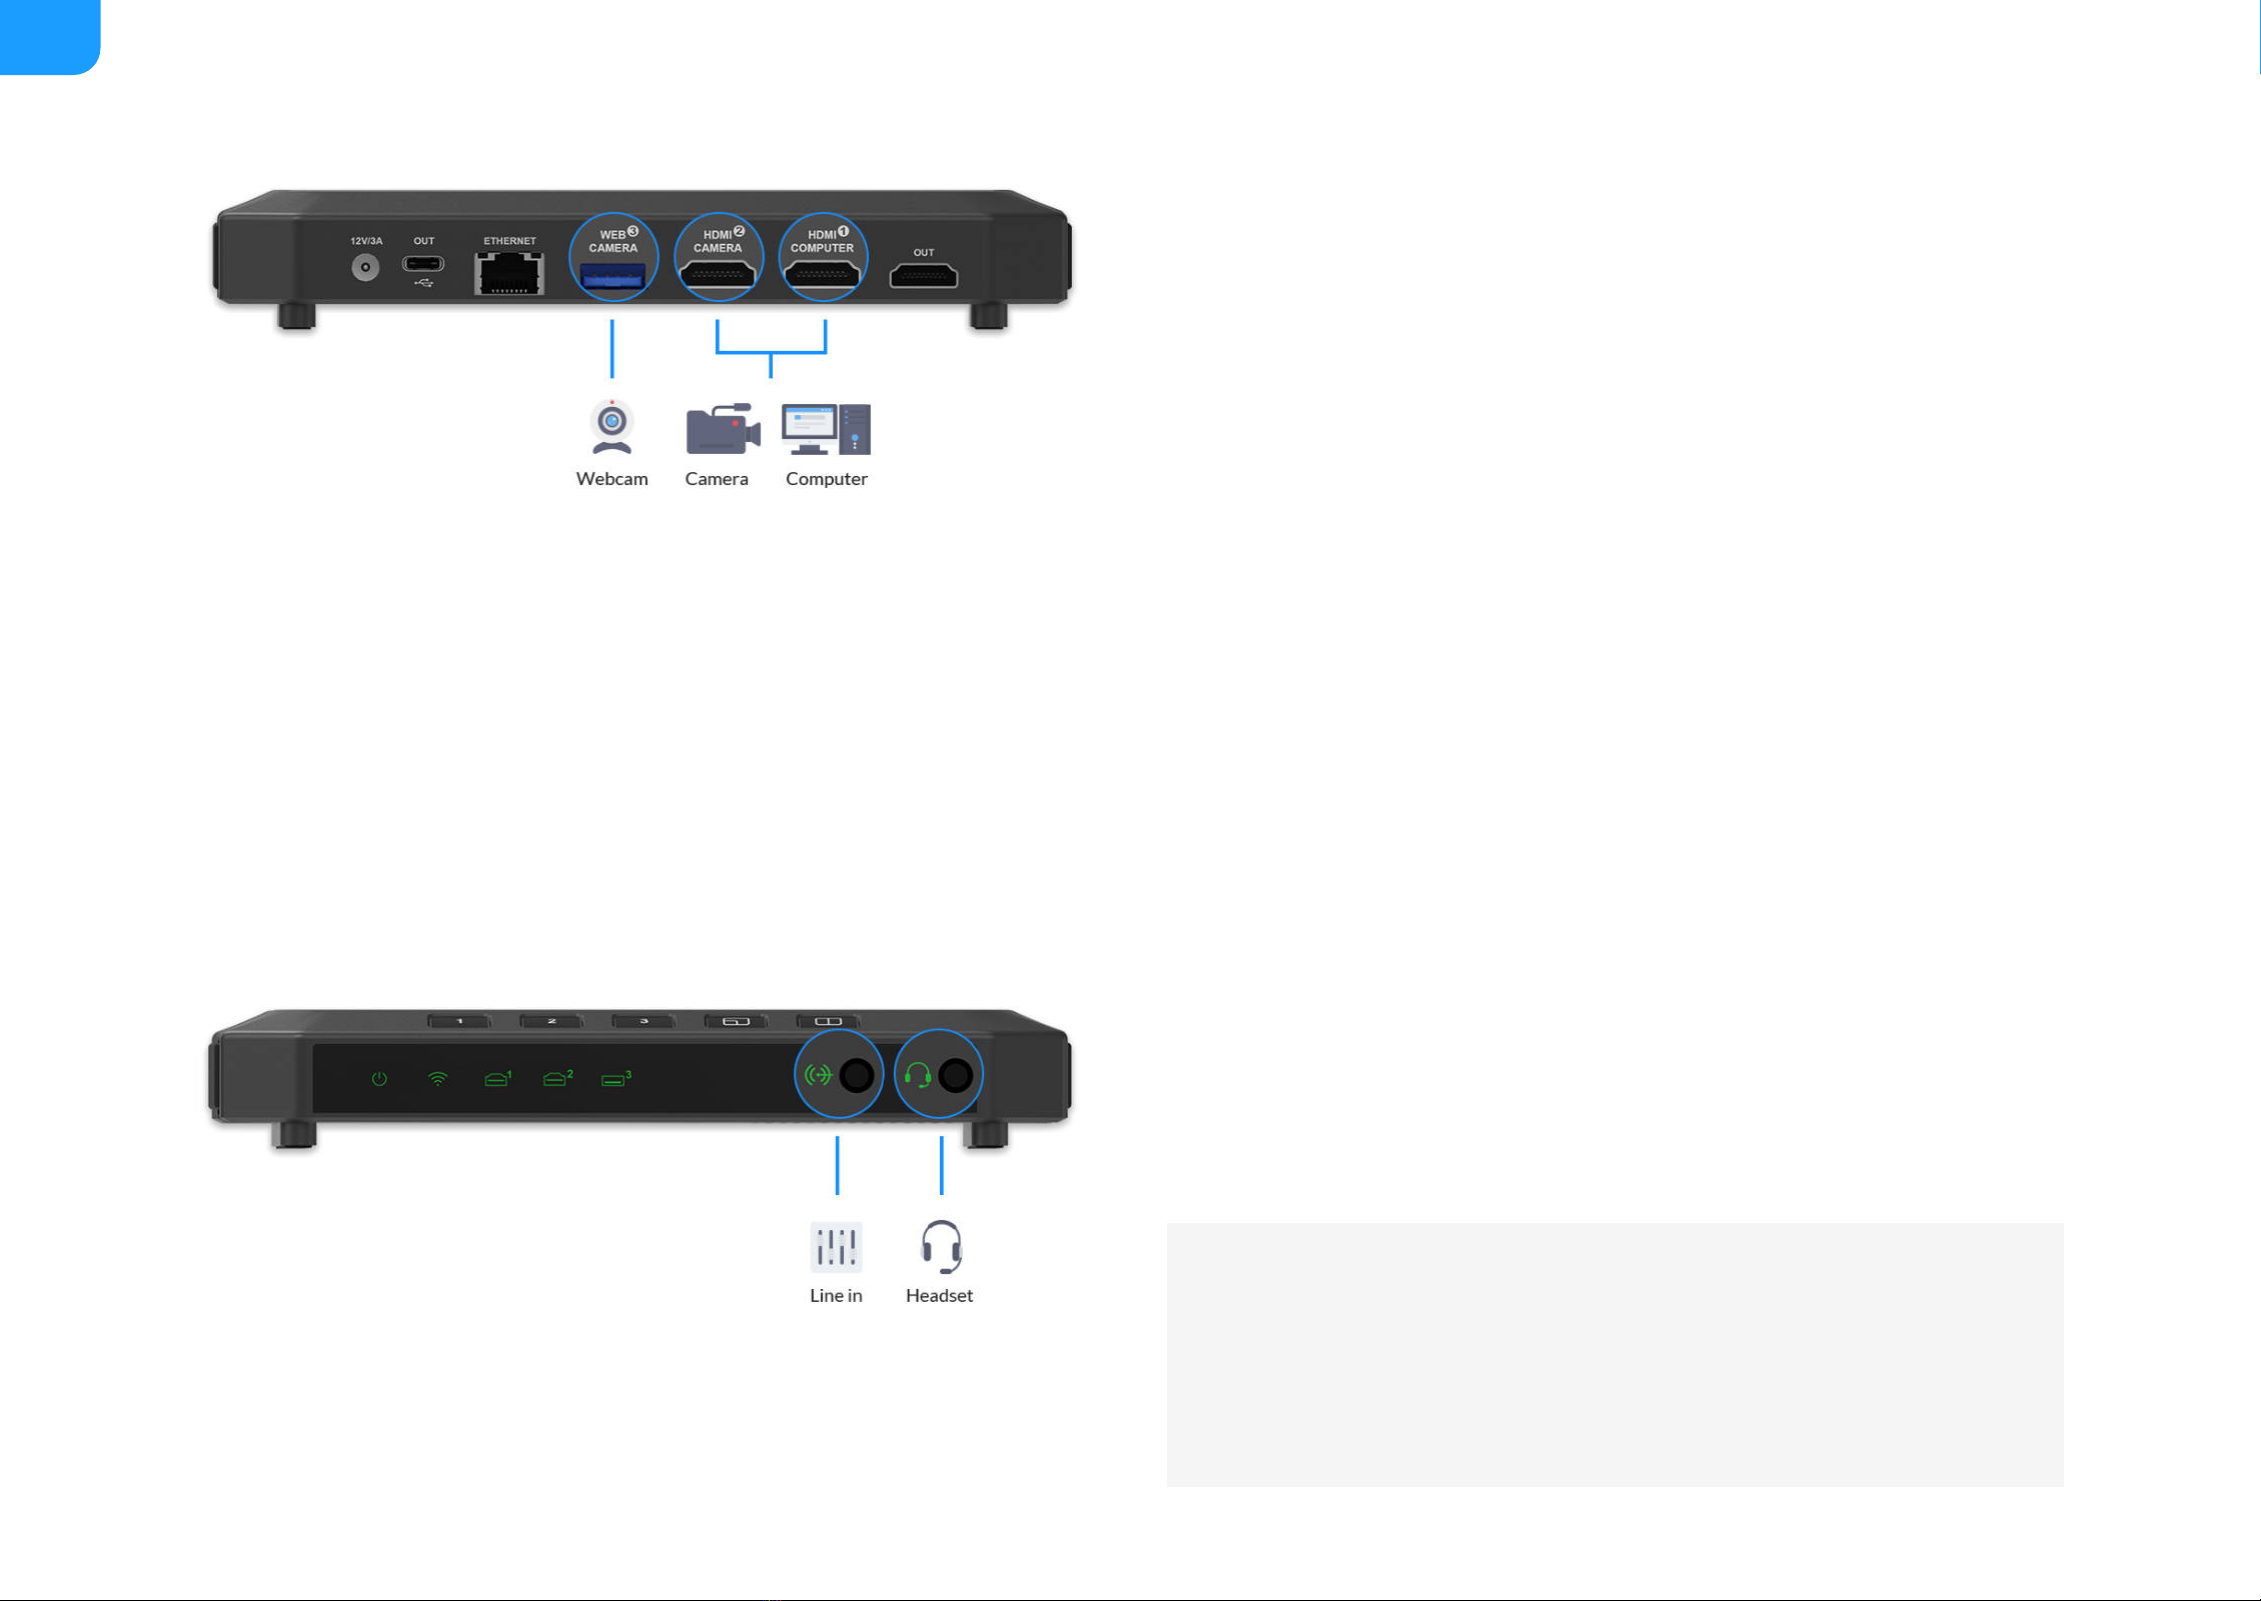
Connecting Video Inputs
USB Fusion can simultaneously connect three video inputs (two HDMI inputs
and one USB input), such as a computer, an HDMI camera, and a webcam.
The video inputs can be used separately or composited into a picture-in-
picture or side-by-side layout.
Connecting HDMI Input Sources
Use an HDMI cable to connect your computer or/and HDMI camera to the
HDMI 1 or/and HDMI 2 input port on the USB Fusion. The input computer is
called source computer. After connected, the HDMI 1 / HDMI 2 indicator lights
up.
Connecting a USB Input Source
Use a USB cable to connect your USB A/V device (e.g. a webcam) to the WEB
CAMERA 3 port on the USB Fusion. After connected, the WEB CAMERA 3
indicator lights up.
Connecting Audio
After connected, the line-in and headset indicators light up.
Connect a headset to the headset port on the USB Fusion.
■
Connect a line-in device to the line-in port on the USB Fusion. (Optional)
■
The line-in port supports two-channel audio input.
■
The headset port supports two-channel audio input and output (for
monitoring).
■
The headset port uses the CTIA standard. For an OMTP-compliant
■
10
Altri manuali per USB Fusion
1
Indice
Altri manuali Magewell Registratore digitale


