
Mcombo 6360-M212W Manuale utente

Electric Toilet Lis
6360-M212W
Distributor and Dealer:
This manual must be given to the user of the product.
User:
Before using your toilet li read this manual and save for
future reference.
!
NEWACME LLC
2808 Vail Ave Commerce
CA, 90040
323-597-1109
Email: [email protected]
©2021 Mcombo Incorporated

2
TABLE OF CONTENTS
SECTION 1 GENERAL INFORMATION
OPERATING INSTRUCTION............................................................................................ 3
INTRODUCTION............................................................................................................. 3
DISCLAIMER................................................................................................................... 3
WATNING....................................................................................................................... 4
SYMBOLS AND LABEL LOCATION................................................................................... 5
PRODUCT OVERVIEW..................................................................................................... 6
SECTION 2 INSTALLATION AND ASSEMBLY
UNPACKING YOUR TOILET LIFT...................................................................................... 7
UNIT ASSEMBLY............................................................................................................. 8
INSTALLING THE TOILET LIFT AROUND TOILET............................................................. 11
SECTION 3 USING YOUR TOILET LIFT
INSTRUCTIONS FOR INDIVIDUAL USERS...................................................................... 13
INSTRUCTIONS FOR CAREGIVERS................................................................................ 15
CLEANING GUIDELINES................................................................................................ 16
SECTION 4 ADDITIONAL INFORMATION
TROUBLESHOOTING.................................................................................................... 17
LIMITED WARRANTY.............................................................................................. ...... 18
RETURN POLICY............................................................................................................ 18
NEWACME LLC
2808 Vail Ave Commerce
CA, 90040
323-597-1109
Email: [email protected]

3
SECTION 1 GENERAL INFORMATION
OPERATING INSTRUCTION
Please ensure both yourself and any helpers read the following instructions carefully
before using your toilet lift. These operating instructions should be retained for
future reference.
This toilet lift is designed and manufactured to assist individuals in getting on and off
the toilet. It should not be used for any other purpose. Do not use it in combination
with other lifting or moving devices.
INTRODUCTION
•Thank you for purchasing the Mcombo Electric Toilet Lift. Our toilet lift corporation
is striving to reduce toileting-related patient falls and caregiver injuries as well as
restore dignity to individuals challenged by the ADL of toileting.
•Please read these instructions entirely before installing or using your new toilet
lift.
•After installation, it is important that you cycle - fully raise and lower - 3-4 times
(without sitting on or adding any weight to the seat) to become familiar with its
functionality.
•Actuator images shown are for illustrative purposes only; actual style may vary.
DISCLAIMER
We ask that you read this manual completely before assembling and operating your
new Mcombo Toilet Lift. We are not and cannot be held responsible for any damage
or injury incurred due to improper or unsafe use of the Mcombo Toilet Lift. We
specifically disclaims responsibility for any bodily injury or property damage that may
occur during any use that does not comply with applicable federal, state, or local
laws or ordinances.

4
WARNING!
●Rated load: 330 lbs. Never exceed rated load.
●Please keep the original packaging after receiving the product
●Read and follow all instructions and warnings prior to assembly and use. Correct
installation, proper use, following instructions and obeying warnings are
necessary for safe operation. For additional information, or to obtain
replacement copies of instructions or labels, call 323-597-1109 or email us
●Understand and learn the location and function of all the features before
operating.
●For use with secure, properly mounted, floor mounted toilets only.
●Observe and avoid all pinch points and always keep hands above the seat when
operating the toilet lift.
●Ensure that there is no interference within the toilet lift’s range of movement.
●To help prevent slipping, it is important to wear footwear with firm, non-skid
soles when using the toiler lift.
●Remove loose rugs and make sure that the area around the toilet lift is free of all
obstructions and moisture.
●The toilet lift is strictly an assist lift. The user must have dexterity, strength, and
balance in order to use the toilet lift safely. Nonresponsive or combative users
may not be suitable for toilet lift usage.
●Do not use toilet lift for anything other than its intended purpose.
●This product is intended for use by ambulatory and semi ambulatory patients
capable of bearing their individual body weight unassisted.
●If any part of the toilet lift is damaged, loose, or faulty, do not use until repairs
can be made by a qualified technician.
●Do not route power cords so that they may become damaged, pinched, create
trip hazards, or create other safety concerns.
●Check all toilet lift electrical cords frequently to ensure they are not worn or
damaged.
●Stop using toilet lift immediately and contact your Certified Dealer or Technician
if any defect is suspected.
●To reduce risk of shock and or electrical hazard, keep all electrical components
free from moisture at all times and only use properly grounded electrical
equipment, outlets, and plugs.
●The toilet lift is not a toy; never play on or near the lift.
●Do not continually operate the hoist functions. The system is not designed as an
exercise machine and continuous operation will cause damage the actuator.
●Do not pull on, or otherwise exert excessive force on, the handset cable as this
may break off the wires inside the cable and prevent some or all toilet lift
operations.
●Warning indicates a potentially hazardous situation which, if not avoided, could
result in death or serious injury.
5
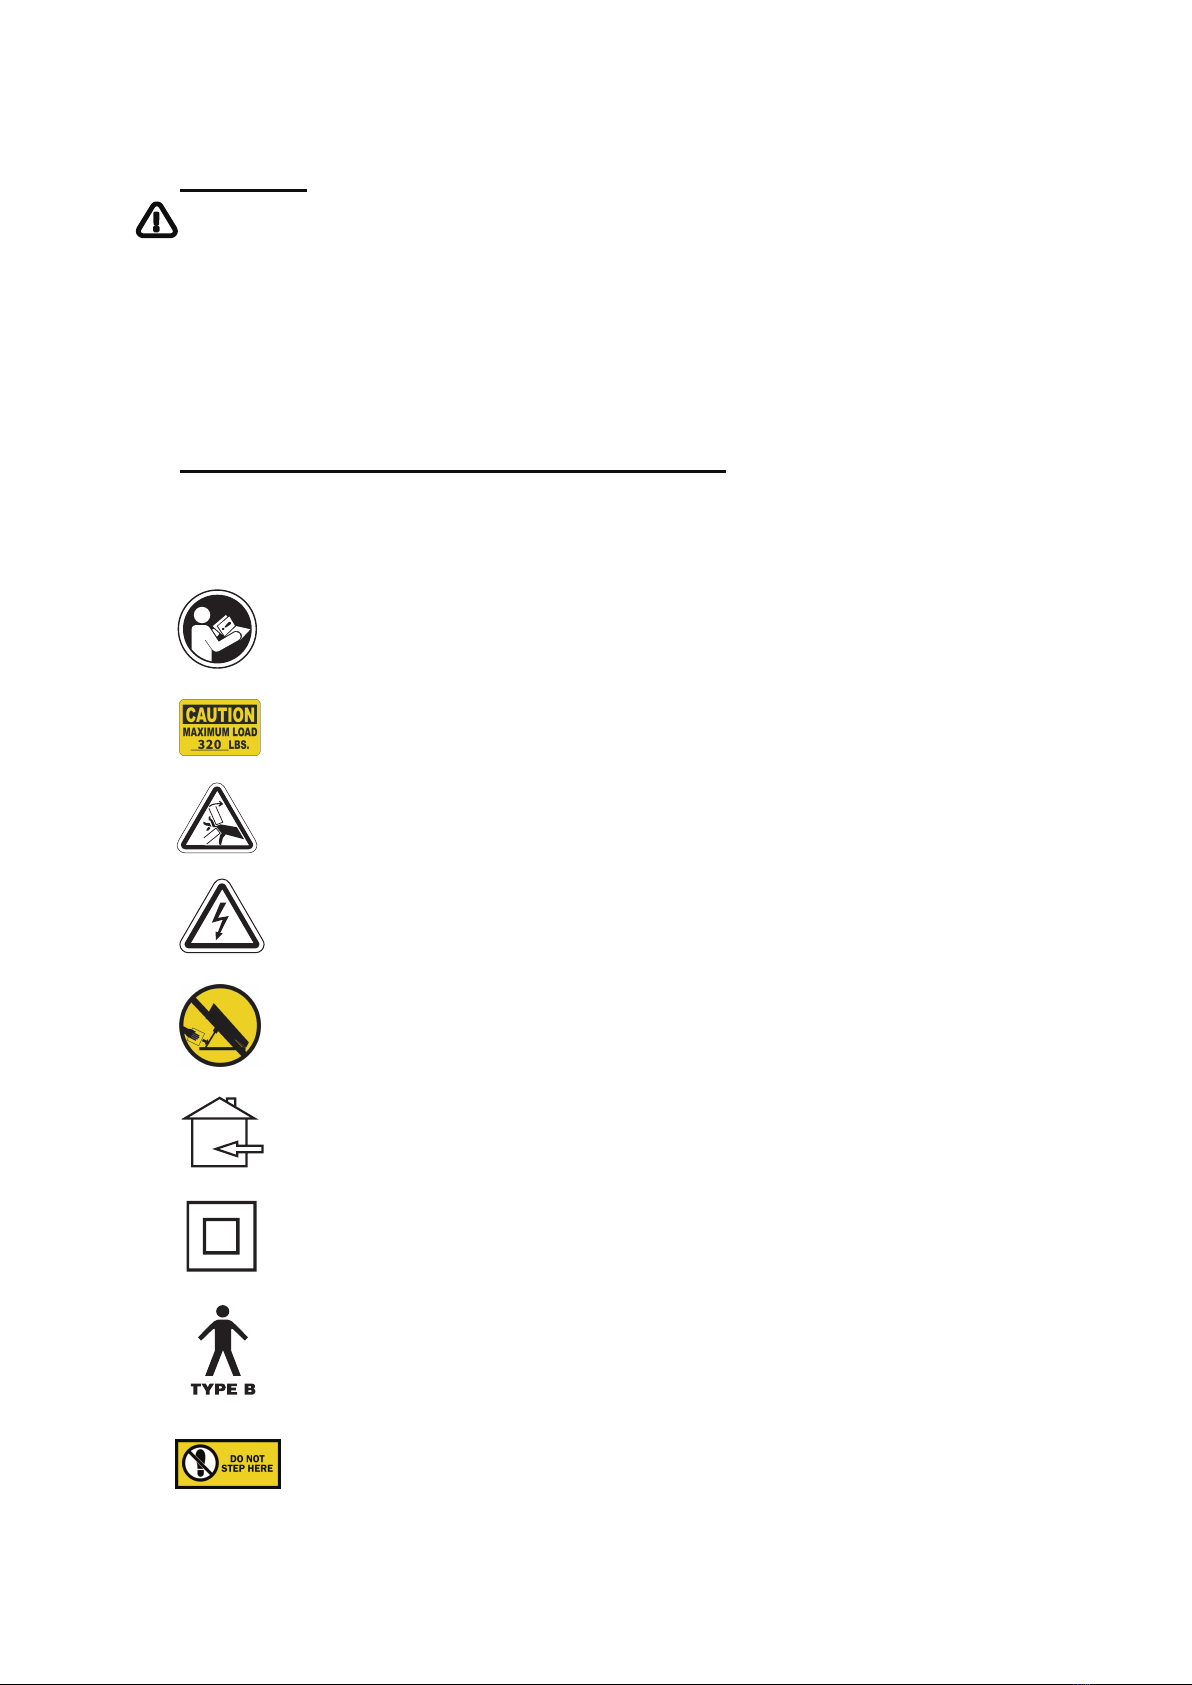
SYMBOLS
The WARNING symbol indicates a potentially hazardous condition/situation. The
safety warnings throughout this manual, and on your equipment, if any, are for the
protection of people and property. Failure by any operator to abide by safety
warnings will result in a waiver of all liabilities, loss of your warranty, and could result
in equipment damage and or failure, property damage, risk of serious bodily injury,
and or death. The symbol may appear in various colors and in conjunction with other
symbols.
Our toilet lift has placed warning tags and labels on the product. Do not remove
these labels
IN DEPENDENCE LABEL LOCATIONS
Read and follow the informaon in the owner’s manual
320 Lbs Weight Capacity
Electrical Hazard
Indoors Use Only.
Class II Equipment
Degree of protecon against electric shock.
Stepping on is forbidden, there is danger of pping over
Pinch/Crush Points Hazard! Do not place objects or appendages in the path
of moving parts
Do not place objects under the power li recliner. Make sure the area is clear
of obstrucons
6
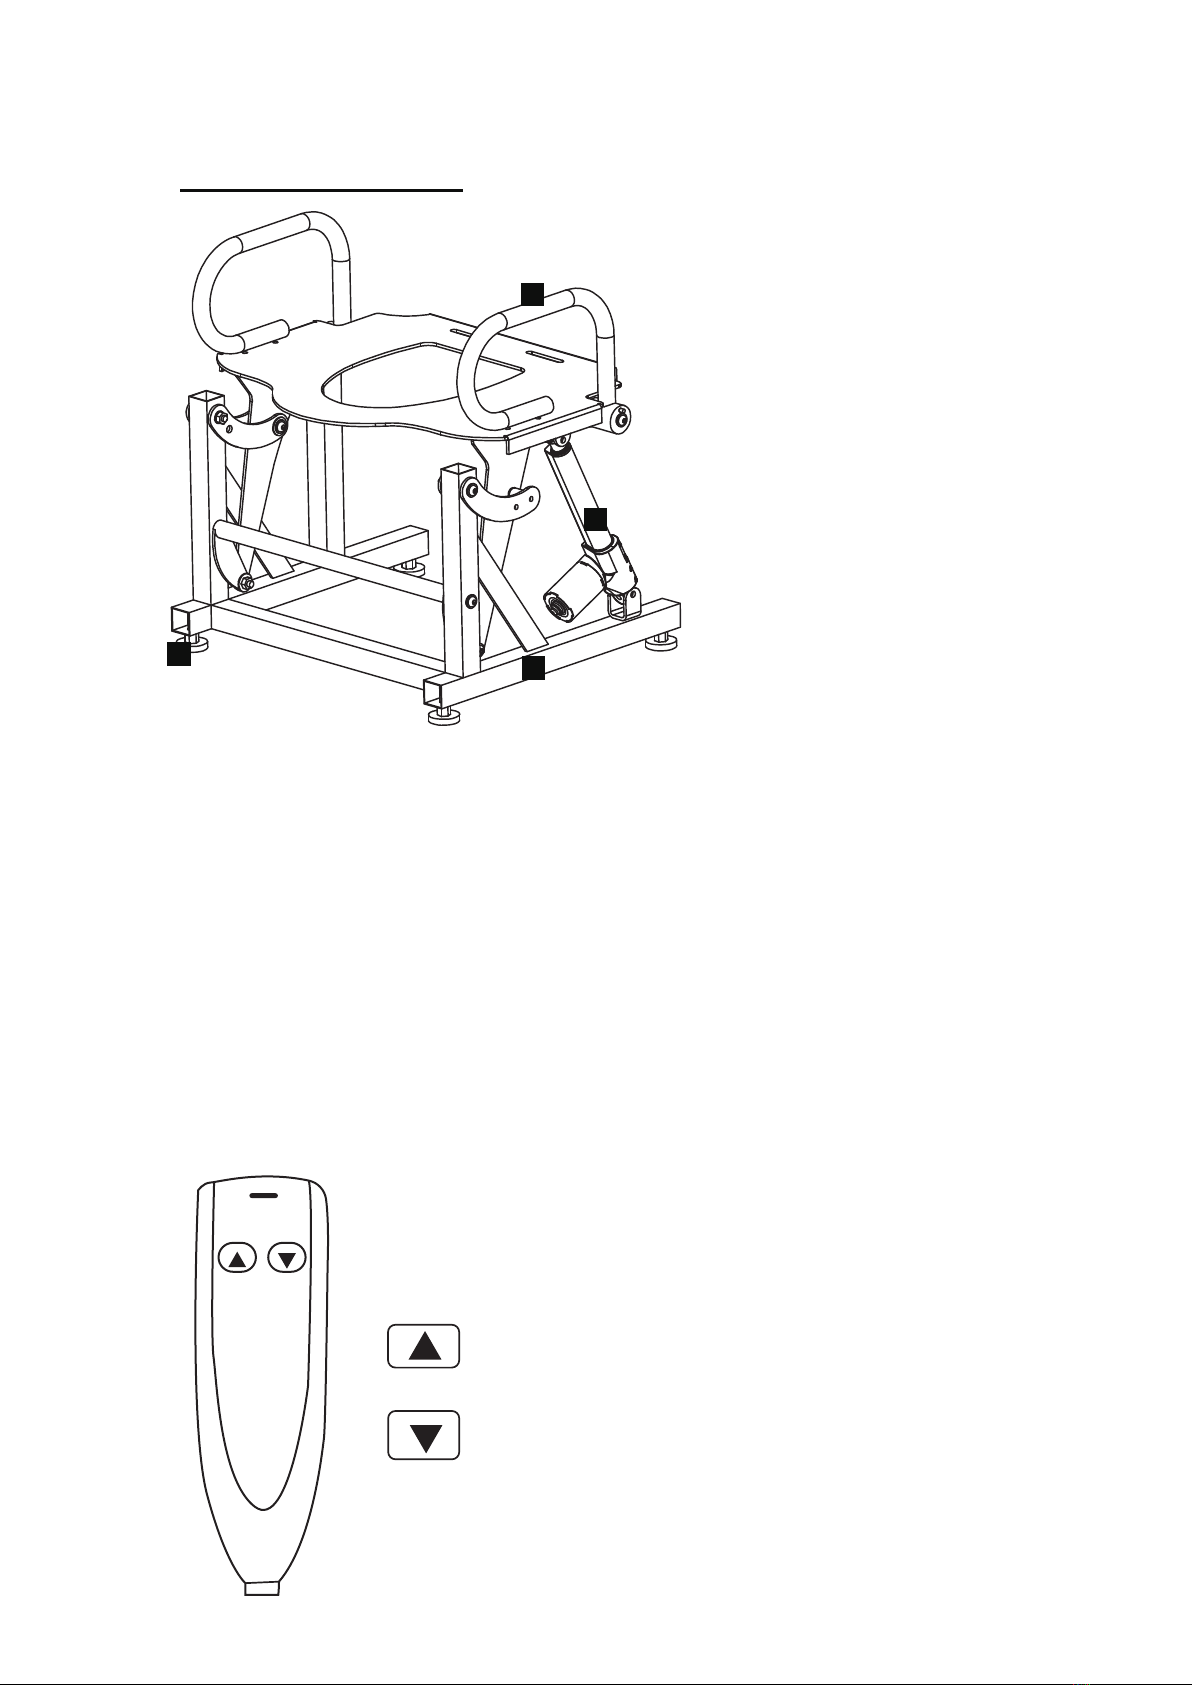
PRODUCT OVERVIEW
1. Structure – Provides the vertical, horizontal, and rotational lift necessary to
support the sit-to-stand process.
2. Handle Bar – Handle bars for patient to place their hands on during the
sit-to-stand process.
3. Linear Actuator – Linear actuator is mounted to the frame to move the device up
and down.
4. Hand Pendant – See below.
5. Leveling Feet – The toilet lift is provided with leveling feet so the unit can be
installed on moderately uneven floors.
Hand Pendant
1
2
5
3
The hand pendant is for a caregiver or paent to use.
The buons on the hand pendant perform the following funcons:
Up Buon: Raises the toilet li
Down Buon: Lowers the toilet li
7
SECTION 2 INSTALLATION AND ASSEMBLY
UNPACKING YOUR TOILET LIFT
Warning!
Inspectionof the Box Contents
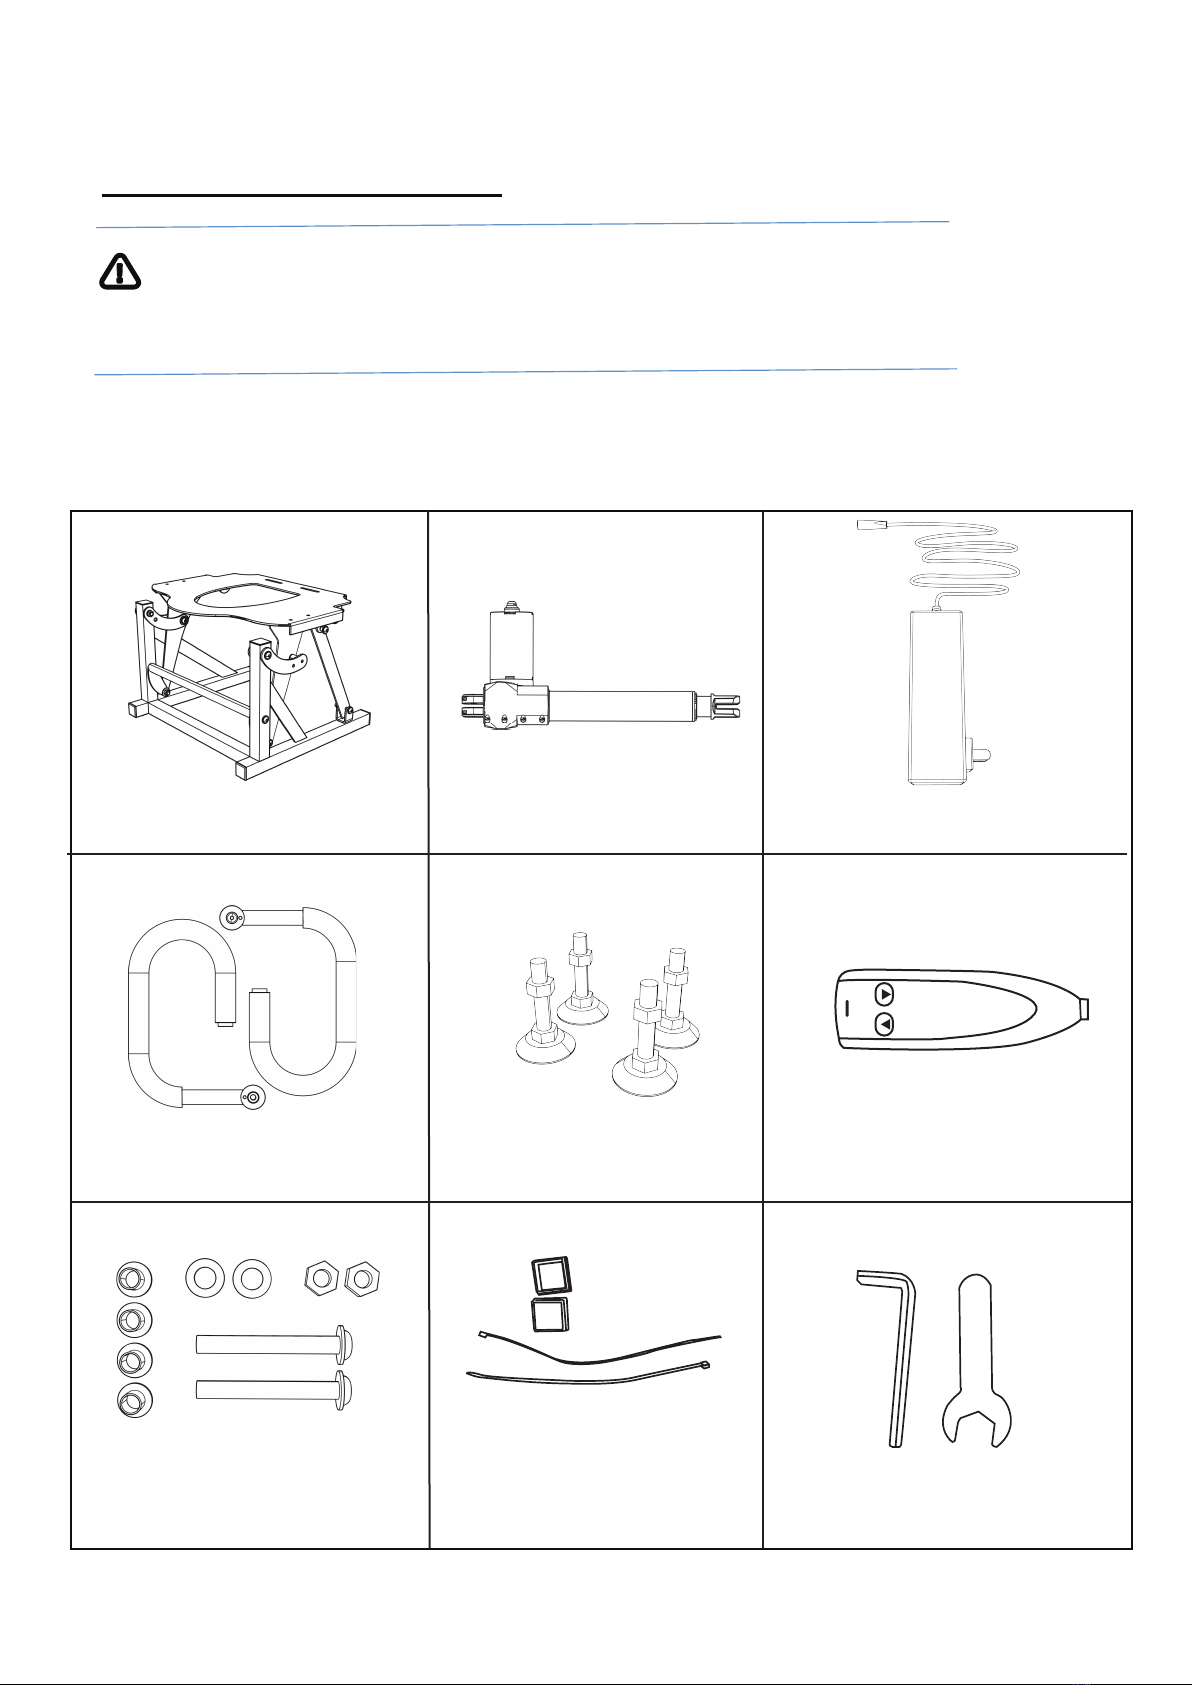
Your toilet lift comes in one box.
Box 1: The box contains:
Spare parts (2*Cable es,
2*Base plasc covers)
Li actuator
Base
Handle bars Leveling feet Hand remote
Armrest mounng screws Wrench
Power supply
I
BA C
D E F
GH
Check all parts for shipping damage before using. In case of damage,
for further instrucons.
8
UNIT ASSEMBLY
Unpacking
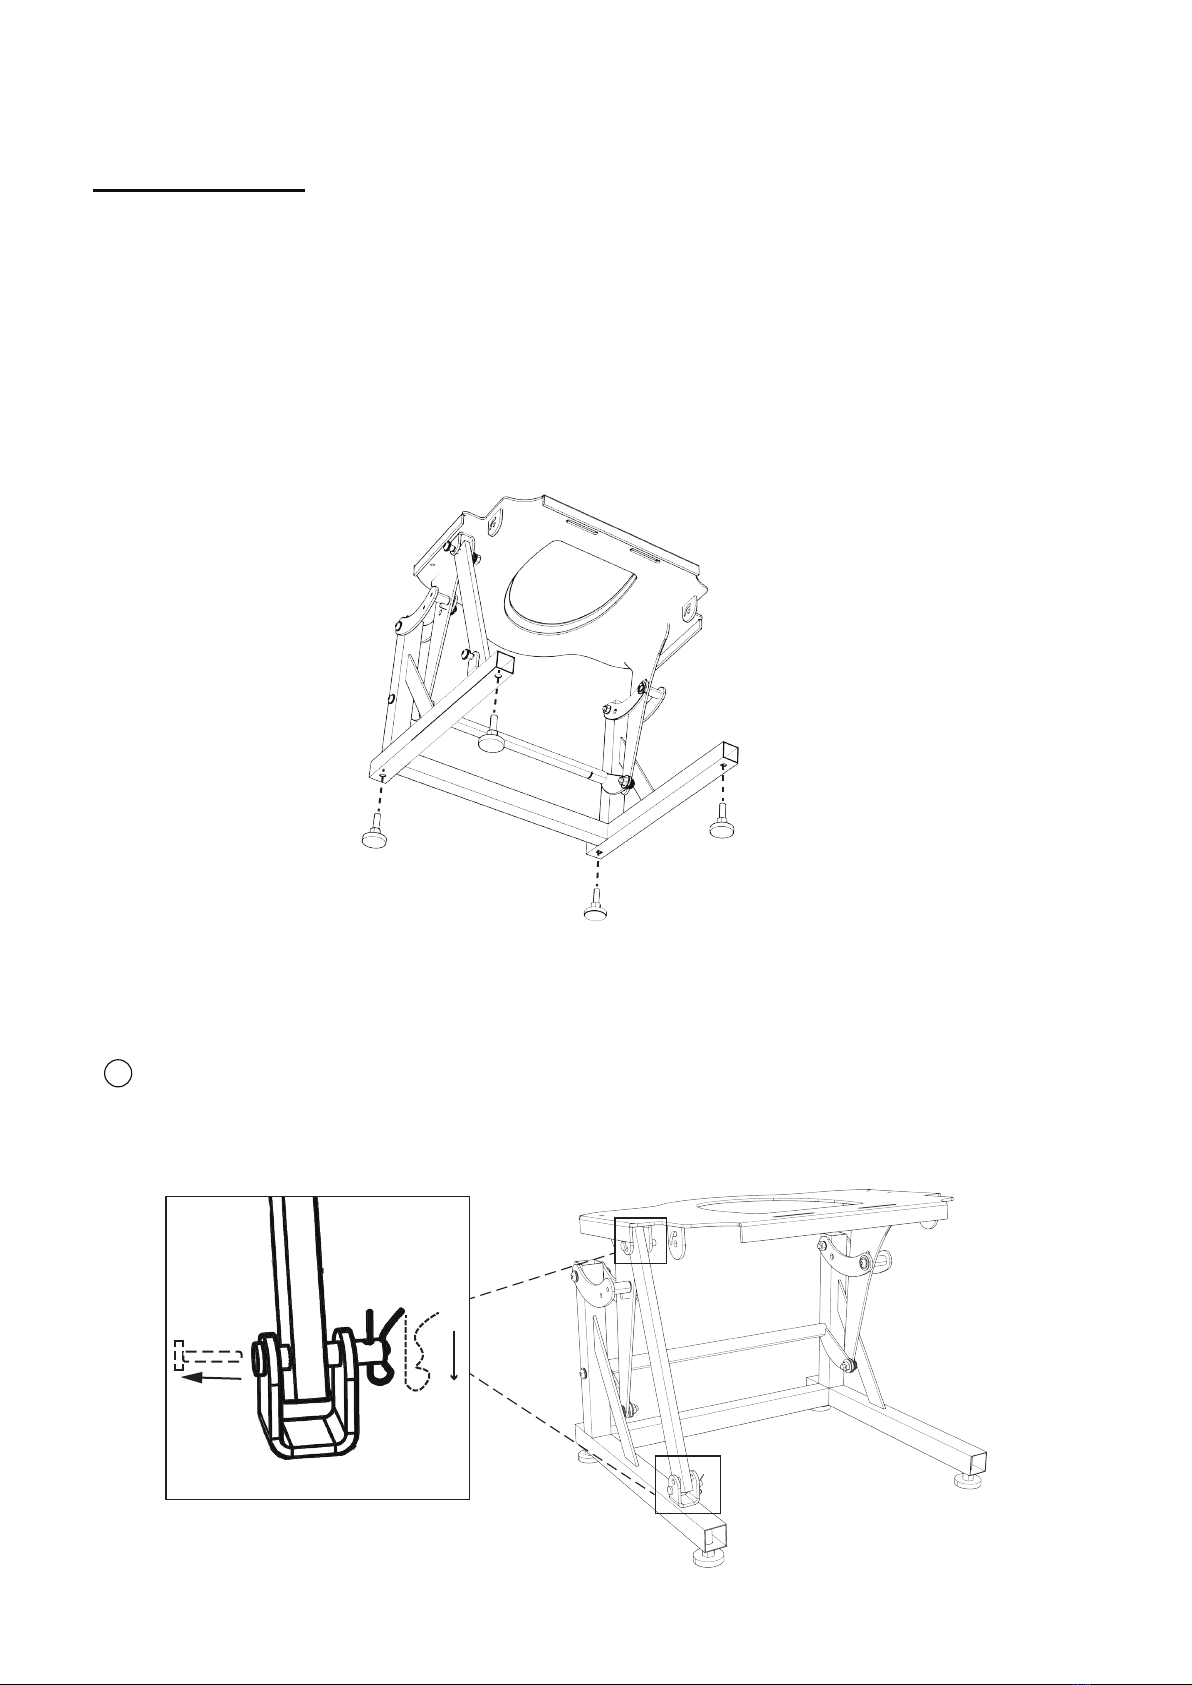
1. Carefully unpack all items and lay out contents for inspecon. Remove any packaging tape
or supplies.
2. Check contents against parts list. If anything is missing contact us at 323-597-1109
Assembly of Toilet li
1.Screw leveling feet into threaded hole on boom of the base.
2.Pull out the bolts at both ends, then remove the iron piece, and install the pneumac rod.
(Note: The bolt wire is relavely ght, please use gloves to pull out for safety)
Put on gloves, break the two bolt wires and pull them out, then pull out the two bolts
and remove the iron pieces.
1
pull out
pull out
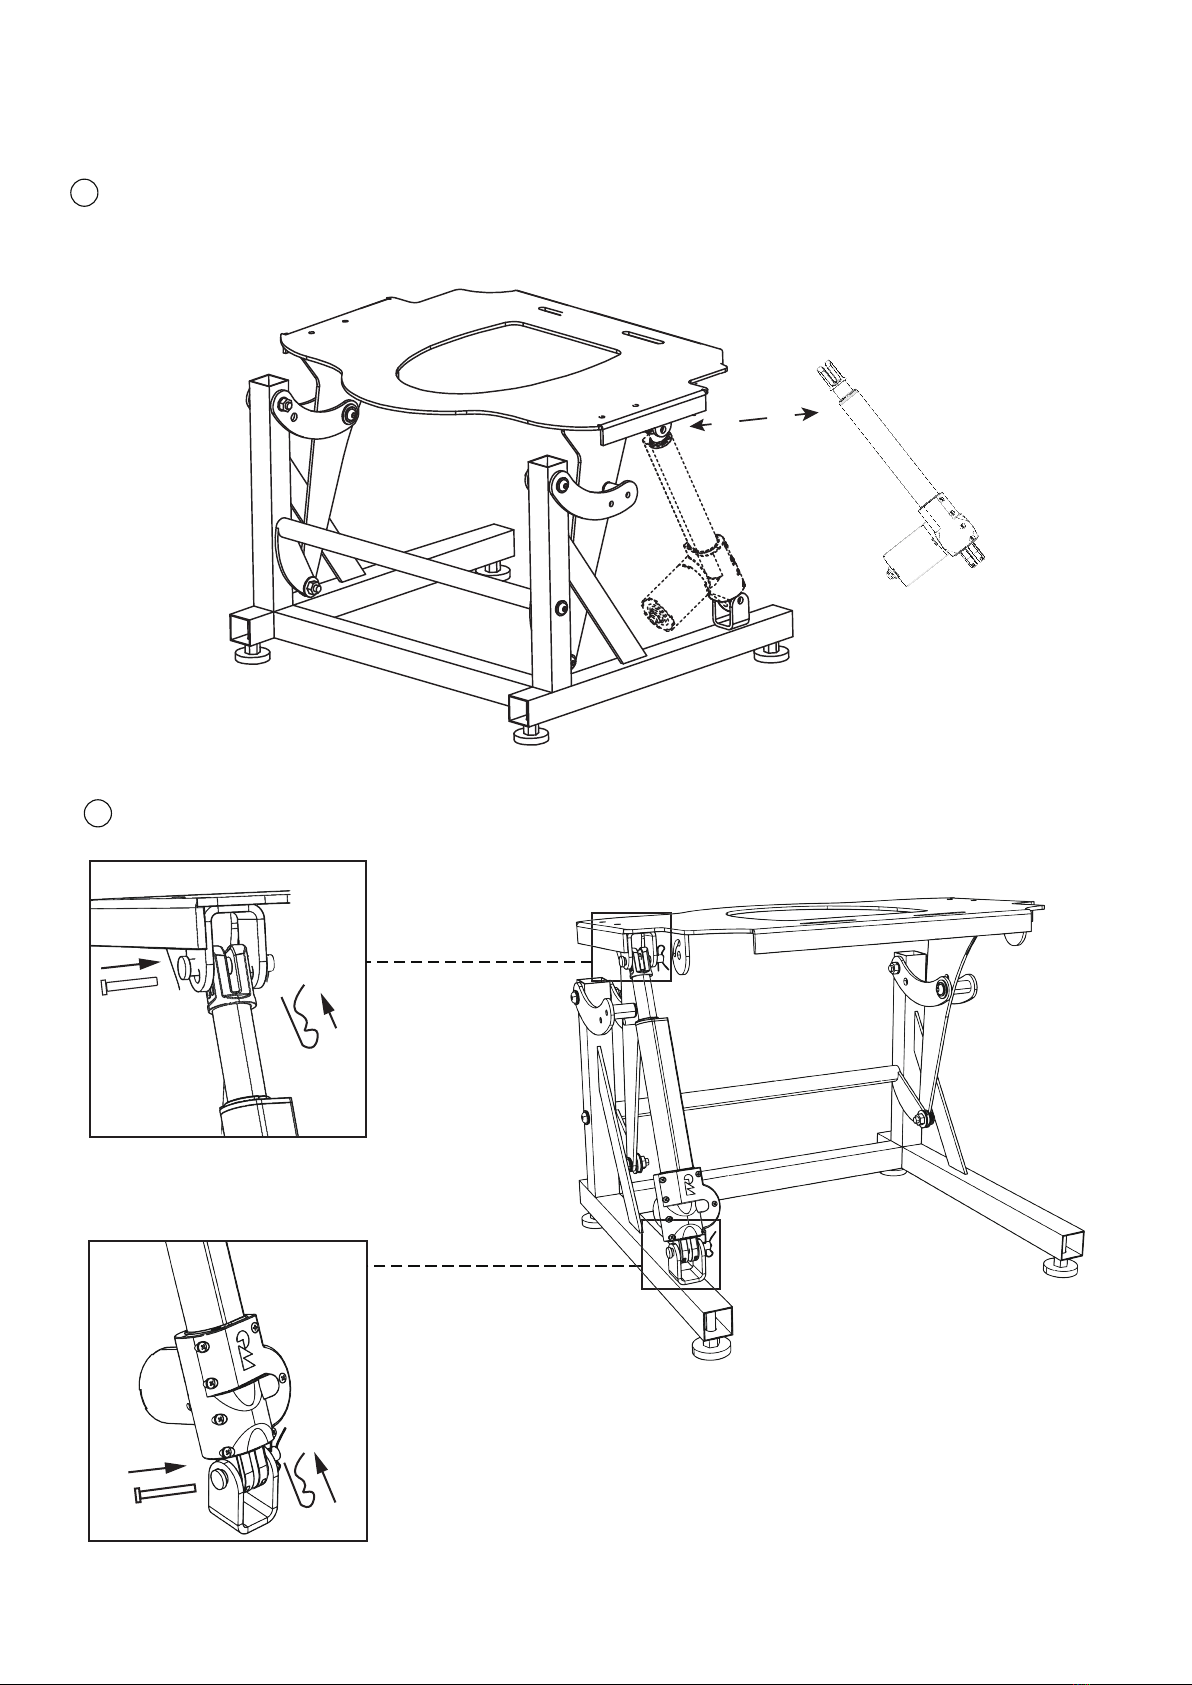
9
2
3
Take out the li actuator and place it to the posion of the iron sheet just now, and align the
screw holes on the upper and lower ends
Insert the bolt just now, and then fix it with the bolt wires that were removed
plug in
plug in
plug in
plug in
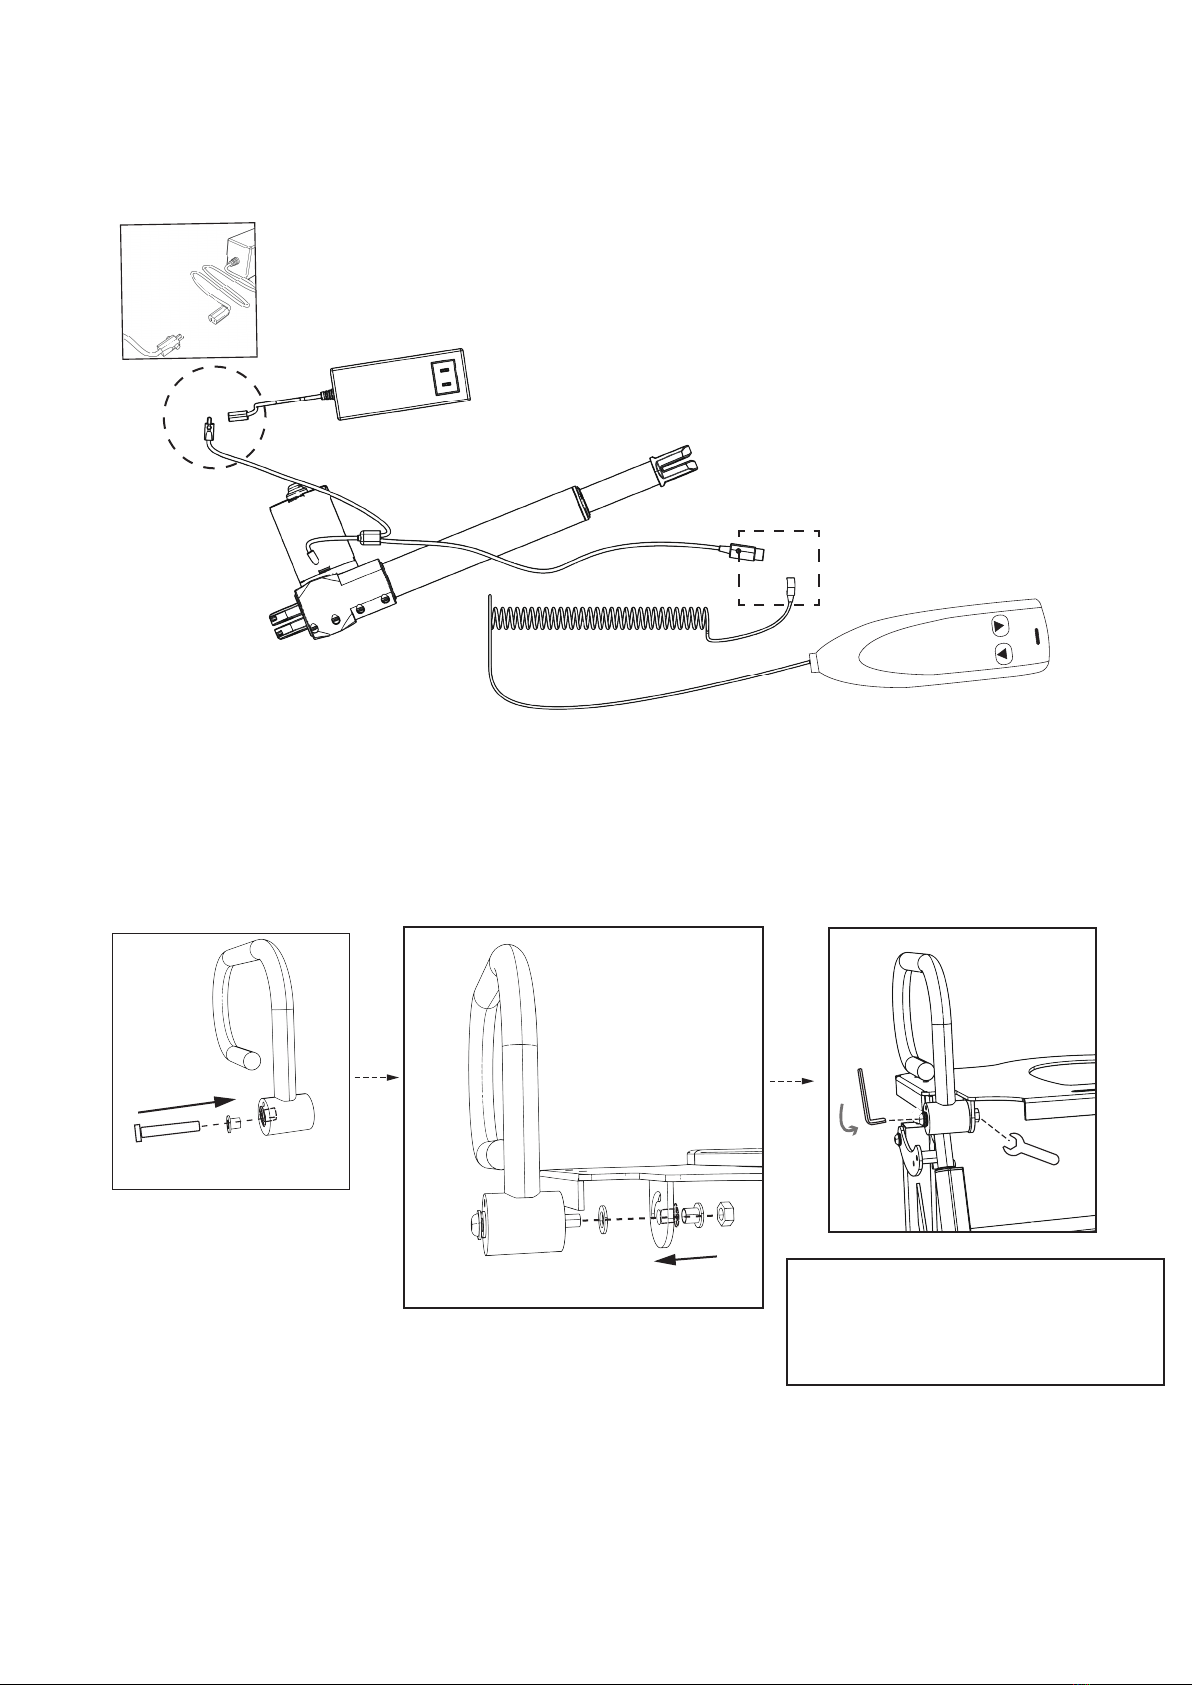
3.Connect Power supply and hand remote to li actuator
4.Install handle bars. (Note: Please install the sleeve on the hole of the armrest first,
and then lock the screw)
5.Plug power supply into a 110V outlet and cycle the unit to the highest posion.
Note: If unit doesn’t cycle when plugged into a 110V outlet, contact us at 323-597-1109
10
Ⅱ Ⅲ
plug in
Ⅰ
plug in
screw
Note: The an-dropping screw
requires two tools to be used at the
same me and requires
a lot of force when strengthening.
Indice
Altri manuali Mcombo Sistema di sollevamento


Manuali Sistema di sollevamento popolari di altre marche


Genie
Genie Z-60/34 Manuale utente

Screen Technics
Screen Technics INTERFIT Vertical Up Lift Manuale utente

Mortuary Lift
Mortuary Lift ULTIMATE 1000 Manuale utente

Custom Equipment
Custom Equipment Hy-Brid 3 Series Manuale di programmazione

Custom Equipment
Custom Equipment Hy-Brid Lifts 2 Series Manuale di programmazione

Hy-Brid Lifts
Hy-Brid Lifts HB-P3.6 Manuale di programmazione


