Mvision ST-5 USB Manuale utente


GENERAL SAFETY 2
GENERAL INFORMATION 3
I. UNPACKING 3
II. FEATURES 3
III. REMOTE CONTROL UNIT (RCU) 4
IV. FRONT PANEL 6
V. REAR PANEL 7
INSTALLING EQUIPMENT 8
CHANNEL LIST GUIDE 0
MENU GUIDE 2
MAIN PAGE 2
I. CHANNEL MANAGER 2
II. INSTALLATION 4
III. OPTIONS 8
IV. UTILITY 2
TROUBLESHOOTING 23
SPECIFICATIONS 24
TABLE OF CONTENTS

3
GENERAL INFORMATION
Please ensure that the following items are included with the receiver in your
packing.
1) Remote Control Unit (RCU)
2) Batteries (2EA)
3) User’s Manual
4) A/V Cable
∙MPEG II Digital & Fully DVB S Compliant.
∙1 Slot smart card.
∙1 slot Common Interface.
∙Satellite & Terrestrial combo receiver.(Only ST 5 USB)
∙C/KU band control for each antenna.
∙LNB Tone Switch 22KHz mode on/off.
∙Multi LNB controlled by DiSeqC 1.0, 1.2 and USALS.
∙Total 5,000 Channels Programmable.
∙Blind scan(Power Scan) & Powerful EPG.
∙PIG(Picture In Graphic).
∙Teletext and subtitle directly from the OSD.
∙EPG(Provider Electronic Program Guide) for On Screen Channel Information.
∙On Screen Display with 65,536 Color.
∙Dolby Digital Bitstream Out through S/PDIF.
∙Upgrade Software & Update Channel Database through USB Port and RS232.
∙PVR Ready via USB.
∙Recorded file play on PC.
I. UNPACKING
II. FEATURES
2
GENERAL SAFETY
Please read the following recommended instructions carefully to avoid the risk of
your physical Injury before the product is operated.
Do not cover the receiver and keep clear space around the receiver for sufficient.
Check the receiver’s operation voltage 90~250V, 50Hz~60Hz Max, 40W Keep liquid
away from the receiver.
The receiver shall not be exposed to dripping or splashing and no objects that filled
with liquid shall not be placed on the receiver.
Unplug the receiver from the wall outlet before cleaning.
Use a soft cloth and a mild solution of washing up liquid to clean the casing.
Do not block the receiver’s ventilation slots which are provided for ventilation and
protection from overheating.
Please maintain the receiver in a free airflow.
Do not allow the receiver to be exposed to hot, cold or humid condition.
Do not use any cable and attachment that are not recommended as these may
damage your equipment.
Please unplug the receiver from the wall outlet and disconnect the cable between
the receiver and the antenna when you will not use it for long time.
Do not remove the cover to reduce the risk of electric shock.
Do not attempt to service the receiver yourself.
Refer all serving to qualified service personnel.
Manual may be updated as new features.
WARNING

5
GENERAL INFORMATION
III. REMOTE CONTROL UNIT (RCU)
. POWER Swithches the receiver between operation and standby mode.
2. MUTE Enables or disables the audio.
3. Numeric buttons Selects the TV or Radio service channels and individual menu.
4. FAV Toggles the selected favorite mode.
5. SAT Toggles the selected Satellite list.
6. Moves up a page in the channel list. (Selects zoom in/out).
7. Moves down a page in the channel list.
8. MENU Displays the main menu on screen.
9. EXIT Returns to the previous menu or normal viewing mode from a menu.
0. ▲▼ Changes channels or moves to the item in the menu.
. ◀▶ Adjusts the volume or moves to left or move item in the menu.
2. OK/LIST Executes the selected item and displays channel lists when you
watching a channel.
3. V+/V- Turns volume up or down.
4. P+/P- Changes channels up or down on normal mode.
5. INFO Displays the program information box on the screen and edit the
name of favorite channel list.
6. TV/RADIO Switches between TV and Radio.
7. EPG Displays the TV or Radio program guide.
(Electronic Program Guide)
8. PAUSE Pauses the playing picture or go to normal mode.
9. AV/TV Selects the TV or AV mode.
20. UHF Switches to UHF turning mode.
2 . ←PR Selects the previously viewed channel.
22. PAL/NTSC Switches PAL or NTSC mode.
23. Audio Changes the audio languages.
24. Position Displays position bar on the screen to adjust the antenna.
25. Selects the sound mode(LEFT/RIGHT/STEREO).
26. Enables subtitle and teletext mode.
GENERAL INFORMATION
4
III. REMOTE CONTROL UNIT (RCU)

GENERAL INFORMATION
7
V. REAL PANEL
6
GENERAL INFORMATION
IV. FRONT PANEL
“All USB 2.0 flash drive may not be compatible with the product”
. POWER Switches the receiver power On and Standby.
2. VOL Up/Down Volume up/down or selects the item of Menu.
3. CH Up/Down Channel up / down or selects the item of Menu.
4. SMART SLOT Insert Smart Card.
5. CI SLOT Insert CAM.
①② ③
④⑤
. AERIAL Connects to Terrestrial antenna cable.
2. LOOP OUT Connects to another STB.
3. LNB IN Connects to Satellite antenna cable.
4. LNB OUT Connects to another STB.
5. DIGITAL AUDIO Output for connecting to a digital amplifier.
6. AUDIO-R Connects to AUDIO RIGHT to TV or other equipment.
7. VIDEO Connects VIDEO to the TV or other equipment.
8. AUDIO-L Connects to AUDIO LEFT to TV or other equipment.
9. TV SCART Connects to TV SCART cable.
0. VCR SCART Connects to VCR SCART cable.
. TV/VCR Connects to TV or VCR.
2. ANT Connects to TV antenna input.
3. RS 232 Connects to personal computer for software upgrade.
4. ETHERNET Connects to LAN cable.
5. YUV Connects to YUV jack of TV or VCR
6. USB Connects to USB device.
7. POWER SUPPLY 90~250V AC, 50/60Hz, 40W.
8. POWER BUTTON Turns On/Off.

III. CONNECTING THE RECEIVER TO TV AND VCR WITH RF CABLE
8
INSTALLING EQUIPMENT
This section explains several ways of connecting the receiver to your existing
TV, VCR and Hi Fi system.
You can choose one of the following setups that we recommend.
If you have any problem or need help, consult your dealer or service provider.
Please ensure that the following items are included with the receiver in your packing.
I- . Connecting the receiver to TV with the SCART cable
Connect one end of the SCRAT cable to the TV SCRAT cocket on the rear panel of the
receiver and the other end to a SCRAT socket on the TV.
II 1.Connecting the receiver to TV with the CINCH cable
Connect one end of the CINCH cable to the Audio R(Red), the Audio L(White)and the Video (Yellow) socket on
the rear panel of the receiver and and other end to the Audio R(Red), the Audio L(White) and the
VIDEO(Yellow) socket on the TV.
III- . Connecting the receiver to TV/VCR with RF cable
Connect one end of the RF cable to the TV socket on the rear panel of the receiver
and the other end to the ANT IN on the TV.
Connect one end of the RF cable to the ANT socket on the rear panel of the receiver and the
other end to the ANT OUT on the VCR.
I. CONNECTING THE RECEIVER TO TV
II. CONNECTING THE RECEIVER TO TV WITH CINCH CABLE
INSTALLING EQUIPMENT
9

CHANNEL LIST GUIDE
i) Press MENU key then cursor will move to ALL,
placed on the left.
j) Sort Key (Yellow Key)~A~Z/Z~A/FAT/CAS.
k) Press Yellow key for sorting A~Z/Z~A/FAT/CAS. If you want to go back to unsort from the
selected CAS go back to Pop UP Window then select unsort.
4.EPG (Electronic Program Guide)
a) Press EPG button on the live mode.
b) EPG of the current channel appears on the screen.
c) Select the channel that you want to watch program.
d) To reserve program with recording function, press
REC(●) button.(PVR model only)
e) It will be appear like rightside picture.
f) If you reserve program, then it will be record
automatically at reserved time.(PVR model only)
g) Press Select button twice to return to current live
channel.
5. ZOOM IN/OUT
a) By selecting page up key ( ) in a normal live mode
you can use Zoom In/Out function.
b) From the Pop Up Window of Zoom function you can
select(*2*3*4)by page up key( ), for Zoom out
press page down key.
c) When you move cursor of Zoom focus by key
(◀▶▲▼ ) then you can select Zoom In/Out on the
focused point by pressing page up/down keys. Press
Pause key then live mode will be paused on the mode
of Zoom.
CHANNEL LIST GUIDE
. Normal Live Mode
a) When you select one channel, information bar appears
automatically on the screen for few seconds. This bar
provides you the current channel information.
b) Press INFO button to see the information during normal
live mode.
2. Simple Channel List
a) Press OK on the normal live mode to go to the channel
list.
b) When detail channel list is displayed on screen press
RED button to go to simple channel list.
3. Detail Channel List
a) Press OK on the normal live mode to go to the channel
list.
b) When simple channel list is displayed on screen press
RED button to go to detail channel list.
c) Press◀▶ and ▲▼to sort by Alphabet.
d) Press SAT button to sort by Satellite and FAV
button for Favorite 1~8.
e) Press GREEN button to return to All Channel or EXIT to
return to the current live channel.
f) Press the SAT key to show Satellite Pop UP Window then
select satellite. Channel list of selected satellite will be
displayed.
g) Press the FAV key to show Favorite Pop UP Window then
select FAV list. Channel list of selected FAV will be
displayed.
h) Press the Green key then all searched channel list will
be displayed.
0
3
MENU GUIDE
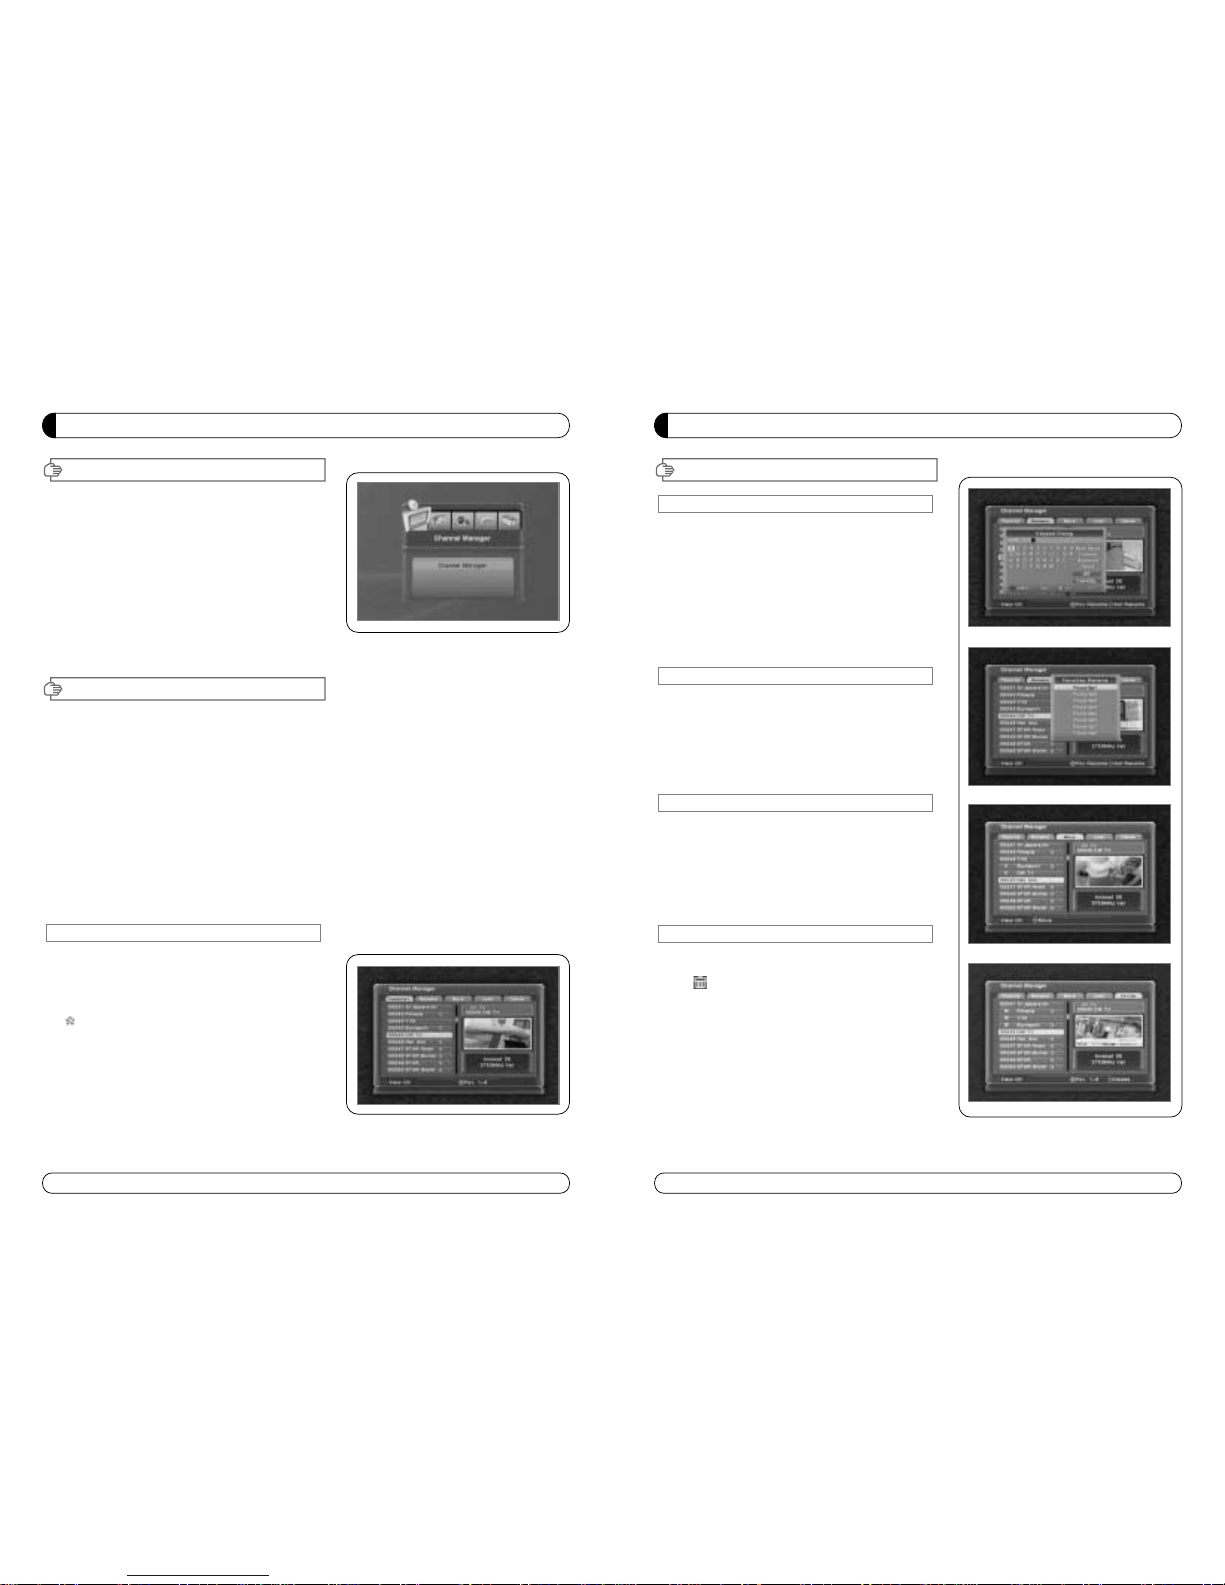
I. Channe Manager
I-2. Rename
1. Using
◀▶
go to the Rename mode.
2. Select the channel that you want to rename using
▲▼
and
then press OK.
3. Keypad Dialog displays on the screen.
4. Edit the name entering NUMBERS and / or WORDS in the
Keypad Dialog.
5. Press YELLOW button to rename Favorite 1~8 and press
BLUE button to rename Satellite.
6. Press EXIT to return to the previous menu or press MENU to
go to the current live channel.
I-3. Move
1. Using
◀▶
go to the Move mode.
2. Select channels which you want to move by pressing OK key.
3. Move cursor that you want to place on than press GREEN
button.
4. Press EXIT to return to the previous menu or press MENU to
go to the current live channel.
I-4. Lock
1. Using
◀▶
go to the Lock mode.
2. Select the channel that you want to lock and then press OK.
will be marked at the end of the selected channel name bar.
To delete press OK again.
3. Press EXIT to go to Main Page or press MENU to go to the
current live channel.
I-5. Delete
1. Using
◀▶
go to the Delete mode.
2. Select the channel that you want to delete and then press
OK. will be marked on the selected channel number.
To delete press Blue button again.
3. Press YELLOW button to delete TP. Select one channel and
press Blue button.
All channels of that TP will be automatically selected.
4. Press YELLOW button to delete Satellite. Select one channel
and press Blue button. All channels of that the Satellite will
be automatically selected.
5. Press EXIT to return to the previous menu or press MENU to
go to the current live channel.
6. Message Box displays on the screen.
7. Select OK on the Message Box and then press OK to delete
the markedchannels.
2
MENU GUIDE
Main Page
I. Channe Manager
Press the MENU button on the RCU to open Main
Page on the screen. Main Page will be displayed.
1. You can move into the main page using ▲▼◀ ▶
on the RCU.
2. Press OK to confirm your selection.
3. Press EXIT to return to the previous menu or press
MENU to go to the current live channel.
I. Channel Manager
II. Installations
III. Options
This section may help you to organize channels according to your preference.
1. Select Channel Manager in the Main Page with ▲▼ and press OK.
2. TV Channel Manager Page displays on the screen.
3. Select the mode that you want using ◀▶.
4. To see the channel that you choose, go to the channel and then press RED botton.
5. Press EXIT to return to the previous menu or press MENU to go to the current live channel.
I- . Favorite
I-2. Rename
I-3. Move
I-4. Lock
I-5. Delete
I- . Favorite
1. Using ◀▶go to the Favorite mode then press
YELLOW button to choose Favorite 1~8.
2. Press OK on the channel that you want to add
or delete.
3. will be marked at the end of selected channel
name bar. To delete press OK again.
4. Selected channels will be automatically saved.
5. If you want to check the saved Favorite Channel List
go to other mode(Rename~Delete) except Favorite
and then press FAV button to check Favorite 1~8.
6. Press EXIT to return to the previous menu or press
MENU to go to the current live channel.
IV. Utility
V. Accessory

MENU GUIDE
5
II-2. DiSEqC Switch
. Select Channel Search in Installation using ▲▼
and press OK.
a) If you select DiSEqC Switch and press OK on the
menu will be, DiSEqC Switch Page will be
displayed.
b) Select the proper Satellite of each DiSEqC port
(A~D) using ◀▶and ▲▼ and press SEARCH.
Selected Satellites will be searched
automatically.
II-3 Motor Setup
. You can move the cursor using ▲▼ and press OK
when you select the value that you want.
a) Motor Type : DiSEqC .2, USAL
Press OK to display Motor Type
Select the proper Motor Type and then press OK.
b) Satellite
Press OK to Display the Satellite List Box
Select the proper Satellite and then press OK.
c) Switch & LNB
Press OK to Display the LNB frequency list or
Switch Setting
Select proper LNB & proper Switch.
d) Frequency
Press OK to Display the Frequency List.
Select the proper Frequency and then press OK.
e) Motor Movement
Search the appropriate position of the selected
Satellite using◀▶.
II. Insta ation
MENU GUIDE
4
This section may help you to set up antenna and
scan satellite or transponder, etc. Select Installations
in Main Page using ▲▼ and press OK.
Press EXIT to return to the previous menu or press
MENU to go to the current live channel.
II- . Satellite Search
II-2. DiSEqC Switch
II-3. Motor Setup
II-4. Terristrial Search
II-5. Factory Default
II- Satellite Search
.You can move the cursor using ▲▼ and press OK
when you select the value that you want.
a) Satellite
Press OK to display the Satellite List Box.
Select the proper Satellite and then press OK.
b) DiSEqC
Press OK to display the DiSEqC Port List.
Select the proper DiSEqC port and then press OK.
c) Frequency
Press OK to display the Frequency List.
Select the proper Frequency and then press OK.
d) LNB
Press OK to display the LNB Frequency List.
Select the proper LNB Frequency and then
press OK.
You can also input directly the numbers using
NUMBER KEY on the RCU.
e) 22KHz Tone
Select the one among None, 0 KHz or 22 KHz
depending on the user’s antenna switch box.
f) Search Option
Press OK to display the Search Option list.
Select the Search Option that you want and then
press OK.
g) Search
Press Search to start scan channels.
Selected Satellite displays on the screen.
Press ▶to select more Satellite or ◀to
cancel the selected Satellites.
Press OK to start scanning.
TP EDIT : To Edit TP, Press the RED
button on the RCU.
II. Insta ation

MENU GUIDE
II. Insta ation
7
II-4. Terristrial Search
. Select Channel Search in Installation using ▲▼
and press OK.
2. ) Select the region where you are using ◀▶.
2) You can select searching type which you want among
Auto and Manual using◀▶.
3) Auto
a) Select ‘Search’on the Screen and pres OK button to scan
channels.
b) Press Exit or Menu after finishing scanning.
4) Manual
a) Select Mux Channel which you want using ◀▶.
b) Frequency will be displayed automatically according to
selected Mux Channel.
II-5. Factory Default
Use Factory Default function only when you want
to return the receiver to the condition of factory
default. All settings and channels will be deleted.
1. Select Factory Default in Installations using ▲▼ and press
OK.
2. Message box displays on the screen.
3. Select OK to return the receiver to the condition of factory
default and then press OK.
4. Press EXIT to return to the previous menu or press MENU
to go to the current live channel.
6
MENU GUIDE
II. Insta ation
e) Motor Control
Select the position using ◀▶and then press OK.
Message box displays on the screen.
- Store Sat position : Stores the current position
of the motor for the selected
satellite.
- Goto Sat Position : Moves the motor to the stored
position of the selected satellite.
- Goto 0 : Goes to the center of the motor.
- Reset Position : Resets all stored position of the motor.
f) Satellite Position
Input directly the position using NUMBER KEY on the RCU
Select the direction using ◀▶(WEST / EAST).
g) Search Option
Press OK to display the Search Option list.
Select the Search Option that you want and then press OK.
h) Search
Press Search to start scan channels.
Press OK to start scanning.
※TP EDIT : To Edit TP Press the RED button on the RCU.
2. Edit my local position
- Press Green Button to edit local Position.
a) Longitude
Input directly the Longitude using NUMBER KEY on the RCU.
Select the direction using ◀▶(WEST / EAST).
b) Latitude
Input directly the Latitude using UNMBER KEY on the RCU.
Select the direction using ◀▶(NORTH/SOUTHd).
3. Press EXIT to return to the previous menu or press MENU to go to the current live channel.
Indice
Lingue:
Altri manuali Mvision Ricevitore


