Newnham Research EKKO Projector adapter Manuale utente

Newnham Research Limited
EKKO Projector
Adapter for Windows XP
Installation Guide
User Guide
Reference
This installation guide is only applicable to networks
that are NOT part of an RM CC3 network.
See technical article TEC344081 – FAQ
for the RM EKKO Projector adapter.
Document No: NR-05-0001 / 1.0

User Guide NR-05-0001/1.0
Table of Contents
1 Overview ...........................................................................................................................3
2 Installation Guide ..............................................................................................................4
2.1 Network ........................................................................................................................4
2.2 Preparing the peripherals..............................................................................................4
2.3 Installing the EKKO Projector Adapter........................................................................5
2.4 Installing the Software..................................................................................................6
2.5 Removing the software...............................................................................................10
3 Reference.........................................................................................................................11
3.1 EKKO Projector Adapter Interfaces...........................................................................11
3.2 Power-up Boot Sequence............................................................................................12
3.3 Troubleshooting..........................................................................................................13
4 Appendices ......................................................................................................................14
4.1 Using the RM EKKO Projector on CC3.....................................................................14
4.2 Online Help.................................................................................................................14
4.3 Frequently Asked Questions (FAQ)...........................................................................14
4.4 Configuring IP address manually. ..............................................................................15
4.5 Determining the MAC address...................................................................................15
page 2 of 15 Newnham Research Ltd
NR-05-0001/1.0 User Guide
1 Overview
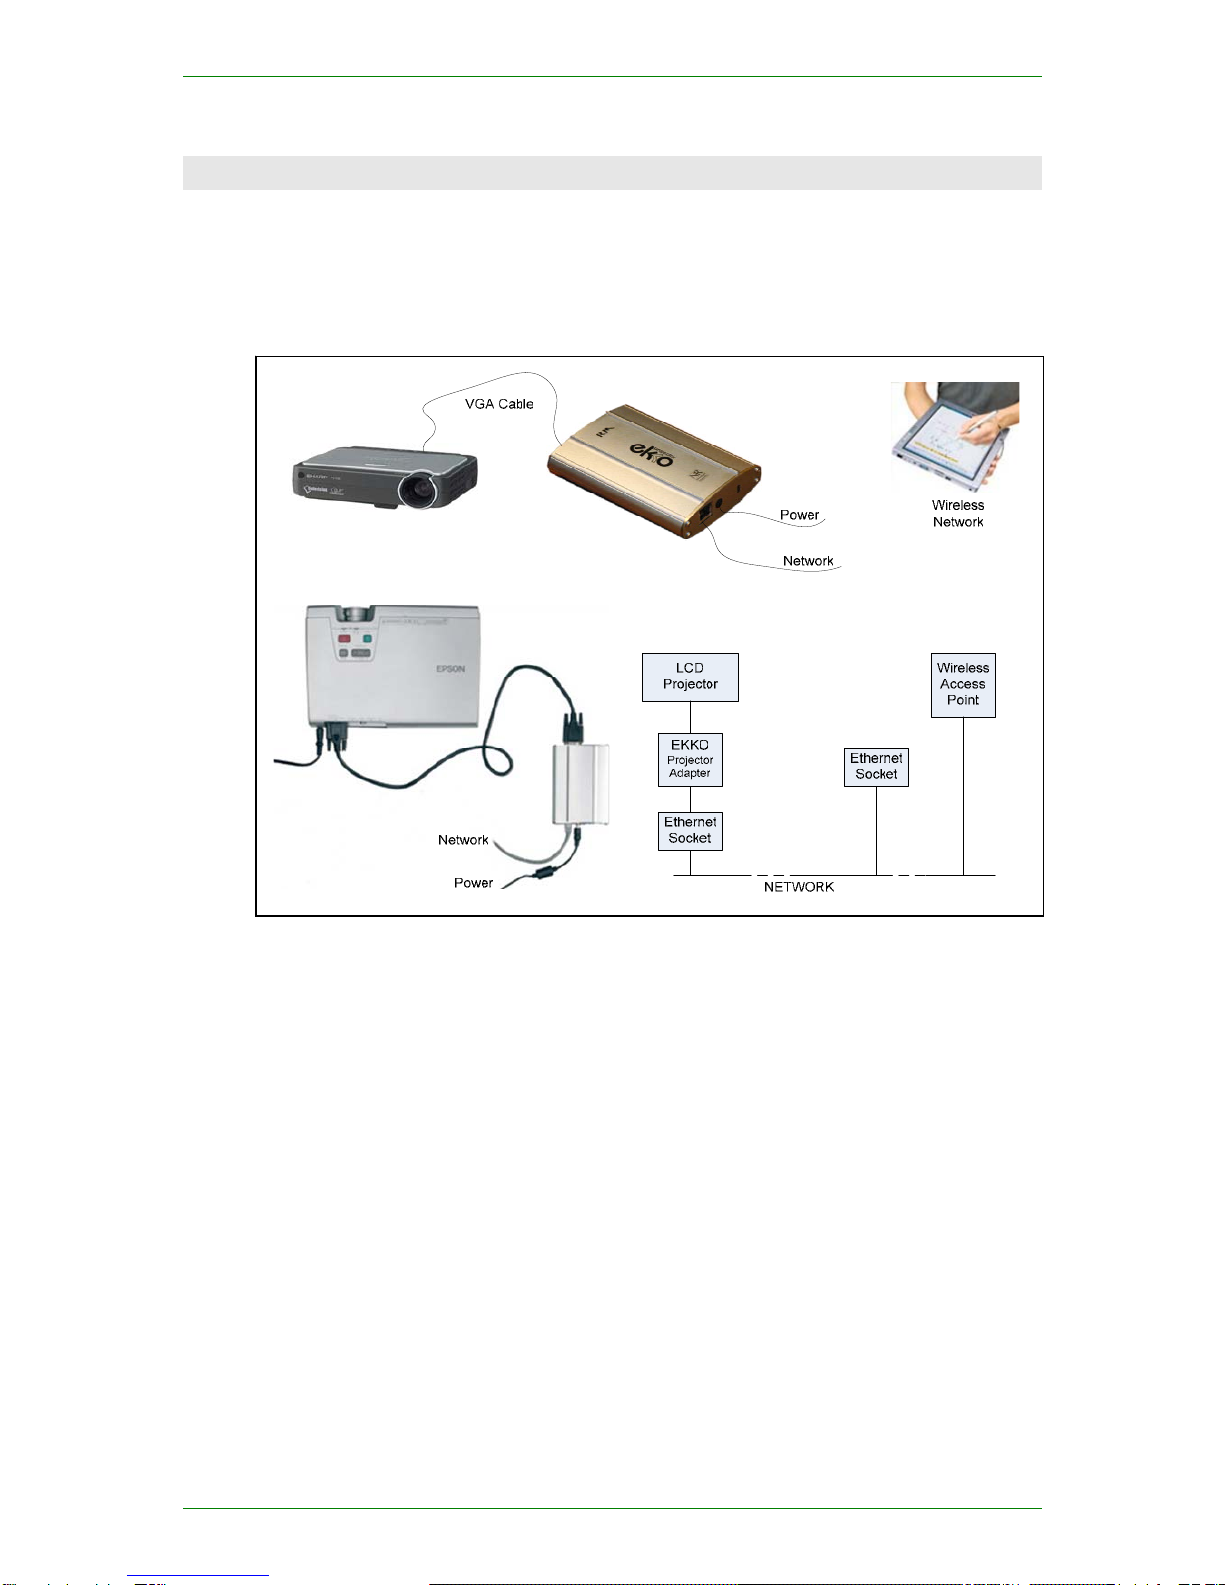
The EKKO Projector adapter (incorporating EKKO Display Technology from Newnham Research,
Cambridge, UK) allows a PC to display an image on a projector via an Ethernet network.
The adapter provides an Ethernet interface to a projector or other LCD computer monitor. It connects
to the projector using a conventional VGA cable, and to the local area network via a standard CAT5
cable. This makes the display available to any PC on the network.
The EKKOdesk application software allows a standard PC screen to be copied, or cloned, to a
projector via the projector adapter. A simple user interface (via a system tray icon) allows the user to
select an available projector or monitor.
Newnham Research Ltd page 3 of 15

User Guide NR-05-0001/1.0
2 Installation Guide
This installation guide is only applicable to network installations that are NOT part of a RM CC3
network. See technical article TEC344081 - FAQ for the RM EKKO Projector adapter.
2.1 Network
2.1.1 Network Configuration
The EKKO Projector adapter will work on Ethernet networks running at 10 Mb/s or 100 Mb/s and is
connected to the network using standard CAT5 cabling.
Full performance requires a 100 Mb/s connection from the projector adapter to a switch. For best
performance with multiple EKKOs, the network should be configured using a 1Gbps backbone and
multiple 100 Mb/s segments, each connecting to a single adapter.
2.1.2 Network Requirements
The network that the EKKO Projector adapter connects to must be equipped with a Dynamic Host
Configuration Protocol (DHCP) server for the configuration described in this manual.
If a DHCP server is not available, see the online help articles referred to in Section 4.3 - 4.5
It is recommended that the DHCP server is configured to reserve a specific IP address for each
adapter,. This avoids the adapter being given different IP addresses each time it is powered up.
If the network is configured to have a Domain Name Server (DNS), the EKKOdesk application will
use the name of the adapter rather than the IP address.
e.g. The EKKO Projector adapter installed in Lecture Theatre 6 will always be
given the IP address of 192.168.52.103 by the DHCP server. The networks
DNS maps the name LT06 to this IP address. This means that the adapter can
ALWAYS be addressed by the network name LT06.
If the network administrator needs to replace the EKKO Projector adapter with another or change the
IP addresses for any reason, it is a simple task to modify the DHCP and/or the DNS server
configuration, rather than change the detail on every PC that uses the adapter.
For networks not equipped with a DHCP server, it will be necessary to configure the network
manually. See the online FAQ at http://www.rm.com/support.
2.1.3 Adapter Naming Conventions
The rest of this document assumes that a set of adapters have been assigned sequential addresses
starting at 192.168.0.101 and that these addresses have been given the names ekko1, ekko2 etc.
2.2 Preparing the peripherals
The EKKO Projector adapter will work with most LCD monitors and projectors. CRT monitors are
not supported.
The projector should support XGA (1024x768) resolution. Lower-resolution modes such as
VGA (640x480) and SVGA (800x600) can be used but the EKKODesk application may switch the
adapter into a mode that cannot be displayed and might damage the projector.
The adapter always assumes the same display resolution as the PC if this is 1024x768 or less. If
greater, a top left 1024x768 window from the display is presented.
page 4 of 15 Newnham Research Ltd
NR-05-0001/1.0 User Guide
2.3 Installing the EKKO Projector Adapter
The adapter should be placed in a ventilated area away from direct sources of heat.
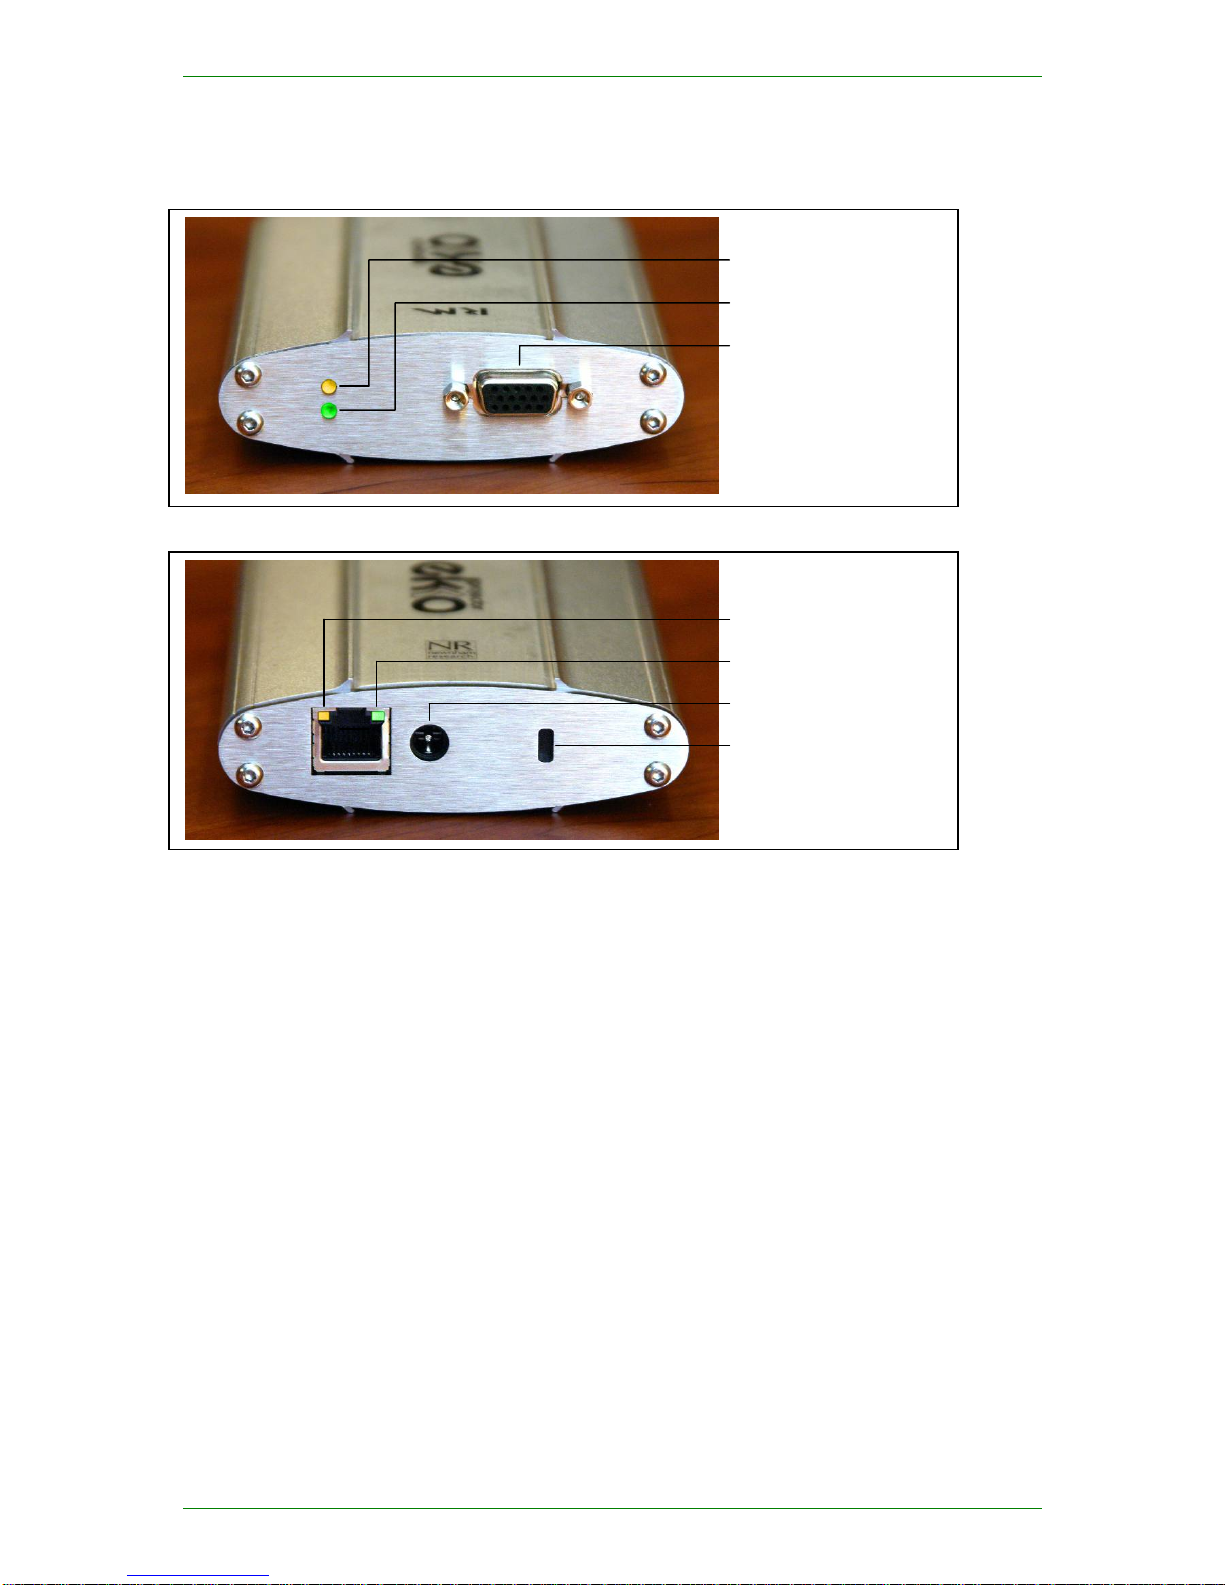
Figure 1 – EKKO Projector Adapter viewed from VGA connector end
Figure 2 - EKKO Projector Adapter viewed from Network connector end
Kensington Security Slot
Power
Network Link (Green)
Network Activity (Yellow)
VGA Connector
Idle Status (Green)
Client Status (Yellow)
Figure 1 and Figure 2 show the details of the various sockets, which should be connected as follows:
1. Connect a projector to the VGA Connector
2. Connect the EKKO Projector Adapter to the Ethernet network using the NETWORK socket
3. Connect the power adaptor to the POWER socket
When the power is switched on the device will go through a boot sequence which will take a few
seconds (see section 3.2 ). Once the boot is complete the Network Link indicator and the Idle Status
indicator should be lit. The Network Activity light will flash intermittently when there is other activity
on the network. If the device does not boot within 15 seconds, check the troubleshooting section
below (section 3.3.1 ).
At this point, assuming the adapter has been given an IP address as described in section 2.1.3 above, it
is possible to test that it is operating correctly, using the ping command-line utility, e.g.:
ping ekko1
or
ping 192.168.0.101
If the EKKO Projector Adapter’s IP address and/or name is not known, it will be necessary to examine
the DHCP server’s information panel or logs for this information. This is best done by your network
administrator.
Newnham Research Ltd page 5 of 15
User Guide NR-05-0001/1.0
2.4 Installing the Software
The EKKO Projector software is contained in the standard Windows Installer file EKKOdesk.msi.
This is found on the distribution CD in the directory:
<CD-drive:>\EKKOdeskInstaller\
Install the software by double-clicking on EKKOdesk.msi or by selecting "Install" from the right-
click menu for the file.
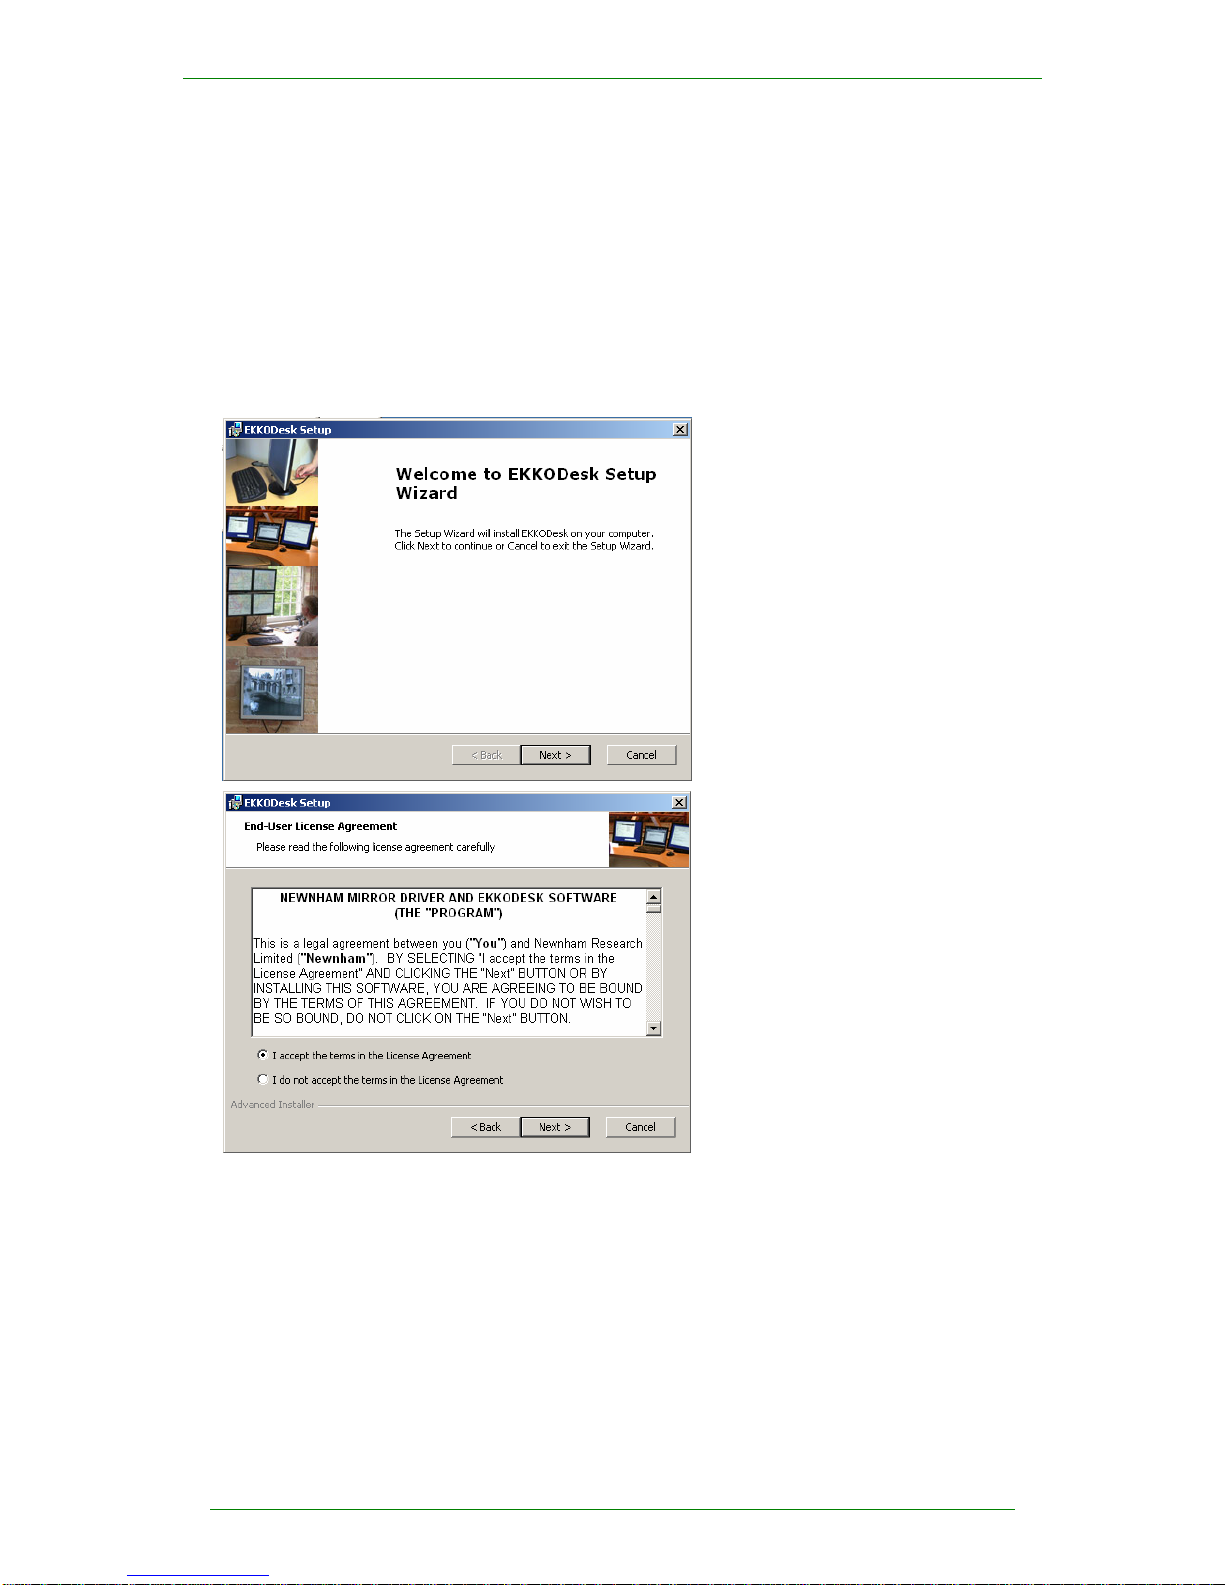
The following screenshots show the installation process:
This is the EKKODESK Installer
welcome screen.
Click on the Next button to
continue.
If you have read and agree with the
end-user licence agreement, click the
I accept…Agreement radio
button and click on the Next button
to continue.
If you do not accept the terms of the
Licence Agreement, click the I do
not accept …… and contact the
company that sold you this software.
page 6 of 15 Newnham Research Ltd
NR-05-0001/1.0 User Guide
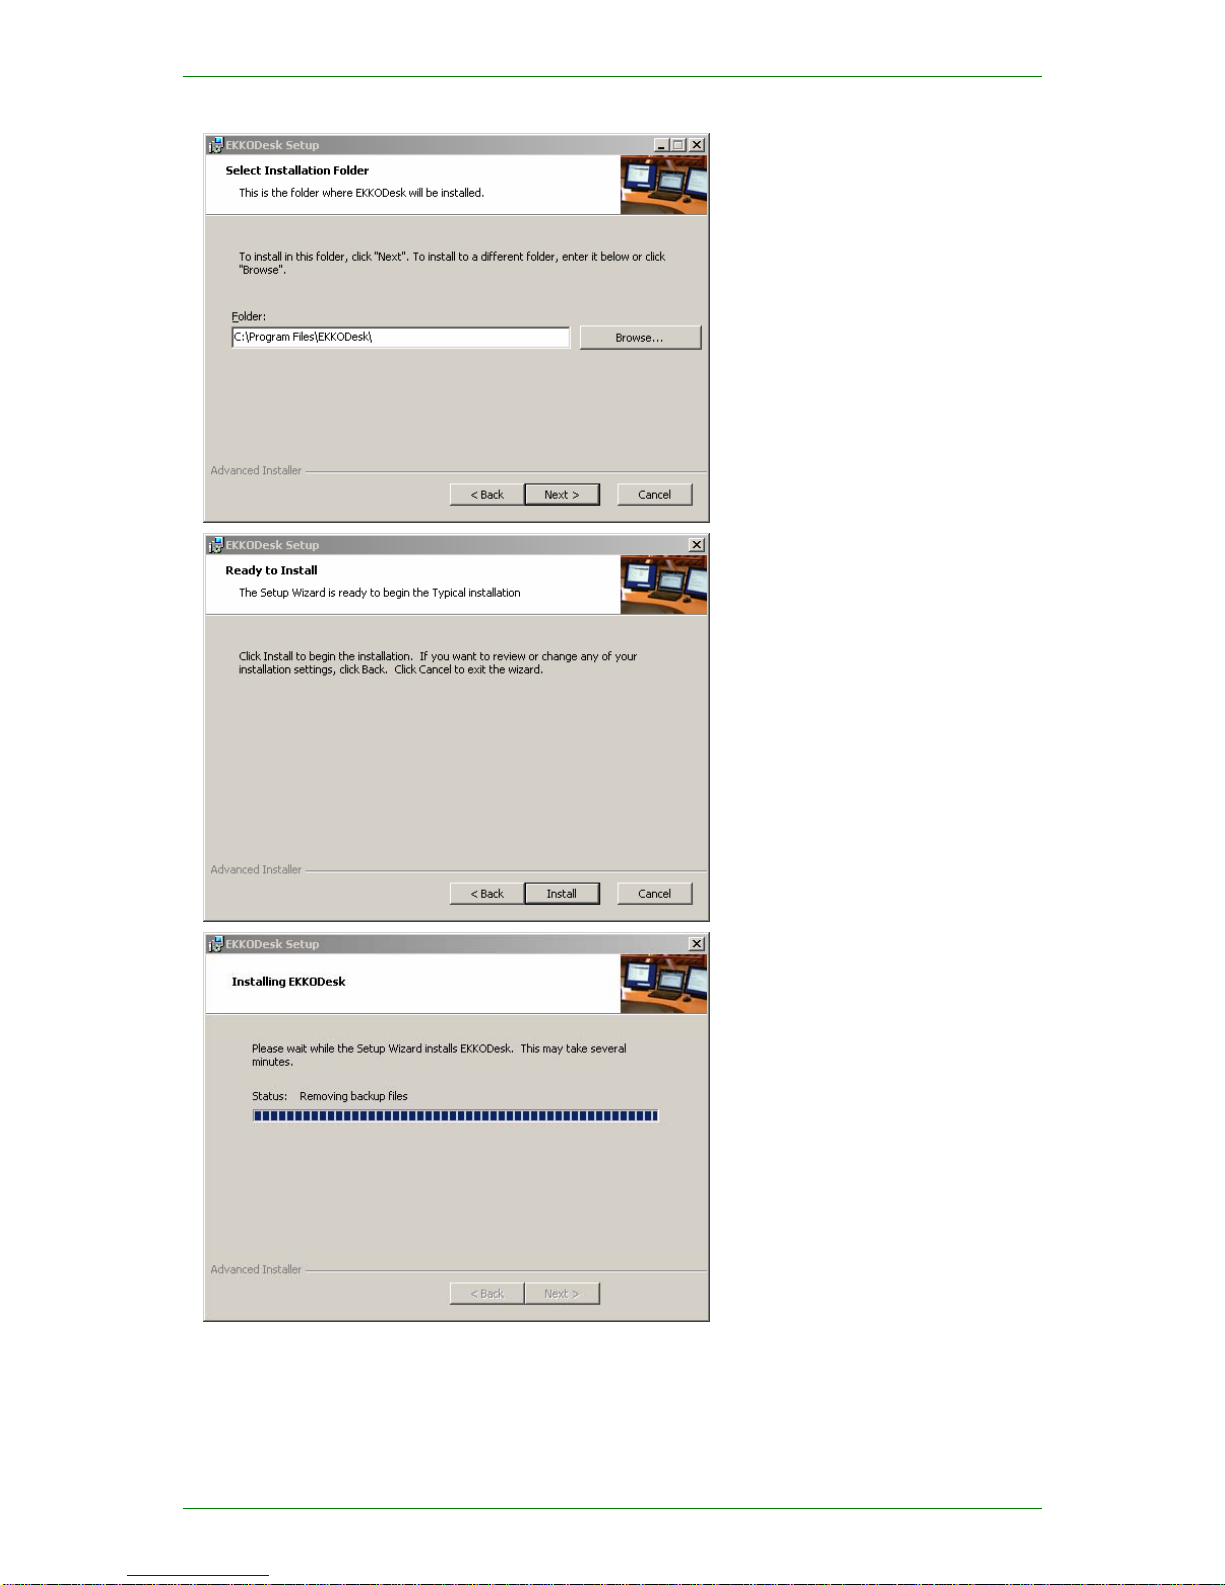
Select where you would like to have
the software installed.
The default folder is
C:\Program Files\EKKODesk\
Another location can be selected
using the Browse button.
This is your opportunity to change
any of the setting or selection you
have made to this point.
If you are happy with the selections
made, click on the Install
button.
The EKKODesk Installation
program will install all the necessary
files in the selected directory, install
the display driver and will make all
necessary modifications to the
operating system registry.
Newnham Research Ltd page 7 of 15
User Guide NR-05-0001/1.0
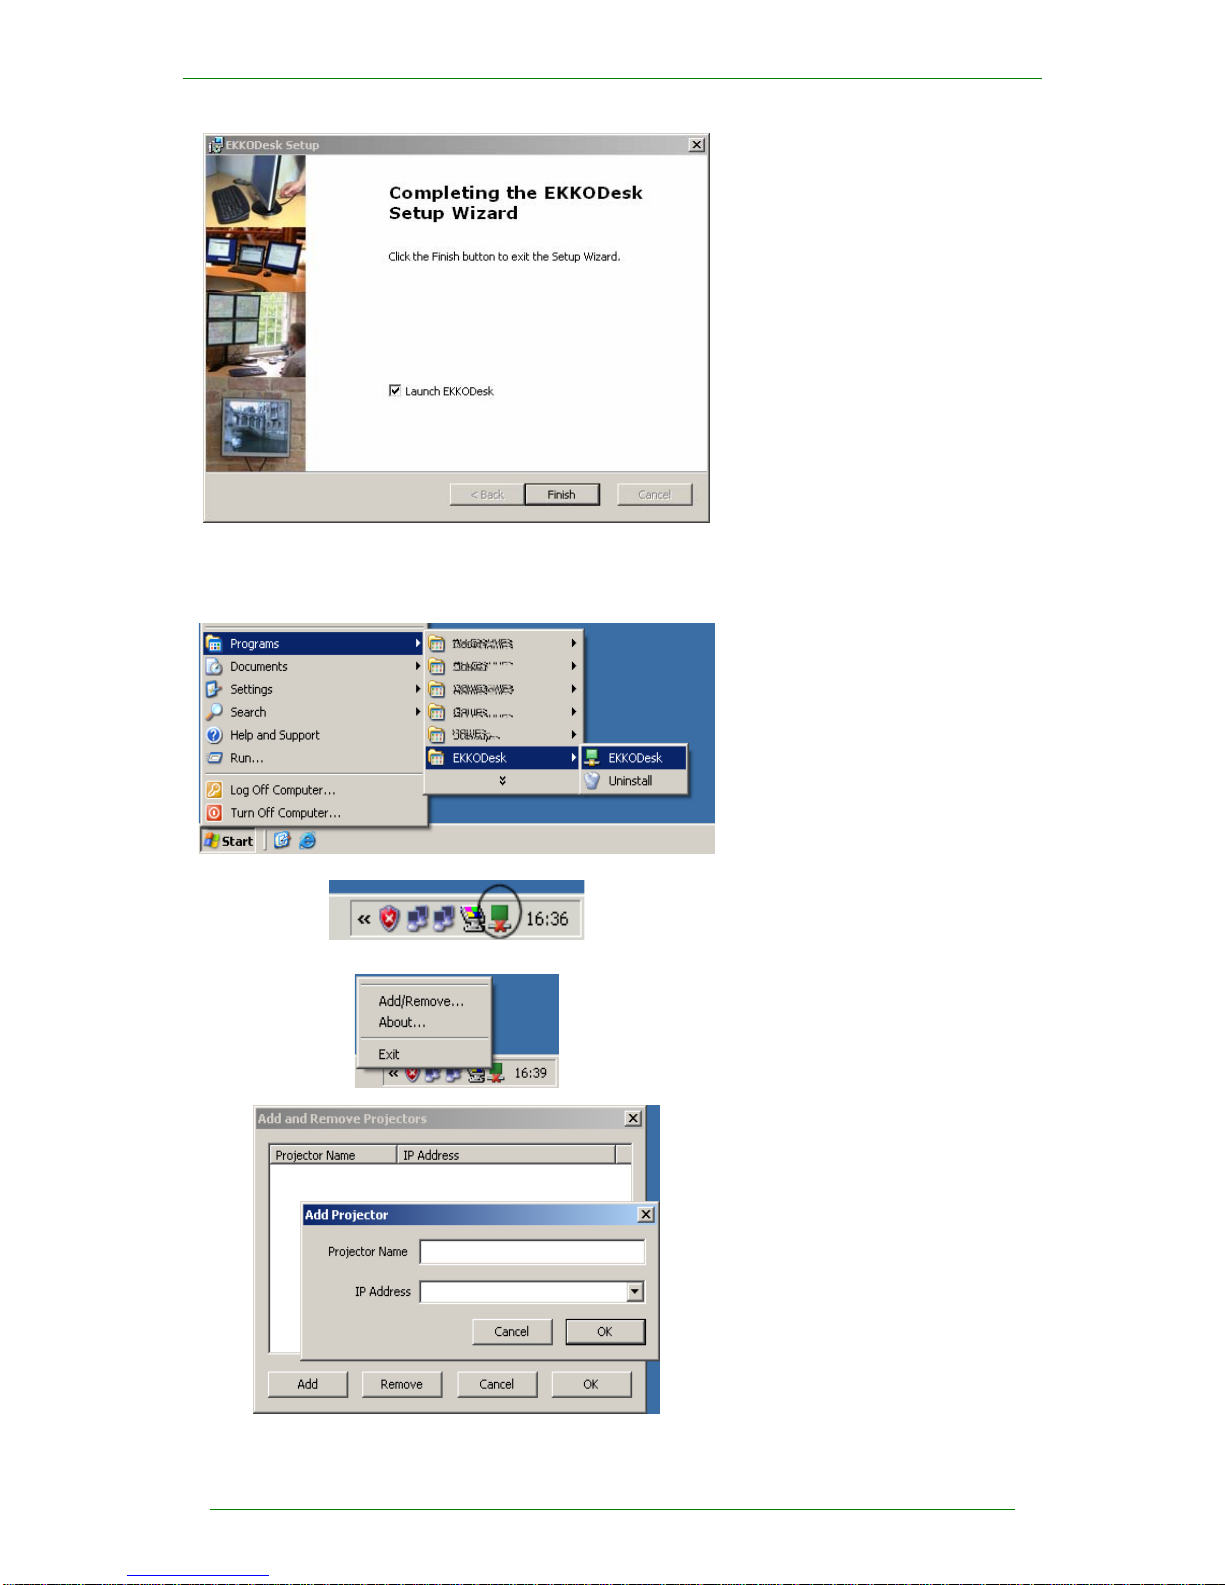
When the installation is complete,
click the Finish button.
If selected, EKKODesk will be
launched.
At this point, the display driver and application are installed and available for use.
To continue with the configuration, the EKKO Projector hardware will need to be connected as described
in Section 2.3 .
To configure and use the
EKKO Projector adapter, run the
EKKODesk application from the
start menu:
Start→
Programs→
EKKODesk
This will place the icon shown in the
Windows XP toolbar. The small red
cross on the icon indicates that the
application has not been configured.
Clicking on this icon brings op the
EKKODesk menu.
Clicking the Add/Remove option
shows the Add and Remove
Projector dialog.
Clicking the Remove button
removes the selected projector from
the list.
Clicking the Add button shows the
add projector dialogue.
page 8 of 15 Newnham Research Ltd
NR-05-0001/1.0 User Guide
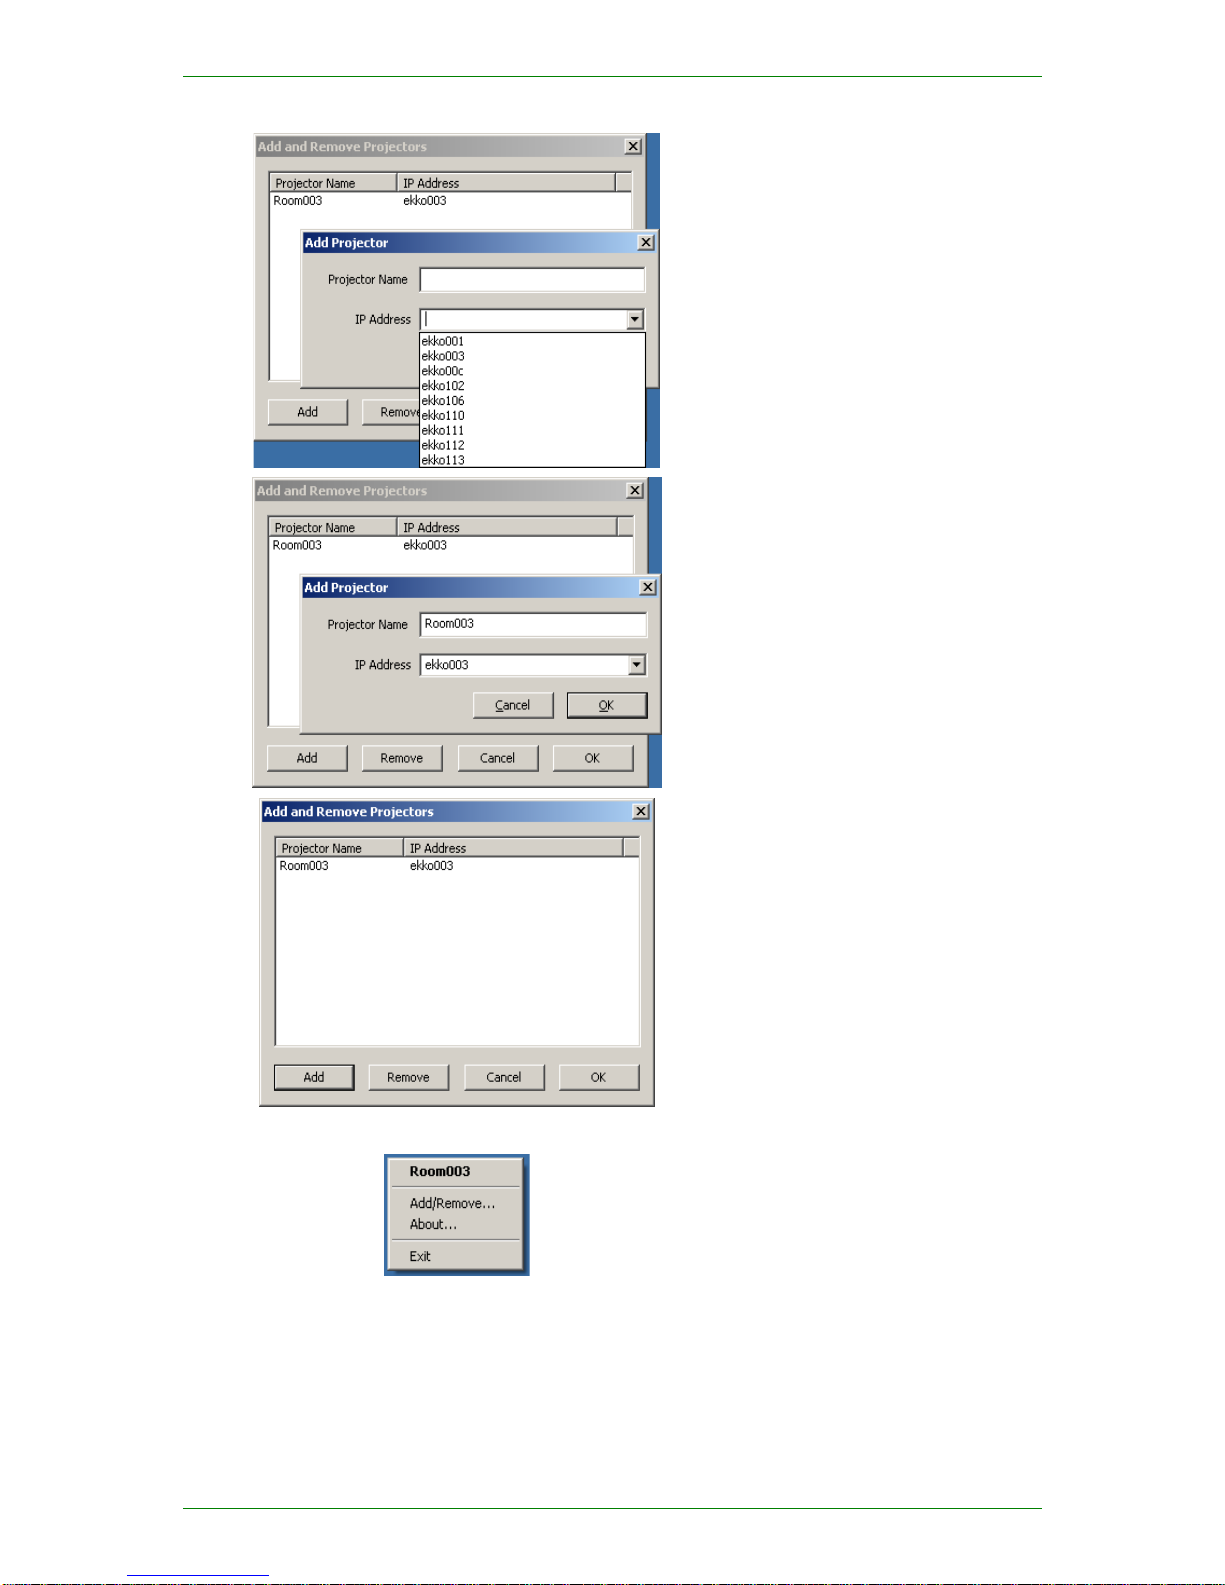
Clicking the drop-down list selector
for IP Address will show the names
of the adapters that are accessible on
the network. If an adapter is found
that does not have a name, the IP
address will be shown instead.
It is also possible to type the name or
IP address of a projector directly into
the box if it does not appear on the
list.
With the adapter selected, give the
EKKO Projector adapter a
descriptive name and click OK.
The list of known EKKO Projector
adapters will be shown.
Click OK to complete.
Clicking on the tool-bar icon will
bring up the EKKODesk menu,
showing the available adapters and
their friendly names.
Click on the name to select the
adapter and enable it. The projector
will be shown in bold with a dot next
to it..
Newnham Research Ltd page 9 of 15
User Guide NR-05-0001/1.0
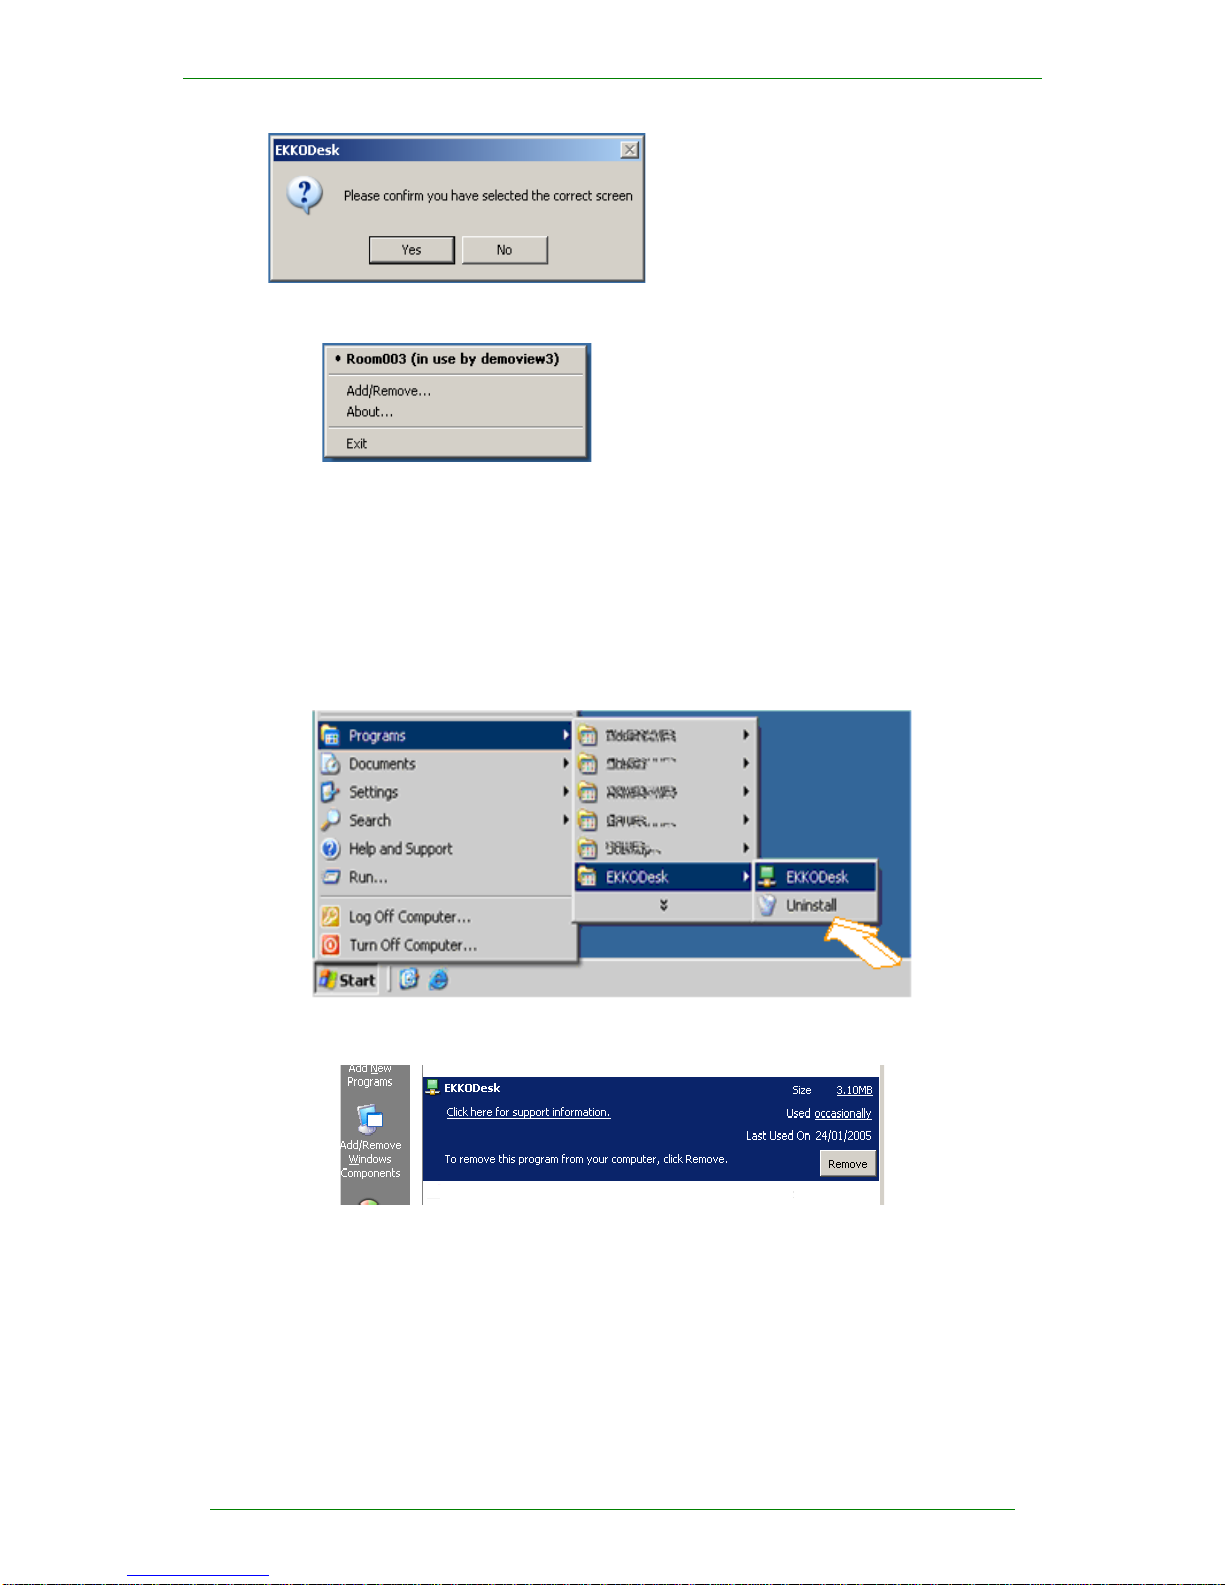
Confirm that you have selected the
correct screen by clicking the YES
button.
When the tool bar icon is clicked in
the future, the menu will show the
name of the adapters and the
computers that they are associated
with.
The projector can be disabled by
clicking on the name again. This
will also put the projector into
standby mode.
2.5 Removing the software
The EKKOdesk software can be removed using the Uninstall option in the program group.
The following screenshots show and describe the uninstallation process (if required) and the
subsequent and new installation process:
The software can also be removed using "Add/Remove Programs" in the Control Panel or by right-
clicking on the original installation file and selecting "Uninstall".
page 10 of 15 Newnham Research Ltd
Questo manuale è adatto per i seguenti modelli
1
Indice
Manuali Software popolari di altre marche


PS Audio
PS Audio PowerPlay Manuale del proprietario

Brady
Brady LOCKOUT PRO 3.0 Manuale di servizio

Avaya
Avaya Interaction Center Manuale utente

Texas Instruments
Texas Instruments TI-83 Plus Silver Edition Manuale

Novell
Novell GROUPWISE 8 - INTERNET AGENT Manuale utente

Oracle
Oracle Application 9i Manuale utente

Acer
Acer RDM Manuale utente

Canon
Canon Vixia HF21 Manuale utente

Canon
Canon ZR950 Manuale utente

Samsung
Samsung Auto Backup Manuale utente

Polycom
Polycom Vortex EF2201 Istruzioni per l'installazione e il funzionamento

Brocade Communications Systems
Brocade Communications Systems Brocade 8/12c Manuale utente