Onvif Redvision CCTV Hub Manuale utente
Redvision CCTV Hub
Quick guide on page 4!
Revision –v1.0
This Guide covers these products:
Redvision CCTV Hub
Proud UK Design and Manufacture-----UK Service and Support

©Redvision CCTV Ltd. 2008 - 2022 Content subject to change without prior notification. E&OE. All rights reserved.
RV-HUB-1
RV-24-HUB-1
RV-HUB-2/4
RV-24-HUB-2/4
Redvision CCTV Ltd.
Alpha House
Blacknest Road
Blacknest
Alton
Hampshire
GU34 4PX
Sales & Technical Support: +44 (0) 1420 448 448
Contact Redvision:
Welcome to Redvision
Thank you for choosing Redvision. Your Hub has been carefully developed and manufactured in the United
Kingdom.
This guide is intended to cover the basic installation of your hub, up to and including accessing the internal
web servers.
Models covered by this manual:

3
Contents
i. Quick-Guide for to essential configuration:.........................................................................................................4
ii. Safety guide...............................................................................................................................................................6
1.0 Installing the Hub..............................................................................................................................................7
1.1 Pole Mounted......................................................................................................................................................7
1.2 Wall Mounted .....................................................................................................................................................9
1.3 Camera installation......................................................................................................................................... 11
2.0 Power supply installation & setup ...................................................................................................................... 12
2.1 Power supply specifications ............................................................................................................................ 12
2.2 24VDC Power supply layout ............................................................................................................................ 13
2.3 24VDC PSU connections.................................................................................................................................. 13
2.4 Mains power connections............................................................................................................................... 13
2.5 Fuses ................................................................................................................................................................ 13
2.6 Hub Network and Power Connections..................................................................................................... 14
3.0 Technical Specifications....................................................................................................................................... 15
4.0 Warranty information.......................................................................................................................................... 16
2022 Hub Install Guide v1.0 4
i. Quick-Guide for to essential configuration:
The hub uses a built-in web server, to allow configuration from any web-browser application.
The table below lists the default configuration for the equipment on your Hub
Hub defaults - with recorder
Device
Default IP
Default Username
Default Password
4G Router
192.168.0.1
admin
admin
Recorder
192.168.0.121
admin
N/A
Camera Port 1
192.168.0.121:40001
admin (if Redvision)
admin (if Redvision)
Camera Port 2
192.168.0.121:40006
admin (if Redvision)
admin (if Redvision)
Camera Port 3
192.168.0.121:40011
admin (if Redvision)
admin (if Redvision)
Camera Port 4
192.168.0.121:40016
admin (if Redvision)
admin (if Redvision)
Hub defaults –with no recorder
Device
Default IP
Default Username
Default Password
4G Router
192.168.0.1
admin
admin
Camera (if
Redvision)
192.168.0.120
admin
admin
Connecting local to the hub:
The Hub uses a 4G LTE router, with a dual LTE & Wi-Fi antenna. For hard wired connectivity, connect via the Hub’s LAN port.
Engineering configuration can be completed over the Wi-Fi connection, search for “Redvision CCTV Hub”. The password will
be the serial number of the unit (for security, please change this password when first connecting to the Hub).
Connecting remotely to the hub:
Redvision offer data packages with either a fixed public IP address, or a dynamic public IP address. The hub will be configured
for connecting to each camera, or the recorder directly, as per the below.
Hub defaults - with recorder
Device
DDNS Domain/ Fixed Public IP
Port
4G Router
See label on base of Hub (DDNS ONLY)
8888
Recorder
See label on base of Hub
11065 (N/A for fixed Public IP)
Camera Port 1
See label on base of Hub
11071
Camera Port 2
See label on base of Hub
11072
Camera Port 3
See label on base of Hub
11073
Camera Port 4
See label on base of Hub
11074
Hub defaults –with no recorder
Device
DDNS Domain/ Fixed Public IP
Port
4G Router
See label on base of Hub (DDNS ONLY)
8888
Camera
See label on base of Hub
11070 (N/A for fixed Public IP)
2022 Hub Install Guide v1.0 5
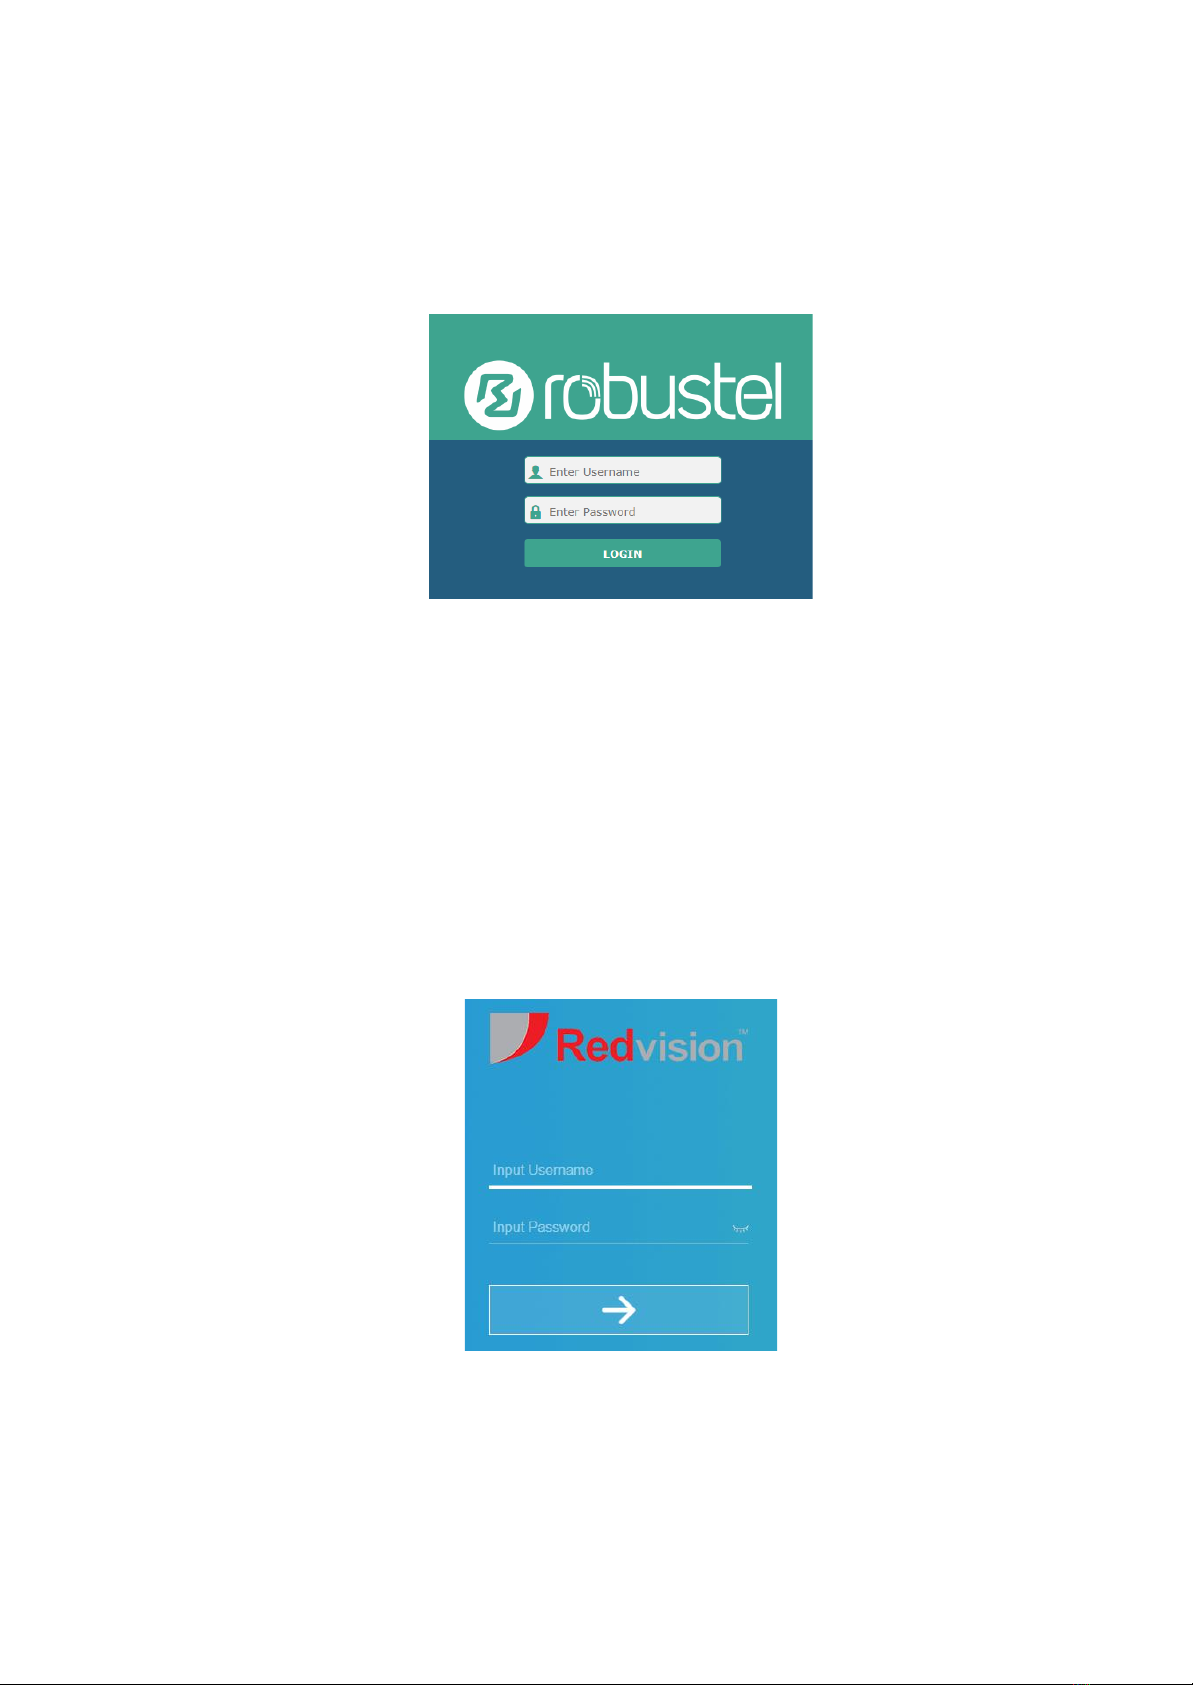
Router Login via web browser
If connecting locally (over Wi-Fi or LAN), type the router’s IP address into the web browser address bar; e.g. 192.168.0.1
and press enter. If connecting remotely, type in the DDNS followed by port 8888 e.g. rc303010.ddns.net:8888.
The login page is then shown, as per below:
•Enter the username and password.
•The default user name is admin. The default password is admin. Change the password when you log in to the system
for the first time to ensure system security.
Recorder Login via web browser
If connecting locally (over Wi-Fi or LAN), type the recorder’s IP address into the web browser address bar; e.g.
192.168.0.121 and press enter. If connecting remotely, type in the DDNS followed by port 11065 e.g.
rc303010.ddns.net:11065; or the fixed public IP address.
The login page is then shown, as per below:
•You will be prompted to setup a username and password upon first login to the system.

2022 Hub Install Guide v1.0 6
ii. Safety guide
1. Installation of this system should be carried out by suitably trained and qualified technicians in accordance
with local electrical codes.
2. To prevent the risk of electric shock do not expose the electrical connectors on the camera or the inside of the
control box to water before or during installation. Condensation/ misting may occur if water is allowed to
enter the housing before power is applied.
3. Do not drop the product.
4. Avoid the use of alcohol or solvent-based cleaners. The Hub should be cleaned with clean water and non-abrasive
material.
5. The camera system should be installed where it cannot be tampered with by unauthorised personnel.
6. The products should be securely fastened to a structure of sufficient strength to support it. Allowance should be
made for additional loads caused by local wind effects.
7. For best results, it is recommended once installed, that the hub be powered as soon as possible, to allow the
internal heater and fan devices to operate. It is not recommended to leave the hub in storage or unpowered for
extended periods of time.
THIS CAMERA SYSTEM MUST BE INSTALLED, OPERATED AND MAINTAINED
IN ACCORDANCE WITH THE MANUFACTURER’S SPECIFICATIONS.
2022 Hub Install Guide v1.0 7
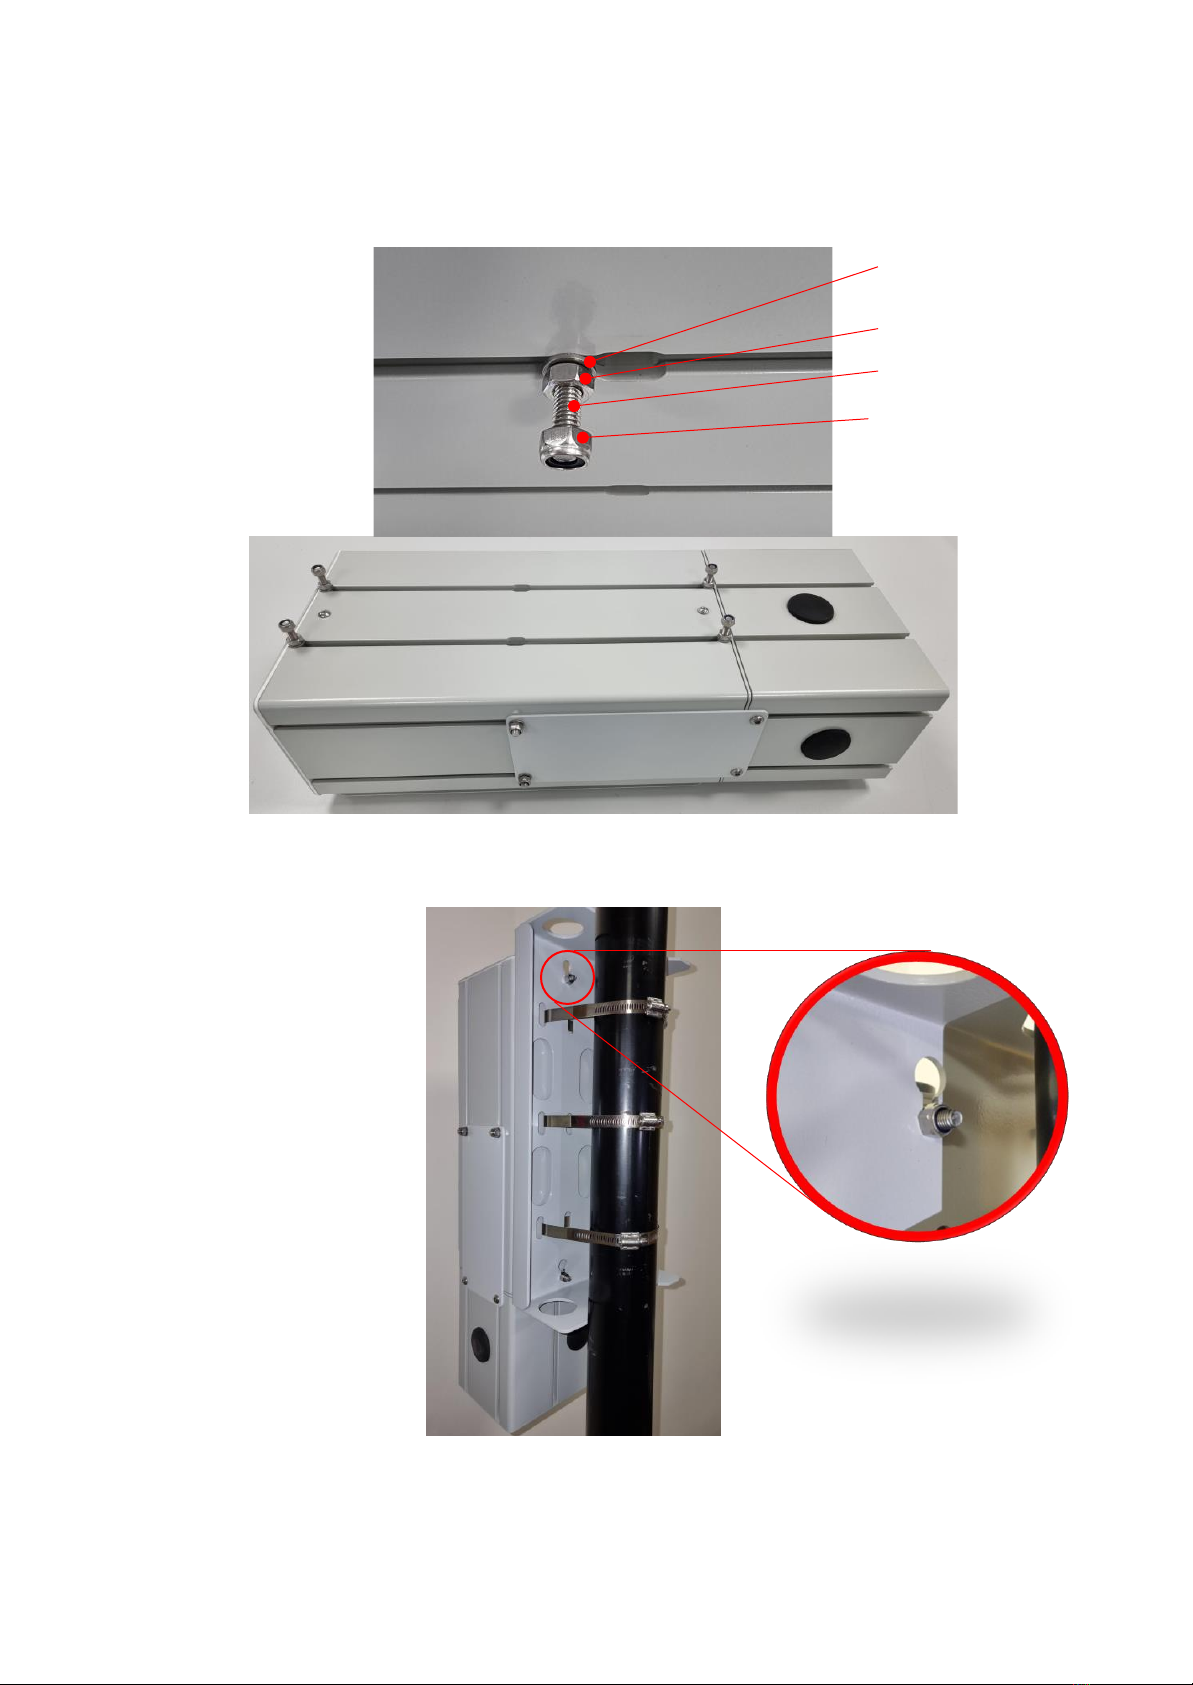
1.0 Installing the Hub
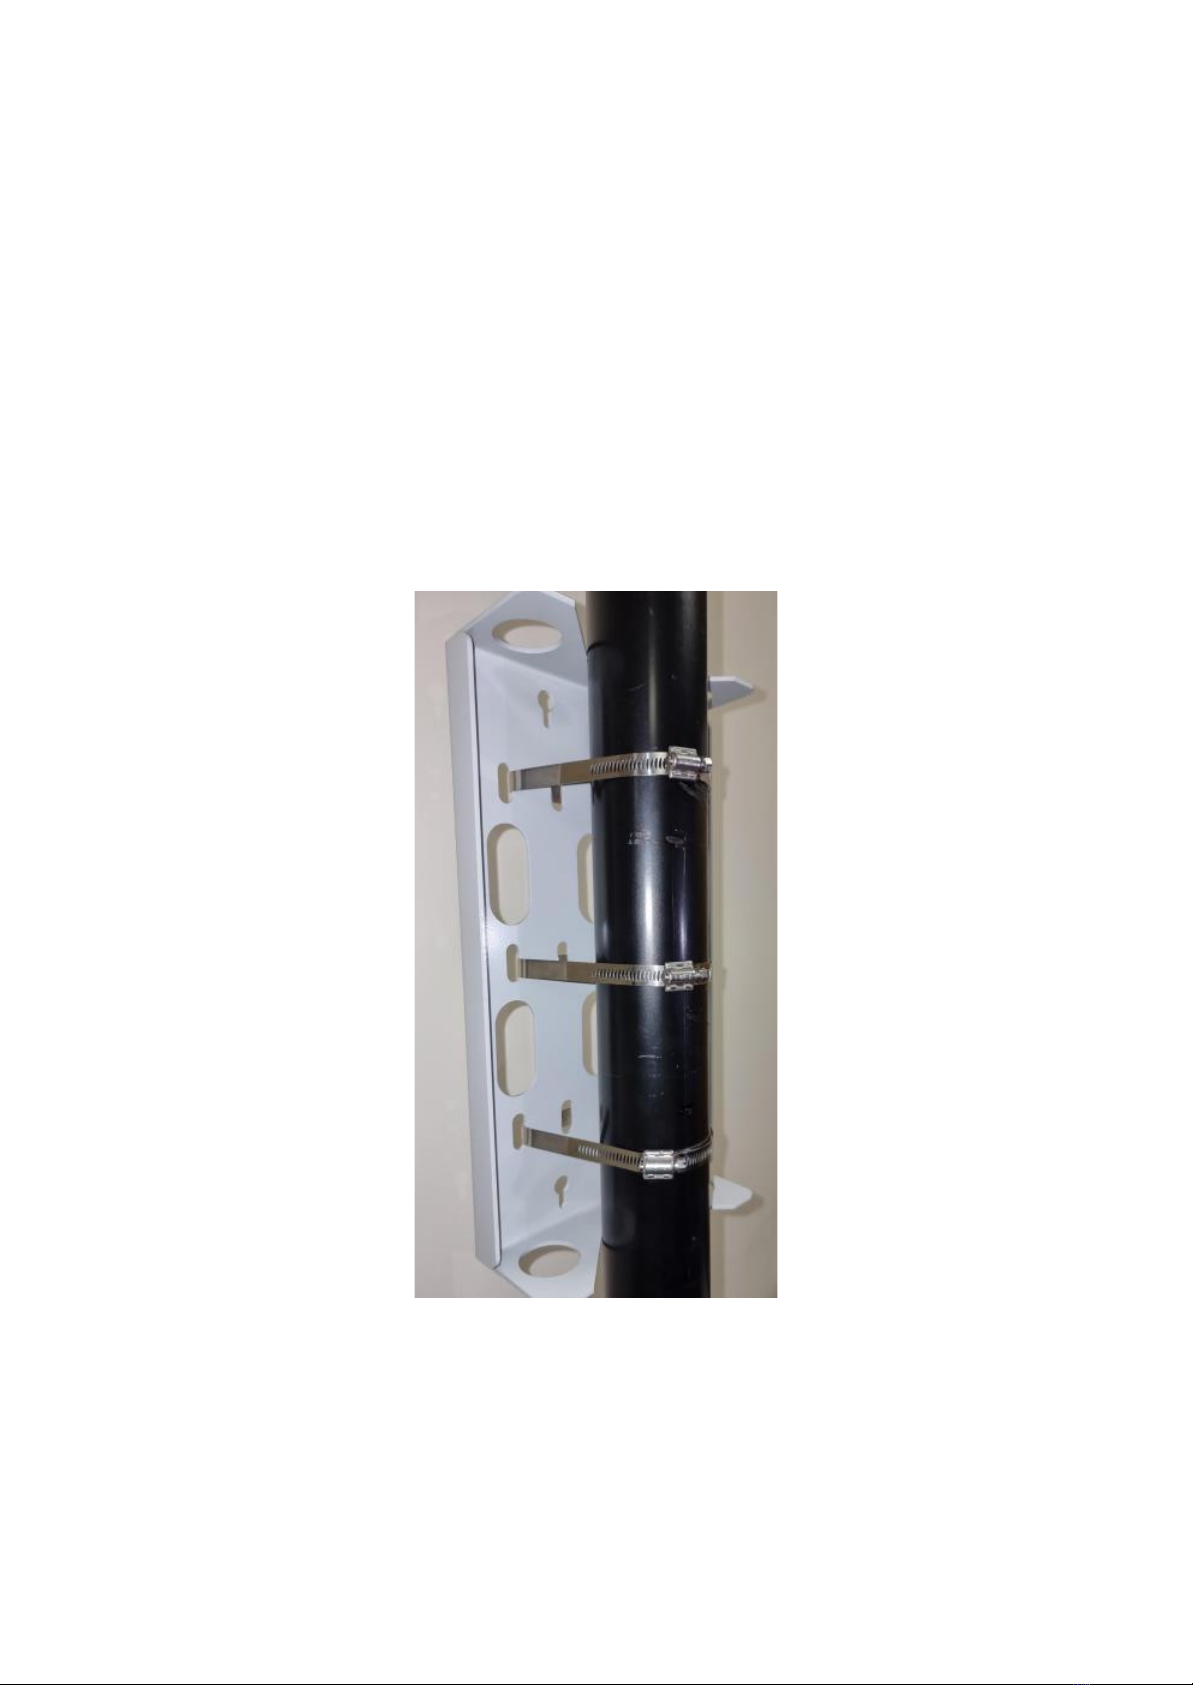
1.1 Pole Mounted
Contents:
-1 x Hub Pole Bracket
-4 x M6 x 25 Hex Head Bolts
-4 x M6 Plain Nuts
-4 x M6 Nyloc Nuts
-4 x M6 Plain Washer
-1 x M5 Allen Key
1) Using three off stainless steel Jubilee bands, fasten the pole bracket to the pole. Note, there are
wide and narrow slots in the pole bracket, use the suitable slots for the pole diameter.
2022 Hub Install Guide v1.0 8
2) Using a M6 plain nut, M6 washer, and M6 Nylon Nut, secure 4 off M6 x 25 Hex Head bolts at
the extremities of the Hub rails. Allow a sufficient gap between two off M6 nuts.
3) Slot the hub onto the pole bracket, ensuring the bracket is in the gap of the two M6 nuts.
Fasten the M6 Nylon Nut to secure the Hub.
M6 Plain Washer
M6 Plain Nut
M6 x 25 Hex Head
M6 Nylon Nut

2022 Hub Install Guide v1.0 9
1.2 Wall Mounted
It is important to use adequate quality fixings to safely support the complete Hub assembly when mounting
the Hub to a wall.
Contents:
-2 x Hub Wall Brackets
-4 x M6 x 12 CSK Bolts
-4 x M6 Plain Nuts
-1 x M4 Allen Key
1) Position the 4 off M6 Nuts in the rails (2 per each rail). It is recommended to locate the nuts
towards the Hub extremities.
2) Fix the 2 off Hub Wall Brackets to the Nuts using the 4 off M6 x 12 CSK Bolts.
4 x M6 Plain Nut
4 x M6 CSK Bolts
2 x Hub Wall
Brackets
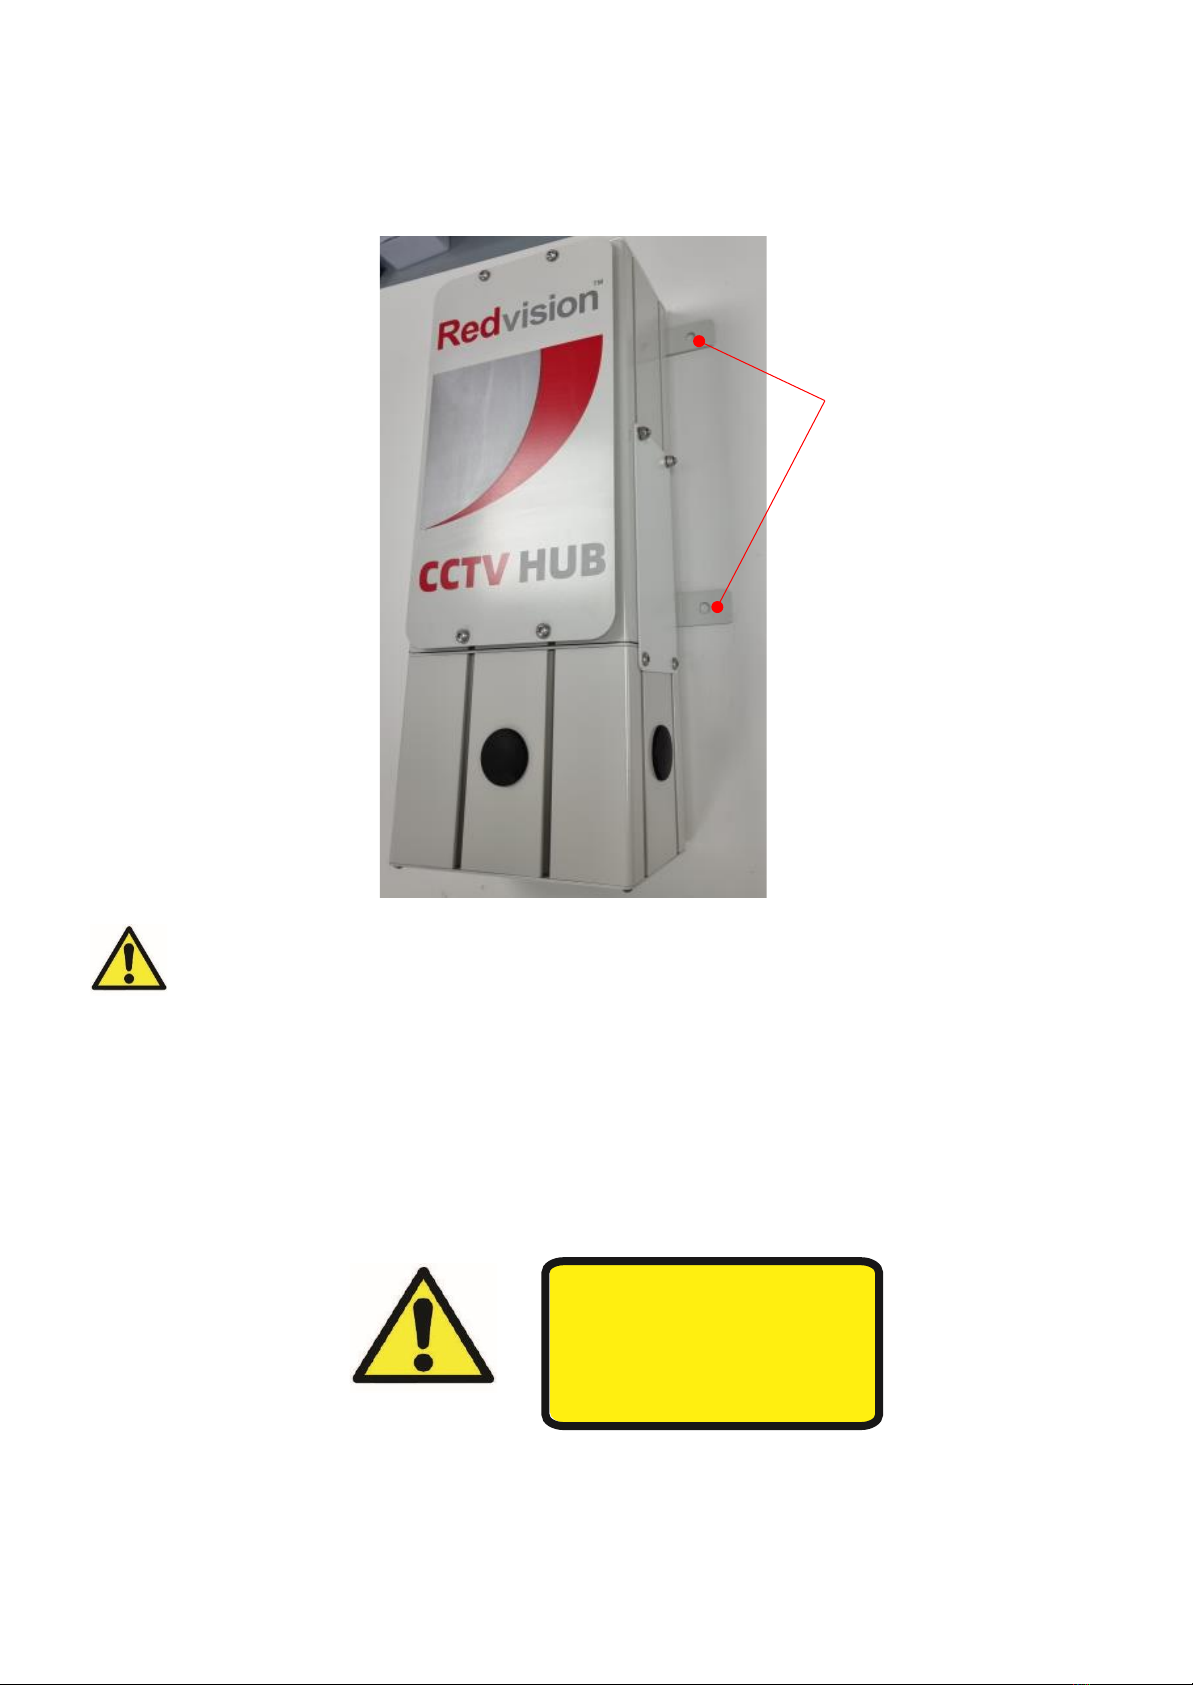
2022 Hub Install Guide v1.0 10
3) Use the external mounting holes to fix the Hub to a wall.
OBSERVE THE FOLLOWING PRECAUTIONS WHEN INSTALLING:
1. Mount the Hub in a position where it cannot be interfered with either intentionally or accidentally.
2. The mounting surface should be capable of supporting the weight of the hub, the camera(s) and mounting
brackets under all expected conditions of load, vibration and temperature.
3.
The mounting brackets should be fitted in accordance with instructions and should observe all appropriate safety
precautions & local building regulations.
4. Ensure the Camera station is in the correct orientation.
EMC Information
WARNING: THIS IS A CLASS A
PRODUCT. IF INSTALLED IN A STATIC
ENVIRONMENT, RADIO
INTERFERENCE MAY BE CAUSED, IN
WHICH CASE THE USER MAY BE
REQUIRED TO TAKE ADEQUATE
MEASURES TO PREVENT IT.
Wall Mounting
Holes
Indice


