Oracle Audio CD turntable Manuale utente


Please note that your Oracle CD turntable does not
contain any user serviceable parts.
Always consult an Oracle qualified service technician.
WARNING
Table of Content
Unpacking 3, 4, 5
Installation Procedure 6
Suspension Fine Tuning 6, 7
Connection Procedure 8, 9, 10
Operating Instructions 11, 12, 13
Remote Control 14, 15, 16,17
Laser Lens Cleaning 18
Fuse Replacement 19
IMPORTANT WARNING CLASS 1 Laser Product. It is essential that the
protective top cover be installed and remains
in place until the « No Disc » message appears in the CD display.
This also applies should the unit be switched off during a listening
session, NEVER remove this cover until the « No Disc » or the disc
information message appears or re-appears after a new switch-on.

Unpacking your Oracle CD Turntable
We developed this packing material so that your
new Oracle CD turntable is afforded maximum protection.
It consist of :
- a double layer cardboard box,
- a module of foam packaging for the accessories,
- a wooden frame with internal foam packing, protecting the CD turntable
itself. It is very important to preserve this packaging material since it is
the only really safe method of transporting your Oracle CD turntable.
The Wooden Module
4 suspension covers
magnetic
disc clamp
aluminium
top cover
power supply
AC power cord
15 pin DC
signal cord
remote control
handset and
batteries
suspension
calibration tool
Brillance cleaner
and linth free blue cloth
1
Content
The Upper Foam Structure
1 CD turntable assembly
1 plinth assembly including :
- 4 suspension towers
- 1 display module assembly
1 main CD turntable chassis assembly
2 main chassis protective foam end caps
1 main chassis hold down « C » shape foam spacer block

- Phillips (cross head) or Pozidrive screw driver
- Small needle nose pliers
TOOL NEEDED
• Open the external box
• Carefully remove the 4 white foam protection corners
• Turn the brown box on its side so you can pull out the white internal
cardboard box
• Carefully slide the white box out and stand it flat with the arrows on the side
pointing up
• Open the box first by opening the end flaps then the front
• Remove the white foam layer to access the wooden box, set it aside
Unpacking
NOTE The suspension covers will be installed following the suspension
fine tuning should this be required.
Accessories Foam Block
• Remove the power supply, power cord and DC cord, put it aside
• Remove the aluminium top cover
and the Brillance cleaner
• Remove the remote control and
install the batteries
• Remove the magnetic disc clamp
• Remove the suspension covers
and put them to one side for
later installation
2

Unpacking
NOTE Place the inner bag, the 2 protective end caps and the «C»
shape hold down spacer blocks back in the wooden box thus
making sure they do not get lost. Put the wooden top cover back on.
NOTE When repackaging, it is important to use this inner protective
bag to prevent surface damage to the clear lacquer finish.
• Open the plastic bag at one end only and remove the foam protective end cap
• Hold the plinth and slide the CD turntable assembly out of the bag
• Remove the «C» shape, hold down spacer block
•␣ Remove the inner protective bag
•␣ Remove the wooden top cover using your Phillips screwdriver
• Grasp the plastic protective bag at each end using the handles and lift the
whole Oracle player unit out of the box
3

CAUTION
NOTE Before beginning this step, very carefully seat the aluminium
top cover above the compact disc in its specially machined
recess and position, so that the two finger slots match the one on
the player main chassis. The slightly curved section of the finger
slots should be facing the front of the unit. This will give a more
accurate operational mass of the main chassis.
Do not attempt to lift the main chassis from the suspension
towers as this could damage the connecting cable between
the display module and the main chassis. If the main chassis needs to
be removed, a special technical document is available from Agence
Commerciale A.C.I. Inc. or your local area distributor. This work should
always be carried out by an experienced and competent technician.
• Place your Oracle CD player on a flat surface to complete the set up procedure.
Suspension Fine Tuning
The suspension of your Oracle CD turntable has been calibrated at the factory
but it possibly might require minor fine-tuning before putting the player into
service. To help with this we have supplied a suspension calibration tool to
assist with accurate measurement and calibration of each suspension tower.
NOTE The reference to clockwise or counter-clockwise is
determined by viewing the spring module from above.
Suspension Fine Tuning
The tool supplied will help you determine if a suspension
fine tuning is required. If no or only minor changes
need to be performed, you might select
to leave the system as is.
At this point, the suspension top covers
can be installed and the player moved to
its final playing location.
To complete the final leveling of the
plinth, it will be necessary to use a spirit
level. The leveling will be achieved by
ajusting the height of the threaded feet
under the plinth.
This picture indicates the target setting of the suspension system.
4

In the unlikely event that your Oracle suspension system
may need to be completely recalibrated please refer to
the caution on the preceeding page.
Make the Suspension Housing Sit Lower
Make the Suspension Housing Sit Higher
If the suspension housing is sitting to high as on this picture
• With one hand apply a
light down pressure to
the main chassis while
holding the suspension
housing
• Rotate the spring counter-clockwise by very small
increments until the suspension housing lightly
rests against the step on the gauge
If the suspension housing is sitting to low as on this picture
Do not allow the pliers to contact the aluminium parts since
this could damage the clear lacquer finish.
• Gently raise the
suspension
housing
with one
hand
• While holding the spring to prevent it from turning, rotate by very small increments
the suspension housing, couter-clockwise. This will move the spring further out of
the spring calibration sleeve thus making the suspension housing sit higher.
NOTE
IMPORTANT
•␣ When all suspension towers are fine tuned, install the suspension covers
Suspension Fine Tuning
To proceed with minor changes to the suspension
fine tuning, please read the following information.
• Using needle nose pliers, insert the tip
of the pliers near the end of the spring
and hold it firmly
5
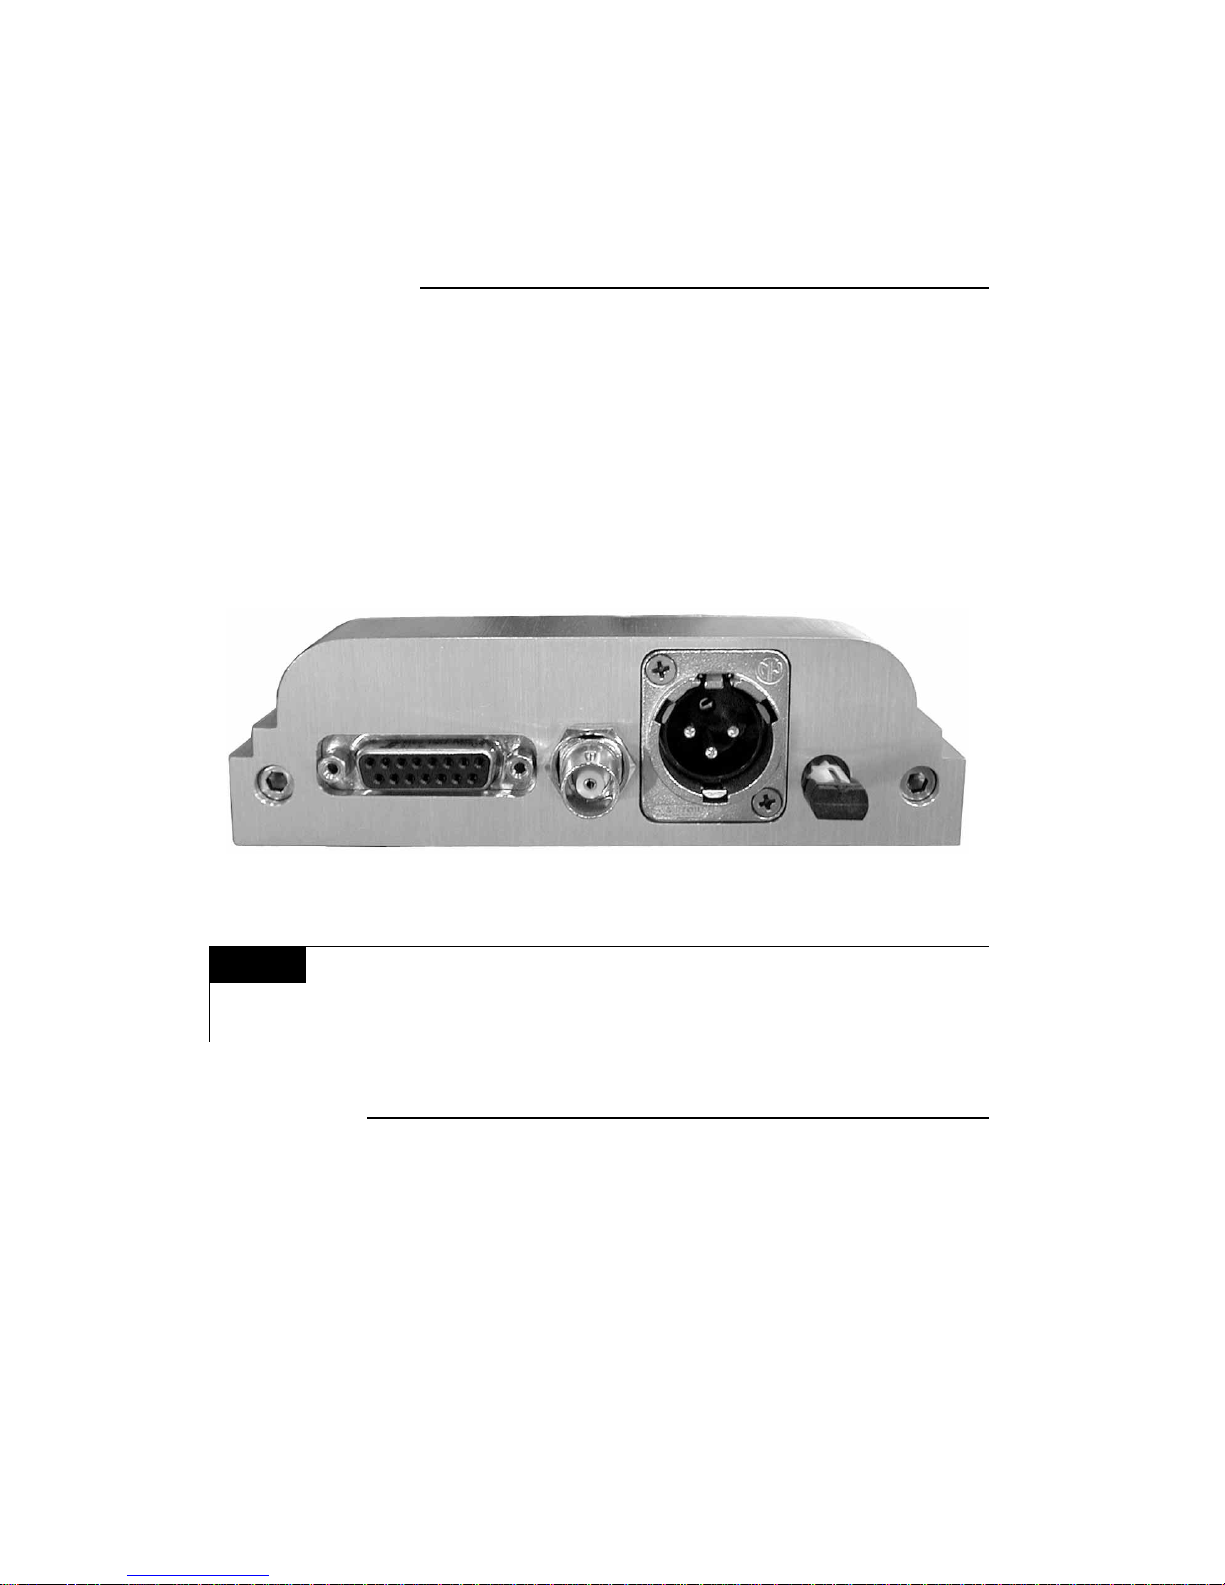
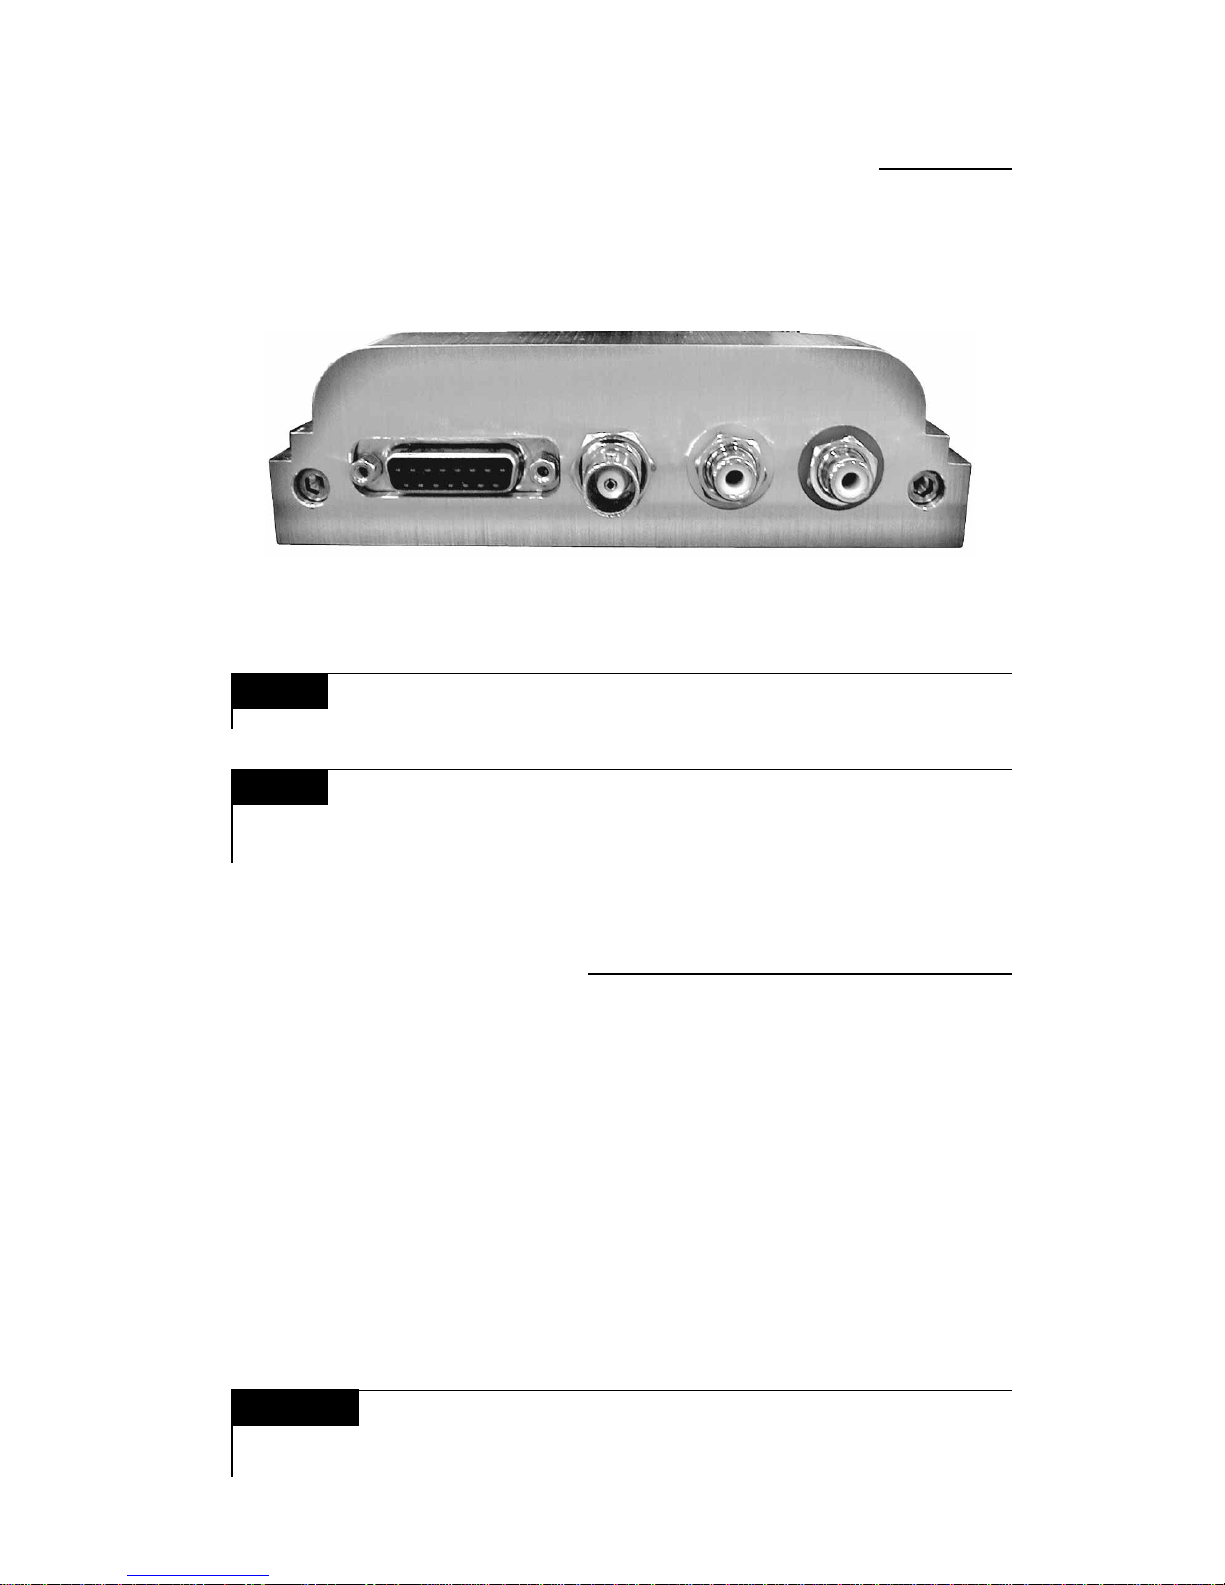
Connection Procedure
15 pin DC input BNC XLR Optical
NOTE We strongly suggest the use of the best possible Digital/Optical
Interconnect cable available, your dealer will help you make the
right choice.
CD Player
• BNC, output of 0,5 volt peak to peak @ 75 Ohms
• RCA analog output,
• Impedance < 100 Ohms
• Recommended impedance load 50 kOhms ( Minimum 5 kOhms )
• Maximum effective output level, 2.4 volts
• Digital to Analog converter type, Delta Sigma
• Resolution 24 Bits
Your Oracle CD Player is equipped with both an Analogue (pair) and a Digital output.
Use the desired output to transfer the signal to your Digital to Analog converter.
• BNC, (75 Ohms) output of 0,5 volt peak to peak
• XLR, AES/EBU (110 Ohms), balanced output of 4 volts peak to peak
• Optical, Hewlett Packard (ST, AT&T - glass) - HP-HFBR 1412
Your Oracle CD transport is equipped with three digital outputs :
CD Transport
THE ANALOGUE AND/OR DIGITAL CONNECTIONS
6
Simultaneous Connection of an External Digital
to Analogue Converter
• Plug your digital/optical interconnect to the rear of the player and connect it
to your stand alone D/A converter
• Connect the Analogue outputs to an « Auxiliary » input at the rear of your
pre-amplifier
• Balance the volume between the two D/A converters through the external
converter volume control... should this facility be available
• Switch from « CD » to « Auxiliary » so as to compare the two options
It is possible to simultaneously use the BNC (75 Ohms) Digital output to compare
the players internal Digital/Analogue converter, with that of an external (stand
alone) D/A converter
15 pin DC Input BNC
Digital Output
NOTE It is not necessary to use digital output unless connecting
to a separate stand alone DAC.
NOTE
Connection Procedure
We strongly suggest the use of the best possible Analogue
Interconnect cables available, your dealer will help you make
the right choice.
WARNING Lower the volume of the pre-amplifier as there could be a
major difference in gain, this could cause damage to your
loudspeakers.
Analogue RCA
Outputs
7
• Connect your pair of RCA terminated Analogue Interconnect cables from the
rear of the player to your pre-amplifier Digital input ( CD input )
Connection to the Pre-Amplifier, CD input

• Connect the 15 pin DC signal cable to the rear of the CD turntable and
secure it with the two locking thumb screws
• Connect the other end to the power supply and secure it as above
• Plug the AC power cord to the IEC socket at the power supply end,
and the other end to the line voltage wall socket
• Turn the power supply « ON », indicated by the line ( — ) on the rocker
switch above the IEC socket, the red « L.E.D. » at the front of the power
supply will now light up.
The « OFF » position is indicated by ( O ) on the rocker switch
Power Supply Connection
IMPORTANT WARNING CLASS 1 Laser product. It is essential that
the protective top cover be installed and
remains in place until the « No Disc » message appears in the CD
display. This also applies should the unit be switched off during
a listening session, NEVER remove this cover until the « No Disc »
or the disc information message appears or re-appears after a
new switch-on.
On/Off switch
IEC socket
15 pin DC Input
8
Indice
Altri manuali Oracle Audio Giradischi


