PLUS Vision magicolor plus Manuale utente

Software Operation Manual
We greatly appreciate your purchase of this PLUS Vision product.
In order to take full advantage of the features of the software supplied
with the Captureboard C-12, please read this software operation manual carefully before use.
After reading, be sure to keep the manual for future reference.
Captureboard C-12 Series

E-2
Trademarks
* Microsoft and Windows are registered trademarks or trademarks of the Microsoft Corporation in the United States and other
countries.
* Adobe and Adobe Acrobat Reader are trademarks of Adobe Systems Incorporated.
Due respect will be afforded to the trademarks of the various companies and to product trademarks even when not expressly
noted.
In addition, product names and company names contained in this manual are registered trademarks or trademarks of the
respective companies.
(1) The contents of this manual may not be reprinted in part or whole without permission.
(2) The contents of this manual are subject to change without notice.
(3) Great care has been taken in the preparation of this manual; however, should any questionable points, errors, or omissions
be apparent, please contact us.
(4) Notwithstanding part (3), PLUS Vision Corp. will not be responsible for any claims or lost profits or other matters deemed to
be the result of using this unit.
(5) The separately sold printer is designed to be used as a peripheral device for a PLUS Captureboard. The printer is not guar-
anteed to operate when connected directly to a computer.
(6) Manuals with incorrect collating or missing pages will be replaced.
Table of Contents
Introduction............................................................................................. E-3
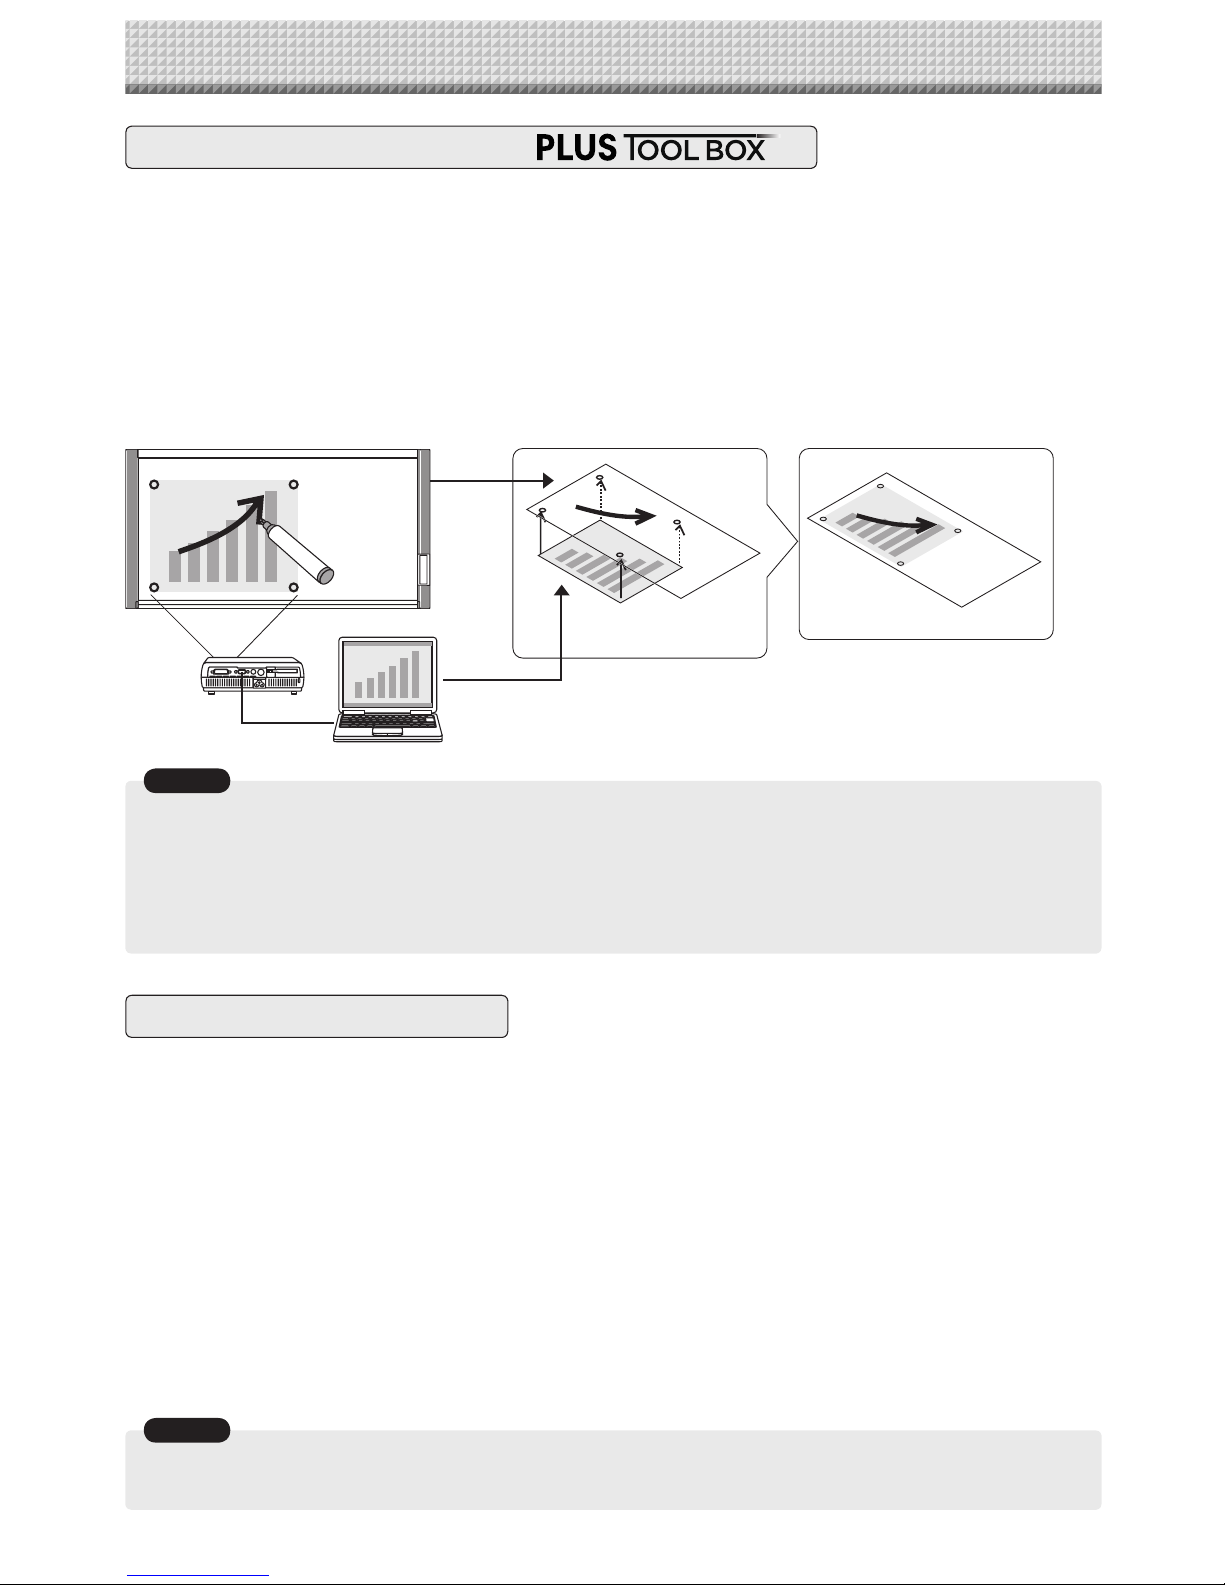
What is Captureboard Soft PLUS TOOLBOX? ........................................................ E-3
Operating Environment ............................................................................................ E-3
Copyright and License ............................................................................................. E-4
Connection to the Computer ................................................................. E-5
Description of the included CD-ROM’s menu screen (C-12 setup launcher)........... E-5
Installation of the Software.................................................................... E-6
Check Prior to Installation ........................................................................................ E-6
Installation of the PLUS TOOLBOX ......................................................................... E-6
Uninstallation of the PLUS TOOLBOX..................................................................... E-8
Menu Screen Names and Functions..................................................... E-9
Menu ........................................................................................................................ E-9
Superimposed Image Display Screen.................................................................... E-11
Basic Operation.................................................................................... E-13
Superimposing captured images............................................................................ E-13
Fine Adjustment of the Captured Image ................................................................ E-17
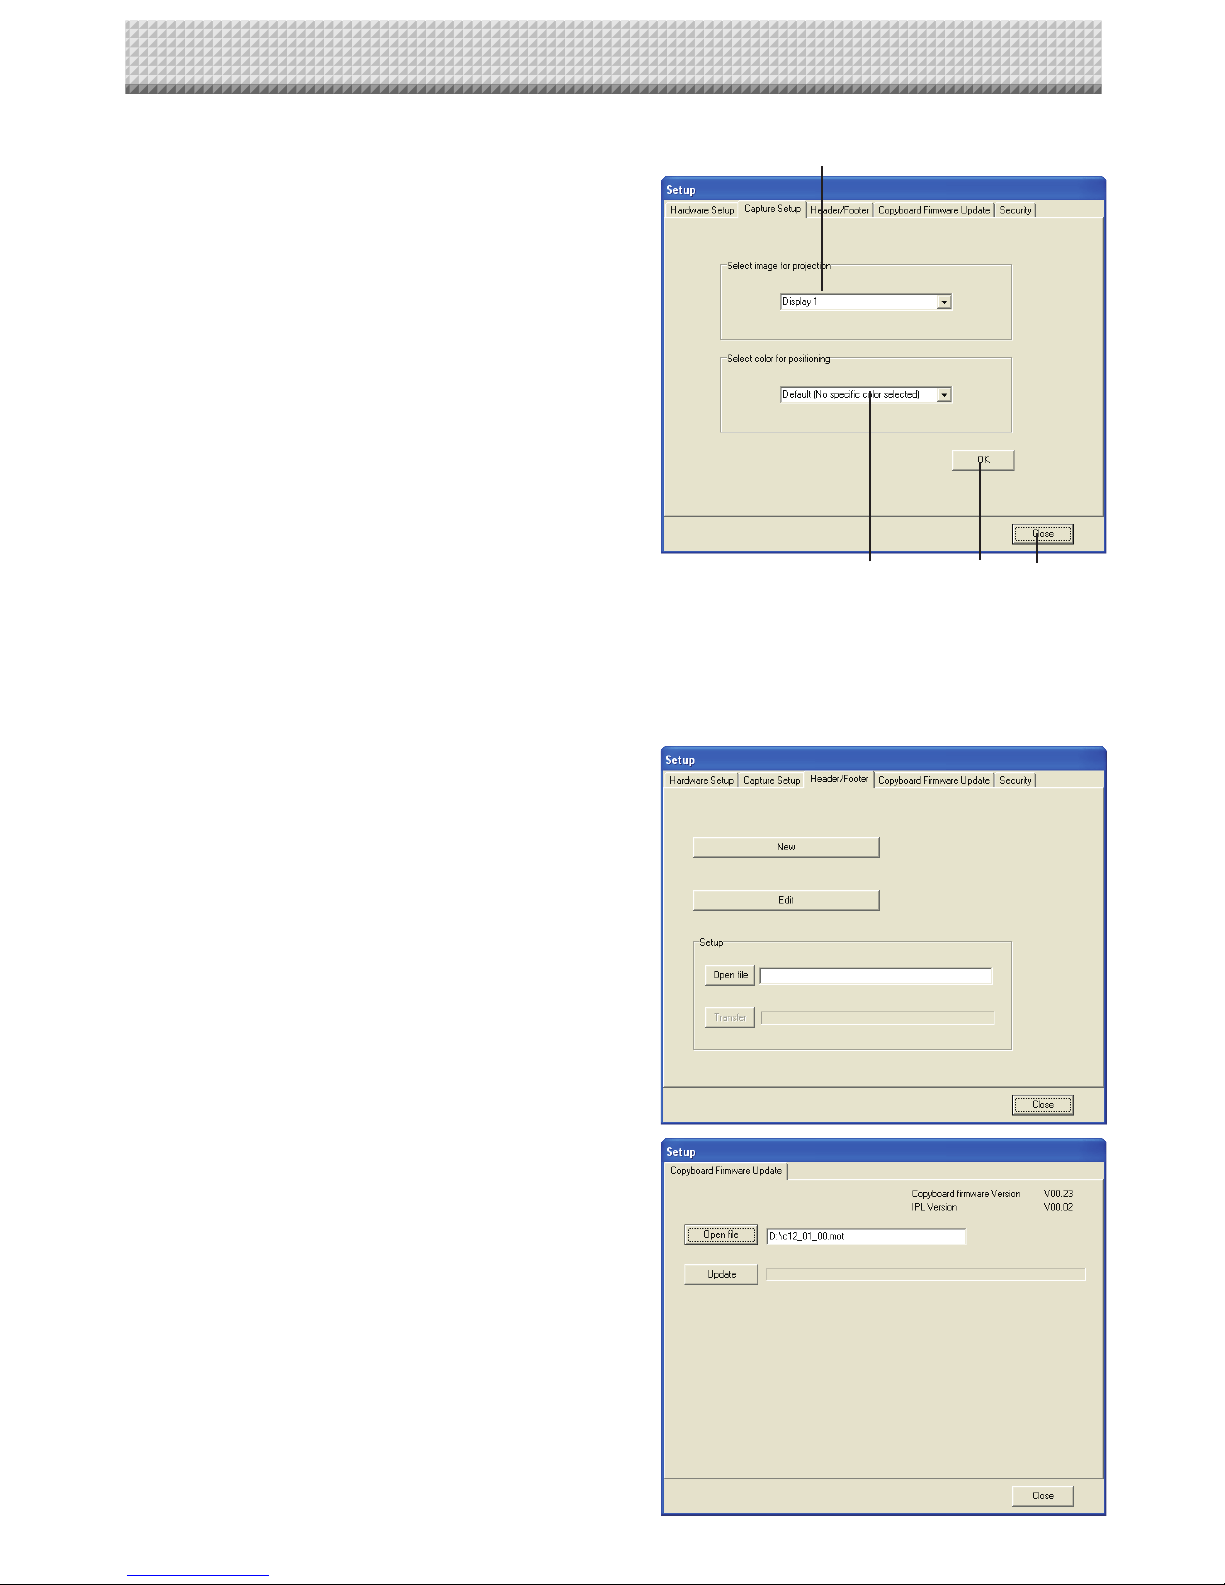
Capture Settings................................................................................... E-18
Hardware Setup .................................................................................... E-20
Creation and Editing of Headers/Footers .......................................... E-23
Names and Functions of the Screen Parts ........................................................... E-23
Creating a New Header/Footer .............................................................................. E-26
Updating the Internal Header/Footer Information of the Captureboard.................. E-29
Update the Captureboard’s Internal Program.................................... E-31
About the security settings ...................................................... Rear cover

E-3
Introduction
What is Captureboard Soft ?
PLUS TOOLBOX allows the user to capture the captureboard's scanned data as an image using a TWAIN driver
then superimpose this over a projector's projected image on the computer and store this as image data.
There is also a function for positioning the projector's projected image and the captureboard's scanned data eas-
ily and automatically by detecting the projector's projection position information marked on the captureboard's
sheet surface.
Furthermore, PLUS TOOLBOX allows the user to set the captureboard's operating environment and security
settings from the computer and create headers/footers that can be stored on the captureboard.
* In this manual, TOOLBOX may be referred to as "this software" or "the software", and the captureboard may be referred to
as "main unit", this unit" or "the unit".
Notice
• This software is designed to store records of meetings. It may not reproduce and store accurate colors or image quality.
Also note that the capture data automatic positioning function is not something that guarantees an accurate positioning
operation.
• The "PLUS TOOLBOX" software is a unified program for copyboards (including captureboards).
* Superimposing the scanned data over the projector's projected image is possible when used in combination with a
captureboard.
Operating Environment
Supported OS: Microsoft Windows 2000 Professional (Service Pack 4 or higher) /
XP (Home Edition /Professional Edition Service Pack 2 or higher) /
Vista (32 bit version)
Supported PC: IBM PC/AT fully compatible computers that run the aforementioned OS
CPU: Pentium III 1.2GHz or greater
Memory: Windows 2000 (128 MB or greater),
Windows XP (256 MB or greater),
Windows Vista (512 MB or greater)
Connector: USB port (type A), interface compatible with USB 1.1 and USB 2.0 standards.
Available hard disk space: 40 MB or greater (not including space for storing images)
Display resolution: 800 x 600 pixels or greater
Peripheral devices: CD-ROM drive, standard USB ports
Web browser: Internet Explorer 6.0 or higher
• All operations are not guaranteed in the aforementioned operating environment.
• Windows 95, 98SE/Me, NT, 2000 Server, Server 2003, and Vista (64 bit version) are not supported.
Notice
ABCD
EFGH
xyz
ABCD
EFGH
xyz
ABCD
EFGH
xyz
Captureboard
Personal Computer
Projector
Store on a hard disk drive, etc.
Superimpose images
with this software

E-4
Introduction
Copyright and License
◆Copyright
PLUS Vision Corp. (hereafter called We) holds the copyright of this software and related works which are pro-
tected by Japan’s Copyright Law and international treaties.
Copyright © Since 2008 PLUS Vision Corp. All rights reserved.
The PLUS TOOLBOX and header/footer software uses fonts supplied by Information-Technology Promotion
Agency, Japan. The text file of the supplied CD-ROM is a user license agreement for the use of the software.
Only use this software after carefully reading and consenting to the software user license agreement.
* Check the text file in the supplied CD-ROM: “General User’s IPA Font User License Agreement”.
◆Disclaimer
We shall not be responsible in any way for direct or indirect damages that may arise from this software or
products derived from related software. We shall not be responsible in any way for damages as a result of the
machine or medium. Furthermore, We shall not be responsible in any way that may relate to the effects of the
results of using this software.
◆Terms of Use and Terms of Distribution
• We shall not be responsible in any way for any kind of damages arising from the use or inoperability of this
software.
• We shall not be liable in any way for support of this software, any kind of warranty, correction of trouble or con-
tinuation of version upgrades, etc.
• Provided that you consent to the aforementioned matters, you shall be permitted to use the software for non-
profit purposes for personal use and use within a company.
• When “this software” is mentioned, it refers not only to the executable file, but to all of the component files
including Help and appended text.
◆Support
We call support the provision of all kinds of information including answers to questions, requests, trouble reports,
and other matters, and the scope of our support shall be limited to the functions and operation of this software.
Problems that arise in using this software cross many paths including those attributable to the personal com-
puter, the OS, other application software, and other peripheral devices. Accordingly, we only support problems
that are attributable to this software. Also, this software is subject to version upgrades without prior notice due to
the technical advancement of hardware and software. The customer can receive and use upgraded versions of
this software through a method determined by us. Note that version upgrades will be limited to customers who
consent to the aforementioned conditions of use.
* Upon downloading this software from the PLUS Vision Web site, or installing it from the CD-ROM, the cus-
tomer is deemed to have consented to each of the terms.

E-5
Connection to the Computer
The Captureboard must be connected with a computer in order to use this software.
• Do not connect this machine to the personal computer before installing the software.
• Do not connect more than one Captureboard to one personal computer.
Notice
PRINTER PC
To the RGB input connector of
the projector
To the RGB output (Display) connector
of the personal computer
To the personal computer
USB port (Type A)
To the PC dedicated
USB port (Type B)
RGB Input
Monitor Output
USB
Personal Computer
Projector
USB cable supplied with the unit
Captureboard
Description of the included CD-ROM’s menu screen (C-12 setup launcher)
The menu screen is displayed automatically when the included CD-ROM is inserted into the computer’s CD-
ROM drive.
■Installation of software
When clicked, the installer is launched and the “PLUS
TOOLBOX”, TWAIN driver and USB driver are installed
simultaneously.
■User’s Manual
When clicked, the User’s manual (in PDF format) open.
■Software Manual (this manual)
When clicked, the PLUS TOOLBOX software’s operating
instructions (in PDF format) open.
■Acrobat Reader
This is an application for viewing files in PDF format.
If the PDF files cannot be opened, click “Acrobat Reader” on the menu and follow the instructions on the screen to
install.
* Browse CD
Click this to view the contents of the CD-ROM using the computer’s Explorer application.
* Copyright & Usage
Click this to open the copyright, usage conditions and other information.
This is a representative example of personal computer and projector connections. Please see the manuals of your per-
sonal computer and projector for details.
Note

E-6
Installation of the Software
When “Install Software” on the included CD-ROM’s menu is clicked, the “PLUS TOOLBOX”, TWAIN driver and
USB driver are installed.
Check Prior to Installation
Installation of the PLUS TOOLBOX
1. Check whether your personal computer satisfies the operating environment. (See page E-3)
2. Check that your personal computer is not currently connected to this machine via USB.
3. At the time of installation, install with Administrator rights (i.e., a user having administrator rights) for
Windows 2000, or with a Computer Administrator rights (account) for Windows XP/Vista.
4. Close all other applications that are running.
Insert the supplied CD-ROM into the CD-
ROM drive of the personal computer.
The menu screen will be displayed automatically.
If the menu screen is not displayed automatically, double
click CD-ROM icon and double click “autorun.exe”.
Click “Installation of Software”.
The installer will start.
Follow the instructions of the installer and
start the installation.
The PLUS TOOLBOX, the TWAIN driver and the USB
driver will be installed at the same time.

E-7
Installation of the Software
Note
* The Windows Security dialog box will be displayed with
Windows Vista.
Select “Install this driver software (I)”.
* When using Windows Vista, each time the installer
is started, the User Account Control dialog box is
displayed.
Select “Continue” and continue with the installation.
Click “Finish”.
The “Installer Information Dialog Box” will be displayed.
Click “Yes” and restart the personal computer.
When this software is installed on the personal computer
for the first time, continue to make the following connec-
tions and operations.
Preparation
1. Press the ON/Standby button of the Captureboard to turn on the power.
2. Use a USB cable to connect the USB port of the personal computer with the PC dedicated USB port of the
Captureboard. (See Page E-5)
The New Hardware Search Wizard will be displayed.
Install according to the New Hardware Search Wizard.
Continue on next page
■Installing the USB Driver
The USB driver is installed on the computer with the installer, but this does not complete association with the
USB port. In order to use PLUS TOOLBOX, install using the procedure described below with the Captureboard
connected.

E-8
Uninstallation of the PLUS TOOLBOX
Note
Installation of the Software
Click “Finish”.
This software can now be used.
Selecting [Start] →[Control Panel] will display the Control Panel screen.
Check that your personal computer and the Captureboard are not currently connected by USB.
Double click “Add or Remove Programs or Applications” (this will differ
depending on the OS) to display the “Add or Remove Programs Properties”
screen.
Select PLUS TOOLBOX from among the list displayed and click [Change /
Remove] to display the Add or Remove wizard screen.
Selecting the [Remove] radio button of the wizard and clicking [Next] will start
the uninstallation.
* “Add or Remove Programs” will be displayed for Windows XP/Vista.
* When using Windows Vista, each time the uninstaller is started, the User Account Control dialog box is displayed.
Select “Continue” and continue with the uninstallation.
Select “Install Software Automatically
(Recommended)” and click “Next” (when
using Windows XP).
Start the installation of the USB driver.
* Installation will be completed automatically with Windows
2000/Windows Vista.
Note

E-9
Menu Screen Names and Functions
When a computer on which the “PLUS TOOLBOX” dedicated software is installed is connected to the
Captureboard, the “PLUS TOOLBOX” main menu appears.
②
Main menu
Menu
①Scan button
Displays the projection image superimposed screen.
Yes: Starts the capture of the image (projected by the projector) that is displayed on the personal
computer screen, and the hand drawn image of the sheet surface.
No: Starts the capture of only the hand written and drawn image of the sheet surface. There will not
be superimposing with the image projected by the projector.
(Close): Closes the projection image superimposed screen.
②Mark button
Switches the display of the positioning ○marks of the projection image.
Each click switches between “Display” and “Hide”.
The default setting is “Display”.
③Feed/Stop button
Scrolls the sheet one page to the left. When pressed while scrolling, the sheet returns to the start position.
Hardware Setup:
Set the Captureboard’s operating environment
here. See page E-20.
④Setup button
Click this to display the settings screen.
The settings screen consists of the “Hardware Setup”, “Capture Setup”, “Header/footer”, “Copyboard
Firmware Update” and “Security” tabs.
Click a tab to switch to the corresponding screen.
Notice
• To set the “Security” settings, contact you nearest PLUS Vision sales office, dealer or store.

E-10
Menu Screen Names and Functions
Copyboard Firmware Update:
Use this to update the Captureboard’s internal
program. (See page E-31.)
Header/Footer:
This is used for the creation or editing of headers and
footers. See Page E-23
(1) Select image for projection:
Selects the number of the monitor that is con-
nected to the projector.
The default setting is “Display 1”. This software
automatically searches for the number of con-
nected monitors.
(2) Select color for positioning:
Selects the color of the ○mark that detects the
position of the projection image of the projector.
Select from among No specific color selected,
Red, Green, Blue, Black. The default setting is “No
specific color selected”.
The setting contents will not be stored unless the
screen is closed by clicking the [OK] button.
(3) OK
Enters the setting.
(4) Close:
Closes the settings screen.
(1)
(2) (3) (4)
Capture Settings:
These settings are used when creating superim-
posed images. See page E-18.
Altri manuali per magicolor plus
1
Questo manuale è adatto per i seguenti modelli
1
Indice
Altri manuali PLUS Vision Software
Manuali Software popolari di altre marche

PS Audio
PS Audio PowerPlay Manuale del proprietario

Brady
Brady LOCKOUT PRO 3.0 Manuale di servizio

Avaya
Avaya Interaction Center Manuale utente

Texas Instruments
Texas Instruments TI-83 Plus Silver Edition Manuale

Novell
Novell GROUPWISE 8 - INTERNET AGENT Manuale utente

Oracle
Oracle Application 9i Manuale utente

Acer
Acer RDM Manuale utente

Canon
Canon Vixia HF21 Manuale utente

Canon
Canon ZR950 Manuale utente

Samsung
Samsung Auto Backup Manuale utente

Polycom
Polycom Vortex EF2201 Istruzioni per l'installazione e il funzionamento

Brocade Communications Systems
Brocade Communications Systems Brocade 8/12c Manuale utente


