POSJET PK-101P Manuale utente

Impact Dot-Matrix Printer
PK-101P
Operation manual
- 1 -

- 2 -
Content
1.Features P.3
2.Specifications P.3
3. Confirmation of package contents P.4
4. Printer introduces and functions P.5
4.1 The obverse of printer
4.2 The inside of printer
5. Control Panel P.6
5.1 The function of Button
5.2 The function of LED and Buzzer
6. Printer preparation P.7
6.1 Ribbon Cassette
6.2 Loading roll paper
6.3 Install battery
7.SelfTest P.9
8.Interface P.10
8.1 RS232C connection (D-sub 9pins to RJ45)
8.2 Bluetooth connection
8.3 Bluetooth connection
9. Command Set P.12
10.Command code description and example P.13
11.Sample program of barcode printing P.16
12.Additionalremark P.18

- 3 -
1. Features
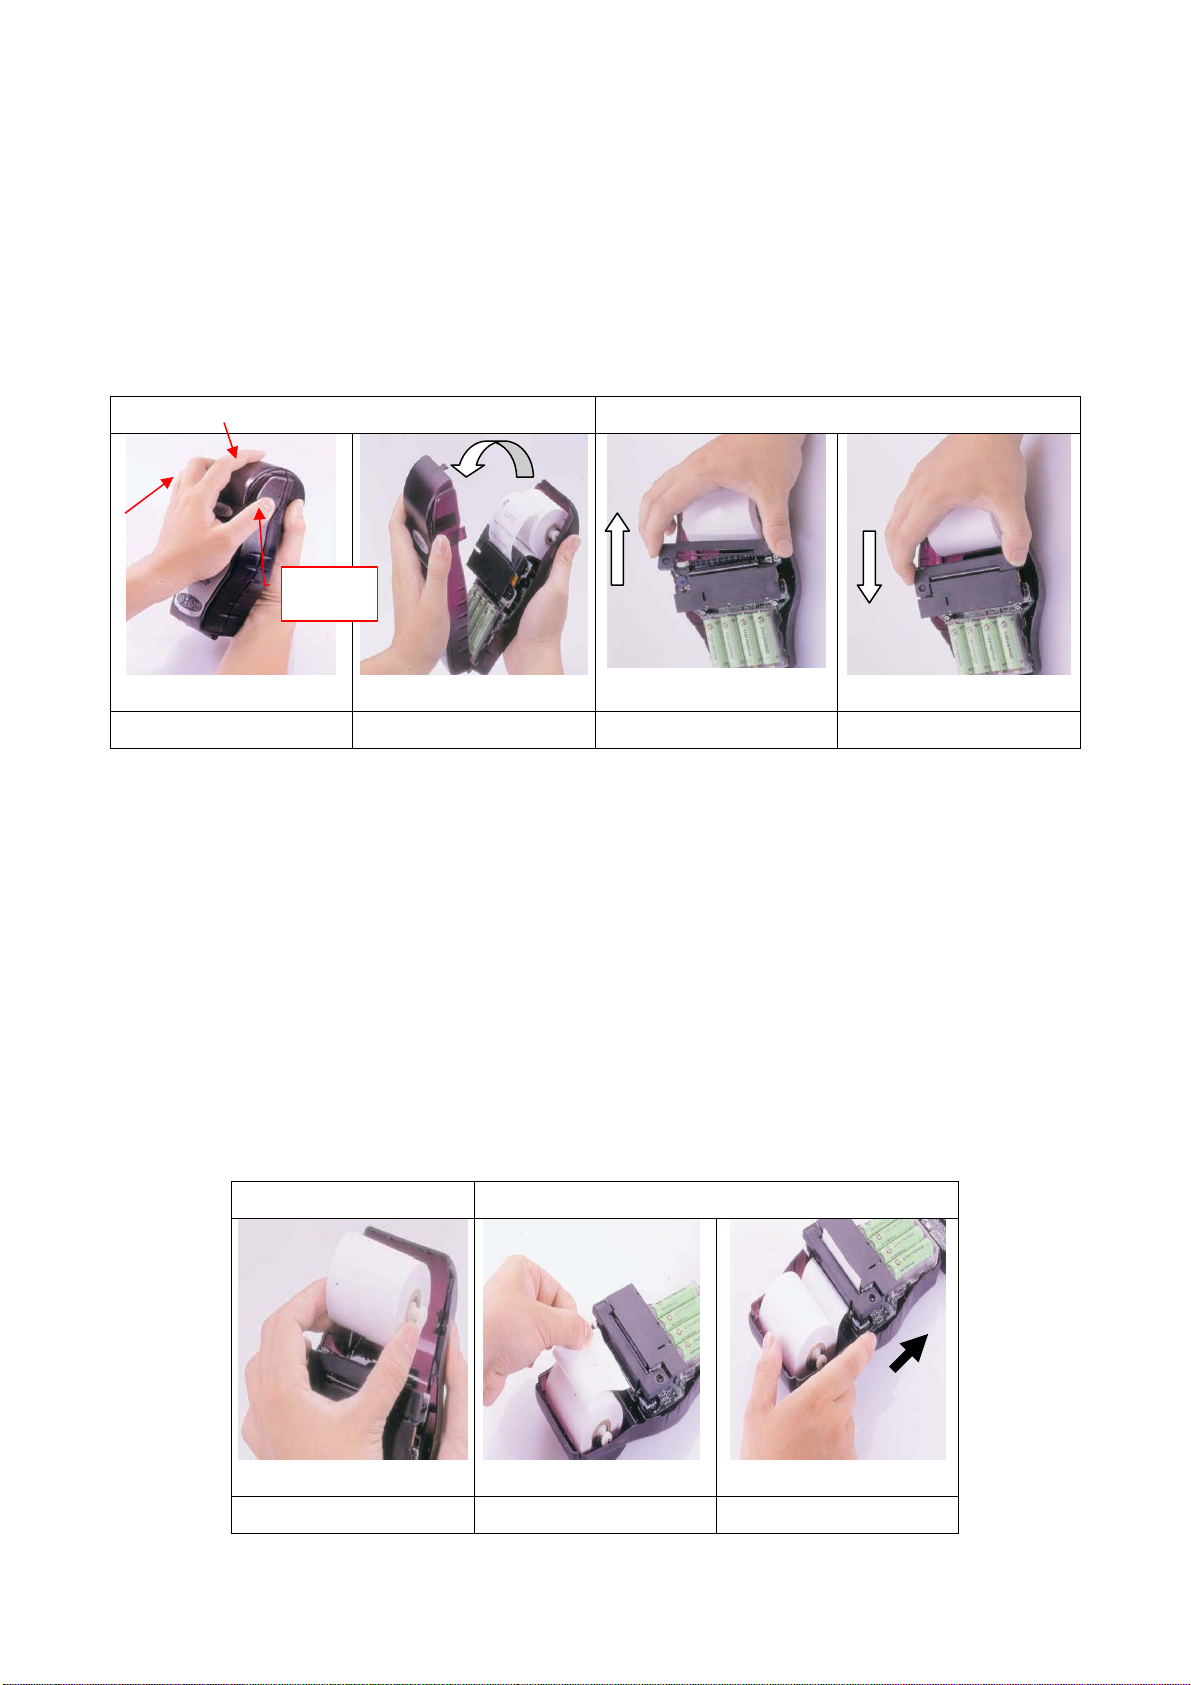
a. “AA” Alkaline or Ni-MH rechargeable battery
b. Same direction of battery installation
c. Sleep mode after printing (1/3/6 Mins. selectable)
d. Data-sensing wake up function
e. Copy capability: 1 original plus 1 copy
f. Bar code printing capability (Vertical direction)
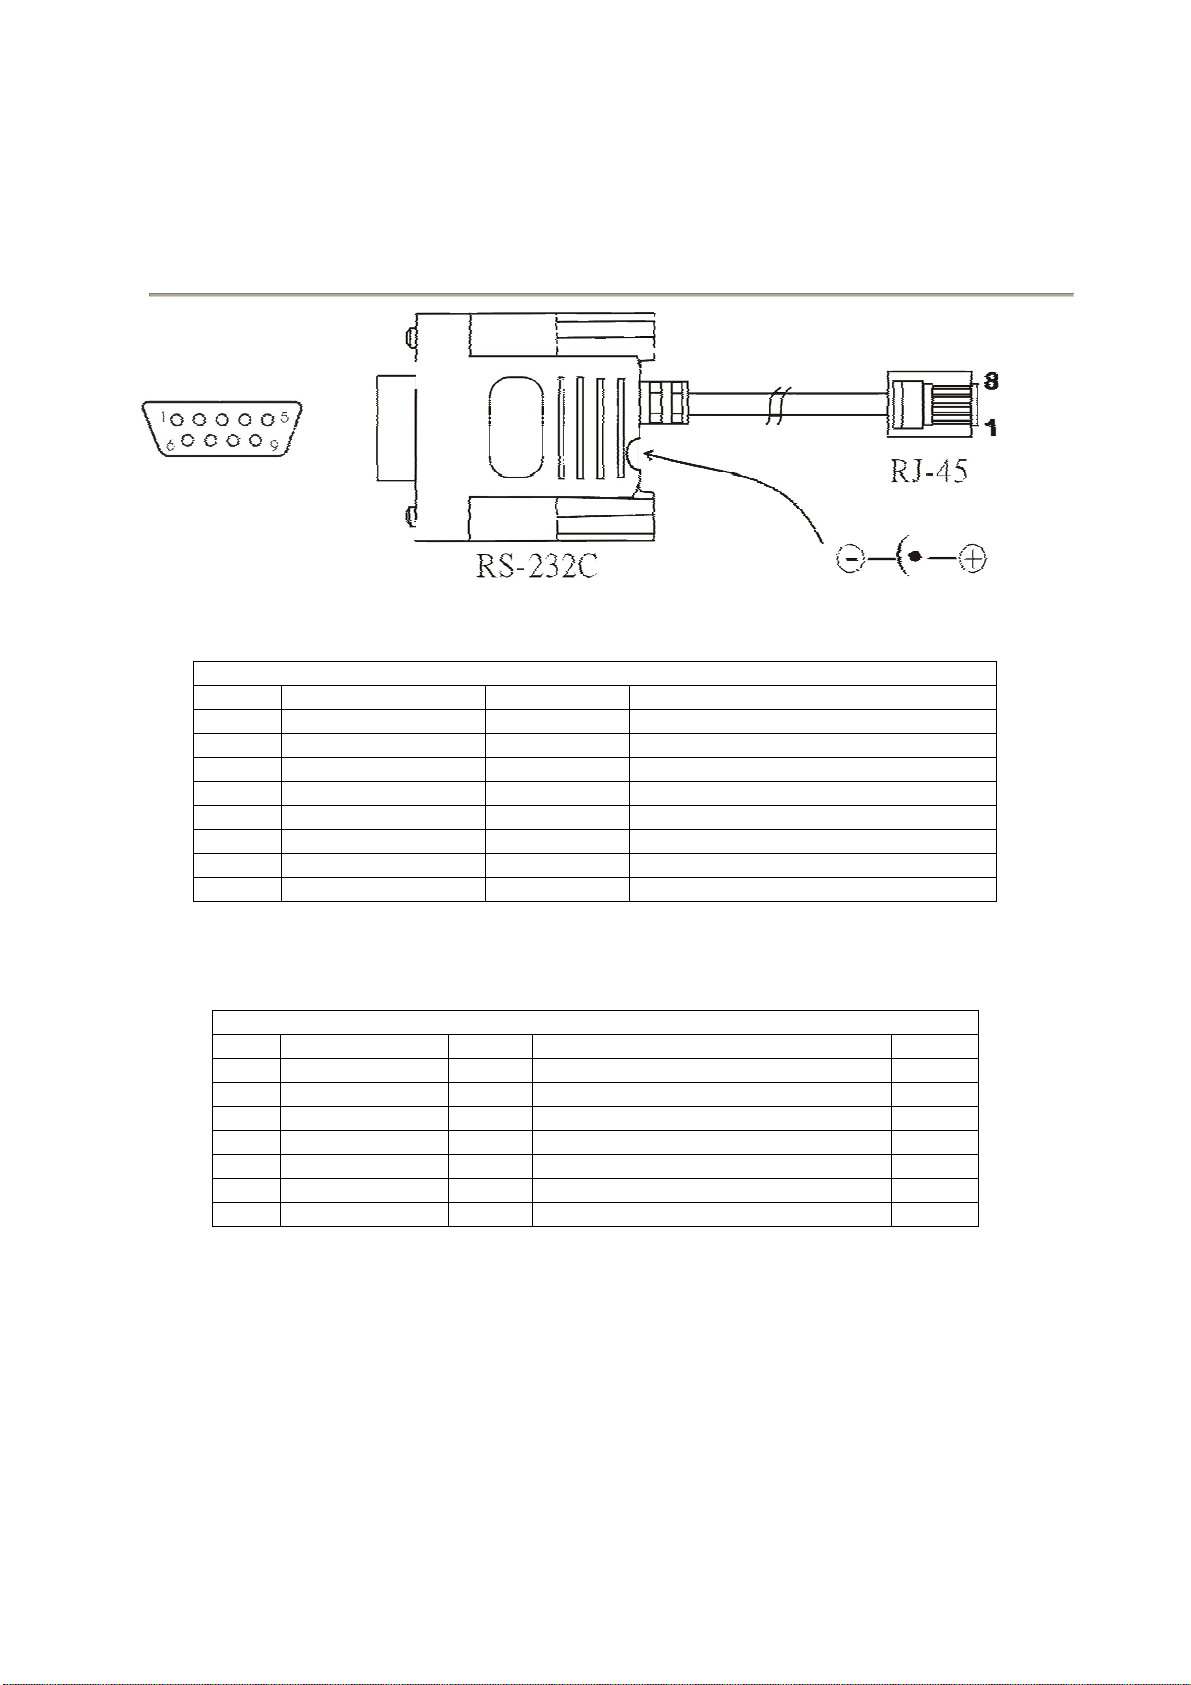
g. Interface: RS232C or Bluetooth
h. Font build-in capability (up on your request)
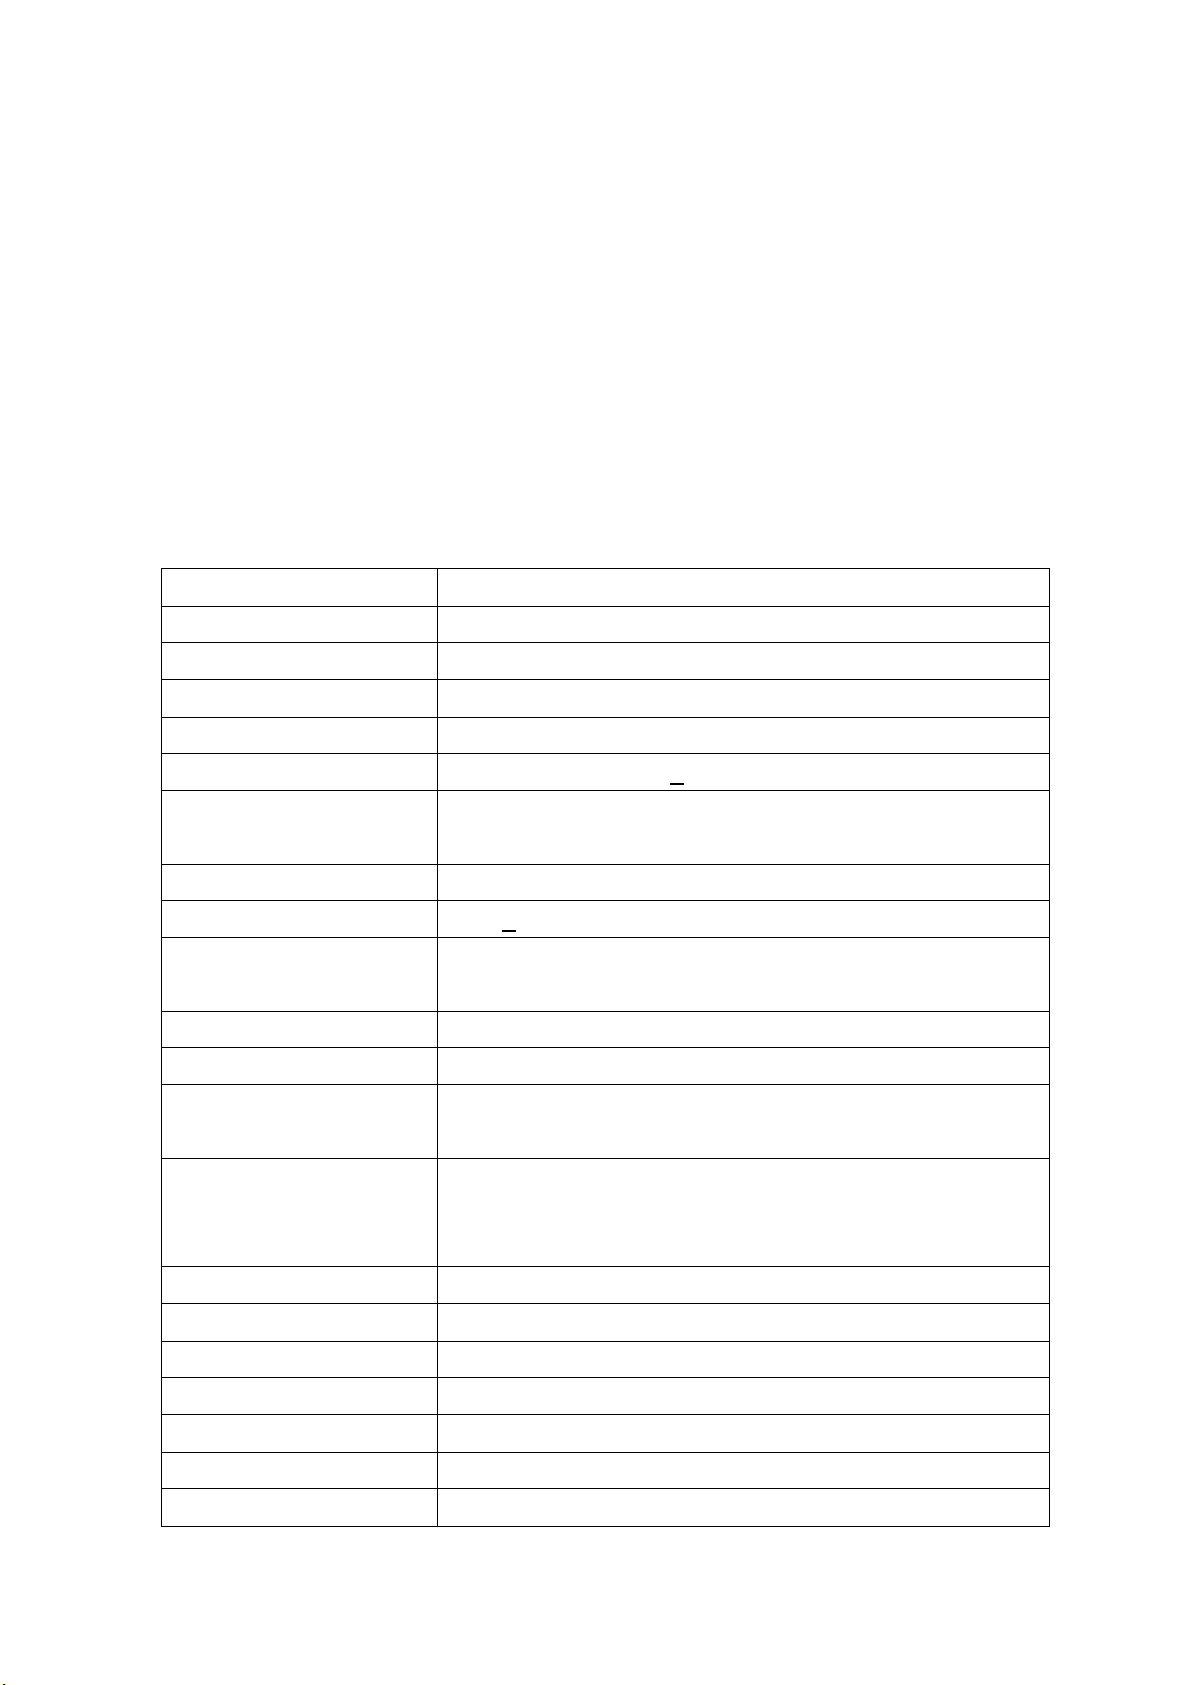
2. Specifications
Printing Method Impact dot matrix printer (Epson M-192G)
Feeding method Friction, with manual knob of feeding
Print Media Normal paper
Coping capability Two-ply, 1 original plus 1 copy
Inking Method Ribbon cassette ERC-09 or ERC-22 in purple color
Print Speed 1.8 lines per second +20% (typical)
Character per line 40 characters, Font 5 x 7 dots
16 characters, Font 15 x 14 dots (Chinese)
Line spacing 0.74 mm
Paper Width 57.5 +0.5 mm
Paper thickness 0.06~ 0.085 mm (1-ply)
Upper/0.066, lower/0.085 mm (2-ply)
Paper Roll Diameter 60mm
Character Sets ASC II (Custom-built up on request)
Command code ESC command set
Built-in Enlarge; Double horizontal; Triple vertical
Interface RS232C (RJ-45 phone-jack connector)
Infrared and Bluetooth<optional>
(Angle - upper/lower 15 degree, Length - 75cm)
Memory buffer 64K Bytes
Power 4pcs “AA” size Alkaline or Ni-MH rechargeable battery
Print Duration 120 Mins. continuous printing (At full charge)
Battery Charge External Battery Re-charger (Optional)
Operating Environment 0 ~ 50℃,10 ~ 90% RH
Dimensions 105 * 189 * 66.5 mm (W * L * H)
Weight 330g (paper and battery exclude)

- 4 -
3. Confirmation of package contents
Standard package included:
No Description Quantity
1 Portable printer PK-101P 1
2 Paper roller 1
3 Ribbon cassette (ERC-09 or 22 in black color) 1
4 Rechargeable Battery(NI-MH 2000mA) 4
5 RS232C cable (RJ45 / D-sub 9Pin with AC inlet) 1
6 AC Adaptor (Input AC90~260V,Output DC6V/300mA) 1
Optional:
No Description Remark
1 Car DC TO DC Adaptor DC 12V In 6V Out
2 Bluetooth Module Building PK-101P
Bluetooth To RS-232
Replacement Other HOST-USE

- 5 -
4. Printer introduces and functions
4.1 The obverse of printer
Paper
feed
manual
kn
ob
Paper outlet
Control
panel
RS-232C
interface
4.2 The inside of printer
Paper Roller
Battery
Ribbon
cassette
Ribbon
adjust
knob

- 6 -
5. Control panel
5.1 The function of button:
A Key: Power On
L Key: Line Feed –
Press once One line feed
Hold it Feeding continuously and stop when release
F Key: Function Key –
Press twice Self-test page will printing out
Press again when self-test printing Stop printing
Press it more than 2 seconds Power off
5.2 The function of LED and Buzzer:
Green LED: Power and status indicator
Red LED: Alarm and status indicator
Status Green LED Red LED Buzzer
Stand-by On Off --
Data receiving Blinking Off --
Communication error On On then Blinking twice Beep
Low power alarm On Blinking Short beep
Printer error On Blinking Long beep
Auto power off On Blinking Beep triple

- 7 -
6. Printer preparation
6.1 Ribbon cassette
a. Turn off power, (Press F-key more than 2 seconds)
b. Open printer cover, Push 3 points as shown on picture (see fig. 6.1.1) then open it.
c. Makes ribbon tight by ribbon twister on the left side first then install ribbon cassette to
the mechanism (see fig. 6.1.2). Be sure the cassette was fixed well.
Fig 6.1.1 Fig 6.1.2
Step 1 Step2 Step1 Step 2
6.2 Loading roll paper
a. Turn off power still and new paper roll was beside
b. Take off roller holder; put into new paper roller (see fig. 6.2.1)
c. Insert paper through mechanism paper inlet (see fig. 6.2.2 step 1) and use manual
knob (forward) to feed paper until the paper has around 10mm out of mechanism paper
outlet (see fig. 6.2.2 step 1)
d. Close printer cover
e. Use the manual knob BACKWARD, once you saw the top of paper from outlet of
printer cover then FORWARD the manual knob, paper will throughout from outlet of
printer cover.
Fig 6.2.1 Fig 6.2.2
Step 1 Step1 Step 2
PUSH

- 8 -
6.3 Install battery
a. Turn off power, (Press F-key more than 2 seconds)
b. Open printer cover (see fig. 6.1.1) and Battery cover
c. Take off old battery set (4pcs) and replace a new set
Caution:
Install the battery AT SAME DIRECTION (positive UP)
DO NOT mix with different brand and specification of battery in a set (4pcs)
The PK101P is workable with battery power only

- 9 -
7. Self-test printing sample
Turn ON the power, press F-key twice the self-test sample will print out as below, and
press F-key again during self-test will stop to printing immediately.

- 10 -
8. Interface
8.1 RS232C connection (D-sub 9pins to RJ45)
<<HOST>> <<PK-101P>>
D-sub 9Pins:<<HOST>>
Pin assignment
1 WAKE UP IN Printer wake up
2 TXD OUT Transmitted Data
3 RXD IN Receive Data
4 DTR OUT Data Terminal Ready
5 GROUND GND Ground
6 DSR IN Data Set Ready
7 - -
8 - -
9 DC-OUT OUT 4.8V / 45mA
RJ-45<<PK-101P>>
Pin assignment
1 DC-IN IN N/A
2 DC-OUT OUT 4.8V / 45mA
3 TXD OUT Transmitted Data
4 DTR OUT Data Terminal Ready
5 RXD IN Receive Data
6 DSR IN Data Set Ready
7 WAKE UP IN Printer wake up
8 GROUND GND Ground
Default setting: 9600, n, 8, 1
Transmission format
baud rate : 9600bps
data bit : 8
stop bit : 1
parity check : none
handshaking : DTR / DSR or XON / XOFF
Indice
Altri manuali POSJET Stampante


