ProFire PFFRIG24 Manuale utente

1
PFFRIG24
24" PREMIUM OUTDOOR RATED REFRIGERATOR
Owner's Manual
Please read and follow all safety rules and operating instructions before using.

2
Safety Instructions .......................................................................................................... 3-4
Unpacking Your Refrigerator..............................................................................................4
Installation Instructions .................................................................................................. 5-7
Using Your Refrigerator ................................................................................................ 8-11
Built-In-Installation............................................................................................................12
Care & Maintenance..........................................................................................................13
Troubleshooting.................................................................................................................14
Warranty .............................................................................................................................15
TABLE OF CONTENTS
CONTACT INFORMATION
For customer service, please contact your authorized dealer immediately. If you need
additional information and/or assistance, please contact:
ProFire Grills | 5565 N 124th Street, Butler, WI 53007
Toll-Free: 1-888-781-4657 | Fax: 1-888-781-3965
Email: CustomerService@ProFireGrills.com
ATTENTION:
INSTALLER:
Please leave these instructions with the consumer.
CONSUMER:
Please read & retain these instructions for future reference and before installing or operating
CORRECT DISPOSAL OF THIS PRODUCT
This symbol on the product, or in its packaging, indicates that this
product may notbe treated as household waste. Instead, it should be
taken to the appropriate waste collection point for the recycling of
electrical and electronic equipment. By ensuring thhis product is
disposed of correctly, you will help prevent potential negative
consequences for the environment and human health, which
could otherwise be caused by inappropriate waste handling of this
product. For more detailed information about the recycling of this
product, please contact your local council, your household waste
disposal service, or the shop where you purchased the product.

3
IMPORTANT SAFETY INSTRUCTIONS
Save these instructions!
WARNING!
To reduce the risk of fire, electrical shock, or injury when using your appliance,
follow these basic precautions:
•Read all instructions before using the outdoor refrigerator.
•DANGER or WARNING: Risk of child entrapment.
•Child entrapment and suffocation are not problems of the past. Junked or abandoned
appliances are still dangerous even if they will “just sit in the garage a few days”.
•Before you throw away your old outdoor refrigerator: Take off the door. Leave the
shelves in place so that children may not easily climb inside.
•Never allow children to operate, play with, or crawl inside the appliance.
•Never clean appliance parts with flammable fluids. The fumes can create a fire hazard or explosion.
•Do not store or use gasoline or any other flammable vapors and liquids in the vicinity of this or
any other appliance. The fumes can create a fire hazard or explosion. Do not store explosive
substances such as aerosol cans with a flammable propellant in this appliance.
•WARNING: Keep ventilation openings, in the appliance enclosure or in the built-in structure,
clear of obstruction;
•WARNING: Do not use mechanical devices or other means to accelerate the defrosting
process, other than those Recommended by the manufacturer;
•To avoid a hazard due to instability of the appliance, it must be fixed in accordance with the
instructions.
•WARNING: Do not damage the refrigerant circuit;
•WARNING: Do not use electrical appliances inside the food storage compartments of the
appliance, unless they are the type recommended by the manufacturer.
•If the refrigerant of these appliances are R600a, flammable and explosive articles
should not be put in or near the cabinet, to avoid the fire or explode caused.
SAFETY INSTRUCTIONS

4
SAFETY INSTRUCTIONS continued
UPPACKING YOUR OUTDOOR REFRIGERATOR
•To prevent damaging the door gasket, make sure to have the door all the way opened when
pulling shelves out of the rail compartment.
•The appliance must be positioned so that the plug is accessible. Release the electric cord.
Move your cabinet to its final location. Do not move your Cabinet while loaded with wine. You
might distort the body. The wine cellar should be installed in a suitable place in order to avoid
touching the compressor with hand.
•This appliance is not intended for use by persons (including children) with reduced physical,
sensory or mental capabilities or lack of experience and knowledge, unless they have been
given supervision or instruction concerning use of the appliance by a person responsible for
their safety.
•If the supply cord is damaged, it must be replaced by manufacturer of its Service agent or a
similarly qualified person in order to avoid a hazard.
•Plug directly into a three prong outlet. Do not use an adapter or extension cord.
•Remove the exterior and interior packing materials.
•Let the appliance stand upright for approximately 2 hours before connecting it to the power
source. This will help to reduce the possibility of a cooling-system malfunction from handling
during transportation.
•Use a soft cloth to clean the interior surface with lukewarm water
The following are packed with your Outdoor Rated Refrigerator:
DOOR KEYS 5/32" ALLEN WRENCH HINGE PIN
(QTY. 2)
HINGE COVER
(QTY. 2)

5
INSTALLATION INSTRUCTIONS
FLAT HEAD
SCREWDRIVER
5/32" ALLEN
WRENCH
PHILLIPS HEAD
SCREWDRIVER
TOOLS NEEDED FOR INSTALLATION
INSTALLATION INSTRUCTIONS
BEFORE USING YOUR OUTDOOR REFRIGERATOR
•Remove the exterior and interior packing.
•Before connecting the outdoor refrigerator to the power source, let it stand upright for
approximately 2 hours. This will reduce the possibility of a malfunction in the cooling system
from handling during transportation.
•Clean the interior surface with lukewarm water using a soft cloth.
•This appliance is intended to be used in household and similar applications such as
– staff kitchen areas in shops, offices and other working environments;
– farm houses and by clients in hotels, motels and other residential type environments;
– bed and breakfast type environments;
– catering and similar non-retail applications.
•When disposing your appliance, please choose an authorized disposal site.
INSTALLATION OF YOUR OUTDOOR REFRIGERATOR
•This appliance is designed to be for free standing installation or built-in (fully recessed)
(Refer to sticker location the back of this appliance).
•This appliance is intended to be used exclusively for the storage of beverages or cold drinks.
•Place your outdoor refrigerator on a floor that is strong enough to support it when it is fully
loaded. To level your outdoor refrigerator, adjust the front leveling leg at the bottom of the
outdoor refrigerator.
•This appliance is using flammability refrigerant. So never damage the cooling pipework during the trans-
portation. Locate the outdoor refrigerator away from direct sunlight and sources of heat (stove, heater,
radiator, etc.). Direct sunlight may affect the acrylic coating and heat sources may increase electrical
consumption. Extreme cold ambient temperatures may also cause the unit not to
perform properly.
•Avoid locating the unit in moist areas.
•Plug the outdoor refrigerator into an exclusive, properly installed-grounded wall outlet. Do not
under any circumstances cut or remove the third (ground) prong from the power cord. Any
questions concerning power and/or grounding should be directed toward a certified electrician
or an authorized products service center.
6
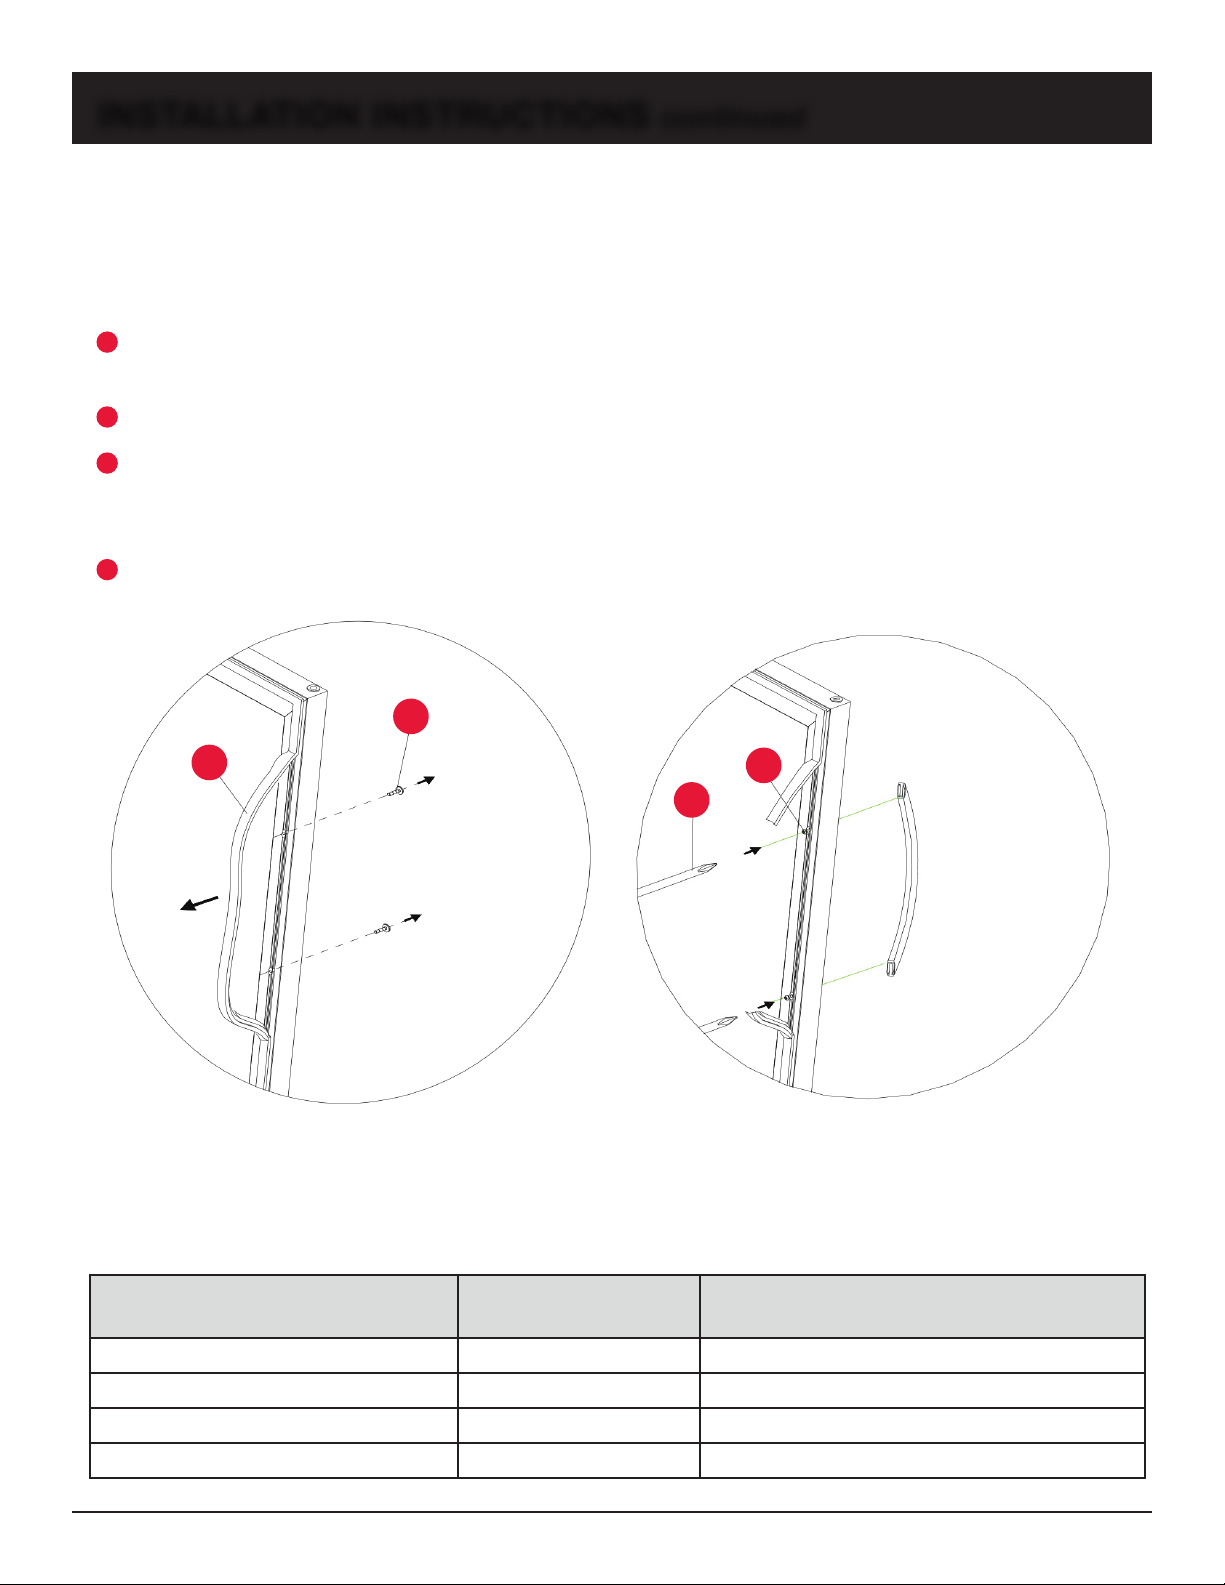
INSTALLATION INSTRUCTIONS continued
INSTALLING THE STAINLESS STEEL HANDLE
This outdoor rated refrigerator includes a stainless-steel handle. To install the handle please follow
the below instructions:
• Pull away the door gasket in the area where the handle is to be installed on the left side as shown
in the illustration below. The gasket is easily displaced by hand, no tools are necessary.
•Align the handle with the screws installed.
Tighten the screws using a Phillips head screwdriver until the handle sets both flush and
secured tightly against the door frame. (DO NOT over tighten as this will cause damage
to the handle assembly).
•Replace the door gasket to its original position.
AMBIENT ROOM TEMPERATURE LIMITS
This appliance is designed to operate in ambient temperatures specified by its temperature class
marked on the rating plate.
Class Symbol Ambient Temperature Range (˚C)
˚C ˚F
Extended Temperate SN 10˚C to 32˚C 50˚F to 89˚F
Temperate N 16˚C to 32˚C 32˚F to 89˚F
Subtropical ST 16˚C to 38˚C 32˚F to 100˚F
Tropical T 16˚C to 43˚C 32˚F to 109˚F
1
2
3
4
1
2
GASKET v
w PHILLIPS HEAD SCREW
w PHILLIPS HEAD SCREW
2
3
u HANDLE
w PHILLIPS HEAD
SCREWDRIVER

7
INSTALLATION INSTRUCTIONS continued
CHARCOAL FILTRATION SYSTEM
This outdoor rated refrigerator is equipped with an active charcoal
filtration system to ensure air purity, cooling efficiancy, and to maintain
an odor free cabinet. The filter assembly is located at the rear panel inside
your unit. The charcoal filter should be changed every 12 months.
How to Change the Filter:
• Remove all items from shelves
• Remove the shelves and set aside until filter has been changed
• Hold the filter and turn it counter-clockwise 45 degrees and
then pull it out
• Remove the existing filter and replace it with a new one
(Part #PFFRIGFIL)
• After putting the new filter in place, turn it clockwise 45 degrees
1
2
3
4
5
Attention
•Store wine in sealed bottles;
•Do not overload the cabinet;
•Do not open the door unless necessary;
•Do not cover shelves with aluminum foil or any other shelf material which may prevent
air circulation;
•Should the outdoor refrigerator be stored without use for long periods it is suggested,
after a careful cleaning, to leave the door ajar to allow air to circulate inside the cabinet
in order to avoid possible formations of condensation, mold or odors.
CHARCOAL REPLACEMENT FILTER
PART #PFFRIGFIL

8
USING YOUR REFRIGERATOR
CONTROL PANEL
ON/OFF Power: To turn the appliance ON or OFF, press and hold the Power button
for 3 seconds.
˚C/˚F Selector: Press the button to change the temperature display between
Celsius and Fahrenheit.
Temperature Setting: To display the set temperatrure, press the Temperature Setting button
once—the display flashes and shows the set temperature. After 5 seconds the temperature inside
the unti will reappear in the dispaly window
Increase Temperature: The temperature will increase by one degree each time you press
the "+" button.
Decrease Temperature: The temperature will decrease by one degree each time you
press the "-" button.
Display Window: 2-digit LED display to show temperature setting or actual interior temperature.
Light Button: Press to turn light on or off.
Key Lock Function: If there is no operation of the digital controls for 3 minutes, they will be
locked automatically. Press the + and - buttons at the same time for 3 seconds to unlock.
1
2
3
5
6
4
7
8
1 2 3 4 5 6
8
7

9
USING YOUR REFRIGERATOR continued
SETTING THE TEMPERATURE CONTROLS
SHELVES
v The temperature setting can be adjusted from 0˚C/32˚F to 20˚C/68˚F
v The temperature preset at the factory is 5˚C/41˚F
Any of the shelves can be removed or readjusted to acommodate larger items.
• When removing shelves off of the shelf supports, make sure to remove all items first.
• To prevent damaging the door gasket, make sure to have the door fully opened when pulling the
shelves out of the shelf supports
To remove a shelf:
• Move the shelf towards the gap on both sides.
• Once the shelf support is released from the gap, lift the shelf
upwards and pull it out from the cabinet.
Your unit comes with a lock and key combination
The keys are located inside the plastic bag that contained this Owner's Manual.
To Unlock Door: Insert the key into the lock and turn
it counter-clockwise
To Lock Door: Insert the key into the lock and turn it clockwise,
making sure the metal pin is engaged completely. Remove key
and put it in a secure place for safekeeping.
Attention
If the unit is unplugged, power lost, or turned off, you must wait 3 to 5 minutes before you restart
the unit. If you try to restart before this time delay, it will not start. If it is the first time in use—
or if it has been off for a long time—the temperature will difference between setting and
LED display temperature. After running a period, the temperature will be reverting back.
DOOR LOCK

10
USING YOUR REFRIGERATOR continued
REVERSING THE DOOR SWING OF YOUR APPLIANCE
The glass door has the capability of opening from either the left side or the right side.
The appliance is delivered with the door opening from the left side. Please follow the directions to
reverse the opening direction to open from the right side. This is easiest when done with two people.
PARTS
Hinge Cover Hinge Pin Upper Hinge
Bracket
Lower Hinge
Bracket
Hinge Mounting
Screw
STEP ONE
You will first need to open the door so that it is parallel to the rest of the unit. Use a flat
head screwdriver to open the upper hinge cover to reveal the hinge pin. Then use the flat head
screwdriver to loosen the hinge pin and let it slide down the hinge pin slot.
Remove the lower hinge cover in the same fashion as the upper hinge and loosen then slide
the hinge pin up to remove the glass door.
Hinge
Bracket
Hinge
Pin
Hinge
Cover
Hinge Mounting Screw
Hinge Bracket
Hinge Pin
Hinge
Cover
Indice


