Quantum 99-NBQ-525-8 Istruzioni per il montaggio

Before installation, careful consideration must be given to how
this system will operate if connected to any other piece of
mechanical equipment. It is always important to assess how
the operation of any air movement device may interact with
vented combustion equipment (i.e. Gas Furnaces, Oil
Furnaces, Wood Stoves, etc.).
NEVER install a ventilator in a situation where its normal
operation, lack of operation or partial failure may result in the
backdrafting or improper functioning of vented combustion
equipment without proper safety/ warning devices installed as
required.
General .......................................................................................1
Table of Contents........................................................................1
Typical Applications ....................................................................2
Installation...................................................................................3
Electrical......................................................................................4
Instructions...............................................................................5-6
Warranty......................................................................................7
General/Généralités/Generalidades Table of Contents/Table des matières/Índice
Installation and Wiring Instructions for Mixed Flow Inline Duct Exhaust Fans
Models/Modèles/Modelos
99-NBQ-525-8
99-NBQ-700-10
99-NBQ-950-12
98-NBQ-8/10/12
0305
Avant de procéder à l’installation, vous devez déterminer com-
ment ce système interagira s’il est raccordé à toute autre pièce
d’équipement mécanique. Il est toujours important d’évaluer quel
impact aura le fonctionnement de tout équipement de déplace-
ment d’air sur un appareil à combustion (ex. : fournaise au gaz,
fournaise à l’huile, poêle à bois, etc.)
N’installez JAMAIS un ventilateur dans une situation où son
fonctionnement normal, une opération inadéquate ou une défail-
lance partielle pourrait causer un refoulement ou un mauvais
fonctionnement d’un appareil à combustion sans y installer, tel
que requis, un système de sécurité/d’alarme.
Généralités..................................................................................1
Table des matières......................................................................1
Applications types .......................................................................8
Installation...................................................................................9
Branchement électrique ............................................................10
Directives .............................................................................11-12
Garantie ....................................................................................13
Antes de instalarla, usted debe determinar como este sistema
obrará si es ajustado a cualquiera otra pieza de equipo mecáni-
co. Siempre es importante evaluar el impacto que tendrá el
functionamiento de todo equipo de desplazamiento de aire en un
aparato a combustión (ejemplo: horno de gas, horno de aceite,
estufa de leña, etc...).
Jamás instale un ventilador en una situación donde su function-
amiento normal, una operación inadecuada o que un fallo parcial
pueda causar una descarga o un mal funcionamiento de un
aparato a combustión sin instalar tal como es requerido, un sis-
tema de seguridad/alarma.
Generalidades.............................................................................1
Índice...........................................................................................1
Aplicaciones típicas...................................................................14
Instalación.................................................................................15
Conección eléctrica ..................................................................16
Instrucciones........................................................................17-18
Garantía ...................................................................................19
Directives d’installation et de branchement électrique des ventilateurs hélico-centrifuges en ligne
Instrucciones de instalación y conección eléctrica ventiladores heliocentrifugal in-line
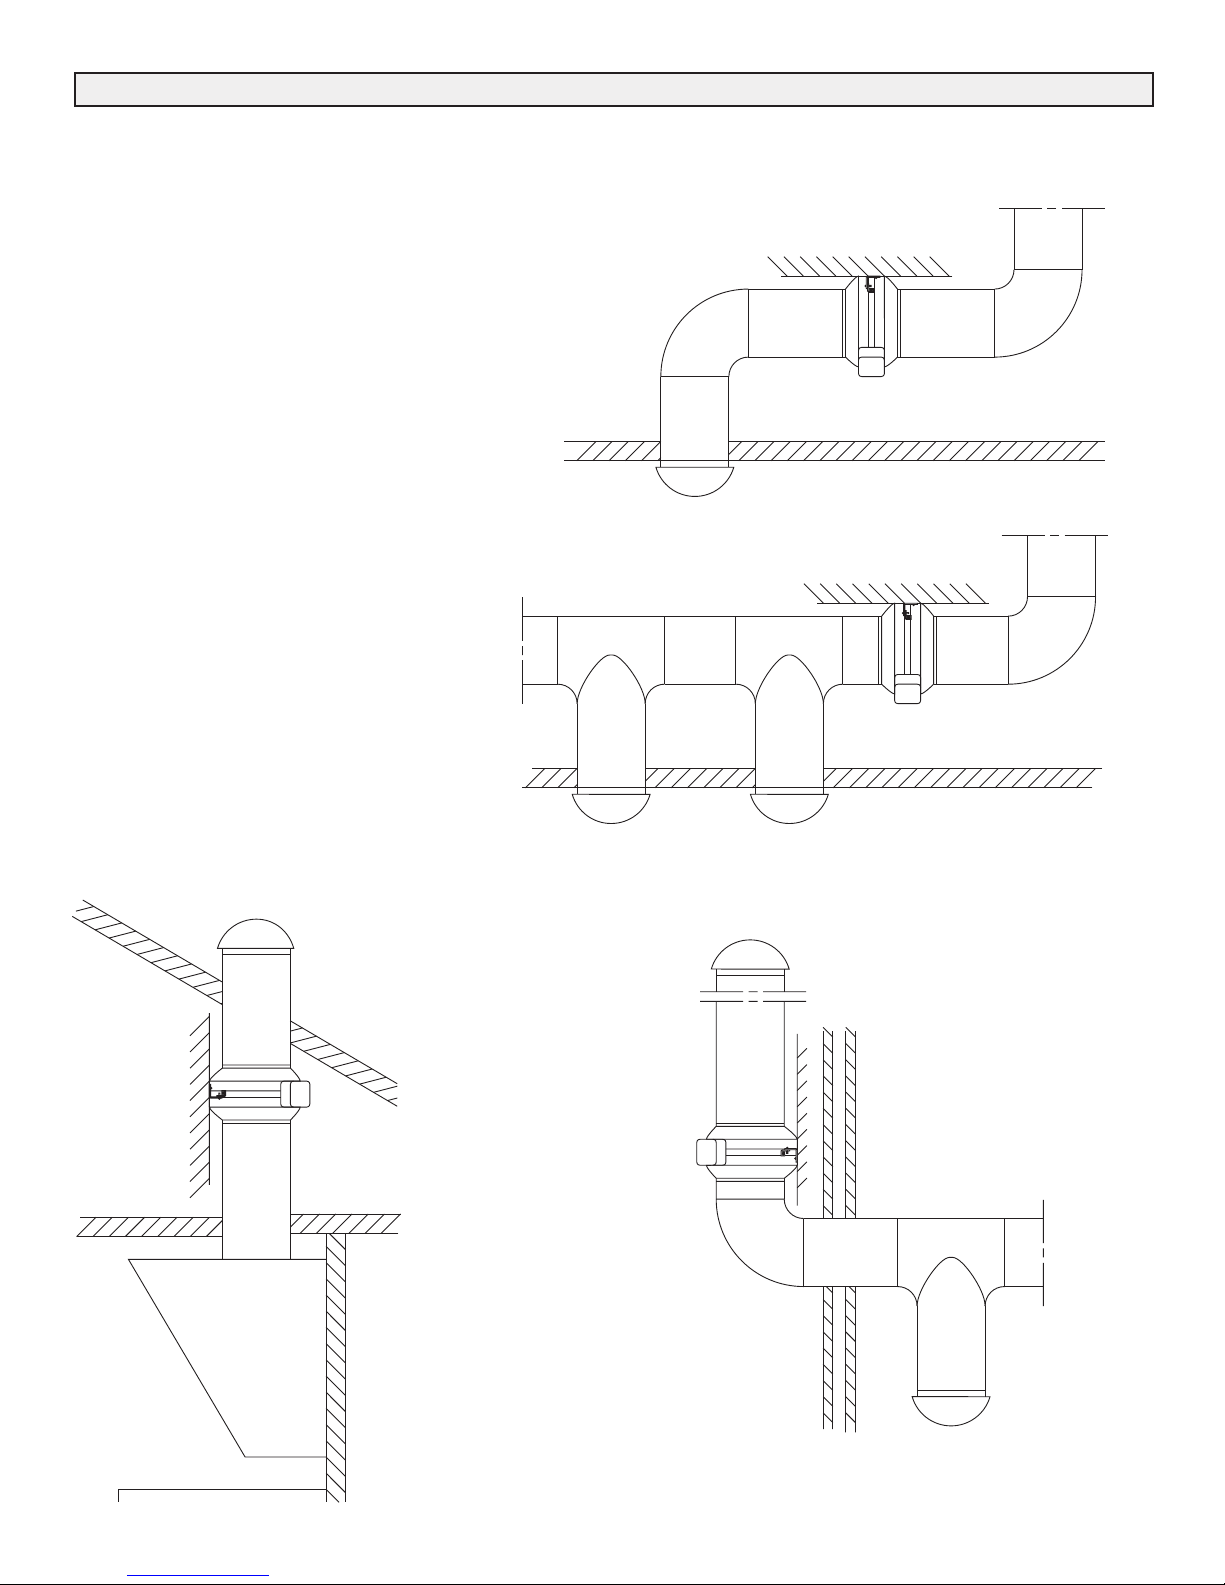
Single Point Exhaust System
Multi-Point Exhaust System
Range Hood Exhaust
2
Typical Applications
Exterior Mounting
Figure 1
3
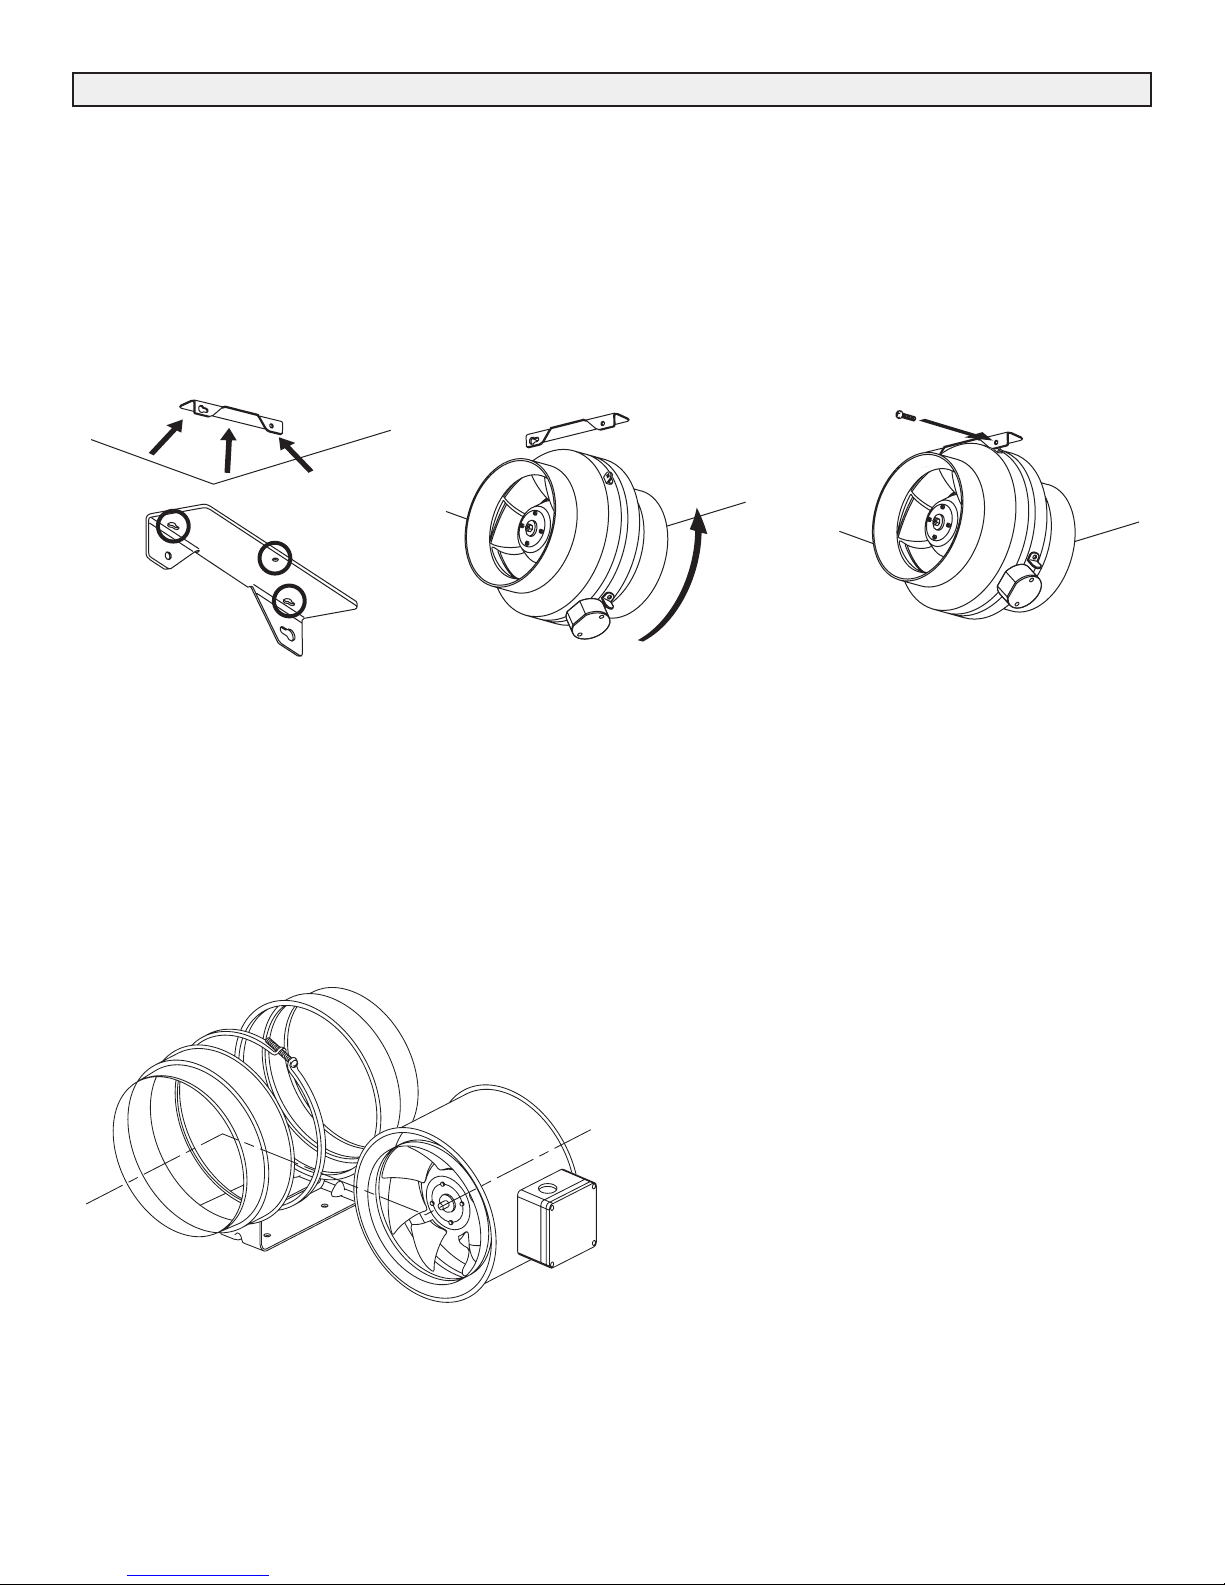
Installation
Model 99-NBQ-525-8
1. Secure mounting bracket to fixed structure.
2. With one screw loosely fitted to fan mounting lug; locate
and align in the slotted mounting bracket hole.
3. Align the other fan fixing hole with the mounting brack-
et. Insert the bolt and washers provided. Fully tighten
both screws to secure the fan.
Model 99-NBQ-700-10 & 99-NBQ-950-12
1. To install the PVP-SL10 & 12 models, the fan
motor/wheel assembly must first be removed. Loosen
the two spring clips around the casing and remove.
2. Secure the mounting bracket.
3. Replace the fan motor/wheel assembly and tighten the
two spring clips to secure the product.
Figure 2

4
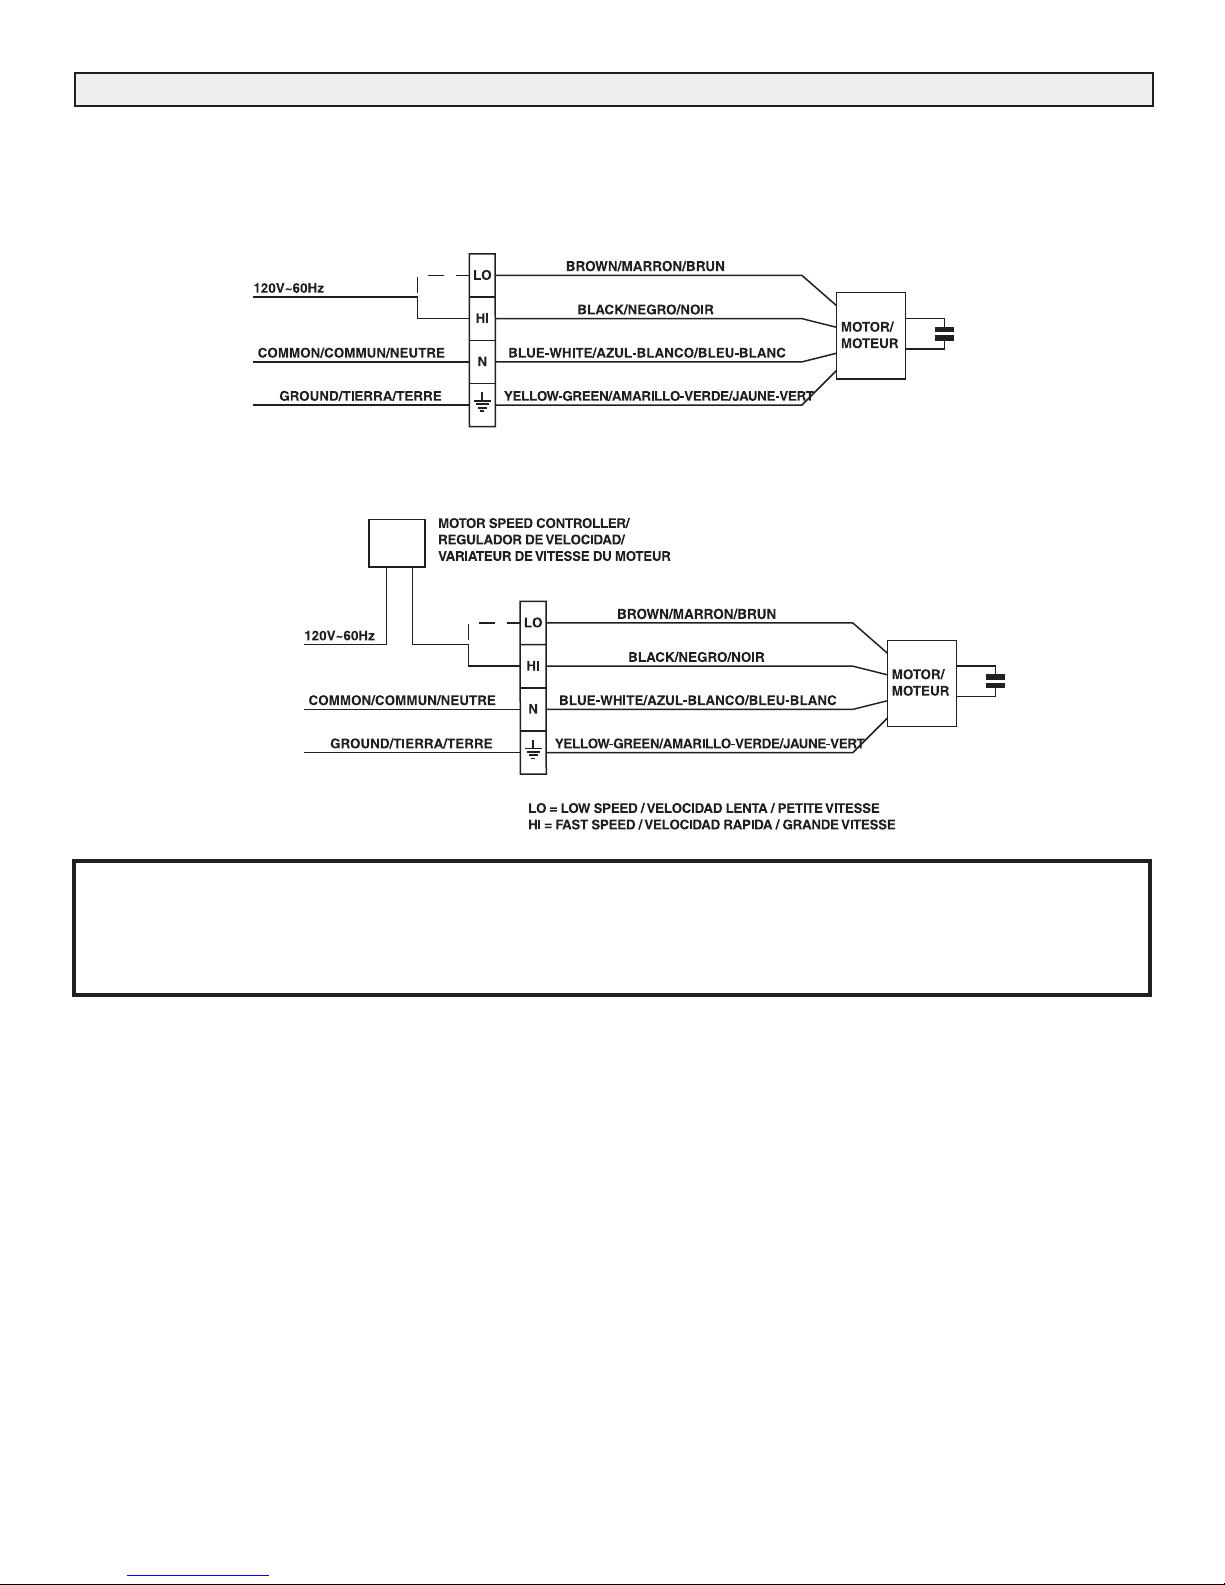
Electrical
IMPORTANT
8”, 10” and 12” metal fans incorporate two speed (120VAC 60Hz) motors. The live supply must
only be made to terminal
HI
or
LO
connection -
NOT TOGETHER
.
Motor without Speed Controller
Motor with Speed Controller
Figure 3

5
99-NBQ
The 99-NBQ mixed flow range of inline duct exhaust fans
have been manufactured in accordance with the rigorous
standards of production as defined by the International
Quality Standards ISO 9001. All the components have
been checked and tested at the end of the manufacturing
process.
We recommend that you check the following after receiv-
ing the product:
1. The correct size has been received.
2. The correct model has been received.
3. That the details on the rating label correspond to the
electrical supply: voltage frequency, etc.
Remove the unit from packaging and inspect for shipping
damage with in 15 days of receipt. If the product is found
to be damaged, immediately contact your local authorized
supplier. DO NOT OPERATE UNIT IF DAMAGED.
These instructions should be considered as a supplement
to EPA standard practices, as well as all state and local
building code regulations.
Environment
The 99-NBQ series of fans are suitable for operation in
both Indoor and Outdoor environments. All models are
suitable for exhaust or supply operation in the temperature
range (inclusive of duct airstream temperature) of -40˚C
(-40˚F) up to +60˚C (140˚F).
Installation
WARNING: To reduce the risk of fire or electric shock,
injury to persons, observe the following:
a) Use this unit only in the manner intended by the manu-
facturer. If you have any questions, contact the
manufacturer.
b) Before servicing or cleaning the unit, switch the power
off at the service panel and lock the service disconnect-
ing means to prevent power from being switched on
accidentally. When the service disconnecting means
cannot be locked, securely fasten a prominent warning
device such as a tag to the service panel.
c) Installation work and electrical wiring must be done by
qualified person(s) in accordance with all applicable
codes and standards including fire rated construction.
d) Sufficient air is needed for proper combustion and
exhausting of gases through the flue (chimney) of fuel
burning equipment to prevent back drafting. Follow the
heating equipment manufacturers’ guideline and safety
standards such as those published by the National Fire
Protection Association (NFPA) and the American
Society for Heating, Refrigeration and Air Conditioning
Engineers (ASHRAE) and the local code authorities.
e) When cutting or drilling into wall or ceiling, do not dam-
age electrical wiring and other hidden utilities.
f) Ducted fans must always be vented to the outdoors.
g) If this unit is to be installed over a tub or a shower, it
must be marked as appropriate for the application and
connected to a GFCI (Ground Fault Circuit Interrupter)
- protected branch circuit.
h) Never place a switch where it can be reached from a
tub or shower.
i) CAUTION: For general ventilating use only. Do not
use to exhaust hazardous or explosive materials
and vapours.
j) CAUTION: This unit has an unguarded impeller. Do
not use in locations readily accessible to people or
animals.
The 99-NBQ series can be mounted in any orientation,
horizontal or vertical and is suitable for numerous types of
applications. See Figure (1). Illustration of some typical
applications.
IMPORTANT:
When using 99-NBQ units in conjunction
with range hoods, the following instructions should be
noted.
WARNING- TO REDUCE THE RISK OF A RANGE TOP
GREASE FIRE, OBSERVE THE FOLLOWING:
a) Never leave surface units unattended at high settings.
Boil-overs cause smoking and greasy spill-overs that
may ignite.
b) Always turn hood ON when cooking at high heat or
when cooking flaming foods.
c) Clean ventilating fans frequently. Grease should not be
allowed to accumulate on fan or filter.
d) Use proper pan size. Always use cookware appropriate
for the size of the surface element.
WARNING - TO REDUCE THE RISK OF INJURY TO PER-
SONS IN THE EVENT OF A RANGE TOP GREASE FIRE,
OBSERVE THE FOLLOWING:
a) Smother flames with a close fitting lid, cookie sheet or
metal tray, then turn off the burner. Be careful to pre-
vent burns. If flames do not go out immediately,
evacuate and call the fire department.
b) Never pick up a flaming pan - you may be burned.
c) Do not use water, including wet dishcloths or towels, a
violent steam explosion will result.
d) Use an extinguisher ONLY IF:
(i) You know you have a class ABC extinguisher and
you already know how to operate it.
(ii) The fire is small and contained where it started.
Instructions

6
(iii) The fire department is being called.
(iv) You can fight the fire with your back to an exit.
e) TO REDUCE THE RISK OF FIRE, ONLY USE METAL
DUCTWORK.
If the installation is made to rigid or flexible ducting, then
we should recommend the correct diameter ducting is
used to couple to the fan flanges. if it is necessary to bend
the duct at the discharge of the fan, then the bend radius
should be as large as possible.
Before installing the product check the following points:
1. the fan impeller turns freely and
2. there are no obstructions to the airflow
All models include a robust mounting bracket which
enables easy and quick installation of the fan. See Figure
2 installation diagram for 99-NBQ duct fans.
Ductwork connection should be made with duct tape or
duct fast-clamps (available through your local supplier) to
ensure a good seal and secure connection.
Electrical Connection
All 99-NBQ series fans operate from a standard 120V
60Hz AC electrical supply. All wiring must be carried out in
accordance with National Electric Code and all applicable
state and local building codes.
Electrical connections should be made in accordance with
the following diagrams: Figure 3 Electrical wiring.
Maintenance
IMPORTANT: BEFORE CARRYING OUT ANY MAINTE-
NANCE OR SERVICING, ENSURE THAT THE UNIT IS
DISCONNECTED FROM THE MAIN ELECTRICAL SUP-
PLY.
All 99-NBQ series exhaust fans incorporate sealed for life
bearings and therefore so not require any lubrication. We
would recommend inspection of the product at least once
every twelve (12) months to avoid excessive accumulation
of dust and dirt on the impeller. To inspect the unit, discon-
nect from electrical supply and remove the ducting. If any
debris is evident on the impeller, clean with a damp (not
wet) cloth. DO NOT USE any detergents or abrasive mate-
rials for cleaning.
Instructions

7
Warranty
FIVE (5) YEAR WARRANTY
Nutech Brands Inc warrants that the 99-NBQ series exhaust fan will be free from defective materials and workmanship for
the period of five (5) years from the date of original purchase. In the event that we find any part is defective, the product
will be repaired or, in the Company’s discretion, replaced without charge provided that the product has been installed in
accordance with the enclosed instructions and all applicable EPA standards and state and local building codes.
IF CLAIMING UNDER WARRANTY
Please return the complete product, freight paid to your local authorized distributor. All returns must be accompanied by a
valid Bill of Sale. All returns must be clearly marked “Warranty Claim” with an accompanying description stating the
nature of the fault.
THE FOLLOWING WARRANTIES DO NOT APPLY
Damages from shipping, either concealed or visible. Claim must be filed with the carrier.
Damages resulting from improper wiring or installation.
Damages caused by acts of nature or resulting from improper consumer procedures such as: Improper maintenance;
Misuse; Negligence; Alteration; Abuse; Abnormal use; Accident or Incorrect electrical voltage and current.
Removal or alteration to the Nutech Brands Inc. data plate label.
WARRANTY VALIDATION
The end user must keep a copy of the Bill of Sale to verify purchase date.
THE ABOVE FIVE (5) YEAR WARRANTY IS EXPRESSLY IN LIEU OF ALL OTHER WARRANTIES, EXPRESSED, WRIT-
TEN OR IMPLIED INCLUDING THE WARRANTIES OF MERCHANTABILITY AND FITNESS FOR USE. IN NO EVENT
SHALL NUTECH BRANDS INC. BE LIABLE FOR ANY SPECIAL, CONSEQUENTIAL OR INCIDENTAL DAMAGES
INCLUDING LOSS OF PROPERTY, REVENUES, LOSS PROFITS, COSTS OF REMOVAL, INSTALLATION OR REINSTAL-
LATION.

8
Applications types
Système avec un seul point d’extraction
Système avec plusieurs points d’extraction
Système à hotte d’extraction Système à montage à l’extérieur
Figure 1

9
Installation
Modèle 99-NBQ-525-8
1. Fixez le support à une surface solide.
2. En vous servant d’une vis dans la patte de fixation du
ventilateur, localisez le trou correspondant du support.
3. Alignez ensuite l’autre patte de fixation avec l’autre trou
du support. Placez l’autre vis et serrez le tout.
Modèle 99-NBQ-700-10 & 99-NBQ-950-12
1. Démontez d’abord l’assemblage du moteur en desser-
rant les vis des deux brides qui le fixent à son support.
2. Fixez le support au mur ou au plafond.
3. Replacez l’assemblage du moteur dans son support
avec les deux brides et serrez les vis.
Figure 2
10
Branchement électrique
IMPORTANT
Les ventilateurs en métal de 8 po, 10 po et 12 po incluent un moteur à deux vitesses
(120V à 60 Hz). Vous ne devez brancher la phase qu’à un seul terminal
HI ou LO et PAS LES DEUX À LA FOIS.
Moteur sans variateur de vitesse
Moteur avec variateur de vitesse
Figure 3
Questo manuale è adatto per i seguenti modelli
2
Indice
Lingue:


