Reolink B5M11WA Guida rapida

Operational Instruction
Apply to: B5M11WA
EN/DE/FR/IT/ES
Sept 2022
QSG1_A
58.03.005.0047 @ReolinkTech https://reolink.com
Technical Support
If you need any technical help, please visit our ocial support site and
contact our support team before returning the products,
https://support.reolink.com
Technische Unterstützung
Wenn Sie Hilfe brauchen, kontaktieren Sie bitte Reolink Support Team
zuerst, bevor Sie Ihre Bestellung zurücksenden. Meiste Fragen oder
Probleme können von unserem Online Support Center beantwortet
und gelöst werden: https://support.reolink.com
Support technique
Si vous avez besoin d’aide, veuillez contacter Reolink avant de
retourner votre produit. La plupart des questions peuvent être
répondues via notre centre de support en ligne à l'adresse
https://support.reolink.com
Assistenza Tecnica
Se avete bisogno di aiuto, le chiediamo gentilmente di contattare
Reolink prima di restituire il prodotto. La maggior parte delle domande
può essere risolta tramite il nostro centro di assistenza online
all'indirizzo https://support.reolink.com
Soporte técnico
Si necesita ayuda, comuníquese con Reolink antes de devolver su
producto. La mayoría de las preguntas se pueden responder a través
de nuestro centro de soporte en línea en https://support.reolink.com
REOLINK INNOVATION LIMITED
FLAT/RM 705 7/F FA YUEN COMMERCIAL BUILDING 75-77 FA YUEN
STREET MONG KOK KL HONG KONG
Hoferstasse 9B, 71636 Ludwigsburg, Germany
Product Ident GmbH
89 Princess Street, Manchester, M1 4HT, UK
APEX CE SPECIALISTS LIMITED
REP
EU
REP
UK
Contents
EN
2English
1 English
What’s in the Box
Camera Introduction
Connection Diagram
Set up the Camera
Install the Camera
Troubleshooting
Specifications
Notification of Compliance
2
3
5
6
7
11
12
12
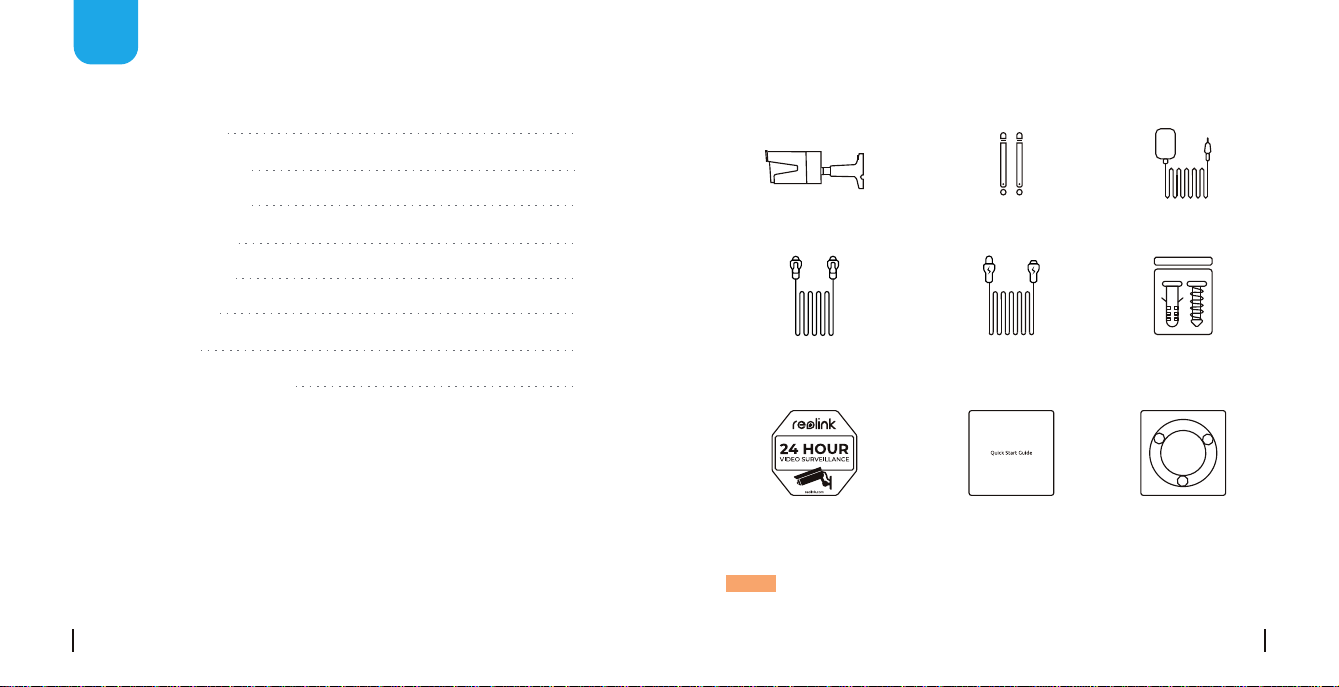
What’s in the Box
Camera Antenna
1m
Network Cable
Power Adapter
4.5m Power
Extension Cable
Quick Start GuideSurveillance Sign Mounting
Template
Pack
of Screws
NOTE: Camera and accessories vary with dierent camera models that
you purchase.
4English
3 English
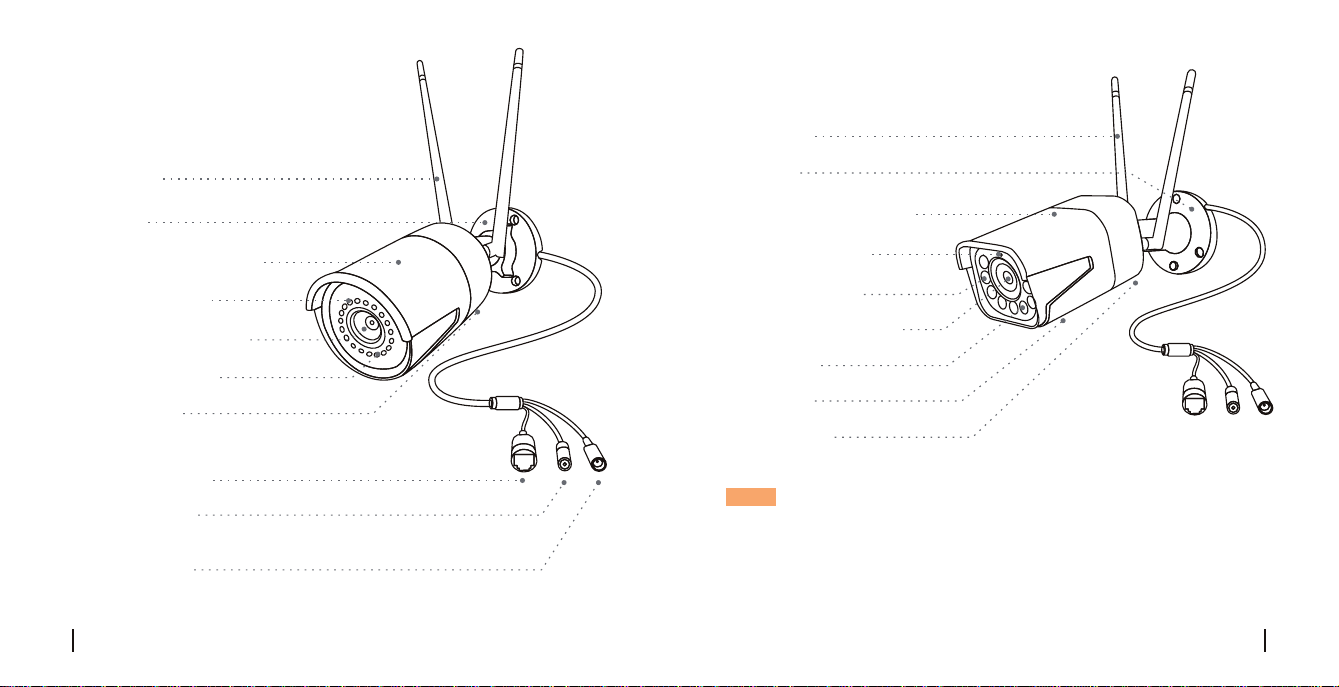
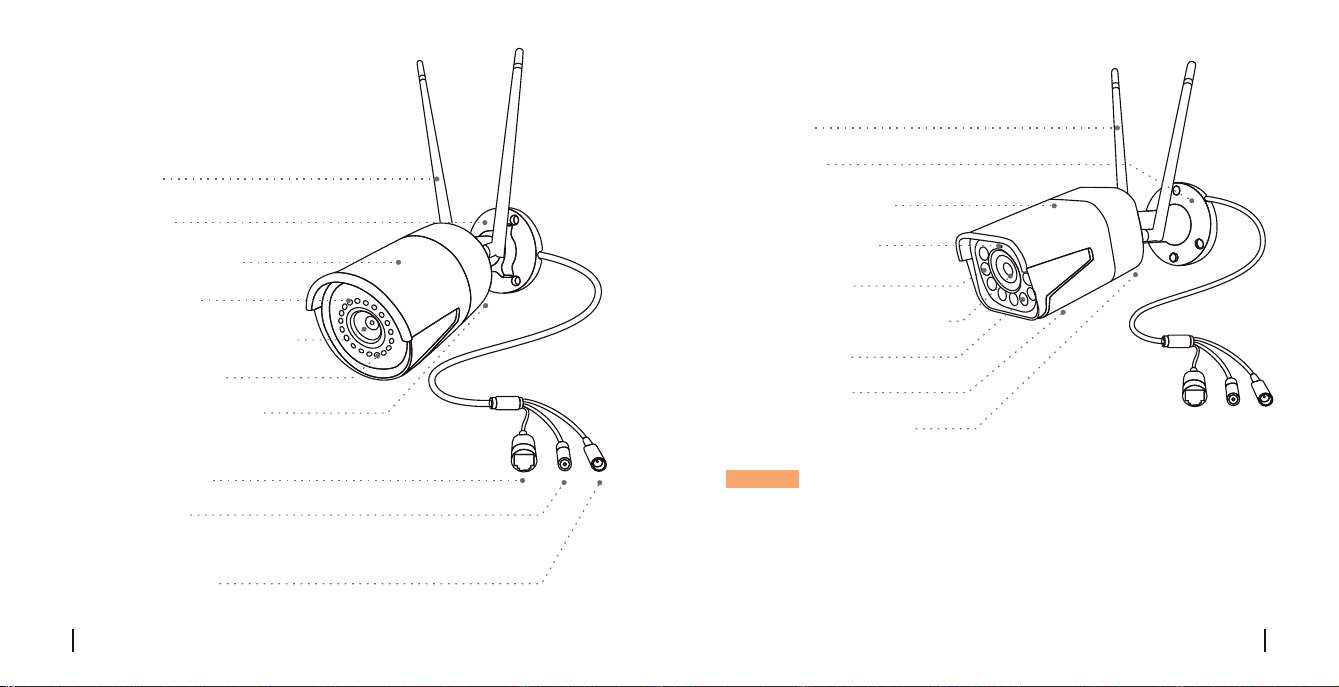
Camera Introduction
Network Cable
Infrared Lights
High Definition Lens
Mount
Metal Aluminum Case
Antenna
Daylight Sensor
Reset Button
Power Cable
Built-in Mic
* Press for about 10 seconds to restore factory settings.
NOTE:
• Dierent types of cameras are introduced in this section. Please check
out the camera included in the package and check out the details from
the correpsonding introduction above.
• The actual appearance and components may vary with dierent
model of product.
NOTE:
• Dierent types of cameras are introduced in this section. Please check
out the camera included in the package and check out the details from
the correpsonding introduction above.
• The actual appearance and components may vary with dierent
model of product.
Antenna
Mount
Metal Aluminum Case
Infrared Lights
Daylight Sensor
High Definition Lens
Spotlight
Speaker
Built-in Mic

Connection Diagram
Before initial setup, follow the steps below to connect your camera.
1. Connect the camera to a LAN port on your router with an Ethernet cable.
2. Power on the camera with a power adapter.
6English
5 English
• On Smartphone
Download and launch the Reolink App or Client software, and follow the
onscreen instructions to finish initial setup.
Scan to download the Reolink App.
Set up the Camera
• On PC
Download path of the Reolink Client: Go to https://reolink.com >
Support > App & Client.
Power Adapter
Router
WiFi IP Camera
Power Cable
Network Cable

Install the Camera
Installation Tips
• Do not face the camera towards any light sources.
• Do not point the camera towards a glass window. Or, it may result in
poor image performance because of the window glare by infrared LEDs,
ambient lights or status lights.
• Do not place the camera in a shaded area and point it towards a well-lit
area. Or, it may result in poor image performance. For better image
quality, please make sure that the lighting condition for both the camera
and the capture object is the same.
• For better image quality, it’s recommended to clean the lens with a soft
cloth from time to time.
• Make sure the power ports are not exposed to water or moisture or
blocked by dirt or other elements.
• Do not install the camera at places where rain and snow may hit the
lens directly.
• The camera may work in extreme cold conditions as low as -25°C.
Because when it is powered on, the camera will produce heat. You may
power on the camera indoors for a few minutes before installing it
outdoors.
8English
7 English
Drill holes in accordance with the
mounting hole template.
NOTE: Use the drywall anchors
included in the package if needed.
NOTE: Run the cable through the
cable notch on the mount base.
Install the mount base with the
mounting screws included in
the package.
Mount the Camera
NOTE: There are two dierent types of mounts for bullet cameras.
Please check out the mount included in the package and follow the
corresponding instruction to install the camera properly.
1
2

Twist the screws with the wrench to unlock the camera
and adjust its direction.
After adjustment, twist the
screws back to lock the
camera.
10English
9 English
NOTE: If your camera has another mount without the adjusting knob,
please loosen the adjusting screw with the provided hex key and turn the
camera as shown below to adjust the angle.
Stien the adjustment knob to
lock the camera.
To get the best field of view,
loosen the adjustment knob
on security mount and turn
the camera.
360° 90°
1
2
3
4

12English
11 English
IP Camera is not Powering on
If you find your camera is not powering on, try the following solutions:
• Please check whether the outlet is working properly or not. Try to
plug the camera into a dierent outlet and see if it works.
• Please check whether the DC adapter is working or not. If you have
another 12V DC power adapter which is working, please use another
power adapter and see if it works.
If these won't work, please contact Reolink Support
https://support.reolink.com
Troubleshooting
IR LEDs Stop Working
If you find the IR LEDs of your camera stop working, try the following
solutions:
• Go to Device Settings and check whether you have enabled Infrared
LEDs. If the LEDs are disabled, please enable them.
• Please go to Live View and check the Day/Night mode. Set the mode to
Auto to activate the IR lights.
• Upgrade your camera's firmware to the latest version.
• Restore the camera to the factory settings and check the IR light
settings again.
If these won't work, please contact Reolink Support
https://support.reolink.com
Specifications
Operating Temperature: -10°C to 55°C (14°F to 131°F)
Operating Humidity: 10%-90%
Weather Resistance: IP66 certified weatherproof
IR Distance: 30 meters (100ft)
Day/Night Mode: Auto switchover
Hardware Features
General
Notification of Compliance
This device complies with Part 15 of FCC Rules. Operation is subject to
thefollowing two conditions: (1) this device may not cause harmful
interference, and (2) this device must accept any interference received,
including interference that may cause undesired operation. For more
information, visit: https://reolink.com/fcc-compliance-notice/.
FCC Compliance Statement

14English
OPERATING FREQUENCY
(the maximum transmitted power)
2412MHz—2472MHz (19dBm)
5180 MHz—5320 MHz (18dBm)
5745 MHz—5825 MHz (18dBm)
Reolink declares that this device is in compliance with the essential
requirements and other relevant provisions of Directive 2014/53/EU.
Simplified EU Declaration of Conformity
This marking indicates that this product should not be disposed with
other household wastes throughout the EU. To prevent possible harm
to the environment or human health from uncontrolled waste disposal,
recycle it responsibly to promote the sustainable reuse of material
resources. To return your used device, please use the return and
collection systems or contact the retailer where the product was
purchased. They can take this product for environmentally safe
recycling.
Correct Disposal of This Product
This product comes with a 2-year limited warranty that is valid only if
purchased from Reolink Ocial Store or or Reolink authorized resellers.
Learn more: https://reolink.com/warranty-and-return/.
NOTE: We hope that you enjoy the new purchase. But if you are not
satisfied with the product and plan to return, we strongly suggest that
you reset the camera to factory default settings and take out the
inserted SD card before returning.
This equipment complies with RSS-102 radiation exposure limits set forth
for an uncontrolled environment. This equipment should be installed and
operated with minimum distance 20cm between the radiator & your body.
Use of the product is subject to your agreement to the Terms of Service
and Privacy Policy at reolink.com. Keep out of the reach of children.
By using the Product Software that is embedded on the Reolink product,
you agree to the terms of this End User License Agreement (“EULA”)
between you and Reolink. Learn more: https://reolink.com/eula/.
Terms and Privacy
End User License Agreement
ISED Radiation Exposure Statement
Limited Warranty
13 English

Überblick
DE
16Deutsch
15 Deutsch
Lieferumfang
Allgemeine Einführung
Diagramm für Kameraanschluss
Kamera-Einrichtung
Installation der Kamera
Fehlerbehebung
Spezifikationen
Konformitätserklärung
16
17
19
20
21
25
26
26
Lieferumfang
HINWEIS: Kamera und Zubehör variieren je nach dem Kameramodell
Ihrer Bestellung.
Kamera Antenne
Netzwerkkabel
1 Meter
Netzadapter
Verlängerungskabel
(Netzkabel) 4,5 Meter
KurzanleitungSchild
Videoüberwachung
Lochschablone
zur Montage
Päckchen
mit Schrauben
18Deutsch
17 Deutsch
Allgemeine Einführung
Netzwerkkabel
Infrarot-LEDs
Hochauflösendes Objektiv
Halterung
Aluminiumgehäuse
Antenne
Tageslichtsensor
Reset-Taste
Stromanschluss
Eingebautes Mikrofon
* Zum Zurücksetzen auf die Werkseinstellungen ca.
10 Sekunden lang drücken.
HINWEIS:
• Bitte überprüfen Sie die im Paket enthaltene Kamera und deren Details
gemäß der oben gegebenen entsprechenden Einführung.
• Das Aussehen und der Lieferumfang der Kamera können je nach
dem Produktmodell variieren.
Antenne
Halterung
Aluminiumgehäuse
Infrarot-LEDs
Tageslichtsensor
Hochauflösendes Objektiv
Scheinwerfer
Lautsprecher
Eingebautes Mikrofon
Indice
Lingue:
Altri manuali Reolink Telecamera per esterni

Reolink
Reolink Argus PT Ultra Guida rapida

Reolink
Reolink E1 Series Guida rapida

Reolink
Reolink Duo Manuale utente

Reolink
Reolink Lumus Manuale utente

Reolink
Reolink Argus 2 Guida rapida

Reolink
Reolink Argus 2 Guida rapida

Reolink
Reolink Duo 2 Guida rapida

Reolink
Reolink RLC-1212A Manuale utente

Reolink
Reolink Go Manuale utente

Reolink
Reolink Argus Eco Guida rapida

Reolink
Reolink Argus 2E Guida rapida

Reolink
Reolink Argus PT Manuale utente

Reolink
Reolink RLC-511WA Guida rapida

Reolink
Reolink TrackMix LTE Manuale utente

Reolink
Reolink Go PT Manuale utente

Reolink
Reolink Duo 2 PoE Guida rapida

Reolink
Reolink Argus 3 Manuale utente

Reolink
Reolink E1 Outdoor PoE Guida rapida


