Rocket Fish RF-900WPS Manuale utente

900 Watt Power Supply
RF-900WPS
User Guide
RF-900WPS 09-0654_MAN_ENG_V2.fm Page 1 Tuesday, August 4, 2009 3:16 PM

RF-900WPS 09-0654_MAN_ENG_V2.fm Page 2 Tuesday, August 4, 2009 3:16 PM

3RF-900WPS
Rocketfish RF-900WPS
900 Watt Power Supply
Contents
Introduction ...................................................................... 3
Features .............................................................................. 5
Installing your power supply ...................................... 7
Specifications.................................................................... 9
Appendix..........................................................................11
Legal notices ...................................................................14
One-year limited warranty.........................................17
Introduction
Congratulations on your choice of this RF-900WPS power supply.
Please read this manual carefully and follow the instructions before
installing the power supply.
The RF-900WPS is an advanced power supply with excellent acoustic
and thermal performance and intelligent thermal fan control
technology that makes it virtually silent under 60% load. Five +12V
rails deliver safer and more reliable output to your system. Active
power factor correction circuits also reduce the power loss of the AC
input line to less than 0.01%. The standby mode consumes less than
1W when +5VSB is less than 0.1A. This power supply series is certified
by the 80 plus program.
RF-900WPS 09-0654_MAN_ENG_V2.fm Page 3 Tuesday, August 4, 2009 3:16 PM

4
Safety information
Warning: To reduce the risk of fire or electric shock, do not
expose this device to rain or moisture.
Safety regulations
The power supply meets safety guidelines and regulations for
UL, cUL, and FCC.
Important safety instructions
• Do not place your system near a radiator or other heat source.
• Do not place your system close to a source of strong magnetic fields.
• Do not place your system in a moist or dusty environment, or in an area
subject to strong vibration.
• Do not place your system in direct sunlight.
• Your computer must operate at a stable AC input voltage.
• Your computer should not be situated directly next to a heater or
another heat source.
The lightning flash with arrowhead symbol, within an
equilateral triangle is intended to alert the user to the
presence of uninsulated dangerous voltage within the
product’s enclosure that may be of sufficient magnitude
to constitute a risk of electric shock.
The exclamation point within an equilateral triangle is
intended to alert the user to the presence of important
operating and maintenance (servicing) instructions in the
literature accompanying the appliance.
RF-900WPS 09-0654_MAN_ENG_V2.fm Page 4 Tuesday, August 4, 2009 3:16 PM

5RF-900WPS
• Do not open the cover on the power supply case. Dangerous voltages
are present inside the cover. Your warranty is void if the cover is
removed.
• Never operate the device with wet or moist hands.
• Never place items in the openings or fan of the power supply.
• Make sure that the power cord is plugged into a powered electrical
outlet.
• Make sure that the power cord is plugged into the power supply.
• Make sure that you connect your power supply properly. Check your
motherboard and graphic card manuals for compatibility before
connecting the power supply to any of your devices.
Note: If the power supply does not work correctly, contact our service center
immediately.
Features
• Cable management design
• Complies with Intel ATX12V V2.3 and EPS12V V2.92
• Certified by 80 PLUS® Silver
• Active PFC (PF>0.99)
• Extremely silent, with Intelligent Fan technology
• Supports SLI Multi-GPU VGA card
• Supports Intel and AMD duo- and multi-core CPUs
• Hairline electronic plating
• Accurate voltage regulation (±3%) provides stable voltage for your
system
• Standby mode consumes less than 1W when +5VSB is less than 0.1A
• Five +12V rails provides superior performance
• Advanced phase-shifting control full bridge for high reliability and
efficiency
• Multiple protection functions, including OCP, OVP, UVP, OPP, and SCP
RF-900WPS 09-0654_MAN_ENG_V2.fm Page 5 Tuesday, August 4, 2009 3:16 PM

6
Cable connections
PCIe
HDD/
SATA
HDD/
SATA
HDD/
SATA
PCIe
MB(CPU) PCIe
PCIe
20+4 pin
8-pin to 8-pin (6+2)
PCI Express + 8-pin
(6+2) PCI Express
8-pin to 8-pin (6+2)
PCI Express + 6-pin
PCI Express
6-pin to 6-pin PCI
Express (2 cables)
6-pin to HDD (3)
+floppy (1)
6-pin to SATA (3)
+HDD (1) (2 cables)
8-pin to 8-pin (4+4)
for CPU
RF-900WPS 09-0654_MAN_ENG_V2.fm Page 6 Tuesday, August 4, 2009 3:16 PM

7RF-900WPS
Installing your power supply
To make sure you connect your power supply correctly, check your
motherboard and graphics card manuals for compatibility before
connecting the RF-900WPS to any of your devices.
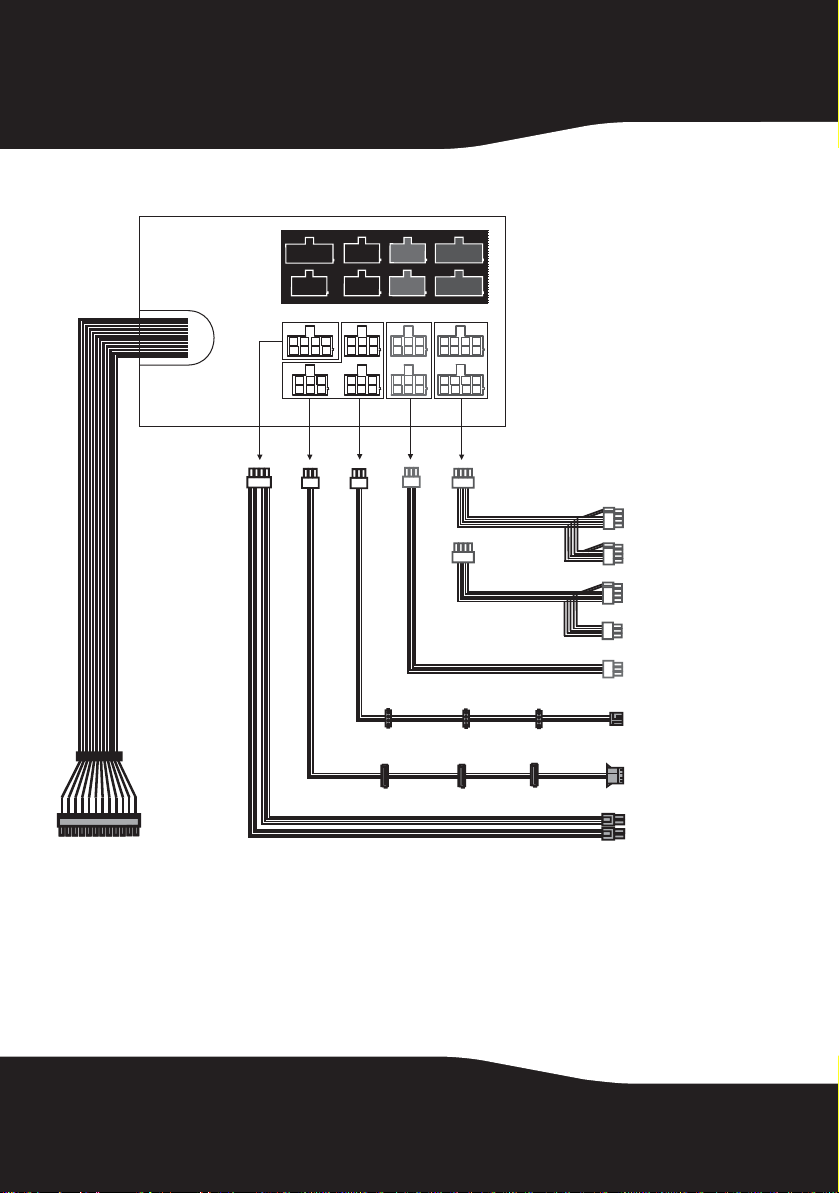
Notice: Cable management
This product uses color-coded sockets and cables for ease of use. Connect the plugs
to only those sockets with the same color ends. Red and blue sockets are to be used
for PCIe cables only. Black sockets are to be used for all other connections.
Warning: Failure to follow these instructions may result in damage to your computer
components.
To install your power supply:
1Check your local AC voltage before installation (115 VAC voltage is for
USA, Japan, and several others, and 230 VAC voltage is for Europe,
Southeast Asia, and many other countries).
Caution: Make sure that you connect the power supply to local input AC voltage
only. Setting the incorrect voltage can damage the power supply and connected
equipment and may void your warranty. The RF-900WPS is compatible with 115 VAC
and 230 VAC input voltage.
2Turn off your computer, then unplug the power cord from your old
power supply.
3Open your computer case following the directions provided in your case
manual.
4Disconnect all power supply connectors from the motherboard and
peripheral devices such as case fans, hard drives, floppy drives and DVD
and CD drives.
5Remove the old power supply from your computer case and install your
new Rocketfish power supply.
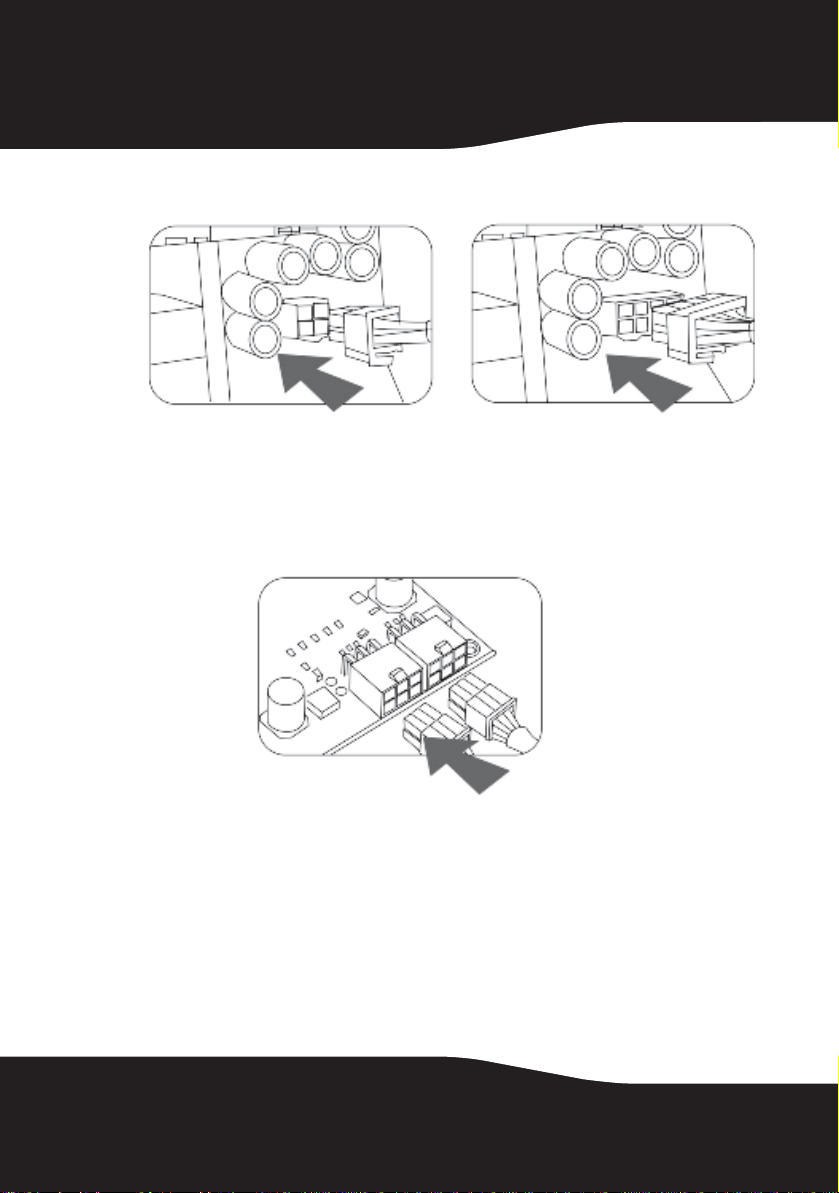
6Connect the 20+4-pin main power connector to your motherboard.
RF-900WPS 09-0654_MAN_ENG_V2.fm Page 7 Tuesday, August 4, 2009 3:16 PM

8
7Connect the 8-pin (4+4) or 4-pin +12 V power connectors to your
motherboard.
8Connect the Serial ATA (SATA) connectors to the peripheral devices.
9Connect the peripheral 4-pin power connectors if you are still using an
IDE connector for hard drives or an optical drive.
10 Connect the 6-pin +12 V PCIe connector to your PCI Express graphics
cards, as needed.
11 Connect your case fans to the regular 4-pin peripheral connectors if you
are using these fans.
Caution: Make sure that all connectors are securely connected. Incorrect
connections could prevent your computer from starting and could damage some
components.
12 Close your computer case and connect the AC power cord to the power
supply.
RF-900WPS 09-0654_MAN_ENG_V2.fm Page 8 Tuesday, August 4, 2009 3:16 PM

9RF-900WPS
Starting your computer
To start your computer:
1Turn on the power supply by setting the power switch on the power
supply to the “I” (on) position.
2Turn on your computer by pressing the power button on the front of
your computer.
Troubleshooting
If the power supply fails to function properly, check the following
before returning it for repair:
• Make sure that the power cord is plugged correctly into an AC power
outlet and into the power supply.
• Make sure that the power switch on the power supply is switched to the
“I” (on) position.
• Make sure that all power connectors are properly connected to all
components.
Specifications
Input voltage Minimum: 90 V
Normal: 100 V ~ 240 V
Maximum: 265 V
Input frequency Minimum: 47 Hz
Maximum: 63 Hz
Overcurrent protection Input fuse
Active PFC Power factor: equal to or greater than 0.99 @230 V/50 Hz full load
Output +3.3V Maximum load 24.0 A Minimum load 0.8 A
+5 V Maximum load 30.0 A Minimum load 0.5 A
+12 V1 Maximum load 16.0 A Minimum load 0.0 A
+12 V2 Maximum load16.0 A Minimum load 0.0 A
+12 V3 Maximum load16.0 A Minimum load 0.9 A
+12 V4 Maximum load 18.0 A Minimum load 0.1 A
+12 V5 Maximum load 18.0 A Minimum load 0.0 A
-12 V Maximum load 0.5 A Minimum load 0.0 A
+5 VSB Maximum load 3.0 A Minimum load 0.1 A
Note: +3.3 V and +5 V total output not to exceed 170 W
+12 V1, 2, 3, 4, and 5 combined output not to exceed 72 A
RF-900WPS 09-0654_MAN_ENG_V2.fm Page 9 Tuesday, August 4, 2009 3:16 PM

10
Rated wattage 900 W
Peak wattage 1000 W
Efficiency 85% (minimum) at full load
88% at typical load
85% at light load
Standby <1 W when +5 VSB <0.1 A @115 V/60 Hz
Output ripple and noise +3.3 V 50 mV p-p
+5 V 50 mV p-p
+12 V 1, 2, 3, 4, 5 120 mV p-p
-12 V 120 mV p-p
+5 VSB 50 mV p-p
Output protection Yes
Over voltage protection Yes
Short circuit protection Yes
Over current protection Yes
Hi-Pot (the power supply is
capable of withstanding)
Input to ground voltage: 1500 VAC
Test time: 3.0 S
Cutoff current (maximum): 10 mA
Leakage current 1.75 mA maximum (at 230 Vrms, 50 Hz)
Grounding resistance 100 mOhm maximum at 25 A
Environmental
Operating temperature 32°F to 122°F (0°C to 50°C)
Storage temperature -40°F to 131°F (-40°C to 55°C)
Operating humidity
(non-condensing)
5% to 95% RH
Vibration (non-operating) Swing: 0.35 mm
Frequency: 10-55-10 Hz
Degree: 5 times per axis, 30 minutes, log sweep p-p
Acceleration: 19.98 m/s2@ a frequency of 55 Hz
Safety compliance IEC60950-1, EN60950-1, UL60950-1, and GB4943
Safety approval UL, C-UL, and FCC
RF-900WPS 09-0654_MAN_ENG_V2.fm Page 10 Tuesday, August 4, 2009 3:16 PM
Altri manuali per RF-900WPS
2
Indice
Altri manuali Rocket Fish Alimentazione elettrica

Rocket Fish
Rocket Fish RF-700WPS Manuale utente

Rocket Fish
Rocket Fish RF-900WPS Manuale utente

Rocket Fish
Rocket Fish RF-900WPS Manuale utente

Rocket Fish
Rocket Fish RF-500WPS2 Manuale utente

Rocket Fish
Rocket Fish RF-500WPS2 Manuale utente

Rocket Fish
Rocket Fish RF-700WPS Manuale utente

Rocket Fish
Rocket Fish RF-550WPS Manuale utente

Rocket Fish
Rocket Fish RF-700WPS Manuale utente

Rocket Fish
Rocket Fish RF-700WPS Manuale utente

Rocket Fish
Rocket Fish RF-500WPS2 Manuale utente


