Rocket Fish RF-WHTIB Manuale utente

Universal Wireless Rear Speaker
Kit
RF-WHTIB
User Guide

2
Rocketfish RF-WHTIB
Universal Wireless Rear Speaker Kit
Contents
Introduction ........................................................................... 2
Features.................................................................................... 4
Setting up your universal wireless rear speaker kit.. 7
Using your universal wireless rear speaker kit .........12
Troubleshooting .................................................................14
Specifications.......................................................................15
Legal notices ........................................................................15
One-Year Limited Warranty.............................................17
Introduction
Congratulations on your purchase of a Rocketfish RF-WHTIB Universal
Wireless Rear Speaker Kit. Your RF-WHTIB represents the state of the
art in wireless speaker kit design, and is designed for reliable and
trouble-free performance.
This manual explains how to correctly install, operate, and get the
best performance from your universal wireless rear speaker kit. Read
this user guide carefully before installing your system, then keep it
near your system for quick reference.
Your RF-WHTIB Universal Wireless Rear Speaker Kit uses a proprietary
2.4 GHz wireless communication system to transmit low-latency, high
fidelity audio to a stereo amplifier, providing a superior level of audio
quality and resistance to interference.
The system accepts speaker-level inputs, and is compatible with a
complete range of multichannel home theater amplifier systems or
AV receivers.
3RF-WHTIB
Safety information
WARNING:
TO REDUCE THE RISK OF FIRE OR ELECTRIC SHOCK, DO NOT EXPOSE
THIS APPLIANCE TO RAIN OR MOISTURE.
Important Safety Instructions
1) Read these instructions.
2) Keep these instructions.
3) Heed all warnings.
4) Follow all instructions.
5) Do not use this apparatus near water.
6) Clean only with dry cloth.
7) Do not block any ventilation openings. Install in accordance with the
manufacturer’s instructions.
8) Do not install near any heat sources such as radiators, heat registers,
stoves, or other apparatus (including amplifiers) that produce heat.
9) Do not defeat the safety purpose of the polarized or grounding-type plug.
A polarized plug has two blades with one wider than the other. A grounding
type plug has two blades and a third grounding prong. The wide blade or
CAUTION:
TO REDUCE THE RISK OF
ELECTRIC
SHOCK, DO NOT REMOVE
COVER
(OR BACK). NO USER-SERVICEABLE
PARTS INSIDE. REFER SERVICING
TO
QUALIFIED SERVICE PERSONNEL.
The lightning flash with arrowhead symbol, within an
equilateral triangle is intended to alert the user to the
presence of uninsulated dangerous voltage within the
product’s enclosure that may be of sufficient magnitude
to constitute a risk of electric shock.
The exclamation point within an equilateral triangle is
intended to alert the user to the presence of important
operating and maintenance (servicing) instructions in the
literature accompanying the appliance.

4
the third prong are provided for your safety. If the provided plug does not fit
into your outlet, consult an electrician for replacement of the obsolete
outlet.
10) Protect the power cord from being walked on or pinched particularly at
plugs, convenience receptacles, and the point where they exit from the
apparatus.
11) Only use attachments/accessories specified by the manufacturer.
12) Use only with the cart, stand, tripod, bracket, or
table specified by the manufacturer, or sold with the
apparatus. When a cart is used, use caution when
moving the cart/apparatus combination to avoid
injury from tip-over.
13) Unplug this apparatus during lightning storms or
when unused for long periods of time.
14) Refer all servicing to qualified service personnel.
Servicing is required when the apparatus has been damaged in any way,
such as power-supply cord or plug is damaged, liquid has been spilled or
objects have fallen into the apparatus, the apparatus has been exposed to
rain or moisture, does not operate normally, or has been dropped.
Additional safety information
• The apparatus shall not be exposed to dripping or splashing and no
objects filled with liquids, such as vases, shall be placed on the
apparatus.
• The AC power plug or an appliance coupler is used as the disconnect
device. This disconnect device shall remain readily operable.
• Read the Rating Labels on the bottom of the sender and receiver for
power input and other safety information.
Features
• 2.4 GHz wireless sender and receiver
• Transmits high quality audio over a radio frequency communication link
•Compactsize
• Hidden antennas
• Low power consumption
S3125A
PORTABLE CART WARNING
(Symbol provided by RETAC
)
5RF-WHTIB
Package contents
Examine the contents of the box for your RF-WHTIB Universal
Wireless Rear Speaker Kit. The box should contain:
•Asenderunit
•Areceiverunit
• A holder for the receiver unit
• An AC power adapter (for the sender unit)
• Two 2-foot speaker wires
•AUserGuide
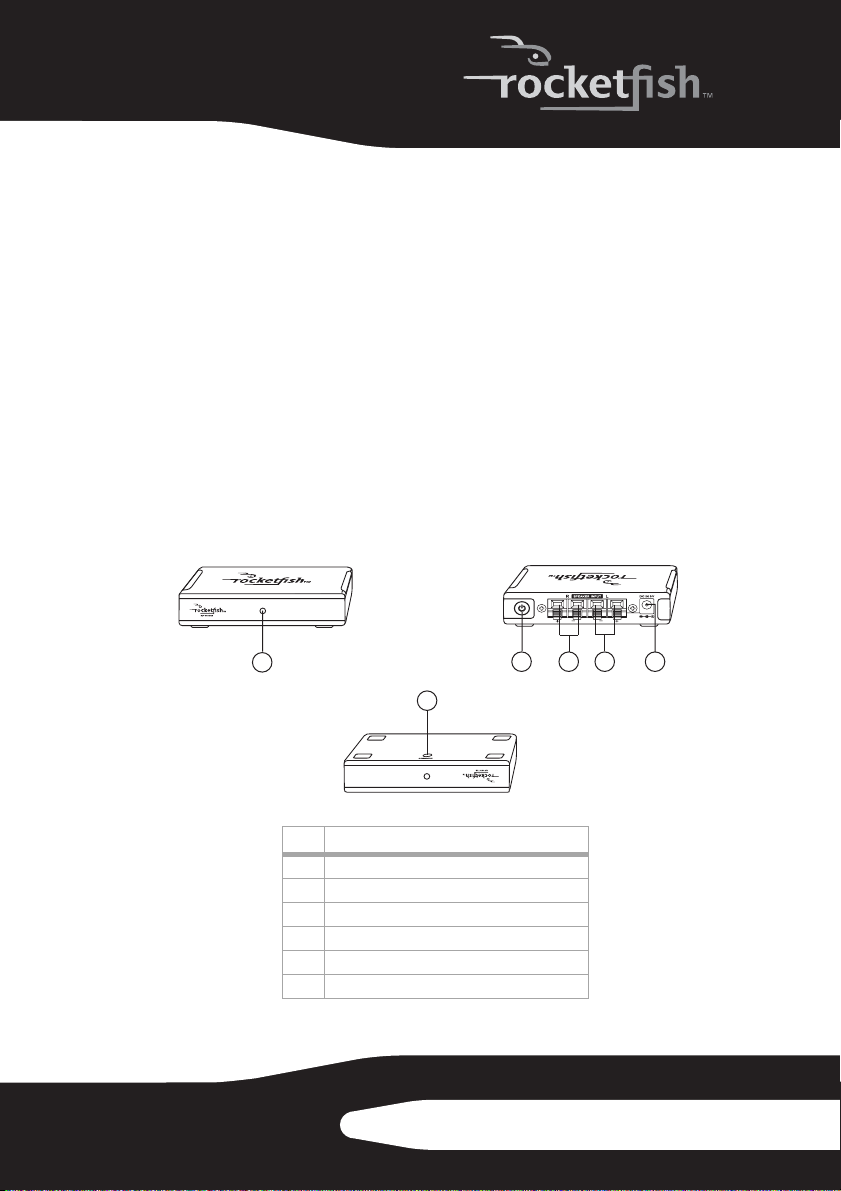
Sender unit
The sender transmits audio signals over a 2.4 GHz radio frequency
carrier to the receiver.
# Feature
1PowerindicatorLED
2 Power button
3 Right speaker input terminals
4 Left speaker input terminals
5DCINjack
6 Manual connect button
12345
6
Front view Back view
Bottom view
6
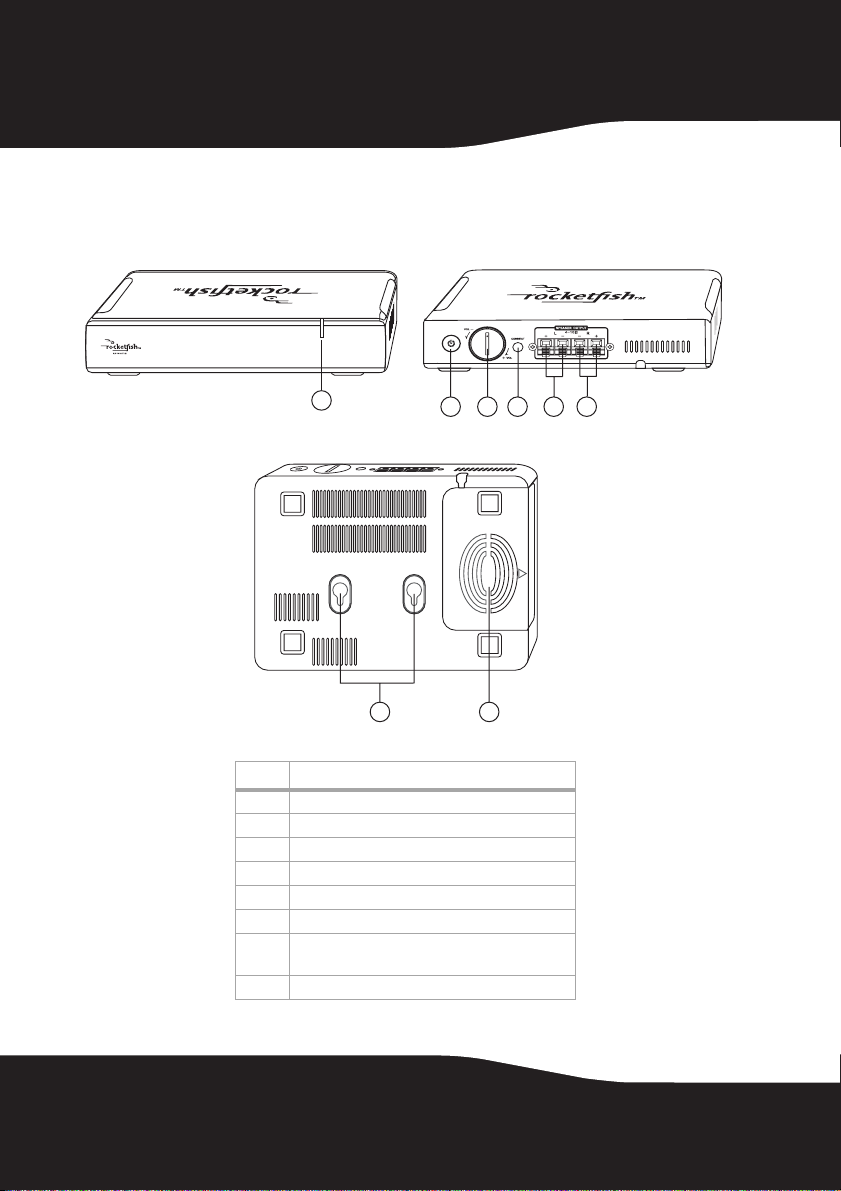
Receiver unit
The receiver unit receives the 2.4 GHz audio signals from the sender.
#Feature
1 Power indicator LED
2 Power button
3 Volume control knob
4 Manual connect button
5 Left surround sound speaker output terminal
6 Right surround sound speaker output terminal
7 Hanging holes for wall mounting the receiver (by
using 3 × 15 mm self-tapping screws)
8 Cable storage compartment
123 645
87
Front view Back view
Bottom view
7RF-WHTIB
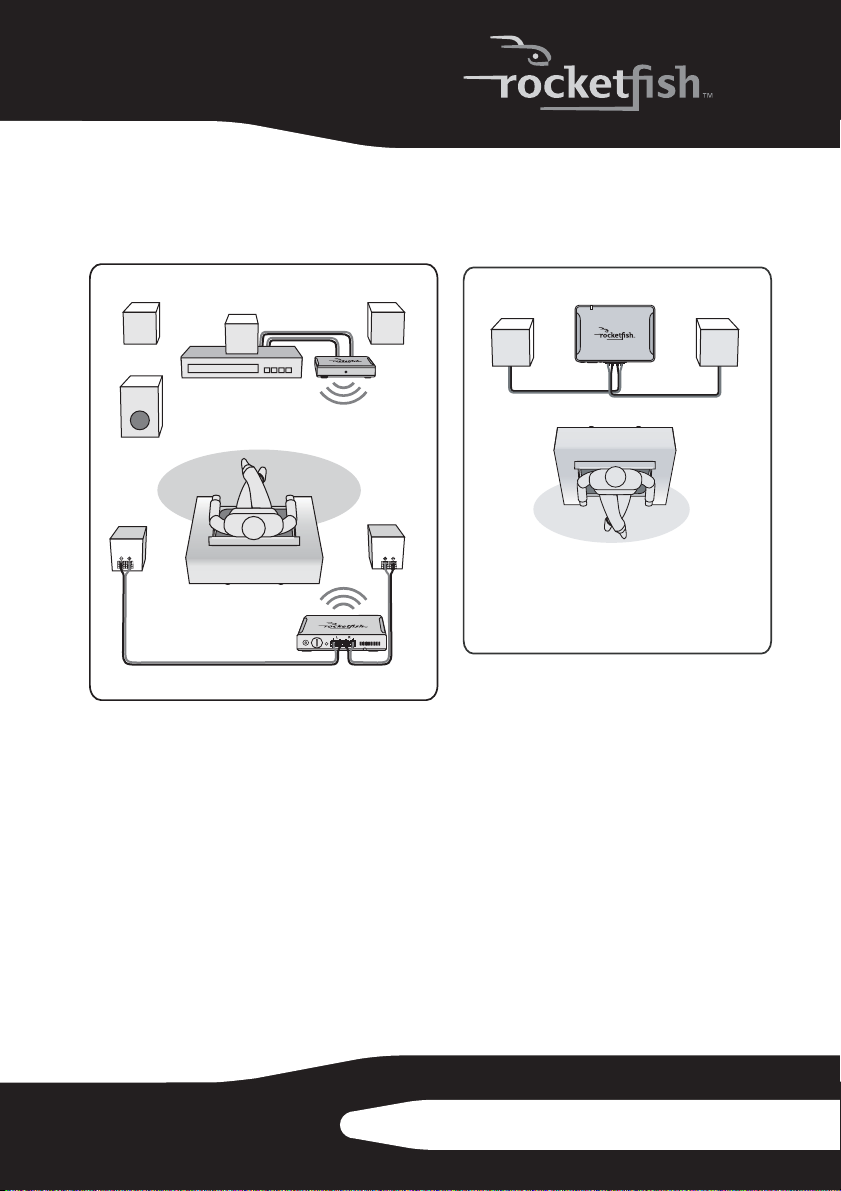
Setting up your universal wireless rear
speaker kit
Left speaker Right speaker
Center speaker
Subwoofer
Amplifier
Sender
Receiver
Right surround
Left surround
Left surround
Right surround Receiver
Note:
If you need to mount the receiver, make sure
that the left and right speaker cords are
correctly connected to the speaker terminals of
the receiver by checking the labels on the rear
panel of the receiver.
8
Connecting the sender
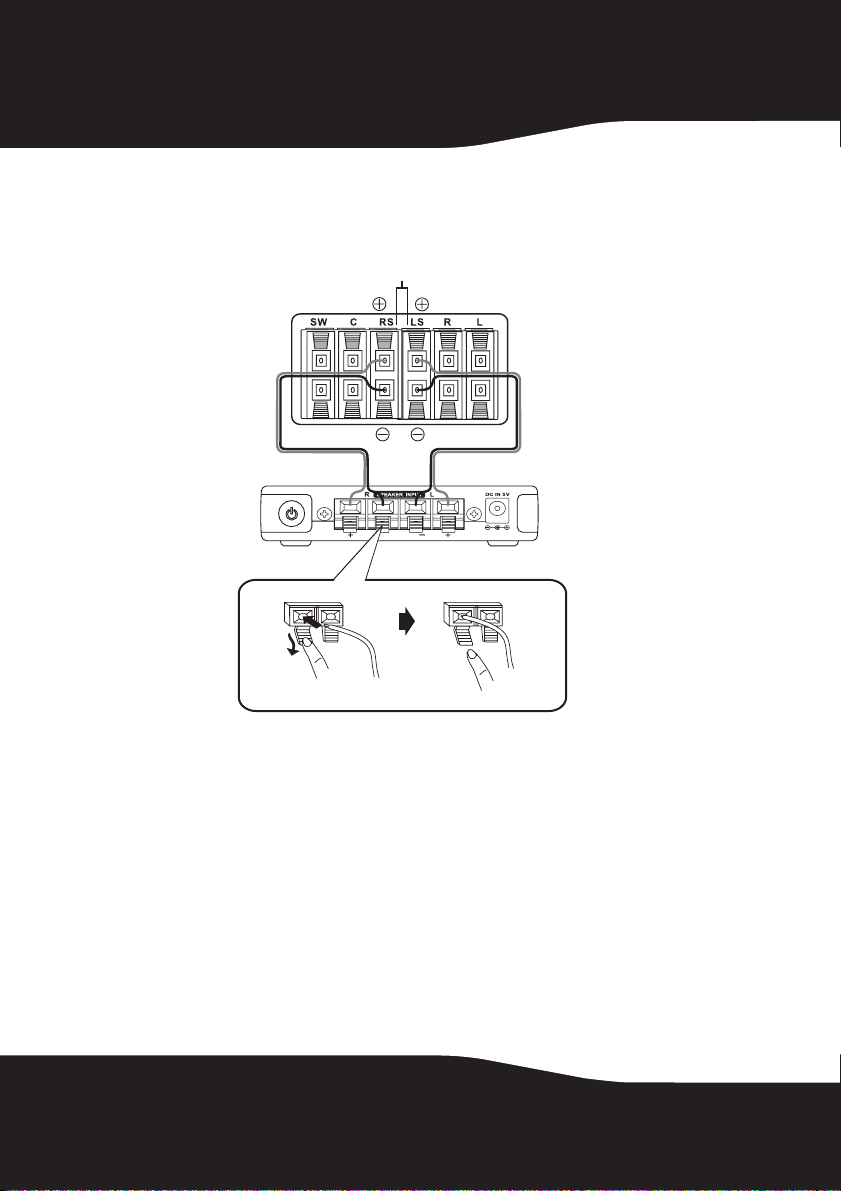
Connecting the sender to the amplifier
Caution: Turn off your amplifier while connecting the units.
To connect the amplifier to the sender:
1Using the 2-foot speaker cords (provided), connect the right surround
speaker terminals of your amplifier to the right speaker terminals of the
sender by connecting the red wire to the Red (+) terminals, and the black
wire to the Black (-) terminals.
2Connect the left surround speaker terminals of the amplifier the same
way.
Notes:
Make sure the exposed tips of each cord do not touch each other, and that they are
fully inserted into the terminals.
Speaker wire colors may vary with different speaker systems.
Make sure you connect your amplifier using the surround speaker terminals only.
Sender back panel
Surround speaker outputs
Press and hold Release
9RF-WHTIB
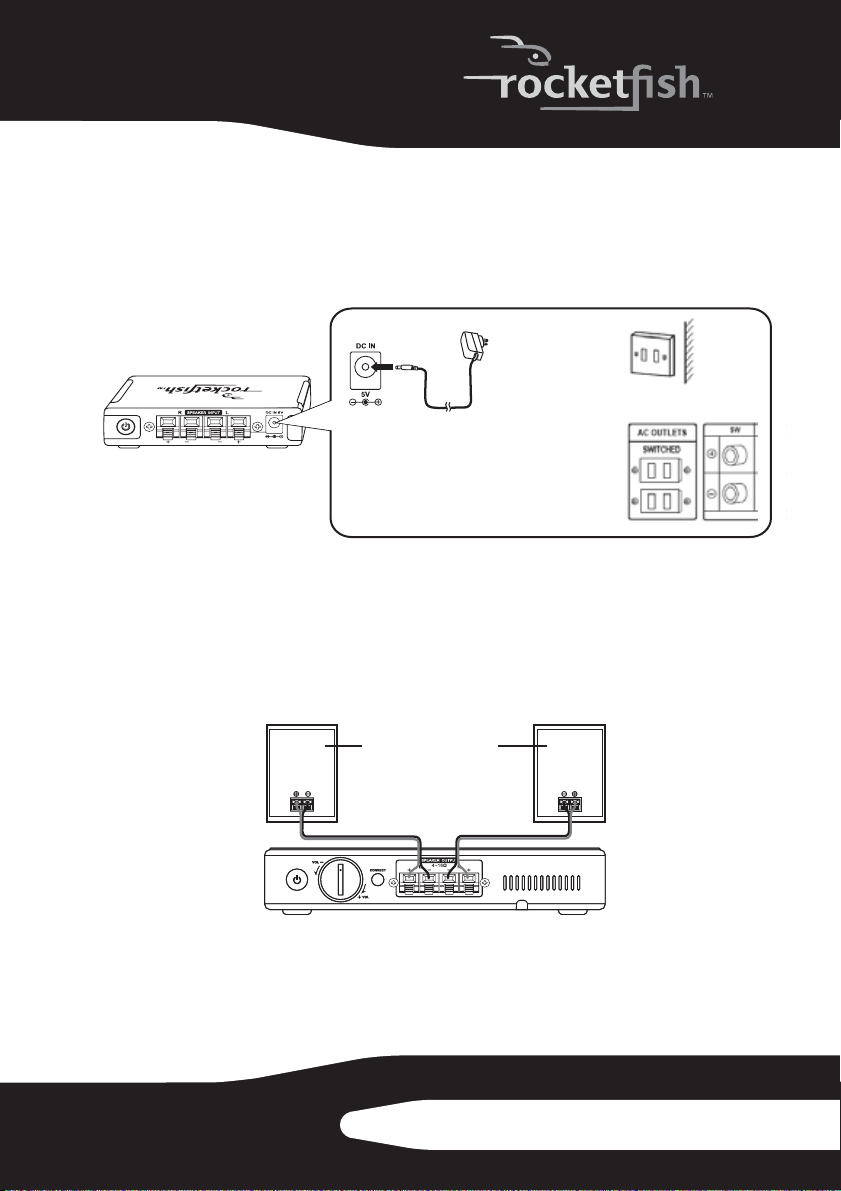
Connecting the sender to the AC power adapter
The AC power adapter can be connected to a wall power outlet or the
SWITCHED AC outlet of your amplifier. If you connect it to the
SWITCHED AC outlet of your amplifier, each time you turn your
amplifier On or Off, the sender is also turned On or Off.
Caution: To avoid risk of fire, and to prevent damage, only use the AC adapter
supplied with your universal wireless rear speaker kit.
Connecting the receiver
Connecting the receiver to your surround speakers
To connect the surround speakers to the receiver:
1Connect the right speaker to the right speaker terminals of the receiver,
and the left speaker to the left speaker terminals.
Sender back panel
To a wall power
outlet.
OR
To the SWITCHED
AC outlet of your
amplifier (on the
back panel).
Connecting the AC adapter
Left
surround
speaker
Right
surround
speaker
10
2If the speakers have wires instead of terminals, connect the positive (+)
wire from the right speaker to the Red (+) terminal for the right speaker
on the receiver and the negative (-) wire from the right speaker to the
Black (-) terminal for the right speaker on the receiver.
3Connect the left speaker the same way.
Notes:
For speaker wires that have proprietary connectors, you may strip the end of the
wires to allow connection to the receiver. However, check with the speaker
manufacturer before doing this, as it may void the warranty.
Make sure the exposed tips of each cord do not touch each other, and that they are
fully inserted into the terminals.
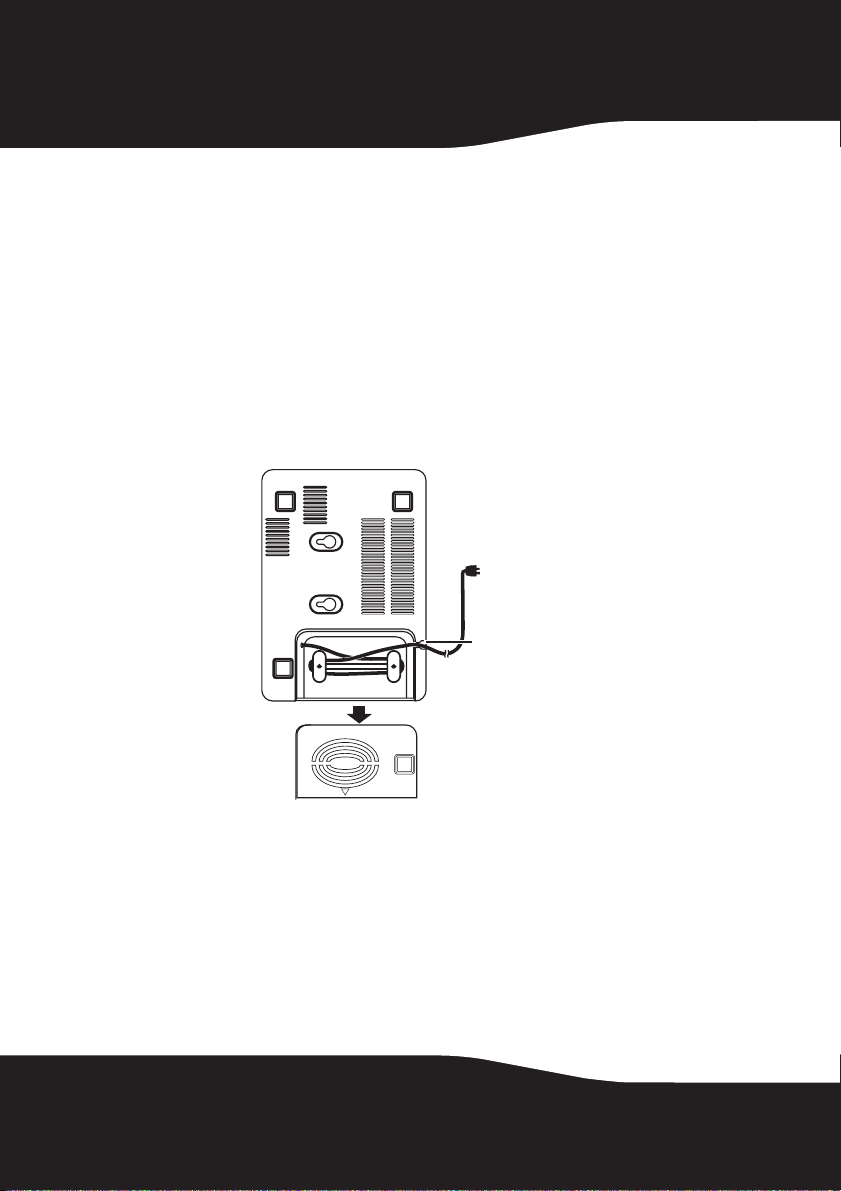
Connecting the receiver to an AC power outlet
To connect the receiver to an AC power outlet:
1Open cover of the cable storage compartment on the bottom of receiver,
then unwrap the cable and extend it to the desired length.
2Close the cover and make sure that the extended cable is not pinched
and comes out from the power cord hole as shown in the diagram.
3Plug the AC power plug into a power outlet.
Power cord hole
Plug the AC
power cord in
only after all
speakers are
connected to
the receiver.
Altri manuali per RF-WHTIB
4
Indice
Altri manuali Rocket Fish Sistema di altoparlanti

Rocket Fish
Rocket Fish RF-2990 Manuale utente

Rocket Fish
Rocket Fish RF-WHTIB Manuale utente

Rocket Fish
Rocket Fish RF-WHTIB Guida rapida

Rocket Fish
Rocket Fish RF-WHTIB-A Manuale utente

Rocket Fish
Rocket Fish RF-WHTIB Manuale utente

Rocket Fish
Rocket Fish RF-WHTIB Guida rapida

Rocket Fish
Rocket Fish RF-3800 Manuale utente
Manuali Sistema di altoparlanti popolari di altre marche


Sondpex
Sondpex Active Speaker System and Digital Music... Manuale utente

JVC
JVC NX-PN7 Manuale utente

Marshall Amplification
Marshall Amplification AR-DM61-BT Manuale utente

Yamaha
Yamaha NX-A01 - Speaker Sys Manuale utente

SE Audiotechnik
SE Audiotechnik I-LINE Manuale utente

Gemini
Gemini WRX-843 Series Manuale utente