Sandstrom SL-BTTB19 Manuale utente

Bluetooth® Turntable
Instruction Manual
SL-BTTB19
SL-BTTB19_IB_Final190605V1.indd 1 06/06/2019 16:03

SL-BTTB19_IB_Final190605V1.indd 2 06/06/2019 16:03

Contents
Safety Warnings.....................................................................................................................................4
Unpacking..............................................................................................................................................6
Product Overview..................................................................................................................................7
Front View.............................................................................................................................................................................7
Rear View ..............................................................................................................................................................................7
Top View................................................................................................................................................................................8
Opening the cover of the Turntable............................................................................................................................9
Connections .........................................................................................................................................10
Using the AUX Connection..........................................................................................................................................10
Connecting to the Mains Supply...............................................................................................................................11
Using Earphones............................................................................................................................................................. 11
General Operation...............................................................................................................................12
Powering ON/OFF........................................................................................................................................................... 12
Auto Stop Function........................................................................................................................................................12
Selecting Modes..............................................................................................................................................................12
Adjusting the Volume....................................................................................................................................................12
Phono Operation .................................................................................................................................12
To listen to phonograph records...............................................................................................................................13
Stylus Replacement .......................................................................................................................................................14
Recording Vinyl Music to USB.............................................................................................................14
Bluetooth® Operation ..........................................................................................................................15
AUX IN Operation ................................................................................................................................15
AUX OUT Operation.............................................................................................................................15
USB Operation .....................................................................................................................................16
Maintenance ........................................................................................................................................16
Cleaning the Unit............................................................................................................................................................16
Hints and Tips ......................................................................................................................................17
Specications.......................................................................................................................................18
SL-BTTB19_IB_Final190605V1.indd 3 06/06/2019 16:03

Safety Warnings
• Read all the instructions carefully before
using the unit and keep them for future
reference.
• Retain the manual. If you pass the unit
onto a third party make sure to include this
manual.
• Check that the voltage marked on the
rating label matches your mains voltage.
Damage
• Please inspect the unit for damage after
unpacking.
• Do not continue to operate the unit if
you are in any doubt about it working
normally, or if it is damaged in any way -
switch o, withdraw the mains plug and
consult your dealer.
Location of Unit
• The unit must be placed on a at stable
surface and should not be subjected to
vibrations.
• Do not place the unit on sloped or
unstable surfaces as the unit may fall o
or tip over.
• The mains socket must be located near the
unit and should be easily accessible.
• This unit is designed for indoor, domestic
use only.
Temperature
• Avoid extreme degrees of temperature,
either hot or cold. Place the unit well away
from heat sources such as radiators or gas/
electric res.
• Avoid exposure to direct sunlight and
other sources of heat.
Naked Flames
• Never place any type of candle or naked
ame on the top of or near the unit.
Moisture
• To reduce the risk of re, electric shock or
product damage, do not expose this unit
to rain, moisture, dripping or splashing.
No objects lled with liquids, such as
vases, should be placed on the unit. Do
not operate the unit with wet hands, near
water or other liquid.
• If you spill any liquid into the unit, it can
cause serious damage. Switch it o at the
mains immediately. Withdraw the mains
plug and consult your dealer.
Ventilation
• To prevent the risk of electric shock or
re hazard due to overheating, ensure
that curtains and other materials do not
obstruct the ventilation vents.
• Do not install or place this unit in a
bookcase, built-in cabinet or in another
conned space. Ensure the unit is well
ventilated.
Safety
• Always disconnect the unit from the mains
supply before connecting/ disconnecting
other devices or moving the unit.
• Unplug the unit from the mains socket
before a lightning storm.
Mains Adapter Cable
• Make sure the unit or unit stand is not
resting on top of the mains adapter cable,
as the weight of the unit may damage the
cable and create a safety hazard.
Mains Adapter
• The mains adapter will continue to
draw electricity from the mains supply
when plugged in the mains socket.
In the interests of safety and to avoid
unnecessary energy consumption, never
leave the adapter plugged in the mains
socket while unattended for long periods
of time. Disconnect the adapter from the
power supply.
Use only power supplies listed in the
user instructions.
Interference
• Do not place the unit on or near appliances
which may cause electromagnetic
interference. If you do, it may adversely
aect the operating performance of the
unit, and cause a distorted picture or
sound.
Earphones
• Listening to loud sounds for
prolonged periods of time may
permanently damage your hearing.
• Before putting on earphones, turn
the volume down then put the earphones
on and slowly increase the volume until
you reach a comfortable listening level.
4
SL-BTTB19_IB_Final190605V1.indd 4 06/06/2019 16:03

Supervision
• Children should be supervised to ensure
that they do not play with the unit.
• Never let anyone especially children push
anything into the holes, slots or any other
openings in the case - this could result in a
fatal electric shock.
CAUTION
RISK OF ELECTRIC SHOCK
DO NOT OPEN
The lightning ash with arrowhead
symbol, within an equilateral triangle, is
intended to alert the user to the
presence of uninsulated“dangerous
voltage” within the unit’s enclosure that
may be of sucient magnitude to
constitute a risk of electric shock.
The exclamation point within an
equilateral triangle is intended to alert
the user to the presence of important
operating and maintenance (servicing)
instructions in the manual
accompanying the unit.
To prevent electric shock hazard, do not
connect to mains power supply while
grille is removed.
Service
• To reduce the risk of electric shock, do not
remove screws. The unit does not contain
any user-serviceable parts. Please leave all
maintenance work to qualied personnel.
• Do not open any xed covers as this may
expose dangerous voltages.
Maintenance
• Ensure the unit is fully unplugged from the
power supply before cleaning.
• Do not use any type of abrasive pad or
abrasive cleaning solutions as these may
damage the unit’s surface.
• Do not use liquids to clean the unit.
• This equipment is a Class II or double
insulated electrical appliance. It has
been designed in such a way that it
does not require a safety connection
to electrical earth.
~ AC voltage: This symbol indicates that the
rated voltage marked with the symbol is AC
voltage.
DC voltage: This symbol indicates that the
rated voltage marked with the symbol is DC
voltage.
5
SL-BTTB19_IB_Final190605V1.indd 5 06/06/2019 16:03

Unpacking
Remove all items from the packaging. Retain the packaging. If you dispose of it please do so
according to local regulations.
The following items are included:
Main Unit Mains Cable
Instruction ManualStylus (For replacement)
Instruction
Manual
Thank you for purchasing your new product.
We recommend that you spend some time reading this instruction
manual in order that you fully understand all the operational features
it oers. You will also nd some hints and tips to help you resolve any
issues.
Read all the safety instructions carefully before use and keep this
instruction manual for future reference.
If items are missing, or damaged please contact Partmaster (UK only).
Tel: 0344 800 3456 for assistance.
3.5 mm to 3.5 mm
stereo audio cable
Turntable mat
6
SL-BTTB19_IB_Final190605V1.indd 6 06/06/2019 16:03

Rear View
3
1
2
1 2 3
Product Overview
Front View
1. AUX IN Socket
2. LINE OUT (L/R) Sockets
1. Latch
2. Handle (for easy carry)
3. Speaker
3. AC~ Socket
Connect the mains cable to the
mains socket.
7
SL-BTTB19_IB_Final190605V1.indd 7 06/06/2019 16:03

1. Lift Lever
2. 45 RPM Adaptor
3. Turntable Platter
4. Turntable Shaft
5. Tone Arm
6. Tone Arm Clip
7. Stylus
8. / PAIR Button
9. Button
• Press to skip forwards to the next
track in BLUETOOTH and USB mode.
10. Button
• Press to skip to the previous track in
BLUETOOTH and USB mode.
11. MODE/REC Button
12. BLUETOOTH Indicator
13. USB Indicator
14. AUX Indicator
15. PHONO Indicator
16. 5V 500mA USB Socket
• Insert a USB device to play music.
• Insert an external device for charging
in USB mode.
17. Earphones Socket
18. VOLUME/OFF Dial
• Turn clockwise/anticlockwise to switch
on/o the unit.
• While the unit is switched on, turn
clockwise/anticlockwise to increase/
decrease volume.
19. Speed (33/45/78) Select Switch
20. AUTO STOP Switch
Top View
OFF
AUTO
STOP
ON
1
3
2
4
5
6
7
8
9
10
11
12
13
14
19
17
18
16
15
20
The 5V 500mA USB Socket is not for charging USB device.
8
SL-BTTB19_IB_Final190605V1.indd 8 06/06/2019 16:03

Opening the cover of the Turntable
1. Release the buckle of the latch
2. Lift up the cover of the unit.
9
SL-BTTB19_IB_Final190605V1.indd 9 06/06/2019 16:03
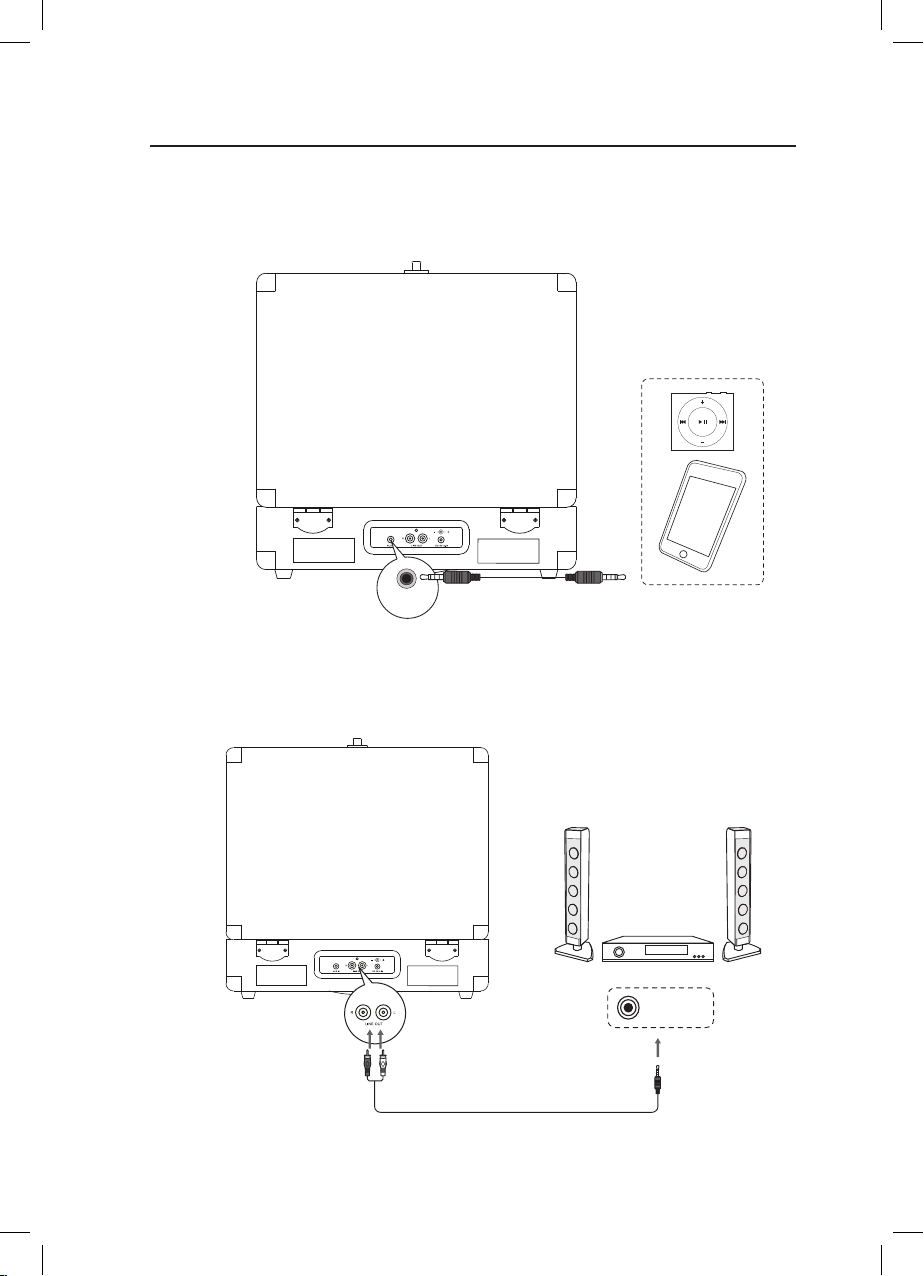
AUX IN
Connections
Using the AUX Connection
Use a 3.5 mm to 3.5 mm stereo audio cable (included) to connect an auxiliary equipment to
the main unit’s AUX IN socket.
Auxiliary Equipment
3.5 mm to 3.5 mm stereo audio cable
Use a 3.5 mm to RCA stereo audio cable (not included) to connect the audio input socket of
an auxiliary equipment to the main unit’s AUX OUT socket.
AUDIO IN
Auxiliary Equipment
3.5 mm to RCA stereo audio
cable (not included)
10
SL-BTTB19_IB_Final190605V1.indd 10 06/06/2019 16:03
Indice


