Setra Systems EZ2-500 Manuale utente

Table of Contents
Introduction ...................................................................................................................... 3
Section One ....................................................................................................................... 4
Installing Your Scale ................................................................................................... 4
SETUP ..........................................................................................................................4
EXPERIMENTATION ................................................................................................ 5
Section Two ....................................................................................................................... 6
Understanding Your Scale ....................................................................................... 6
KEYBOARD FUNCTIONS........................................................................................ 6
DISPLAY SYMBOLS ................................................................................................. 7
MESSAGES ................................................................................................................. 7
Section Three .................................................................................................................... 8
Using Your Scale .......................................................................................................... 8
BASIC WEIGHING ..................................................................................................... 8
CONVERTING THE WEIGHING UNITS - EZ6 MODEL ONLY ....................... 8
WEIGHING WITH A CONTAINER ........................................................................ 8
BASIC COUNTING USING THE SAMPLE SIZE KEY (EZ6) ............................. 9
BASIC COUNTING USING THE COUNT KEY (EZ2) ..................................... 10
USING THE MINIMUM SAMPLE SIZE AND MINIMUM ACCURACY
FEATURE .................................................................................................................. 11
COUNTING WITH ACCURACY ENHANCEMENT ......................................... 11
REVERSE COUNTING OR KITTING ................................................................... 12
LOCKED SAMPLE SIZE ........................................................................................ 13
LOCKING THE SAMPLE SIZE ............................................................................. 13
UNLOCKING THE SAMPLE SIZE ....................................................................... 14
PRINTING OUT INFORMATION ........................................................................ 14
INTERFACING WITH A COMPUTER ................................................................ 15
Appendix I ....................................................................................................................... 16
Set-Up Functions...................................................................................................... 16
Print Output Setup .............................................................................................. 18
Appendix II ...................................................................................................................... 20
Calibration .................................................................................................................. 20
Appendix III..................................................................................................................... 21
Glossary of Terms ..................................................................................................... 21
Appendix II ...................................................................................................................... 22
RS-232 Serial Data Communications ................................................................ 22
The RS-232 Interface Hardware...................................................................... 22

2
Appendix III..................................................................................................................... 24
Accessories and Options ....................................................................................... 24
Appendix IV .................................................................................................................... 25
In Case of Difficulty.................................................................................................. 25
Appendix V ..................................................................................................................... 27
Specifications ............................................................................................................ 27
Appendix IX .................................................................................................................... 29
Limited Two-Year Scale Warranty ..................................................................... 29
FCC WARNING ....................................................................................................... 30
.................................................................................................................................... 30
.................................................................................................................................... 30
CE Compliance Statement ............................................................................... 31
Top Loading Scales ............................................................................................. 31
Results of Compliance Testing for EMC Directives ................................. 32

3
Introduction
Thank you for purchasing a Setra Easy Count scale. Its ease of operation and
durable construction should provide years of convenient and reliable ser-
vice. While your scale is easy to operate, it is advisable to read this manual
carefully before use. It is designed to help you perform weighing, counting,
and related operations quickly and accurately.
This manual is divided into four sections. Section One, “Installing Your Scale,”
explains the proper installation of your scale. Section Two, “Understanding
Your Scale,” explains the various keys and messages you will encounter
while using your scale. Section Three, “Using Your Scale,” provides the de-
tailed instructions necessary to perform your scale’s various operations. The
Appendices include examples, a glossary of terms, and setup information
for advanced operations.
For advanced programming of the Easy Count using an Auto Count™ 200,
Smart Wand or PC, get a copy of the Setra Easy Count Technician’s Guide by
contacting your local authorized Setra dealer or call Setra toll free at 1-800-
25-SETRA.
Typographical conventions used in this manual include the following:
1. Bold lower case characters indicate specific keys on the scale key-
board.
2. “Quotation marks” enclose messages you receive from the scale dis-
play.
3. nnn indicates that a number will appear in the display message.

4
Section One
Installing Your Scale
SETUP
1. Locating your scale...
You should treat your scale as you would any piece of precision equip-
ment, locating it on a clean, dry surface; away from extremes of draft
and vibration.
2. Leveling your scale...
The bubble level is located underneath the loading pan. Adjust the
two front feet until the bubble is centered in the circle.
3. Installing the weighing pan...
Next, place the pan support over the shaft in the center of the unit.
Then, place the pan over the pan support.
4. Connecting your scale to an AC outlet...
To power up your scale, insert the appropriate end of the AC adaptor
into an electrical outlet. Now insert the connector end into the back of
the scale. The scale draws very little current from an outlet, and should
always remain plugged in. The display may be turned off by holding
down the ZERO key for five seconds. This keeps your scale always
ready to use with no “warm up” time.
5. Display test...
Each time your scale is plugged in, it automatically runs through a
display test lasting about thirty seconds, showing all possible seg-
ments which might be displayed, and then setting itself to zero. The
scale is then ready to be used. For best accuracy allow the scale to
warm up for 5 minutes prior to using or calibrating.

5
EXPERIMENTATION
1. Display test
When your scale is first powered on, it automatically runs through a
display test; lasting about six seconds. The scale next displays “C nnn
g” (where nnn equals the full scale capacity in grams), performs self-
diagnostics to ensure proper operation and then sets itself to zero. A
wake up message is always transmitted upon power up. (If a printer is
connected to the scale, the scale model, capacity and software version
will be printed. If the scale is connected to a computer the wake up
message may be disregarded.) The scale is then ready for use. For best
accuracy, allow the scale to warm up for 5 minutes.
2. Using your scale for the first time
It is important that you read this operator’s manual thoroughly to
ensure proper use of your scale. Nonetheless, experimenting with
your scale and its keyboard prior to reading this manual in its entirety
will not harm your scale (provided it is not overloaded), and may
actually give you a better understanding of the instructions in this
manual. If you instruct the scale to do something it is not capable of
doing, the scale will respond by displaying the message “UnAbLE”. To
continue experimenting, simply press the clear (EZ6) or zero (EZ2)
key.

6
Section Two
Understanding Your Scale
KEYBOARD FUNCTIONS
EZ6:
zero Assigns the pan and whatever is currently being weighed or
counted a value of zero. While the scale is determining a
stable zero reading, the display will indicate “bUSY”.
sample size Displays the preprogrammed sample sizes (10, 25, 50 or 100
pieces).
count Instructs the scale to begin or resume counting. This key
may also be used to “update” the average piece weight for
increased counting accuracy.
print Scale sends any displayed and stored information to a
printer, computer or other RS-232 peripheral device.
units Converts the weighing units of measure (e.g. changes from
grams to ounces).
clear Clears the last number entered or operation requested, and
displays weight.
EZ2:
zero Assigns the pan and whatever is currently being weighed or
counted a value of zero. Repeatedly pressing this key will
toggle the units from grams to pieces.
count Press once to display the preprogrammed sample sizes (10,
25, 50, 100 pieces). Press again after the sample has been
added to begin counting. Press once more to print and/or
“update” the average piece weight for increased counting
accuracy.

7
DISPLAY SYMBOLS
EZ2/EZ6:
OK Reading shown is stable.
PC Reading shown is given in number of pieces.
g Reading shown is given in grams.
EZ6:
oz Reading shown is given in ounces.
lb Reading shown is given in pounds.
x Reading shown is given in user programmable units (fac-
tory default is pennyweights)
MESSAGES
C nnn Displayed when the scale is powered on. “nnn” equals the
scale’s full capacity in grams.
bUSY The scale is developing a stable reading.
UnAbLE The scale is unable to complete your requested operation.
FLASHING
DISPLAY The weight on the pan exceeds the capacity of the scale; the
pan is not properly seated or the scale is under loaded.
OFLO The displayed count exceeds six digits (999,999).
UPdAtE The scale is recalculating the average piece weight to en-
hance counting accuracy.
Add nnn. The scale requests an additional number of pieces (nnn) to
satisfy any minimum accuracy setup requirements.
Sub nnn. When kitting, the scale requests pieces (nnn) be removed to
satisfy any minimum accuracy setup requirements.
rEF n.n The scale is displaying the current software version number
(n.n).

8
Section Three
Using Your Scale
BASIC WEIGHING
To weigh a sample on your scale, use the following procedure:
1. Press the zero key.
2. Place the object(s) to be weighed on the pan.
3. Wait for the “OK” symbol, then read the weight from the display.
CONVERTING THE WEIGHING UNITS - EZ6 MODEL ONLY
Your Easy Count (EZ6) scale is capable of weighing in any of the units listed
in the DISPLAY SYMBOLS portion of this guide. To convert from one unit to
another, simply press the units key. Each time you press the key the display
is converted to the next unit in line. Continue pressing the key until the
units you wish to use are displayed. The order of units is as follows: GRAMS -
- OUNCES - POUNDS - X UNITS (PENNYWEIGHTS).
It is possible to limit which units of measure are displayed when the units
key is repeatedly pressed. The units of measure can be limited to two, three,
four, etc. or it can be entirely disabled so that only one unit of measure can
be used. Contact your local Authorized Setra dealer for more information, or
refer to the Setra Easy Count Technician’s Guide.
WEIGHING WITH A CONTAINER
You can use your scale to weigh objects (or liquids) by placing or pouring
them into a container. To weigh objects or liquids in this manner, WITHOUT
including the weight of the container, use the following procedure:
1. Place the empty container on the pan.
2. Press the zero key.
3. Wait for “OK”, place or pour objects or liquids into the container.
4. Wait for the “OK” symbol, then read the net weight from the display.

9
BASIC COUNTING USING THE SAMPLE SIZE KEY (EZ6)
To count a number of like objects on the scale, use the following procedure:
count print clear
0.00
sample
size
zero
g
1. Place an empty container on the scale. Press the zero key.
sample
size count print clear
Add 10
zero
PC
2. Press the sample size key. Each time the key is pressed the requested
sample size will increase (i.e., Add 10, 25, 50, 100 PCs).
PC
sample
size count print clearzero
10
3. Place the requested number of pieces in the container. Press the
count key.
sample
size count print clearzero
202
PC
4. Fill the container to the desired number of pieces.
sample
size count print clearzero
Tape/Label
278
PC
5. Press the print key to generate a tape/label by transmitting the data
out the RS-232 port.
count print clear 0.00
sample
size
zero
g
6. Remove the pieces from the container and press the clear key to
return the scale to the weight display.
10
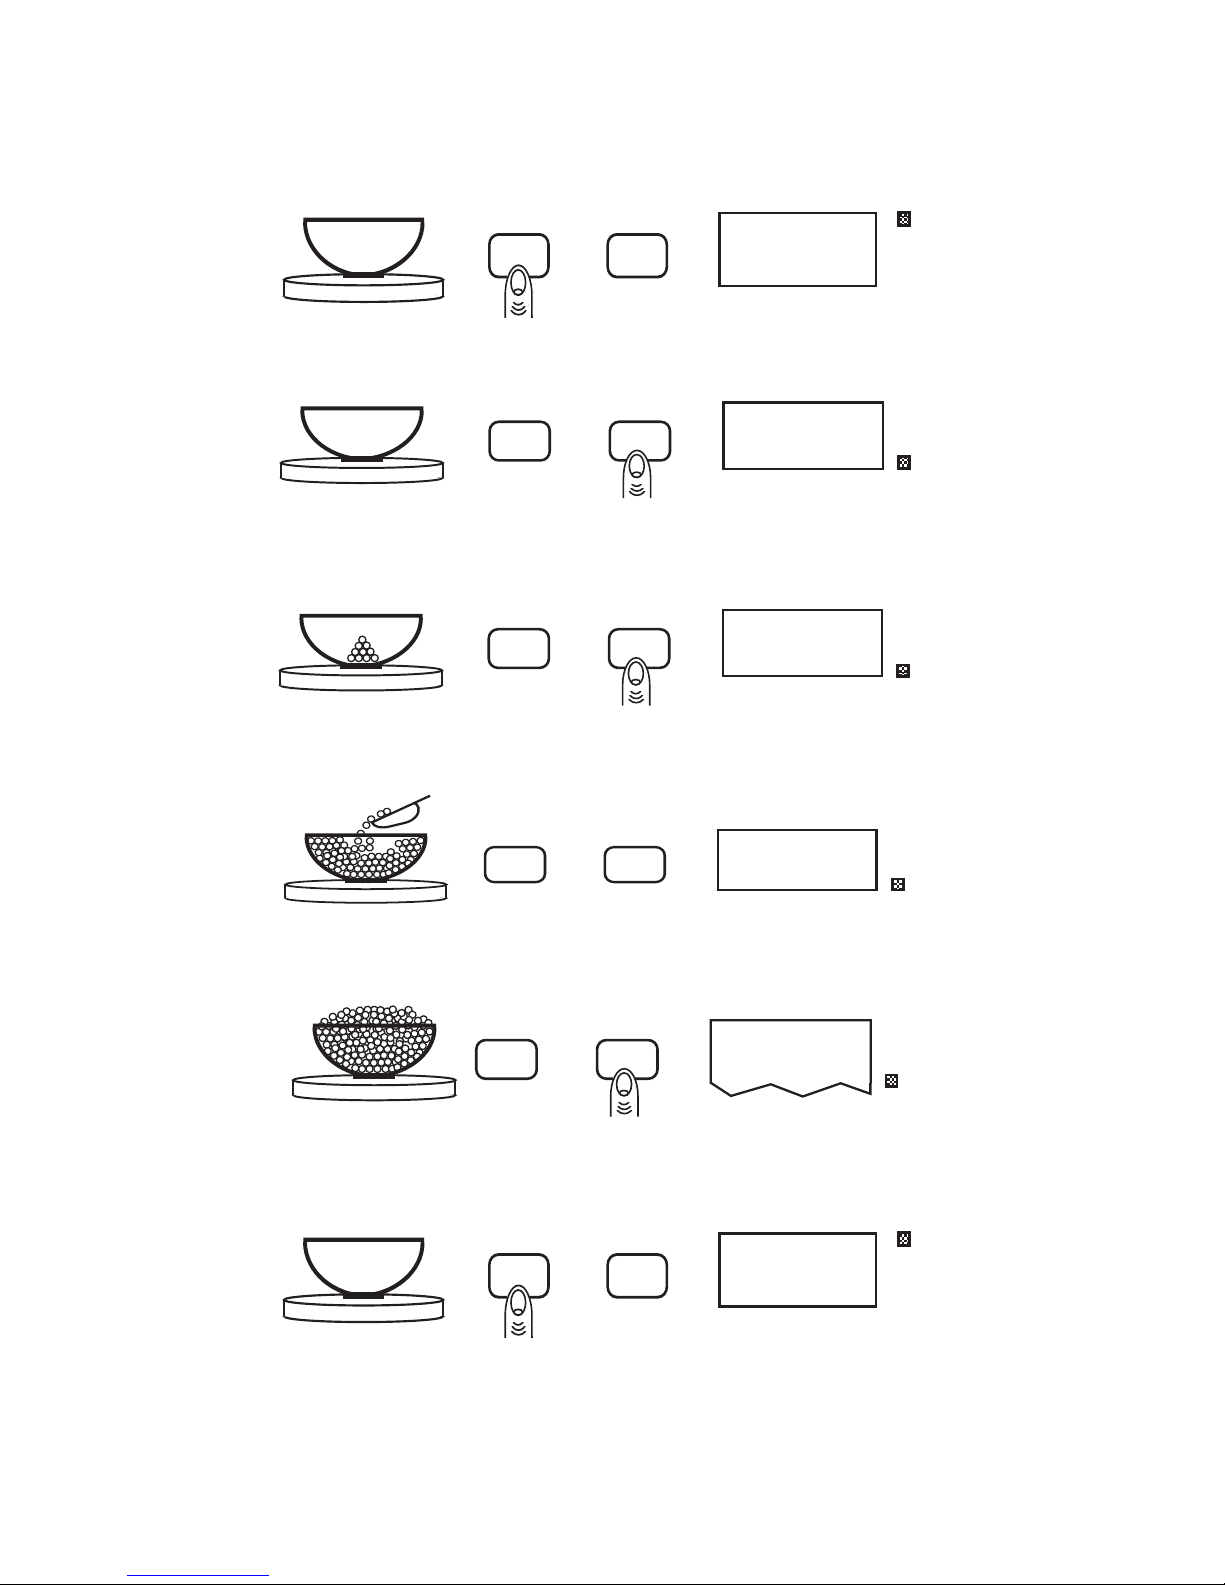
BASIC COUNTING USING THE COUNT KEY (EZ2)
To count a number of like objects on the scale, use the following procedure:
count
zero
0.00
g
1. Place an empty container on the scale. Press the zero key.
Add 10
count
zero
PC
2. Press the count key. Each time the key is pressed the requested sample
size will increase (i.e., Add 10, 25, 50, 100 PCs).
10
count
zero
PC
3. Place the requested number of pieces in the container. Press the
count key a second time.
202
count
zero
PC
4. Fill the container to the desired number of pieces.
count
zero
Tape/Label
278
PC
5. Press the count key again to generate a tape/label by transmitting the
data out the RS-232 port.
count
zero
0.00
g
6. Remove the pieces from the container and press the zero key once to
return the scale to the weight display. (Pressing the zero key twice will
return the display to Ø pieces, enabling you to continue counting the
same parts.)
Questo manuale è adatto per i seguenti modelli
5
Indice
Altri manuali Setra Systems Scala

Setra Systems
Setra Systems EL-200S Manuale utente

Setra Systems
Setra Systems 35CP Manuale utente

Setra Systems
Setra Systems Super II Manuale utente

Setra Systems
Setra Systems Super Count Manuale utente

Setra Systems
Setra Systems Super II Manuale utente

Setra Systems
Setra Systems Super II Manuale utente

Setra Systems
Setra Systems 500C Manuale utente

Setra Systems
Setra Systems L Series Manuale utente

Setra Systems
Setra Systems Super Count Manuale utente

Setra Systems
Setra Systems Super Count Manuale utente


