Sew Pro SuperLockstitch SP-403 Manuale utente

Model SP-403
Owners Manual
Innovative Products to Make Your Life Easier
Portable Sewing Machine
xSews Durable LockStitch
xHandheld or Table-Top Operation
xOperates on 4AA batteries (not included)

Dear Valued Customer:
Thank you for purchasing your Portable
Sewing Machine from our rapidly growing Sew Pro line. Our firm
takes pride in providing products with quality and value while
offering excellent service.
The Portable Sewing Machine will become a
valuable tool that will keep your family’s wardrobe in shape. Al-
though not designed to make complicated clothing from scratch,
it provides a durable LockStitch to complete your basic mending
jobs quickly and with a quality stitch. This machine was
specifically designed to be lightweight for easy portability. We
are confident you will enjoy the time you spend using our
product.
Top Innovations, Inc. would like to invite you to take advantage of
our customer support web site at www.topinnovations.com. Here
you will find additional information about the many other exciting
Sew Pro and Steam Fast products that are available. We take
pride in our quality line of garment care and steam cleaning
products and hope you will visit our web site to review our
product line.
Benny Lee
Chairman & CEO, Top Innovations, Inc.
1

SAFETY INSTRUCTIONS 2
PARTS LISTING 3-4
ACCESSORIES 4
WINDING A BOBBIN 5
THREADING THE BOBBIN 6
INSERTING THE THREADED BOBBIN CASE 6
REMOVING BOBBIN & BOBBIN CASE 7
THREADING THE MACHINE 8
RAISING THE BOBBIN THREAD 9
ADJUSTING THREAD TENSION 10
START TO SEW—HANDHELD OPERATION 11
START TO SEW—TAPLE-TOP OPERATION 12
SECURING A SEAM; DARNING 13
TURNING A SQUARE CORNER 14
CHANGING NEEDLES 14
HOW TO REPLACE THE SLIDE PLATE 14
PERFORMANCE CHECKLIST 15
CONTENTS
IMPORTANT SAFETY INSTRUCTIONS
WHEN USING THIS MACHINE, THE FOLLOWING BASIC SAFETY
PRECAUTIONS SHOULD ALWAYS BE FOLLOWED:
xDO NOT USE WITH BENT NEEDLE.
xWHEN SEWING, KEEP FINGERS AWAY FROM ALL MOVING
PARTS. SPECIAL CARE IS REQUIRED AROUND THE NEEDLE.
xCLOSE ATTENTION IS NECESSARY WHEN THE MACHINE IS
USED BY OR NEAR CHILDREN.
xWHEN THREADING OR CHANGING A NEEDLE, ALWAYS
SWITCH OFF THE POWER SUPPLY.
xNEVER PRESS OR PULL THE NEEDLE ARM DIRECTLY, AL-
WAYS USE THE HAND WHEEL TO MOVE IT.
2

PARTS LISTING
1. On/Off Switch 11. Spool Holder Ring
2. Dust Cover 12. Spool Stand
3. Thread Tension Dial 13. Hand Wheel
4. Needle Arm 14. Battery Access
( 4 AA Batteries not included)
5. Needle Clamp Screw 15. AC Adaptor Socket
6. Presser Foot Rating: Input: 120V/ 60Hz
7. Slide Plate Output: 6 VDC, 600mA
8. Needle Plate 16. Foot Switch Socket
9. Pretension Stud
10. Spool Pin
3

PARTS LISTING (cont’d)
17. Accessories Storage 22. Take-Up Lever
18. Bobbin Winder Cover 23. Thread Guide Wire Loop
19. Bobbin Winder 24. Bobbin Case Holder
20. Bobbin Winder Thread Guidepost 25. Bobbin Case
21. Presser Foot Lift Lever 26. Bobbin
1. Bobbin x4 (1 in Machine) 5. Thread Spool (On Machine)
2. Needle Threader 6. Foot Switch
3. Needle x2 (1 in Machine)
(Regular Needle No. 14 for General Sewing)
7. Stabilizer (Table Top Operation)
4. Spool Holder Ring (On Machine) 8. Bonus AC Adapter
ACCESSORIES
4

WINDING A BOBBIN
xPlace spool of thread onto spool pin.
xPress spool holder ring against spool.
CAUTION: Spool of thread
should be rotated freely after
pressing the holder ring on.
xLead thread to Guidepost (1) and draw
to the left under pretension stud (2).
xDraw thread between the two tension
discs of thread tension dial, then pull
thread to right as shown.
xFollow arrows. Guide thread through
guidepost (3).
xOpen the bobbin winder cover and in-
sert a bobbin.
xAlign the small bobbin hole on pin of
bobbin winder.
xFollow arrows. Manually wind thread
clockwise around the bobbin 3-5 turns,
then pass thread through the notch.
xStill holding end of thread, push on/off
switch and start to wind
xTrim the end of the thread after bobbin
is wound around a few times. (5-10 winds)
xContinue to wind bobbin until desired
amount is reached and cut thread.
CAUTION: Do not over-wind bobbin.
Over-winding causes thread jamming of
bobbin case.
5

THREADING THE BOBBIN
INSERTING THE THREADED BOBBIN CASE
xBe sure that the bobbin winder cover
is closed, raise needle to its highest po-
sition by turning hand wheel counter
clockwise.
xFully open slide plate, and make sure
bobbin case holder is parallel to presser
foot edge by rotating hand wheel
slightly.
xPosition and place threaded bobbin case
as per graphics shown on slide plate re-
cess.
xSlide the bobbin case forward into the
bobbin case holder as arrow shown.
xPull thread 2-3 inches to the front.
xReplace slide plate.
xUse needle threader to pull bobbin
thread (bottom) from inside of bobbin
case hole
xPosition bobbin in bobbin case and draw
2-3 inches of thread. You will feel thread
tension force while drawing.
CAUTION: Bobbin case tension was pre-
set at factory and is not adjustable.
6

REMOVING BOBBIN & BOBBIN CASE
xBe sure that bobbin winder
cover is closed, raise needle to
highest position by turning hand
wheel counter clockwise.
xFully open slide plate, make sure
bobbin case holder is parallel to
presser foot edge by rotating
hand wheel slightly.
xShake machine head to throw
the bobbin case out from its re-
cess.
xUsing a pin, insert into the hole
at the bottom of the bobbin case
and push bobbin out of bobbin
case.
7

THREADING THE MACHINE
xPlace spool of thread onto spool pin.
xPress spool holder ring against spool.
CAUTION: Spool of thread should be ro-
tated freely after pressing the holder ring
on.
xPull thread to Guidepost (1) and draw it
to left, under pretension stud (2).
xDraw thread between two tension discs
and then pull to right as shown.
xFollow arrows, guide thread into take-up
lever eyelet (3) and then backwards to
wire loop (4).
xTop view of threading.
xSlip thread through (5).
xInsert needle threader through needle
eye and pull thread through needle eye.
xPull thread 2-3 inches to the front.
8
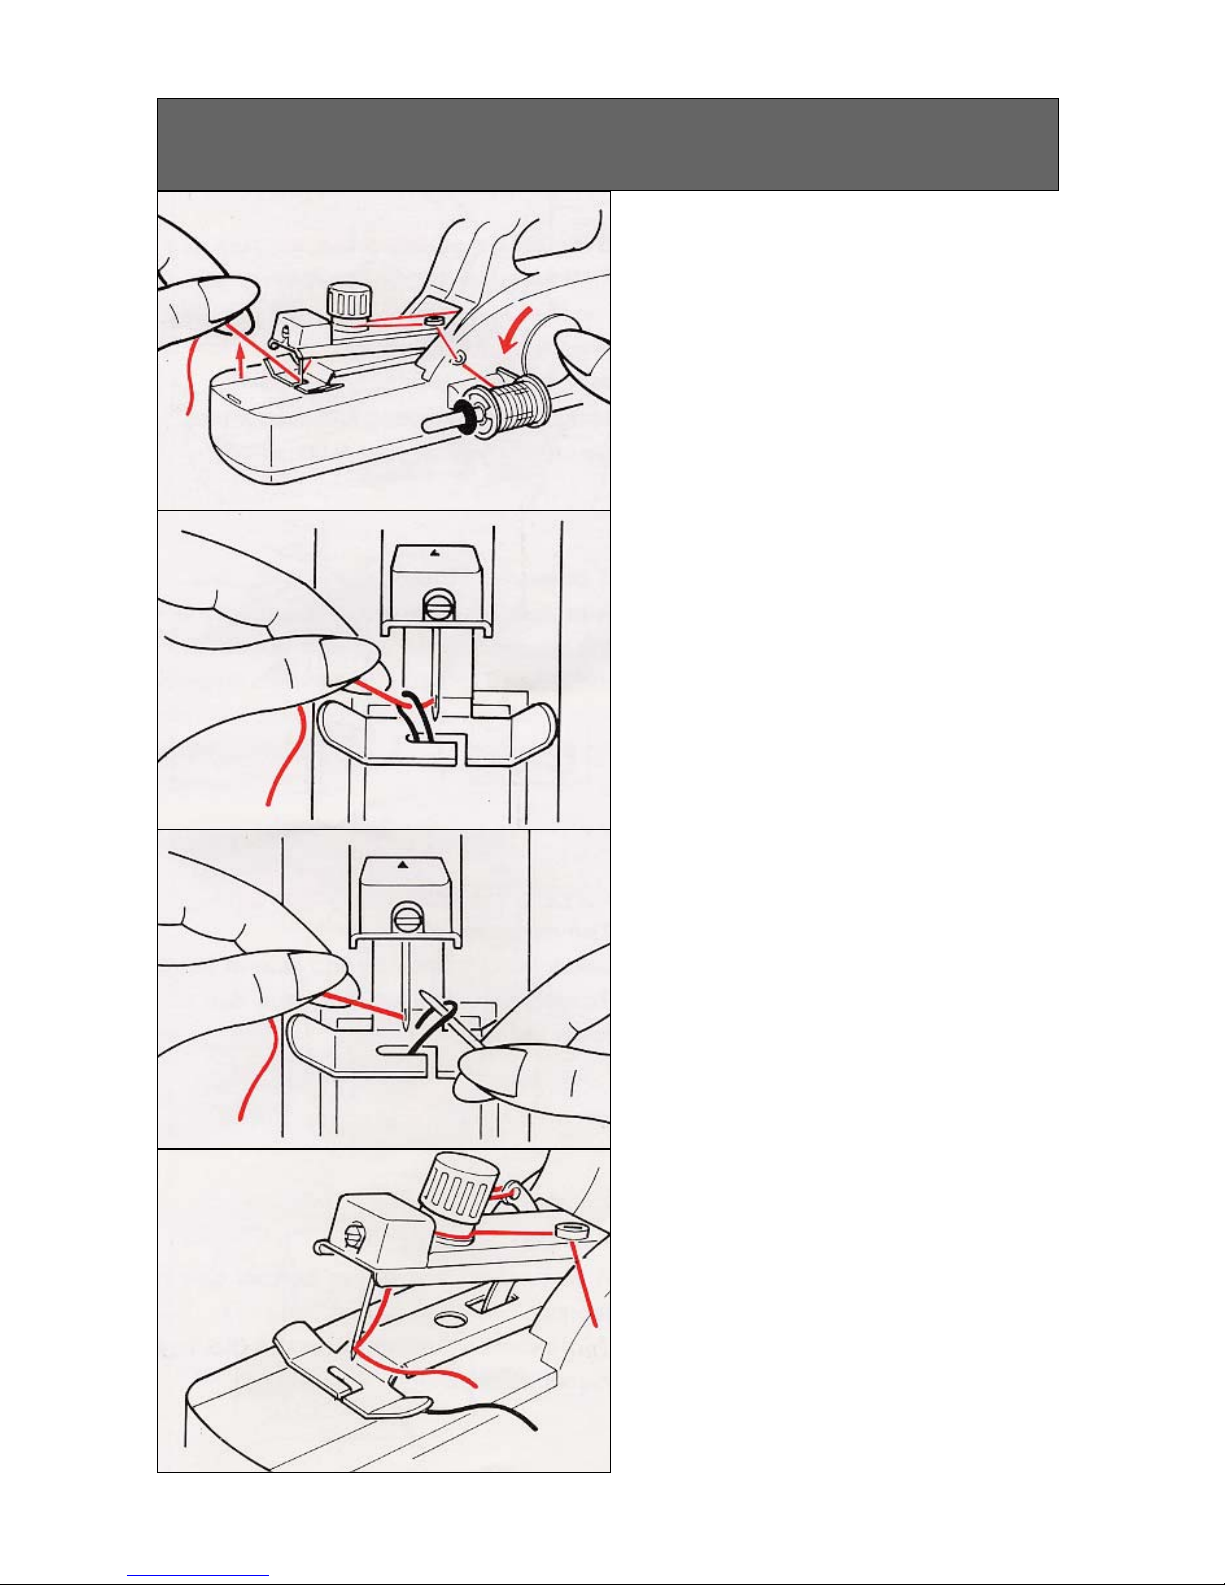
RAISING THE BOBBIN THREAD
xHold the needle thread (top) and
turn hand wheel counterclockwise
to lower needle, then raise to
highest position.
xGently pull needle thread (top)
until bobbin thread (bottom)
comes up and forms a loop.
xUse a pin to pull up bobbin thread
loop (bottom).
xPlace bobbin thread (bottom) un-
der presser foot.
9
Indice
Altri manuali Sew Pro Macchina da cucire


