SmartBridges airPoint Pro Series Manuale utente

s m a r t Bridges
to the future ...
Revision 1.8 Page 1 of 28
airPoint-PRO Series Wireless Access Point
Quick Install Guide
Installing the airPoint-PRO Series
airPoint-PRO is a wireless Access Point to provide WLAN connectivity to any PC. It
operates at 2.4 GHz ISM band and conforms to IEEE 802.11b specifications. All the
access points in this series can provide network connection to any 802.11b Wi-Fi
compliant client device.
Currently there are 2 models in the airPoint-PRO series
1. airPoint-PRO Outdoor - Outdoor wireless access point device.
2. airPoint-PRO TOTAL - Outdoor wireless access point integrated with 13 dBi / 9 dBi*
flat panel antenna. Now with new enhancements like Surge Protection and an
external N connector for an external antenna option.
With a high gain external Omni / Directional antenna the airPoint-PRO Outdoor can
provide range of upto 32 Kilometers. All the access points in this series provide data
rates upto 11Mbps making it one of the fastest Wireless Access Point family in the
market. Encryption capability of 64 bits or 128 bits provides network security.
The airPoint-PRO series can be used as an access point, client bridge, wireless bridge
and wireless repeater to provide various networking functions. Designed to tolerate
extreme weather conditions like heavy rain, freezing cold and hot summer, airPoint-PRO
is an ideal solution for outdoor access points and customer premise equipments (CPE).
Numerous applications like broadband connectivity to farflung neighborhood homes,
wireless networking of PC's in a campus, wireless networking across waterways, roads,
valleys and rough terrain are possible. The home PC gets connected to the Internet
through the airBridge series and airPoint-PRO series wirelessly.
Note:
*13dBi integrated antennas comply to FCC
standards. 9dBi integrated antennas comply to
ETSI standards
+airBridge series is an ethernet based wireless
client

Revision 1.8 Page 2 of 28
Contents of Package
airPoint-PRO Outdoor
lairPoint-PRO Outdoor Unit
lpowerShot
lAC Adapter
lPole Mounting Kit : U Bracket, Nuts,
Washers
lWall Mounting Kit : Wall plugs,
Screws
lairPoint-PRO Setup Software and
User Manual CD
lQuick Install Guide
lCoax Seal
airPoint-PRO TOTAL
lairPoint-PRO TOTAL Unit
lpowerShot
lAC Adapter
lPole Mounting Kit :
U Bracket, Nuts, Washers
lWall Mounting Kit : Wall plugs, Screws
lairPoint-PRO Setup Software and
User Manual CD
lQuick Install Guide
lCoax Seal
lEarthing tag
Hardware Installation
11
AC / DC
Adapter
AC / DC Adapter
to airBridge Outdoor / TOTAL
Home PC
Office
airPoint-PRO Outdoor / TOTAL
powerShot
Network Point
RJ 45 Socket
RJ 45 Ethernet Port

s m a r t Bridges
to the future ...
Revision 1.8 Page 3 of 28
for airPoint-PRO Outdoor / airPoint-PRO TOTAL
Important note - Earthing Requirements:
Follow National Electric Code NEC 810-20 and NEC 810-21 for this installation.
Mounting the airPoint-PRO Outdoor
Fix the airPoint-PRO Outdoor unit with the U bolts to the steel pipe. Make sure to tighten
both top and bottom mounting plates to the pipe with U bolts, nuts and spring washers.
Tighten the nuts so that the airPoint-PRO Outdoor does not rotate on the pipe. The
mounting should be such that the antenna socket, LED's, ethernet cable outlet etc face
downward. The airPoint-PRO Outdoor is weather proof box made to NEMA 4 specs.
There are no user adjustable parts inside and it is recommended that the unit is used in
the same way it is shipped.
Note:
Do not mount the unit upside down with connectors facing up. In this position water will
leak inside through the drain plug.

Revision 1.8 Page 4 of 28
Outdoor
airPoint
PRO
Antenna
airPoint-PRO Outdoor
AC/DC Adapter
RJ-45 Ethernet Port
1.5 Inch pipe
powerShot
RF Cable
Ethernet Cable
U-bolt

s m a r t Bridges
to the future ...
Revision 1.8 Page 5 of 28
Mounting the Antenna:
Follow the mounting instructions provided by the antenna manufacturer and mount the
antenna on the steel pipe. Antenna should be mounted on the same pipe as the
airPoint-PRO Outdoor and positioned above it. The height of the antenna and direction
should be in the direction of the Client devices. The antenna socket of the airPoint-PRO
Outdoor and the antenna input have to be connected by an RG 8 N Male to N Male
cable. Use the coax seal to seal the N connector after fixing RG8 N male to male cable.
Prevent rain water entering the RF cable.
Wall mounting:
When client devices are in line of sight from the outer wall of the building then wall
mounting can be used. The airPoint-PRO Outdoor can be mounted on the outer wall with
the holes provided on the mounting bracket. Drill holes in the wall and insert the wall
Plugs. The airPoint-PRO Outdoor then can be fixed to the wall using the wall mount
screws. The antenna has to be fixed to the wall using suitable mounting bracket. Rest of
the procedures up to alignment follows the previous paragraphs.
Cabling:
Use the ethernet cable that is manufactured for outdoor use. The ethernet cable has to
be routed along the pipe, roof, edge of the roof and along the wall into the building,
suitable cable ties should be used to hold it rigidly all along its path.

Revision 1.8 Page 6 of 28
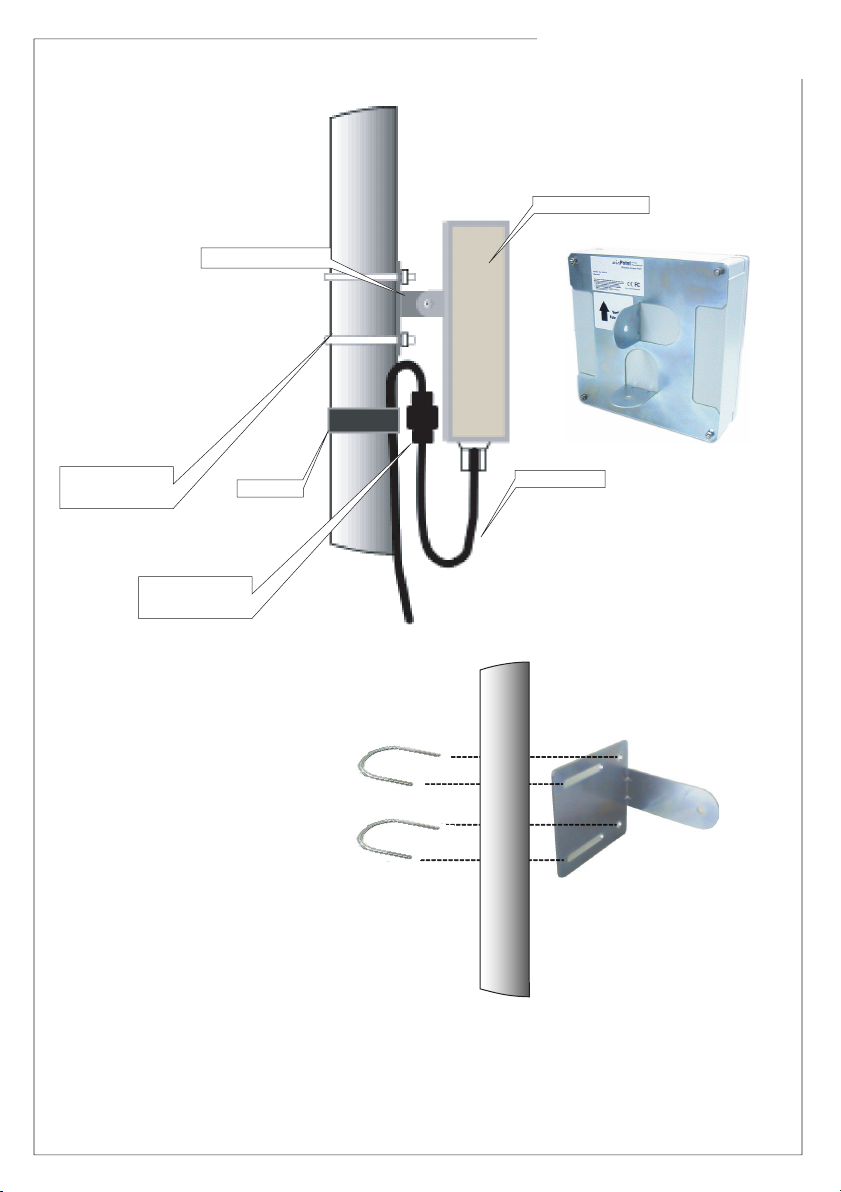
Mounting the airPoint-PRO TOTAL
Attach the mounting arm of the airPoint-PRO TOTAL unit with the 2pcs of U bolts to the
pipe. Make sure to tighten both top and bottom U bolts, with nuts and spring washers.
Tighten the nuts so that the mounting arm does not rotate on the pipe. Use the external
toothed washer between the cabinet bracket and the mounting arm. Use the internal
toothed washer with the nut to ensure the TOTAL is tightly held in place.
The airPoint-PRO TOTAL has a high gain in-built directional antenna. Depending on the
required signal polarity, use the correct fin for Vertical / Horizontal polarization. Please
note that the vertical polarity is indicated on the backside of the device. Mount the unit on
the mounting arm with the 1/4" bolt, spring washer and nut and tighten.
Adjust the azimuth angle of the airPoint-PRO TOTAL unit by rotating the mounting arm
above the pipe. Adjust the elevation / tilt angle of the airPoint-PRO TOTAL unit by rotating
the around the fin.
Use the correct azimuth and the elevation angle to point the airPoint-PRO TOTAL unit
towards the remote transmission tower.
Use the Antenna alignment mode in the simpleMonitor software to maximize the received
signal strength for the unit.
Mounting the Antenna:
Follow the mounting instructions provided by the antenna manufacturer and mount the
antenna on the steel pipe. Antenna should be mounted on the same pipe as the
airPoint-PRO TOTAL and positioned above it. The height of the antenna and direction
should be in the direction of the Client devices. The antenna socket of the airPoint-PRO
TOTAL and the antenna input have to be connected by an RG 8 N Male to N Male cable.
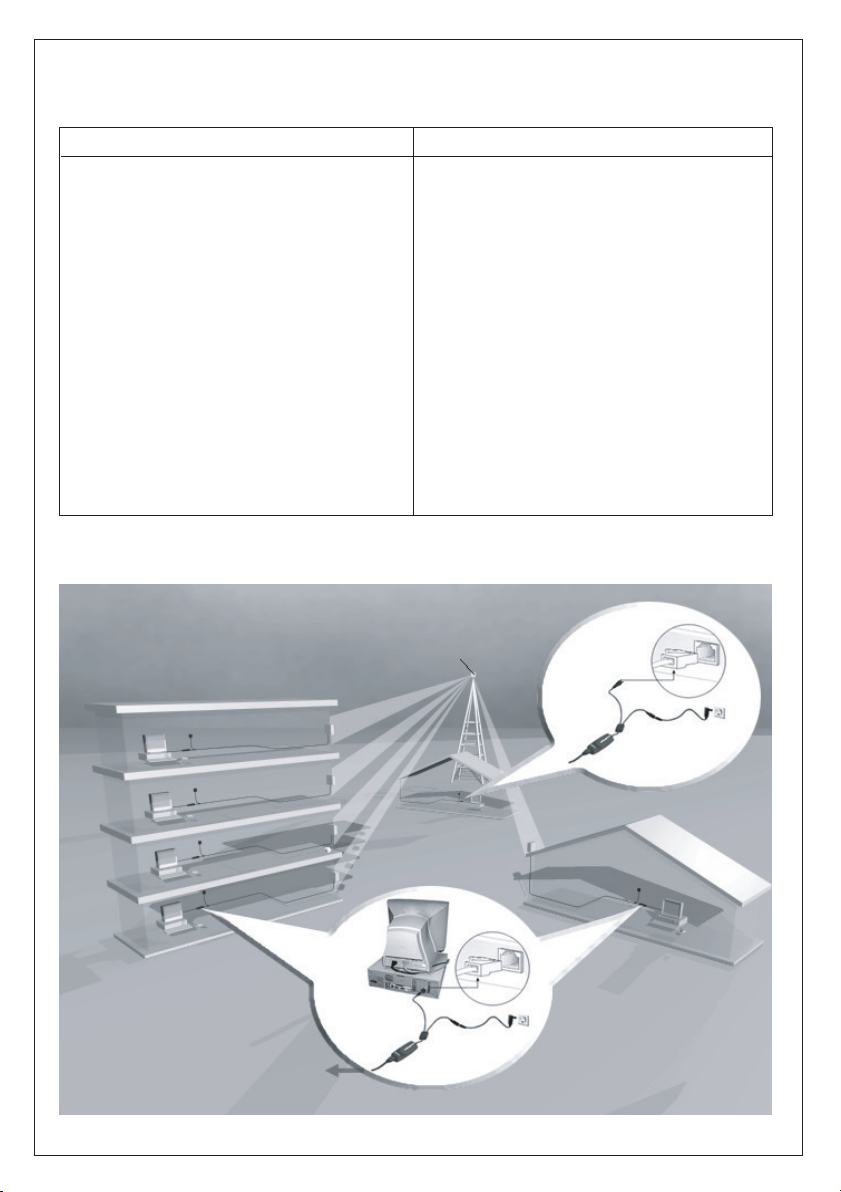
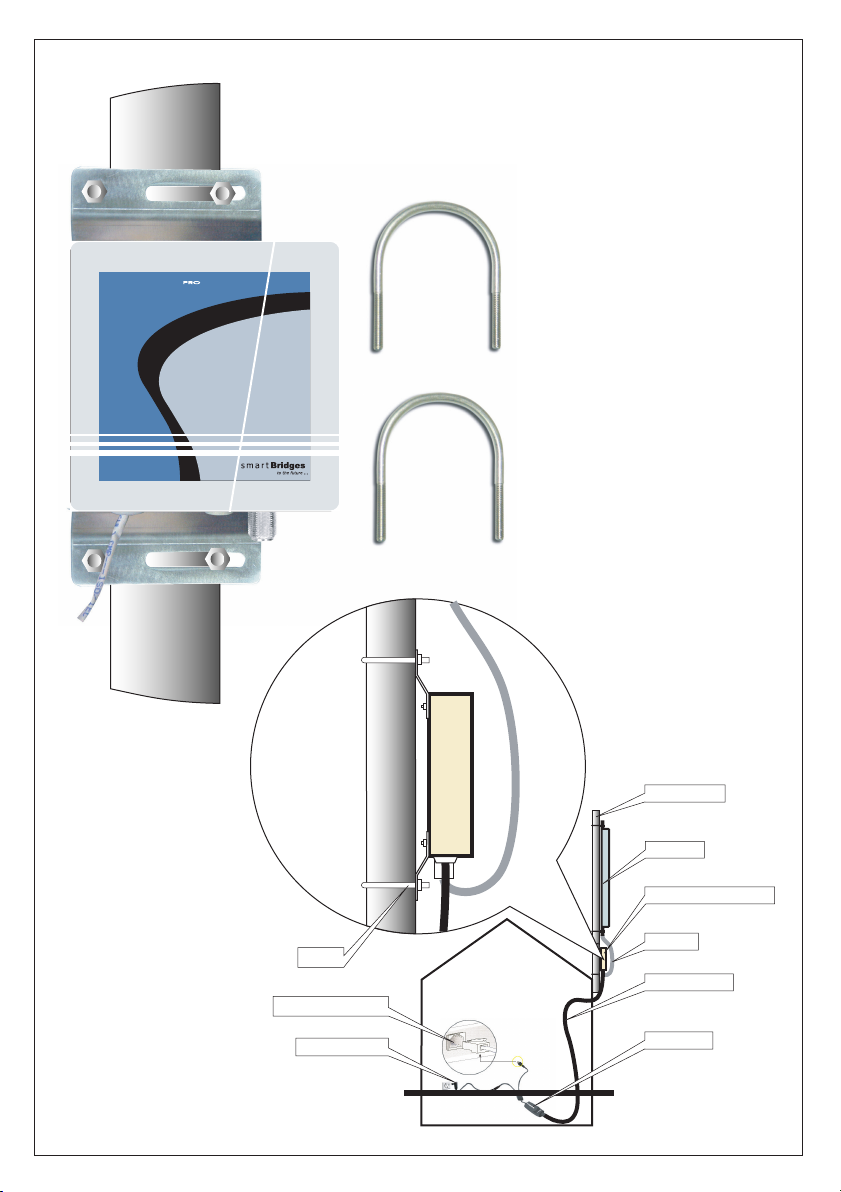
Cabling:
The airPoint-PRO TOTAL is terminated a weatherproof RJ45 female connector for
outdoor use. Refer to the cable and connector installation instructions placed inside the
weatherproof connector for more information. The user can connect required length of
suitable ethernet cable to connect the airPoint-PRO TOTAL to the user's PC / Network.
Use the external toothed washer between the cabinet bracket and the mounting arm.
Use the internal toothed washer with the nut to ensure the TOTAL is tightly held in place.

s m a r t Bridges
to the future ...
Revision 1.8 Page 7 of 28
U-bolt fixing pipe
to Mounting Arm
Mounting Arm
airPoint-PRO TOTAL
RJ45 Cable
Cable Tie
Weather proof
Connector

Revision 1.8 Page 8 of 28
to airPoint-PRO / airPoint-PRO Outdoor /
airPoint-PRO TOTAL
RJ45 to Network / PC
AC Adapter
powerShot
RJ45 Cable
Cross Coupler switch
SB2820
Cross Coupler switch
Restore Default button
Note:
Restore Default button at the bottom side of the powerShot should be used to restore the device
back to factory / WISP defaults.
Grounding:
The internal ground of the TOTAL is bought out to an earthing stud at the bottom side of the unit.
Crimp the 10 AWG wire to the earth tag and secure the earth tag on to the earthing stud tightly with
the M6 nut provided. Ensure that the other end of the 10 AWG wire is grounded to the earth at the
power ground of the premises.
Note:
Grounding has to be done before mounting the TOTAL on wall/pole.

s m a r t Bridges
to the future ...
Revision 1.8 Page 9 of 28
Connecting the airPoint-PRO series using Power Over Ethernet:
The airPoint-PRO series is powered through the ethernet cable itself. This mode of
operation gives flexibility for the user to position the airPoint-PRO at any location for best
radio coverage.
Connect one end of the power cord to the powerShot and the other end in the power
socket.
Connect the RJ45 cable to network / PC.
Connect the RJ45 cable between the powerShot and airPoint-PRO Outdoor / airPoint-
PRO TOTAL. This cable will provide both ethernet signals and power.
Cross coupler switch in SB2820 powerShot selects straight or crossed ethernet
connection.
For cable lengths in excess of 50 meters it is recommended that the AC adapter should
be of 18 Volt type. Normally 12 V AC adapter is provided with the airPoint-PRO.

Revision 1.8 Page 10 of 28
Software Installation
System Requirements:
Computer with Windows 98/ME/NT/2000/XP with working network card
Installing airPoint-PRO Setup Software:
Please insert the Setup Software CD into the CD-ROM drive of your PC. The CD will run
automatically. If it doesn't autorun, please browse the CD and double click on index.htm.
lSelect the appropriate product from the drop-down list and click the Go button.
lClick on the Setup File link. You should see the File Download dialog box.
lSelect Open or Run this program from its currrent location to start the setup.
lThe setup will install all the necessary files in the "C:\Program
Files\smartBridges\airPoint-PRO" directory.
lThe installation will create the following shortcuts in the Program Menu at
smartBridges\airPoint-PRO for easy accessibility of Setup software.
oFirmware upgrade utility allows upgrading of firmware.
osimpleMonitor allows configuration of the airPoint-PRO.
oUser Guide shows the User Guide in HTML form.
oWeb Register opens the product registration of airPoint-PRO on smartBridges
website.
oKnown Issues with the Software, Firmware and Hardware.
oUninstall the Setup Software.
lAfter Installing please restart the PC if asked.
Uninstalling airPoint-PRO Setup Software:
Click on the shortcut "Start >Programs >smartBridges >airPoint-PRO >Uninstall
airPoint-PRO" and it will uninstall the setup software from your PC.
Note:
airPoint-PRO, airPoint-PRO Outdoor and airPoint-PRO TOTAL can be configured using
the same software which is referred to as airPoint-PRO.
Questo manuale è adatto per i seguenti modelli
3
Indice
Altri manuali SmartBridges Punto di accesso wireless


