Soloshot 3 Manuale utente

YOUR SOLOSHOT3 2
In the Box 2
The Tag 2
The Base and Camera 2
GETTING STARTED 3
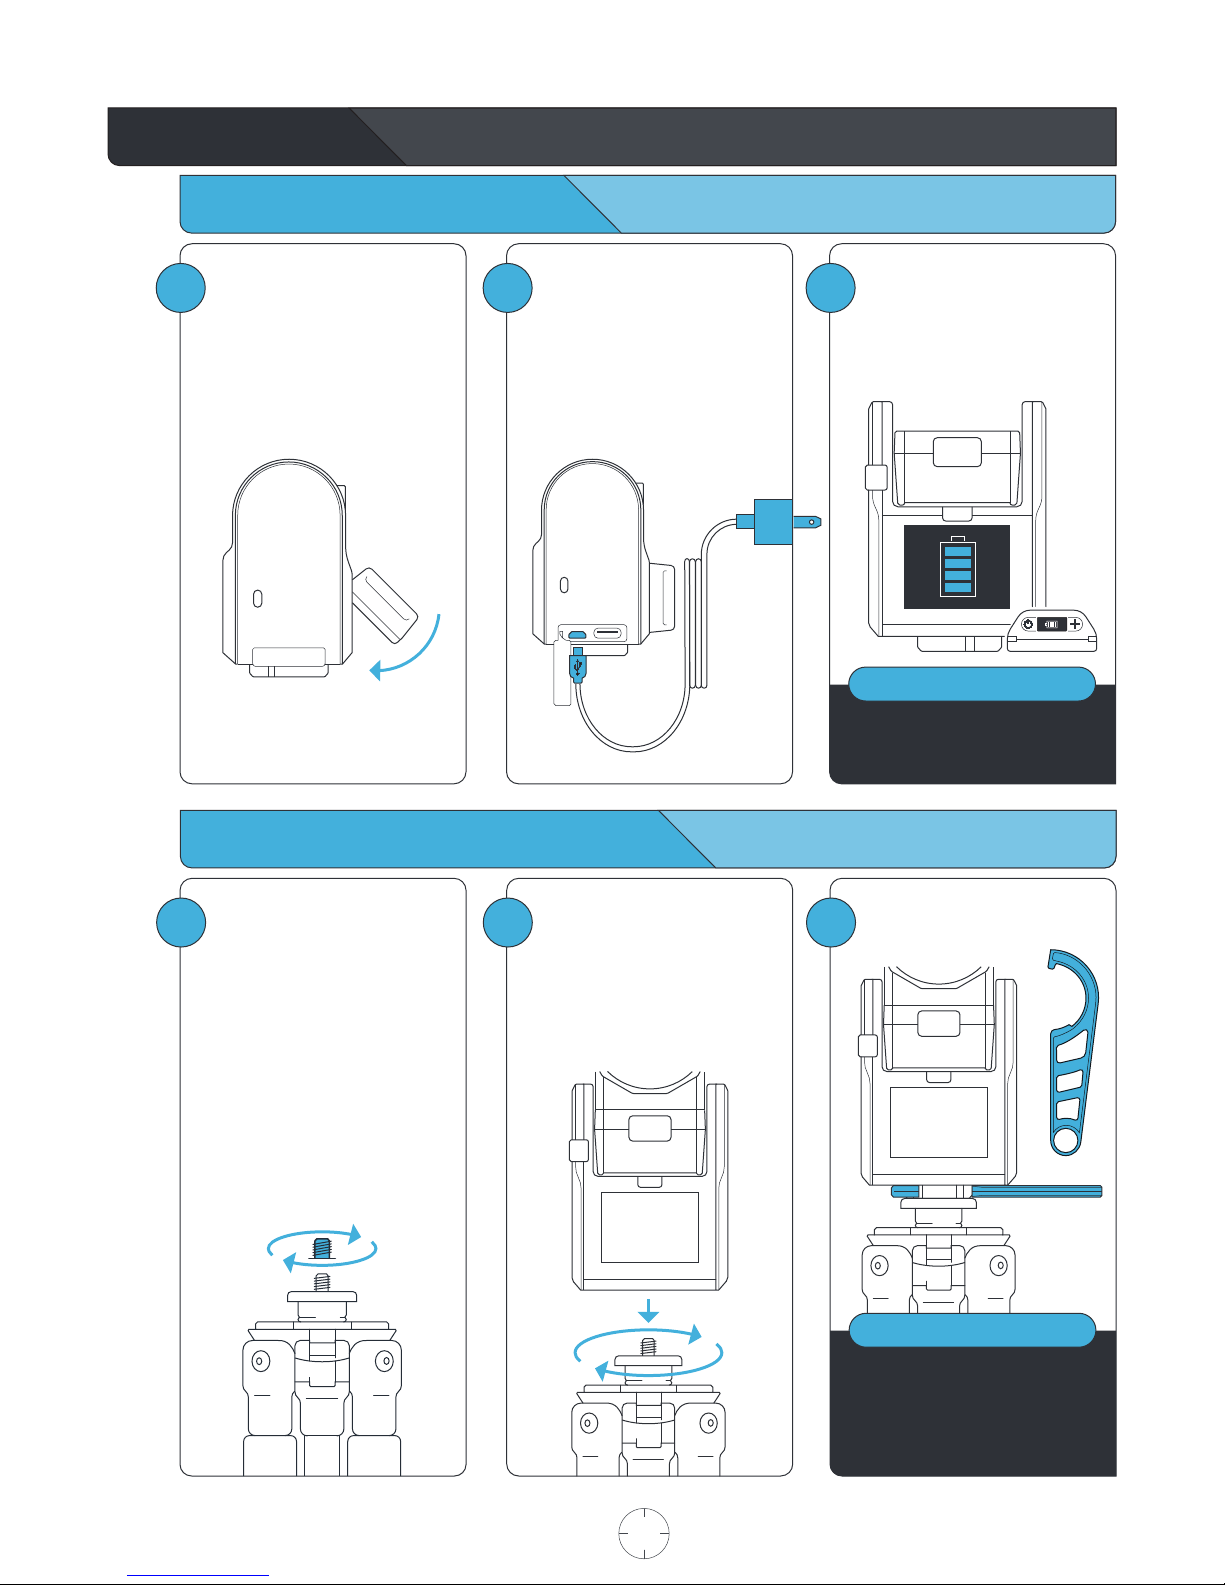
Charging your Base and Tag 3
Connecting the Base to your Tripod 3
Preparing your SOLOSHOT3 4
Update and Registration 4-5
LOCATION SETUP 5
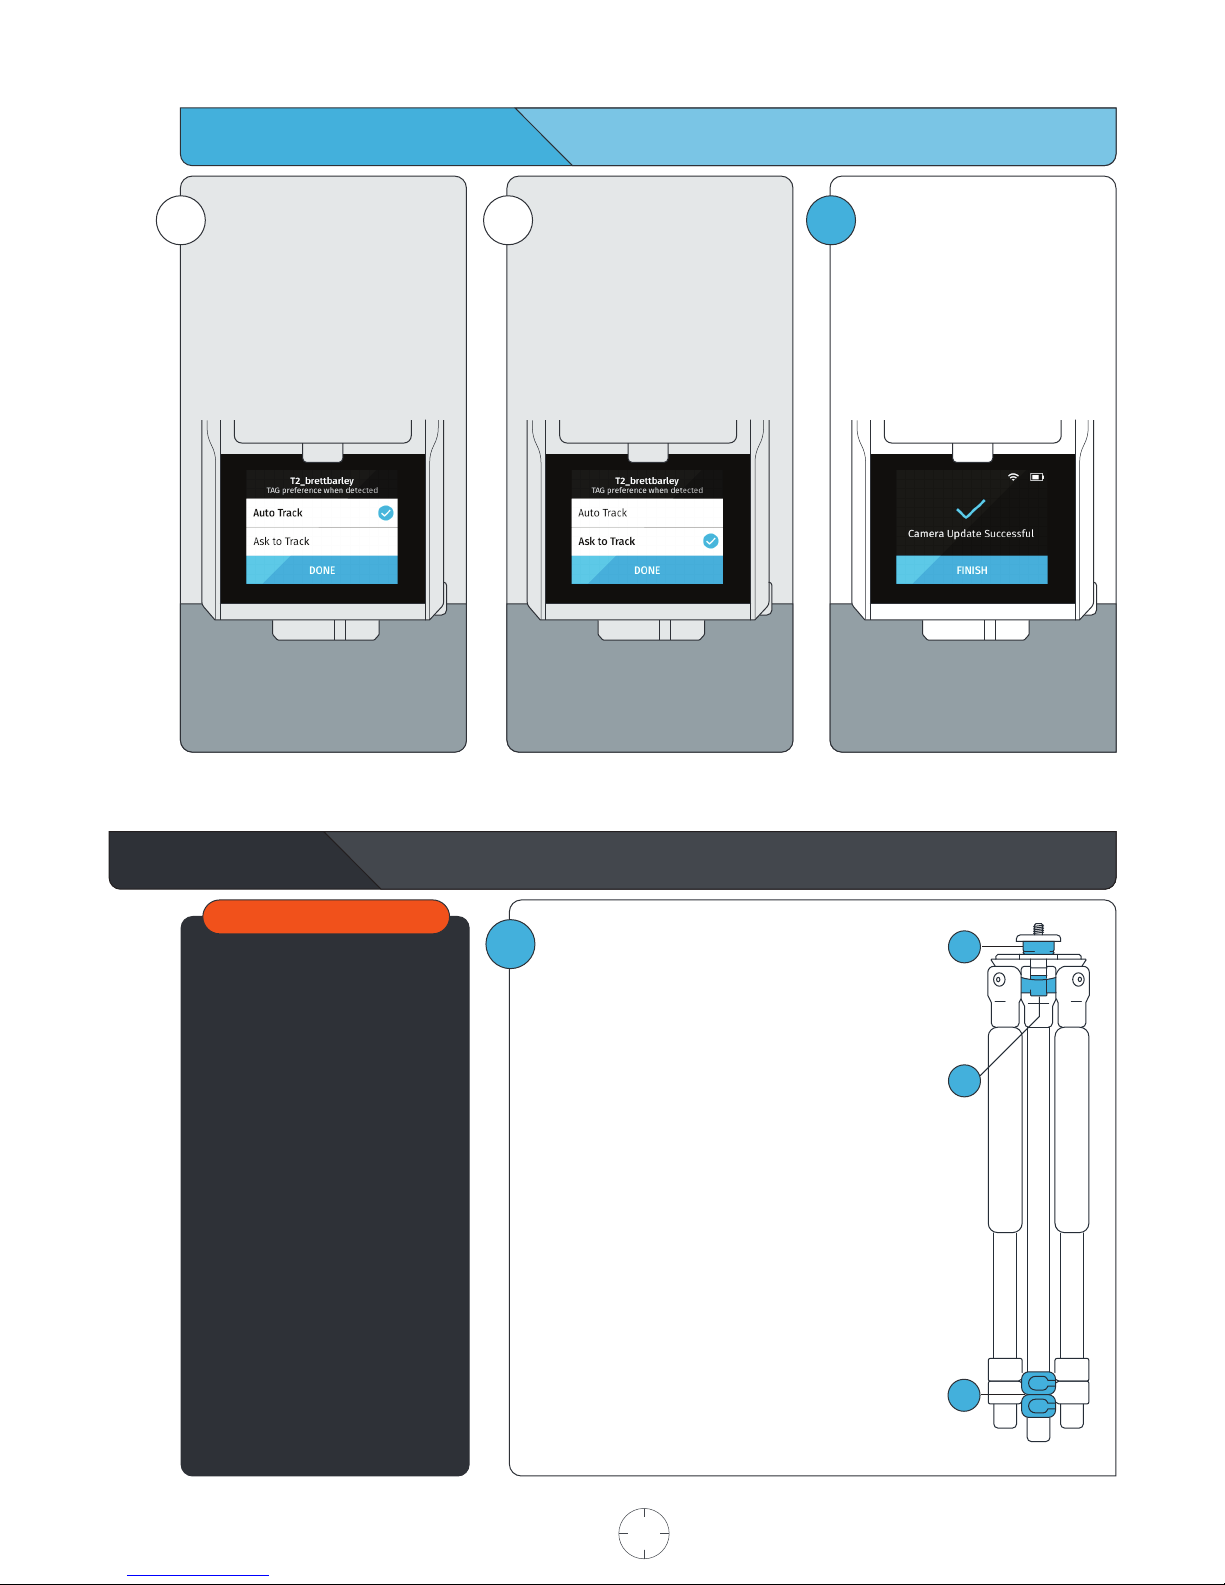
Setting up the SOLOSHOT Tripod 5
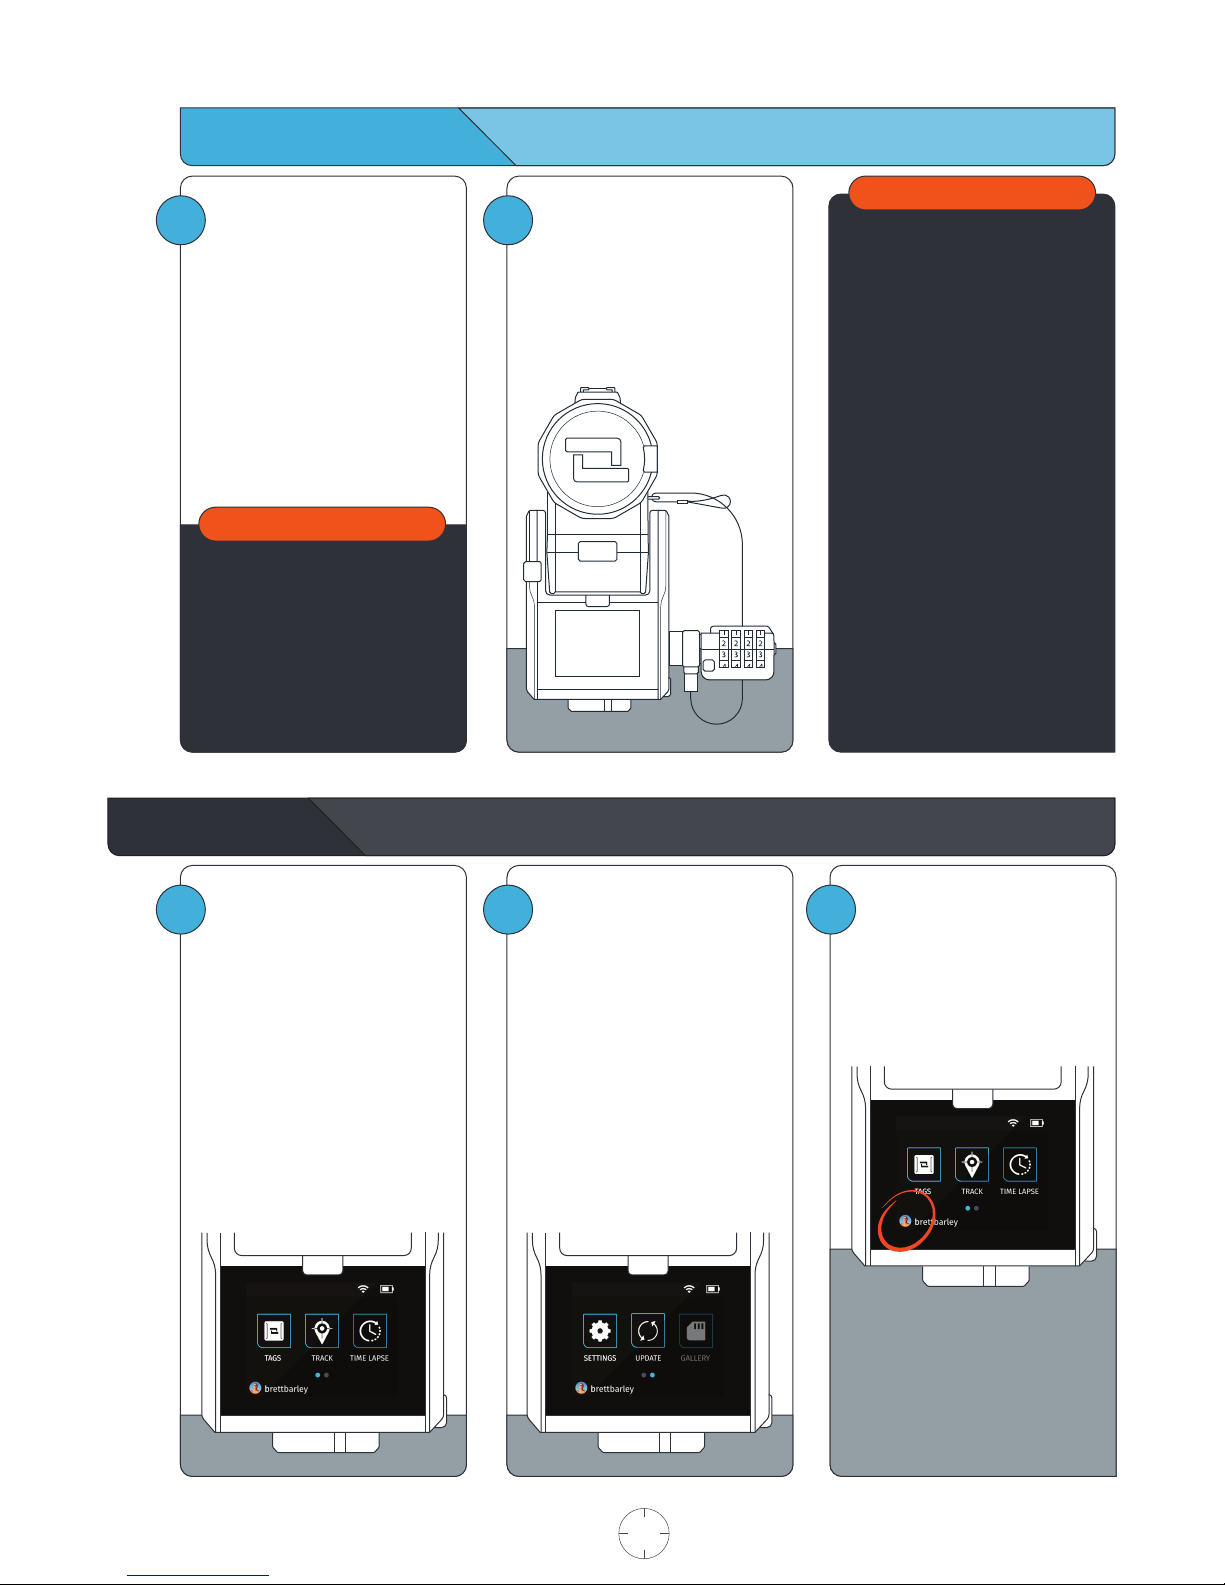
Safety and Security 6
HOME SCREEN 6
USING THE TRACK APP 7
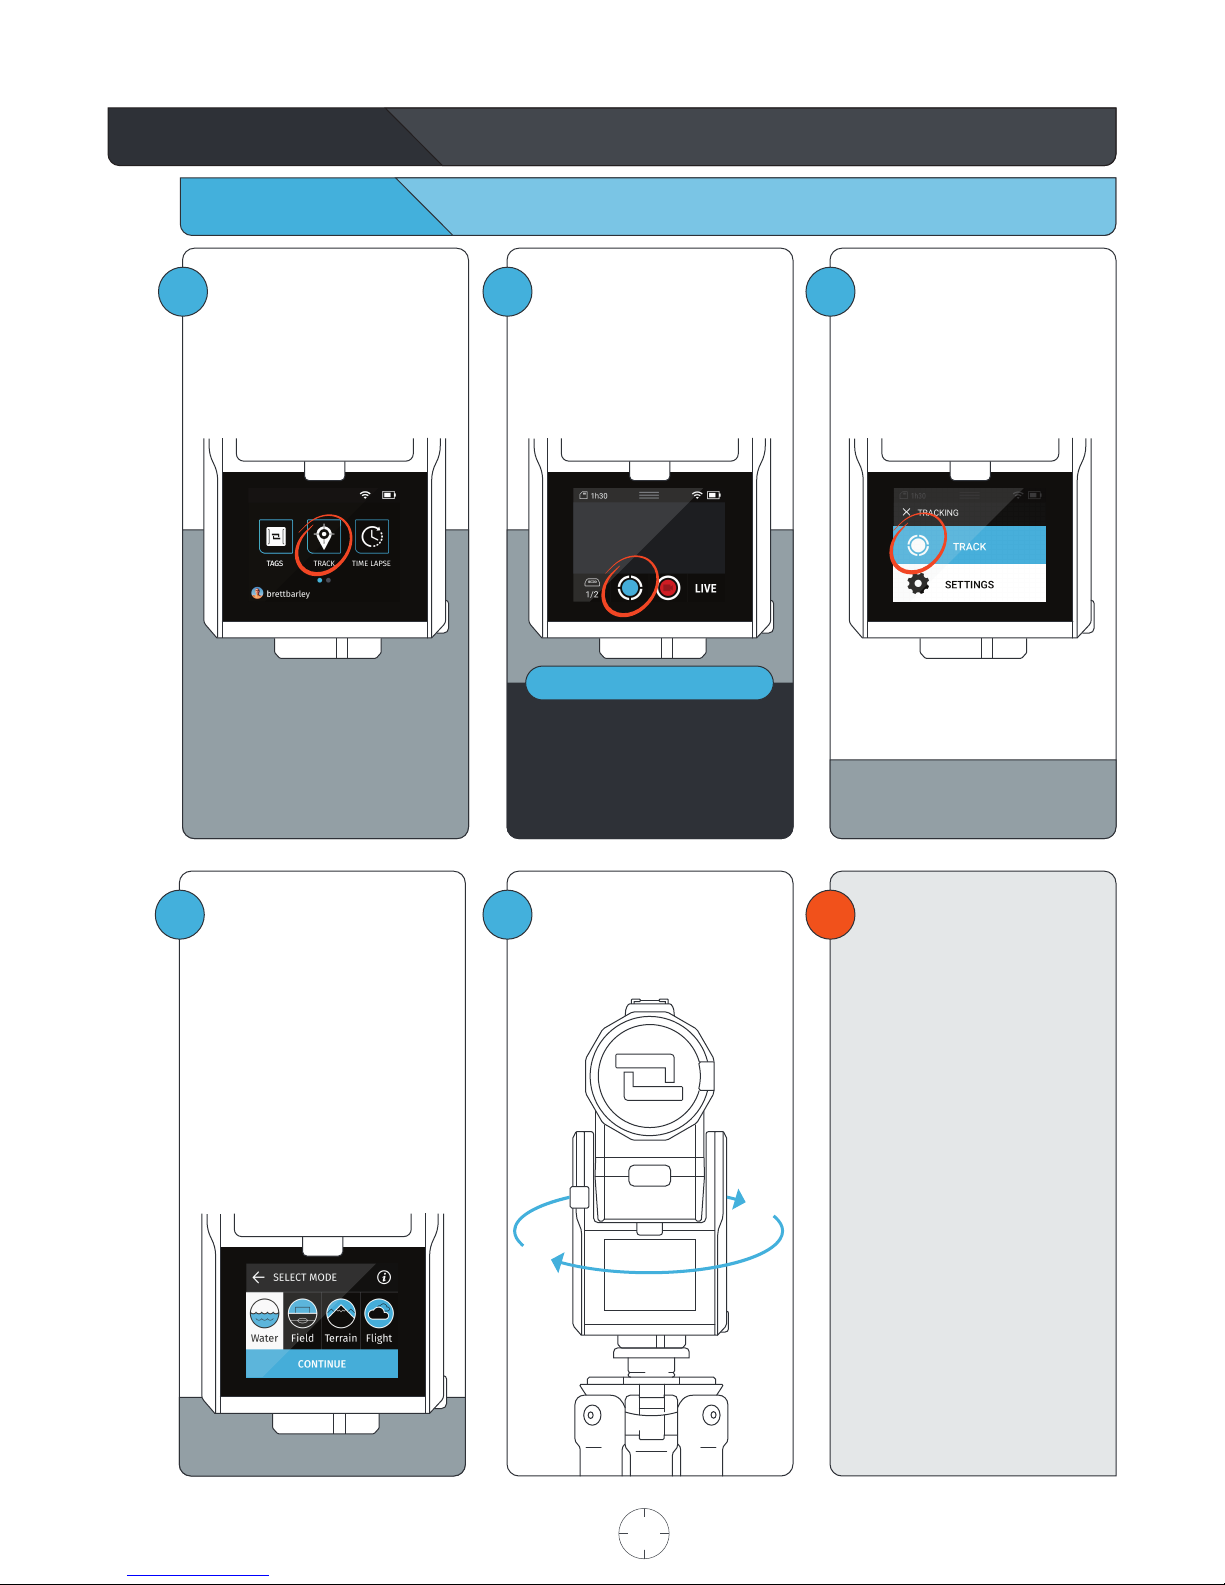
Begin Tracking 7
Calibrating 8
Tag Manager 8-9
Wearing the Tag 9
Using the Track App Viewfinder 10
Using the Tag Screen 10
Tracking 11
Recording 11
Live Streaming 12
Moving the Base 13
Tracking Distance 13
ADVANCED TRACKING SETTINGS 13
Track Mode 14
Field of View 14
Framing 14
Trajectory 14
CAMERA SETTINGS 15
Access Camera Settings 15
Video Mode 15
Photo Mode 16
Taking Photos 16
MULTI MODE 17
Requirements 17
Filming Multiple TAGS 17
from a Single BASE
Filming a single TAG 18
from Multiple BASES (Angles)
Filming Multiple TAGS 18
from Multiple BASES
MOTION TIME LAPSE 19
Setting MTL Parameters 19
Setting Start and End Points 19
UPDATE APP 20
Performing a Software Update 20
Tag Update Mode 20
SETTINGS 21
Wi-Fi 21
SD Card 21
Display 21
Battery 21
Date & Time 21
Account 21
About 21
Help 21
Developer Options 21
HDMI OUT 22
AUDIO 22
HOT SHOE MOUNT 22
MAINTENANCE 22
Table of Contents
User Manual
with Optic65 and Optic25 Cameras
FOR OUTDOOR TRACKING ONLY unless used in conjunction with the Indoor Tracking Accessory.

Table of Contents
Power Button
OLED Screen
Function Button
123
1
8
9
10
11
12
13
23
4
5
6
7
Hot Shoe
Mono Mic
3.5 mm Auxiliary Jack
Indicator LED
K-Lock Slot
Accessory Port/Tag Charger
Mini USB Charging Port
+ USB Type A Port
HDMI Out
Micro SD Card Slot
Camera Release Button
Power Button
Touchscreen
3/4” Tripod Mounting Head
OpticX Camera
Tripod ToolTripod Adapter Screw
Mini USB Charging Cord
Base
Tag
Armband
The Base and Camera
The Tag
In the Box
1
2
3
1
2
3
4
5
6
7
8
9
10
11
12
13
USER MANUAL 02 SOLOSHOT.COM

Getting Started
1 2
1
3
Note: you must be connected to Wi-Fi to live stream.
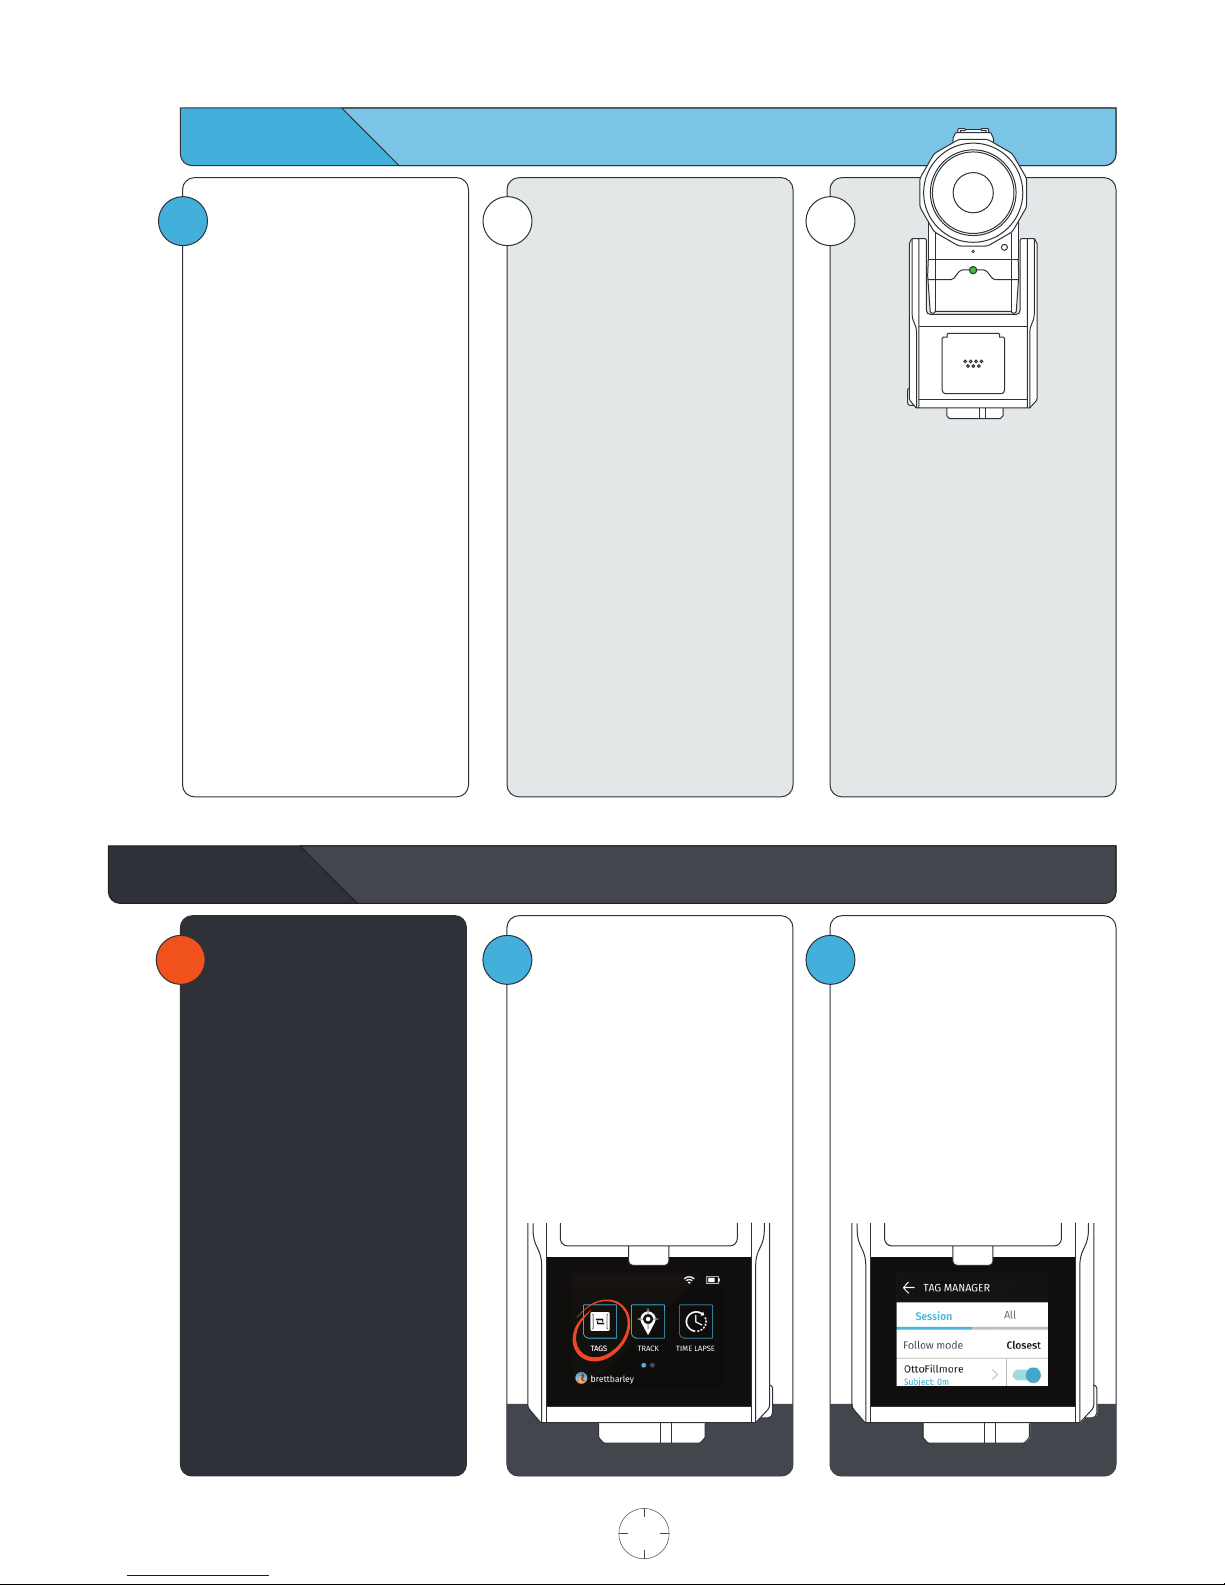
Dock the Tag, with buttons facing
up, into the Accessory Port on
the front of the Base.
Attach the Tag to the Base by
first inserting from the top, as
depicted in the graphic below.
Insert the Mini USB Charging
Cord into a USB outlet adapter
(not included) rated at 1.5A to
2.1A (most tablet charger
adapters) and plug it into the
Base.
For the best results, we
recommend mounting the Base
on a Tripod with a 3/8”
mounting screw.
If you already have a pan/tilt
head on your tripod, please
remove it prior to connecting
your Base.
If your tripod only has a ¼”
screw, use the provided Tripod
Adapter Screw.
Fully charge the Base and Tag
prior to use. This will take about
4 hours. Charging time varies
based on USB wall adapter
rating.
Charging your Base and Tag
Connecting the Base to your Tripod
ONLY Base & Tag contain batteries
and must be recharged.
NOTE
2Hand tighten the Base onto your
tripod until you feel light
resistance from the panning
motor. Avoid excessive manual
panning and tilting of the Base
motors by hand.
4Use the provided Tripod Tool to
finish tightening.
For the best experience, use a
sturdy tripod.
Visit soloshot.com to purchase a
recommended tripod.
NOTE
USER MANUAL 03 SOLOSHOT.COM

2Dock the OpticX Camera to the
Base by guiding it down onto the
tilt drum from above, and then
pushing it forward until it securely
clicks into place.
Preparing your SOLOSHOT3
Insert an approved Micro SD
Card into the side of the
OpticX Camera.
You will hear a click when fully
inserted.
1
Your SD card will be completely
erased. Make sure to save any
content that you don’t want erased!
Visit soloshot.com/sd-card for a
list of compatible SD cards.
IMPORTANT
3To power on Base, press and
hold the POWER button for
3 seconds.
To power on Tag, press the
POWER button.
Update and Registration
1Create a SOLOSHOT account at
soloshot.com/ss3setup.2Power on the Base and follow the
on-screen instructions to update
your device.
IMPORTANT
Your SOLOSHOT3 must be upright
and level upon start-up and
updating software. It’s recommend
it be connected to a tripod during
this process.
3
IMPORTANT
The screen will be blank for up to
one minute during certain steps
of the update process. DO NOT
power down device during
update.
After registering your Tags, you
are prompted to select the
tracking preferences of the Tag.
Continue on next page
USER MANUAL 04 SOLOSHOT.COM
IMPORTANT
A SOLOSHOT account is required
before setup of your SOLOSHOT3.

Update and Registration
Location Setup
iAuto Track
When the Tag is turned on and
within range of the Base, the
Base will automatically track this
Tag.
This is the default setting.
iAsk to Track
When the Tag is turned on and
within range of the Base, the
Tag will need to be toggled on
within the Tag Manager.
Tags that are toggled off will not
be tracked by the Base.
4Finish setup by updating and
registering your Base, Tag(s) and
Camera to your SOLOSHOT
account, created in Step 1.
To ensure the best filming results:
•Level your SOLOSHOT3 using the
bubble level on the Tripod.
•Ensure that both the Base and
Tag always have a clear view of
the sky.
•Do not bring the Tag and/or Base
inside once powered on.
•Do not setup under an overhang,
dense tree canopy, or close to a
building or cliffs.
1Setting up the SOLOSHOT Tripod
Open and set up the Tripod by unlocking the Leg Locks
(a) and extending the telescoping legs until the Tripod is
at the desired height. Lock the Leg Locks. In windy or
otherwise unstable conditions, be sure to widen the leg
stance using the Wide Leg Locks (b).
Tripod Neck Extension:
Extend the Tripod Neck by loosening the Neck Thumb
Screw (c). Tighten Neck Thumb Screw and Leg Locks
when desired height is achieved.
Wide Leg Lock Option:
Use a wider stance if necessary to improve stability or to
account for local topography. For example, in windy or
unstable conditions, or in areas where the Tripod may be
bumped or jostled, you should use a wider stance.
Windy Conditions:
Add a weight to the hook on the bottom of the Tripod
neck and/or widen the leg stance, as outlined above.
Continued from last page
a
c
b
IMPORTANT
USER MANUAL 05 SOLOSHOT.COM

Safety and Security
Home Screen
SOLOSHOT INC IS NOT
RESPONSIBLE FOR THEFT OR
DAMAGE TO YOUR SOLOSHOT3
AND ITS ACCESSORIES.
2Use the k-lock accessory to
secure the Camera to the Base.
Available at soloshot.com.
1Make sure the location you
choose for your SOLOSHOT3 is
safe and secure.
Be smart and creative when
selecting your setup location and
leaving your Base and Camera
unattended.
Do not use SOLOSHOT near high
voltage power lines, radar/radio
jamming equipment, or telecom-
munications towers. To ensure
proper functionality of your
SOLOSHOT, stay at least 500m
(0.3mi) away from these areas.
IMPORTANT
1Tags: Select Tags that you would
like to track from the TAG
MANAGER.
Track: Start/stop tracking, toggle
record on/off, trigger single
photos or bursts, adjust tracking
and camera settings, quickly
manage your Tag(s), and live
stream.
Time Lapse: Capture a series of
photos at preselected intervals.
2Settings: Manage Wi-Fi, format
the SD card, access current
software version and more.
Update: Install the most recent
software updates on the Base,
Tag and/or Camera. When
updates are available, the user
will be notified upon entering
the Update App.
Gallery: Playback your video
and photos on the touchscreen.
[Coming soon]
3Account: Manage your
SOLOSHOT account on the Base.
IMPORTANT
USER MANUAL 06 SOLOSHOT.COM

2
NOTE
Using the Track App
Begin Tracking
1Within the HOME SCREEN, tap
TRACK to enter the Track App. 3
Tap the TRACK button.
If “Ask to Track” was selected when
setting up your Tag or no Tag is
detected, follow the onscreen
instructions.
!
4
3
This is the tracking action sheet,
which allows you to either begin
tracking, or change tracking
settings.
Select TRACK.
The Base will spin for about
one minute as it calibrates the
sensors.
USER MANUAL 07 SOLOSHOT.COM
Choose TRACK MODE
See page 14 for information on
Track Modes.
Tap CONTINUE to begin
calibrating the system.
Before beginning your activity,
we recommend that you walk
back and forth in front of the
Camera a few times in the area
where you will be performing
your activity. This will allow the
Camera’s smart tracking system
to center you in the screen.

1i i
Calibrating
Problem Detected
Calibration may fail due to poor
GPS signal or local magnetic
interference. In this case, follow
the on-screen instructions.
Please be sure to set up your
Base in a location with a clear
view of the sky and away from
sources of magnetic interference.
See page 5, LOCATION SETUP
Successful Calibration
Once calibration is successful,
your Base will automatically
begin tracking the selected
Tag(s).
• The Camera viewfinder appears
on the screen.
• The LED at the front of the BASE
blinks green.
• If every selected Tag indicates
they do not wish to be tracked,
then the Base will be idle.
Green Indicator LED States
LED is highly directional & changes
brightness with distance. If you
can see it, the Base is pointing at
you and you are within range.
Slow Blinking
Base is actively tracking. No
problems detected.
Rapid blinking
Problem detected. Return to the
Base immediately and resolve the
issue via on-screen instructions.
Tag Manager
2
1!REQUIREMENTS
In order for a Tag to be detected
by a Base, it must be:
• Powered on
• Have been docked to the Base
in the past
• Be within the 2,000-ft. tracking
distance
• Have a GPS signal
Select Tags you want to Track or
pair new Tags by docking them
to the accessory port on the front
of the Base.
The TAG MANAGER is accessible
both through the HOME SCREEN
(below) and from the TRACK APP
(See page 9).
USER MANUAL 08 SOLOSHOT.COM

i
iALL: This list shows a history of
every Tag that has ever been
docked onto the Base, even if
they do not meet the pre-requi-
sites.
This allows you to view and
manage your history of Tag,
including the ability to forget
Tags.
SESSION: This list comprises of
Tags that the Base is currently
tracking, meets the pre-requisites
to be tracked, or has been
tracked in the current session.
The list starts out empty until a
Tag meets the pre-requisites.
Tags remain in the list until the
Base has been turned off, but will
remain in the ALL list.
1 2 Always wear the Tag with
button/screen side facing
upward.
3
Wearing the Tag
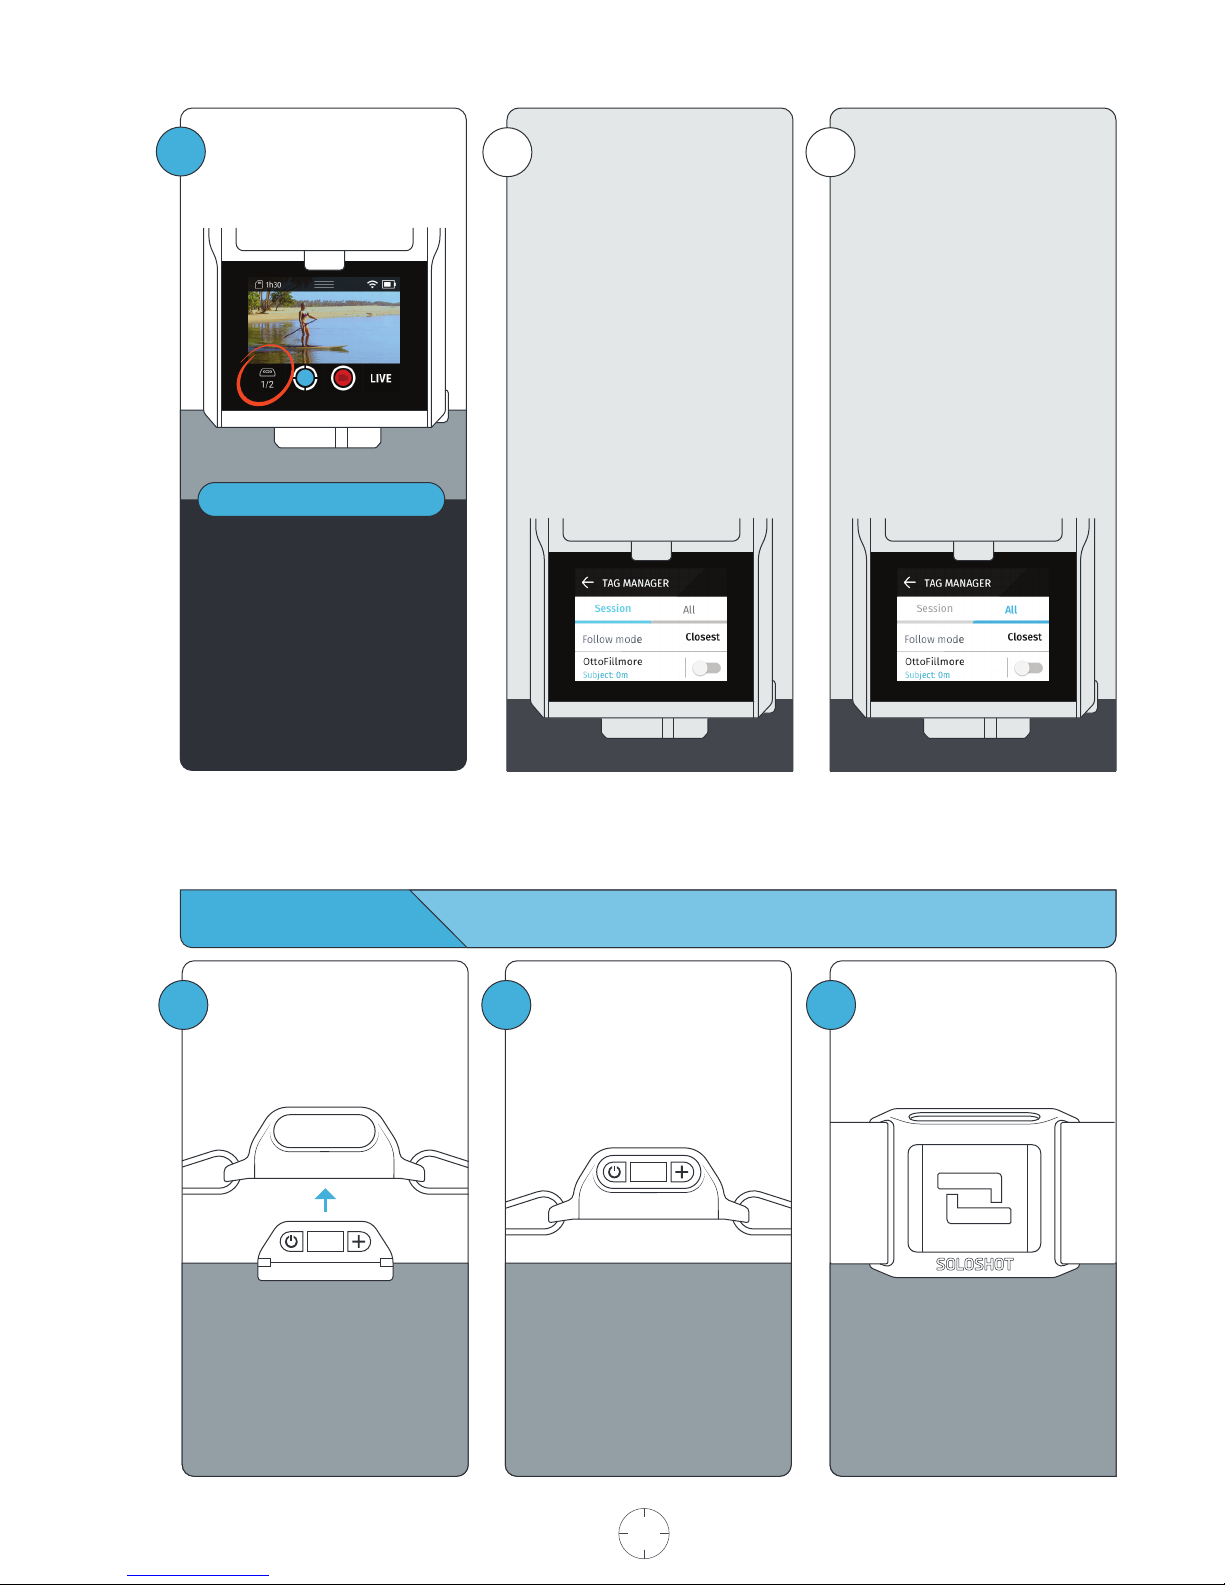
Always wear the Tag with
buttons facing upward.
Snap the Tag into the Armband
Clip with the button side aligned
with the clip window.
You will hear a distinct click
when Tag is in place. Check the
alignment and adjust if
necessary.
USER MANUAL 09 SOLOSHOT.COM
3Tapping the Tag icon will take
you to the Tag Manager.
Below the icon are two numbers.
The numerator shows how many
Tags are currently being tracked in
your session.
The denominator shows how many
Tags are available to track. These are
Tags that are turned on, detected,
and within range of the Base.
NOTE

Using the Viewfinder
Tag Manager
Displays how many Tags are being tracked.
Tap to navigate to the Tag Manager.
Track
Start or stop tracking.
Record
Start or stop recording.
LIVE
Start or stop live streaming.
Status Bar
Displays Wi-Fi strength and battery level.
Pulldown Menu
Access the home screen, Wi-Fi,
camera controls, and settings.
SD Card Indicator
Available SD Card Space and record time
Pulldown Window
SD Card Storage Space
Displays how much recording time or
number of photos remain.
Home
Exits the Track App, ends tracking/recording
and takes you back to the Home Screen.
Wi-Fi
Opens WiFi settings.
Refine
Allows you to manually adjust the framing
of the the subject in the viewfinder.
Settings
Opens the Settings window, allowing
you to change camera mode and
tracking settings.
6
9
8
Using the Tag Screen
Battery Level
Displays the remaining battery level.
Tracking Status
Displays whether the TAG would like
to be tracked.
GPS Status
Displays the status of the TAG’s GPS signal.
Record
Displays if TAG would like to be recorded.
12
1110
5
7
32
1
1
2
3
4
1
2
3
4
5
6
7
8
9
10
11
12
4
23 4
1
USER MANUAL 10 SOLOSHOT.COM
Altri manuali per 3
4
Questo manuale è adatto per i seguenti modelli
3
Indice
Altri manuali Soloshot Accessori per fotocamere