UEC DTT Manuale utente

DIGITAL TERRESTRIAL TERMINAL
USER MANUAL
CONTENTS
Preface 2
Unpacking 2
Safety 3
Remote Control Unit 4
Rear Panel Connections 6
Decoder Connections 7
Hints to Quakity TV system Configuration 7
Set-Up 1: Decoder,TV 8
Set-Up 2: Decoder,TV,VCR 9
Set-Up 3: Decoder,TV,Hi-Fi 10
Set-Up 4: Decoder,TV,VCR,Hi-Fi 11
Front Panel Buttons 12
Front Panel Display 12
Conditional Access 13
Smart Card 13
Inserting The Smart Card 13
Getting Started 14
Switching the Decoder On at the Mains 14
Tuning Your TV 14
Information Plate 15
Reminders 16
Soundtracks 17
Subtitles 17
Teletext 18
Signal Source Selection 18
Electronic Programme Guide 19
Display by Time 19
Display by Channel 20
Theme Search 20
Reminder List 20
Using the Menus 21
Parental Guidance 22
Blocking Options 22
Service Blocking 23
Change PIN 24
Soundtrack Options 25
Mailbox 25
Colours and Transparency 26
Information Display Period 27
Advanced Options 27
Local Time 28
Decoder Upgrade 28
Troubleshooting 29
Specifications 30
Hotlines 31
Notes 32
1

DIGITAL TERRESTRIAL TERMINAL
USER MANUAL
The Digital Terrestrial Terminal introduces you to exciting new technology. This manual
provides information on how to use the decoder and enjoy the benefits of all its features.
The Decoder is menu-driven and is easy to use, even for users unfamiliar with, or
intimidated by modern technology. When you are comfortable with the basic operation
of the DTT, you can move onto the more advanced and complex features.
The manual provides:
Important safety precautions, please study them.
Step-by-step instructions on how to use the Decoder and its
advanced features.
Step-by-step instructions on how to connect to basic sound and TV
systems. Please note that it is beyond the scope of this manual to
include all possible configurations.
A troubleshooting guide to assist you if you have difficulty operating
the DTT correctly, or in the event of technical difficulties.
The operation of the Decoder can be upgraded via the Digital Terrestrial Network, thus
the menus in the manual may differ slightly from those displayed on your television.
This manual, the menus and the features downloaded in this document and the
information contained herein are the subject of copyright and intellectual property rights
under international conventions. All rights are reserved. No part of this document may
be reproduced, stored in a retrieval system or transmitted in any form by any means,
electronic, mechanical or optical, in whole or in part, without the prior written permission
of UEC Technologies (Pty) Ltd., the Manufacturer.
PREFACE
UNPACKING
The following items are included with the Digital Terrestrial Terminal (DTT):
1 x Remote Control Unit (RCU)
2 x AA Size Batteries
1 x RF Flylead
1 x Mains Cable
1 x User Manual (Operating Instructions)
2

DIGITAL TERRESTRIAL TERMINAL
USER MANUAL
SAFETY
This DTT meets/exceeds International Safety Standards. Please read the following
recommended safety precautions carefully.
MAINS SUPPLY
:88 - 288 V AC 50/60 Hz ONLY.
LIQUIDS : K eep liquids away from the Terminal.
CLEANING : Disconnect the Terminal from the Mains. Use a dry cloth to clean
the exterior.
VENTILATION :Do not block ventilation holes. Ensure that free airflow is maintained
around the Terminal. Never stand the terminal on soft furnishings or
on carpet. Do not use or store the Terminal where it is exposed to
direct sunlight, or near a heater. Never stack other electronic equipment
on top of the Terminal.
ATTACHMENTS
:Do not use any attachment that is not recommended by the
manufacturer, as it may cause a hazard/damage the equipment.
SERVICING : Do not attempt to service this product yourself. Any attempt to do
so will invalidate the warranty. Refer all servicing to a qualified
service agent.
LIGHTNING : If the Terminal is installed in an area subject to intense lightning
activity, protection devices for the Terminal mains connector and
modem telephone lines are essential. The individual manufacturers
instructions for safeguarding other equipment, such as TV sets,
Hi-Fi system, etc must also be followed during lightning storms.
EARTHING : The earthing system must comply with local regulations.
3

DIGITAL TERRESTRIAL TERMINAL
USER MANUAL
REMOTE CONTROL UNIT (RCU)
ALT
?
Standby button
Allows you to switch between the current channel and
the last viewed channel
Allows you to access the UHF channel and to switch
between signal sources
Displays the clock
Allows access to soundtrack options
Mutes the Volume
Allows accessto the
Information Plate and to the
Extended Information
i
Allows access to Subtitles and
Teletext
TV Allows access to the various
TV Bouquets available and
switches from a Radio service
to a TV srevice
TV Allows access to the
various Radio/Music
Bouquets available and
switches from a TV
service to a Radio
service
4

5
DIGITAL TERRESTRIAL TERMINAL
USER MANUAL
0
to Numeric Keys used to enter
PIN codes, Channel Numbers
and other numbers
P+
P-
V+
V+
When pressed, advances to the
next channel in the list
When pressed, advances to the
previous channel in the list
Increases the volume level
Decreases the volume level
Is used as an escape key to
escape from the selected
option. Exits from the Menu
Allows access to the Menu.
If pressed while in the Menu,
Exits to normal viewing
Allows access to the Electronic
Programme Guide
OK Used to confirm all selections
made in the Menus and to set
Reminders
Cursor Keys, used for scrolling
through the Menu and list boxes.
and when scrolling through
channels with the Information
Plate displayed
9
EXIT
MENU
TV
GUIDE
DIGITAL TERRESTRIAL TERMINAL
USER MANUAL
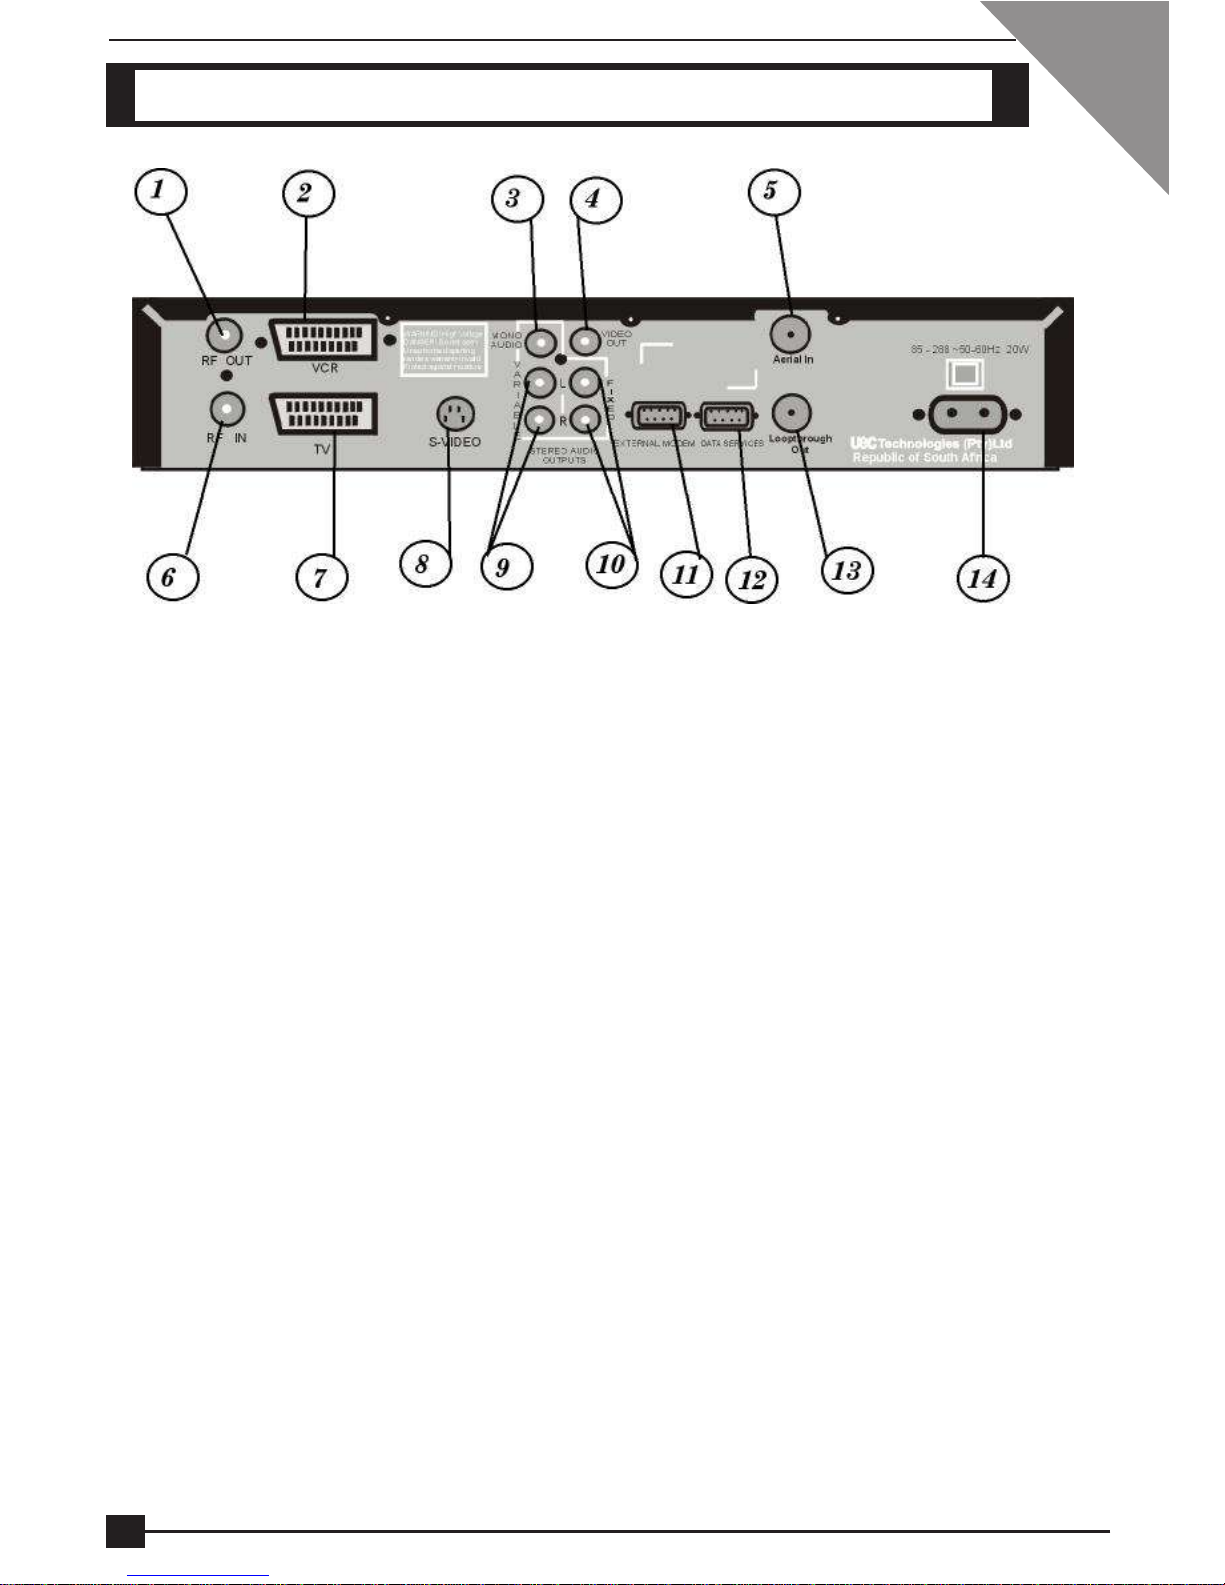
REAR PANEL CONNECTIONS
CONNECTORS
1 To TV/VCR
2 SCART connector to VCR
3 Audio to Mono Amplifier (TV or VCR)
4 Video to Non-SCART input (TV or VCR)
5 Terrestrial Antenna In
6 RF In connector (From VCR)
7 SCART connector to TV or AUX input
8 To S-Video connector on the TV
9 Variable Left and Right Audio to Hi-Fi or TV
10 For Stereo Fixed Audio recording (Left and Right)
11 To External Modem
12 Communication Port
13 Loopthough to RF In (6)
14 Mains Input
6

DIGITAL TERRESTRIAL TERMINAL
USER MANUAL
DECODER CONNECTIONS
There are several ways of connecting the DTT to your existing entertainment system.
The following more common examples enable you to view the available Terrestrial
services, record and playback on your VCR and listen to CD quality stereo sound on
your Hi-Fi.
Consult your local installer for assistance in setting up an audio/video configuration
best suited to your requirements.
HINTS FOR QUALITY TV SYSTEM CONFIGURATIONS
1 Where possible, connect cables via audio/video outputs/inputs (SCART or
RCA) rather than RF connectors.
2 Use an appropriate, correctly installed Terrestrial system.
3 Ensure that the system is properly earthed and protected against lightning.
4 Use high quality stereo TV and Hi-Fi equipment.
5 Use high quality screened cables.
7
DIGITAL TERRESTRIAL TERMINAL
USER MANUAL
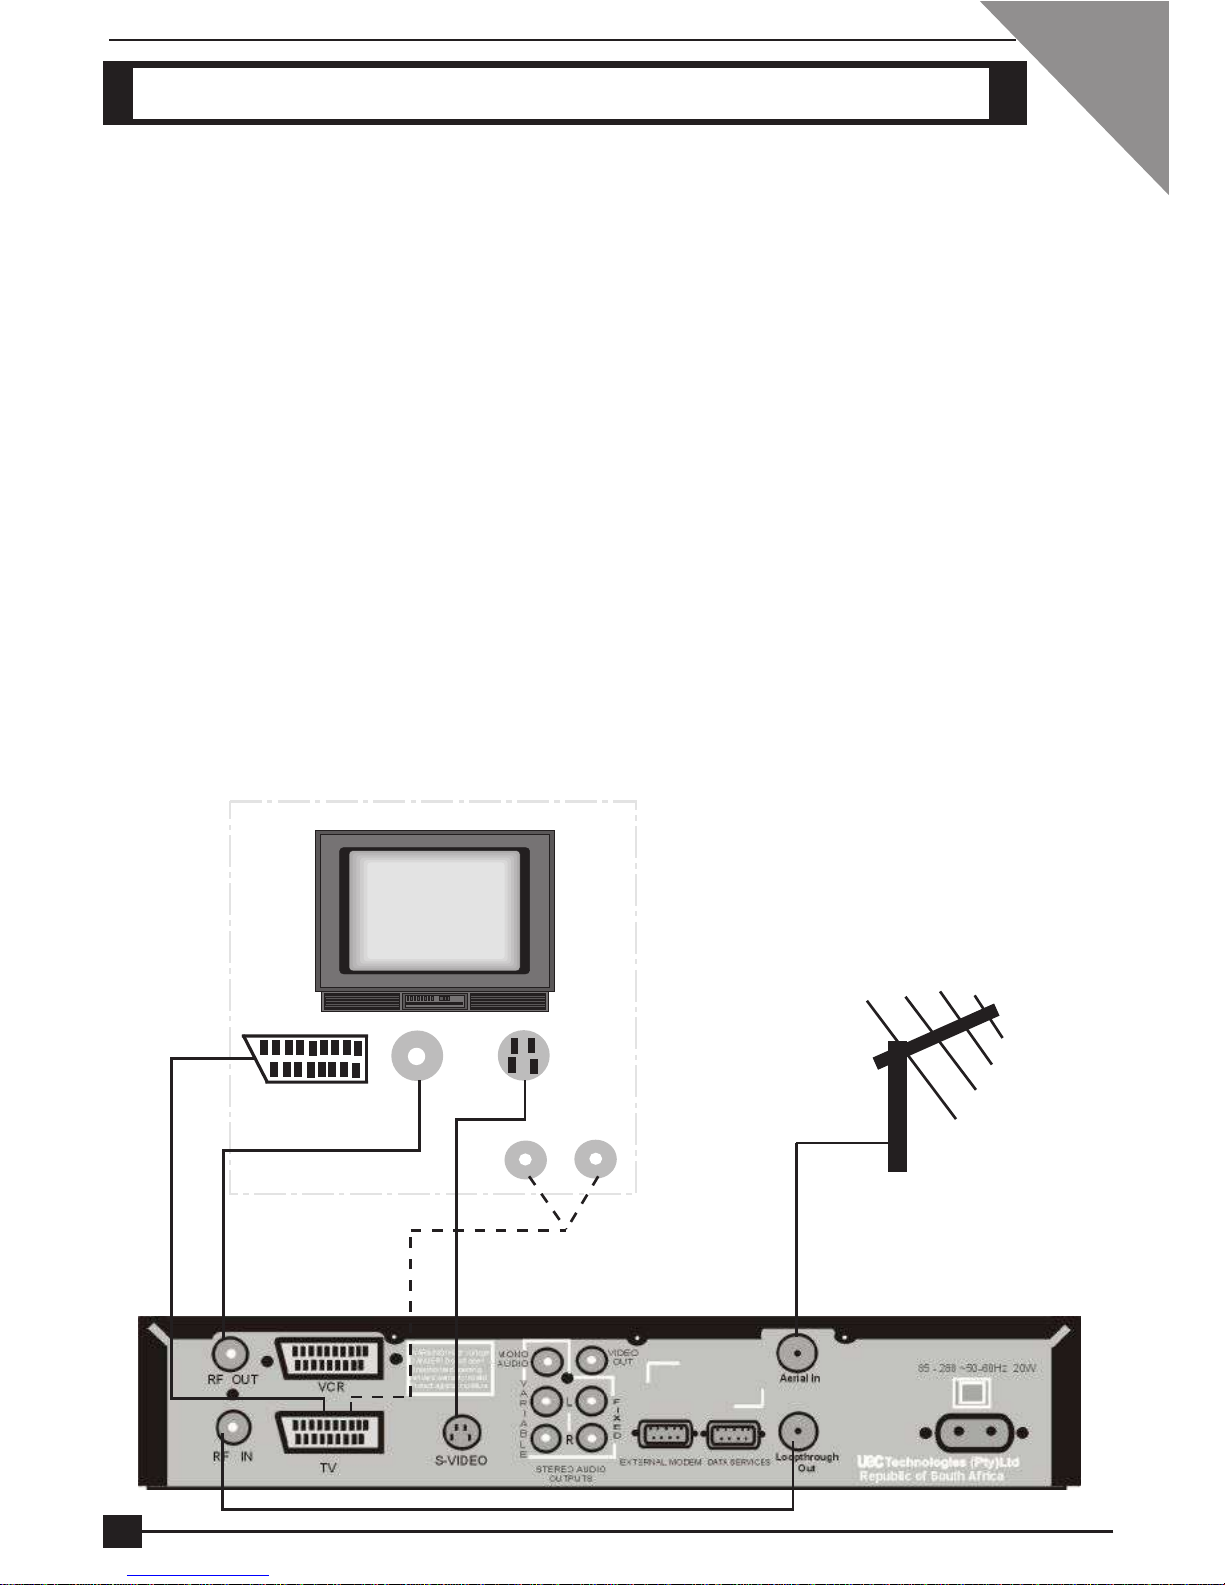
NOTE: In the event that only one DTT but more than one TV set is used
domestically, the same channel will be viewed on all sets.
1 Connect the cable from the antenna to the Aerial In socket on the DTT. Using the
RF flylead supplied, connect the Loopthrough Out socket on the Decoder to the RF
In socket on the Decoder. This connection allows you to have access to the normal
analogue Terrestrial channels. (Refer to [1] on illustration below)
2 Using a SCART-to-SCART cable (not supplied), connect the TV SCART on the
Terminal to the SCART connector on your TV. (SCART connections only).(Refer
to [2] on illustration below)
3 If your TV set does not have a SCART connector, then use a RF flylead to
connect the RF Out socket of the Terminal to the RF In socket of your TV.(Refer
to [3] on illustration below)
4 If your TV set has a S-Video connector, connect to the S-Video connector on the
Terminal. Also connect Mono Audio on the Terminal to Audio In on the TV. (Refer
to [4] on illustration below)
5If your TV set does not have a SCART connector, you could use a SCART-to-RCA
cable and connect the SCART connector to the TV SCART connector on the decoder
and the RCA connectors to the RCA connectors on the TV. (Refer to [5] on
illustration below.)
TV
SCART to SCART
AV Connections
A
V
RF In
S-Video
[1]
[1]
[2] [3]
[4]
[5]
SETUP1: DTT, TV
8
DIGITAL TERRESTRIAL TERMINAL
USER MANUAL
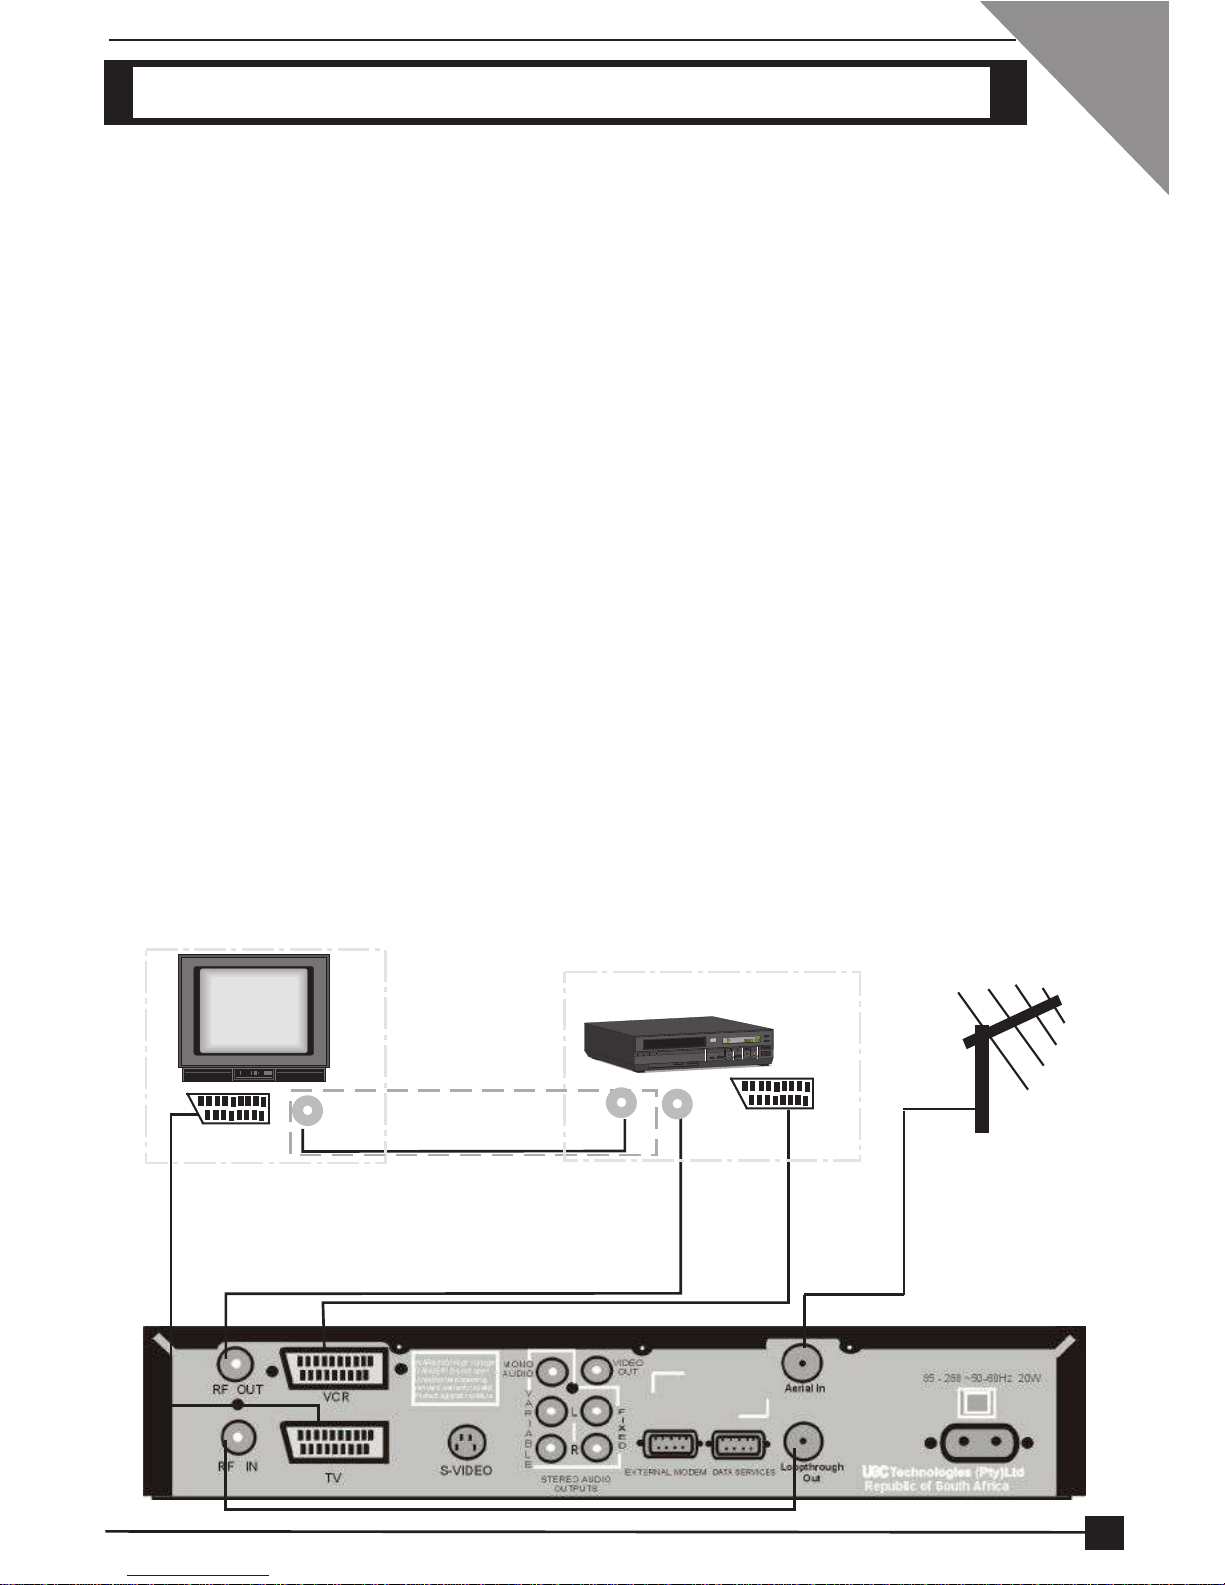
SETUP2: DTT, TV, VCR
NOTE: It is recommended that you remove the Mains supply to the Terminal
before connecting or disconnecting to or from the Digital Terrestrial
Network.
1 Connect the Antenna connector to the Aerial In socket of the Terminal. Connect
the Loopthrough Out socket of the Terminal to the RF In socket of the Terminal,
using the RF flylead supplied. (Refer to [1] on illustration below)
2 Refer to Setup1. Make those connections first and then proceed to step 3.
3Using a RF flylead, connect the RF Out socket of the Terminal to the RF In socket
on the VCR. (Refer to [3] on illustration below)
4 Using the RF flylead supplied with the VCR, connect the RF Out socket of the
VCR to RF In socket on the TV. (Refer to [4] on illustration below)
5 Using another SCART cable, connect the VCR SCART on the decoder to the
SCART connector on the VCR. (Refer to [5] on illustration below)
6 Switch Power to On.
7Set the TV and VCR Scart Source and the TV and VCR Scart Video Output using
the TV installation option.
TV
Scart to Scart RF In
Connections in box used
if no Scart connectors
VCR
RF Out RF In Scart to Scart
[3]
[4]
[5]
[1]
[1] 9

DIGITAL TERRESTRIAL TERMINAL
USER MANUAL
SETUP3: DTT, TV, Hi-Fi
NOTE: Do not connect or disconnect the Terminal to or from the Terrestrial
Network while connected to the Mains supply.
1 Connect the Antenna to the Aerial In socket on the Terminal. Connect a RF
flylead (supplied) from the Loopthrough Out socket on the Terminal to the RF
In socket on the Terminal. (Refer to [1] on illustration below)
2 Refer to Set-Up1. Make those connections first and then proceed to step 3.
3 Connect a flylead between the variable stereo sound outputs on the Terminal
and the audio inputs on the Hi-Fi. (Refer to [3] on illustration below)
TV
Hi-Fi
SCART to SCART RF In
Audio
Input
LR
[1]
[1]
[3] [3]
10
Indice


