ViseeO CARK 11 Manuale utente

CARK 11
B
Bl
lu
ue
et
to
oo
ot
th
h
R
Re
ec
ce
ei
iv
ve
er
r
U
Us
se
er
r’
’s
s
M
Ma
an
nu
ua
al
l


1
Preface
This publication, including all photographs, illustrations and software, is protected
under international copyright laws, with all rights reserved. Neither this manual,
nor any of the material contained herein, may be reproduced without the express
written consent of the manufacturer.
Version 1.0, November 2005
Trademarks
Other product names mentioned herein are used for identification purposes only
and may be trademarks and/or registered trademarks of their respective
companies.
Limitation of Liability
While reasonable efforts have been made to ensure the accuracy of this manual,
the manufacturer and distributor assume no liability resulting from errors or
omissions in this manual, or from the use of the information contained herein.

Preface
2
Table of Contents
Introduction -------------------------------------------------------------------------- 3
Identifying components ----------------------------------------------------------- 3
Optional items-------------------------------------------------------------------------- 3
Installing the CARK 11 ----------------------------------------------------------- 4
Preparing the wireless remote control ----------------------------------------- 5
Attaching the remote control to the steering wheel ------------------------------- 5
Replacing the battery------------------------------------------------------------------ 8
Using the remote controls-------------------------------------------------------- 9
CARK 11 and control module functions ------------------------------------------ 10
Pairing phones ------------------------------------------------------------------------ 11
Operation with multiple paired phones -------------------------------------------- 12
Resetting the CARK 11-------------------------------------------------------------- 12
Transferring calls --------------------------------------------------------------------- 12
Notes on using voice recognition--------------------------------------------------- 13
Upgrading firmware (optional) ------------------------------------------------13
Troubleshooting ------------------------------------------------------------------14

3
Introduction
This CARK 11 is designed for a trouble-free installation in the Cark91. When
installed, you can operate your phone without taking it from your pocket.
The CARK 11 can only operate with one phone at a time, but it can be paired
with up to four phones. This multi-pairing function means you can switch
phones without resetting the CARK 11. (Refer to “Operation with multiple
paired phones” on page 12.)
Identifying components
Unpack the CARK 11 package and ensure the following items are included.
Bluetooth receiver
Optional items
Control module
(23A battery installed)
Module bracket
(with two hex bolts
and key)
Rubber clasp
If any item is missing or damaged, contact your dealer.

Bluetooth Car Kit User Manual
4
Installing the CARK 11
The power button on the CARK 11 should be pushed up to the off position
before installing it in the Cark91 cradle. Install the CARK 11 in the Cark91
cradle as shown here.
1. Align the connector on the CARK 11 with the connector on the
Cark91 cradle.
2. Push the CARK 11 down to connect it to the cradle.
OFF
ON
Power button

Preparing the wireless remote control
5
Preparing the wireless remote control
The wireless remote control is designed to attach to the inside of the steering
wheel on the left or right side.
Note: The wireless remote control is optional and may not be included in your
package.
Attaching the remote control to the steering wheel
Refer to the following to attach the wireless remote control to the car steering
wheel:
1. Attach the rubber clasp to the two notches on one side of the bracket
base.
2. Pull tightly on the rubber clasp and position the bracket base on the
inside of the steering wheel.

Bluetooth Car Kit User Manual
6
3. Wrap the rubber clasp tightly around the steering wheel and secure it
on the other two notches on the bracket base.
4. Cut off the excess rubber as close to the bracket base as you can.

Preparing the wireless remote control
7
5. Attach the bracket cover with the two supplied hex bolts.
6. Slide the remote control into the module bracket as shown.
(To remove the remote control, push the release button to the right and
remove the remote control.)
Release button
Bluetooth Car Kit User Manual
8
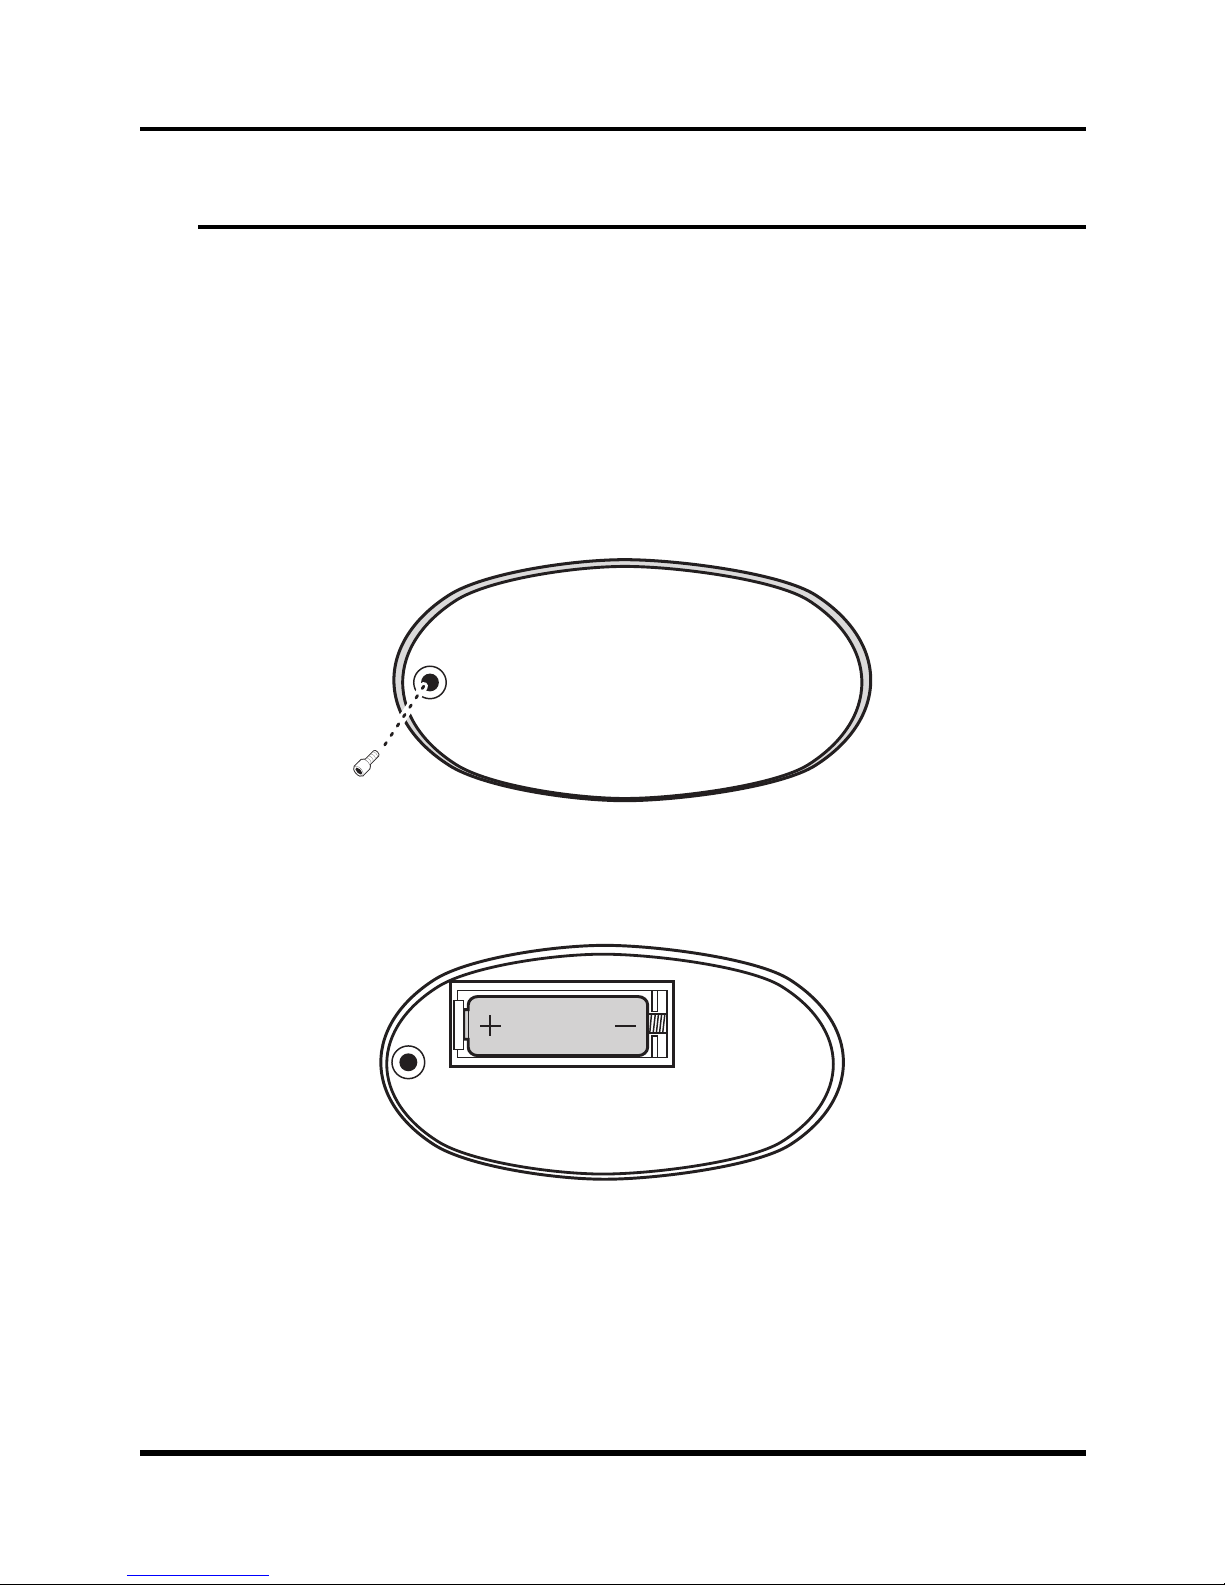
Replacing the battery
If the status LED on the remote control does not light, the battery needs to be
replaced with a 23A battery. Refer to the following to replace the battery.
1. Push the release button on the module bracket to the right and remove
the remote control.
2. Remove the screw from the rear of the remote control and remove the
rear cover.
3. Remove the old battery and insert a new one with the correct polarity
as shown below.
4. Replace the rear cover.
Indice


