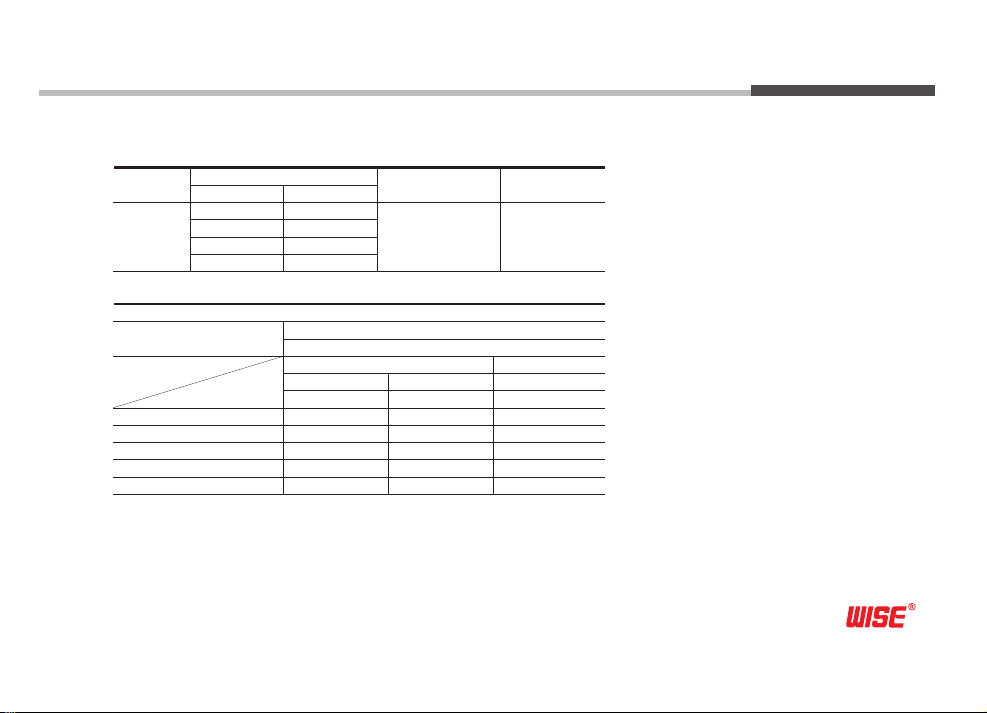
Wise P980 Series Manuale utente

P980 Series
Pressure Indicating Switch
Manual

01. INTRODUCTION
02. APPLICATION
03. FEATURES
04. SPECIFICATION AND STANDARDS
05. STRUCTURE AND FUNCTION
06. OPERATING PRINCIPLE
07. CONTACT POINT WORKING TYPE AND CONNECTION
08. HOW TO SET
09. USE
10. INSTALLATION
11. WIRING
12. GROUND
13. MAINTENANCE AND PRECAUTIONS
04
04
04
04
07
08
09
16
17
17
17
18
18
02

■WARNING
1.
2.
3.
4.
5.
6.
7.
8.
9.
10.
11.
12.
13.
Do not impose excessive pressure beyond the allowance.
Do not use corrosive measuring fluid.
This may cause pressure measuring element damage or rupture, resulting in measurung spill, eventually human injury or surrounding destruction.
Avoid excessive load, vibration, or shock. The glass tube may be broken.
This may cause product damage or rupture to spill measuring fluid, resulting in human injury or surrounding destruction.
Keep the working temperature range.(* Ambient : -40 ~ 65℃, * Fluid : Max. 100℃)
In excess of the working temperature range, the pressure switch may be broken or damaged to destroy the surroundings.
Use the device within the rated in/out value as written in the specification. Otherwise, the device may fall in trouble.
Both ends of a cable shall be the solderless terminal coated with an insulator.
The cable gland shall have the specified explosionproof grade or equivalent.
As for wiring, follow the internal wiring rules and the electric facility technology standard.
To detach the pressure switch, be sure to close the valve to block the measuring fluid. Measuring fluid spillage may destroy the surroundings.
When you are using oxygen for the measuring fluid, rely on the Use No Oil manometer.
Any oil reside in an ordinary product may react with oxygen, causing fire or explosion.
During site installation, be sure to follow this manual.
Do not modify the product by all means. Be sure to consult with us prior to repair.
Before you open the product case for installation, be sure to shut off the power behorehand.
Wiring while current is flowing may cause electric shock. Be sure to shut off the power beforehand.
For the right use and safety of this product, please read through this manual prior to use. Handling error may cause device trip, injury, or disaster.
03
Instructions for Proper and Safe Operation

1)
2)
3)
4)
5)
The pressure switch is the most suitable for simultaneous use of pressure indication and switching.
Since the measuring element is separate for indication and contact, the indication is correct after mounting the switch.
It can be used for explosionproof or hazardous area.
In the case of micro switch type, the indication scale and setting scale are installed separately, so the setting is very easy.
In the case of the micro switch type, stable opening and closing operation can be achieved by SNAP ACTION.
1)
2)
3)
4)
5)
6)
: 100 mm
: ±1.5% of Full Scale
: ±3.0% of Full Scale (Micro Switch Type)
: ±1.5% of Full Scale
: Stainless Steel (316SS)
: ¼", ⅜", ½" PT, NPT & PF
: -20~65 °C
: 1 X SPDT or 2 X SPDT (Independent Operation)
Indicator
Accuracy
Indication Range
Alarm Setting
Repeatability
Materials of Wetted Part
Connection Type
Ambient
No. of Contact Points
This product is a pressure-resistant explosion-proof contact pressure gauge with a built-in indicator and micro switch or inductive contact switch.
Before you use this product, please read through this manual for correct use of each device.
1. Introduction
On reaching a set pressure, this product can be used for process control, abnormality notice, or warning on the basis of the On/Off signal.
In addition, due to the pressure resistant and explosionproof structure, it can be installed in explosionproof areas.
2. Application
4. Specification and Standards
3. Features
04

7) Electrical Properties
* Micro Contact Type
05
Withstand Voltage Insulation Resistance
Rated Voltage
Resistance Load
SIZE
100 mm
Inductive Load
125V AC 5A 100MΩor
more on 500VDC
(Between Each Terminal
and Case)
125V DC 0.4A
250V AC 3A
30V DC 4A
125V AC 3A
125V DC 0.5A
250V AC 2A
1500V AC, 50/60Hz
One Minute
(Between Each Terminal
and Case)
30V DC 3A
* Electrical Contact Type
Recommended Contact Ratings with Ohmic and Inductive Load
Voltage (DIN IEC 38) DC / AC Electrical Contacts Type Pressure Gauge
Dry Gauge
Ohmic Load Inductive Load
COSØ > 0.7
DC
mA mA mAV
100 120 65220 / 230
200 240 130110 / 110
300 450 20048 / 48
400 600 25024 / 24
AC

8) Measuring Pressure Range and Folded Terminal Gap
06
ADJUSTABLE SETTING RANGE
DEAD BAND OVER RANGE
mmH
2
O (bar)
ONE SPDT
SET POINT
TWO SPDT
SET POINT PROOF RANGE
bar
-1
1
1.6
2
2.5
3
4
6
10
-1~1
-1~1.6
-1~2
-1~2.5
-1~3
-1~4
-1~5
-1~6
-1~9
-1~10
-100
100
160
200
250
300
400
600
Within 5 % of
Adjustable Range
Within 10 % of
Adjustable Range
150 % of
Adjustable Range
1000
-100~100
-100~160
-100~200
-100~250
-100~300
-100~400
-100~500
-100~600
-100~900
-100~1000
-100~1.5 MPa
-100~2 MPa
-100~2.5 MPa
kPa
-1~15
-1~20
-1~25

1) 100 mm Type Contact Part Pressure Indicator
P981 MICRO CONTACT TYPE P982 ELECTRICAL CONTACT TYPE
07
5. Structure and Function
12 4
3
5
6
7
8
9
10
11
12
14
15
16
17
1918
9
14
15
12 4
3
5
6
7
8
11
13
16
17
DescriptionNo.
CASE1
COVER2
SAFETY GLASS3
O-RING5
MOVEMENT6
ONE SPDT : PLUG, TWO SPDT : ADJUST CONNECTOR19
STOPER4
DescriptionNo.
BOURDON TUBE7
SHANK8
POINTER9
DescriptionNo.
ELECTRICAL SWITCH13
SCALE PLATE14
CABLE GLAND15
ADJUST POINTER10
BOLT11
MICRO SWITCH12
ORIFICE16
LOCK17
ADJUST CONNECTOR18

6. Operating Principle
08
1. Pull Rod
2. Pull Rod Control Point
3. Toothed Segment
4. Segment Opening
5. Spiral Spring
6. Pointer
When pressure is applied to the Bourdon Tube, it extends vertically.
This vertical movement of Bourdon Tube is delivered to the Movement,
and the Movement changes this vertical movement.
Movement is consist of lever and gear, and its main role is converting
vertical movement into a rotating motion.
Generally, the vertical movement of Bourdon Tube ranges from 3~4mm,
and its principle is to point currently applied pressure by using a turn
angle 270°
Therefore, Bourdon Tube and Movement are the most important,
and these parts must be well assembled in the pressure gauge because
these parts leads to precise machining accurracy.
1
2
4
4
5
6

1) Upper Limit Contact Type (HIGH ALARM)
There is one contact point to turn the circuit ON if the pressure is above the setting or OFF if it is below the setting.
* Micro Contact Type
7. Contact Point Working Type and Connection
09
OFF
0
SET POINT Max. PRESSURE
CONNECTION BOX MICRO SWITCH
ON
1
2
CONNECTION TERMINAL
,
1 2
,
1 2 4
3
4
5
6
* Electrical Contact Type
OFF
0
SET POINT Max. PRESSURE
CONNECTION BOX ELECTRIC CONTACT
HIGH
COMMON
GROUND
ON
1
2
CONNECTION TERMINAL GROUNDING
3
1
2
4
4
5
6

2) Lower Limit Contact Type (LOW ALARM)
There is one contact point to turn the circuit ON if the pressure is below the setting or OFF if it is above the setting.
10
* Micro Contact Type
ON
0
SET POINT Max. PRESSURE
CONNECTION BOX MICRO SWITCH
OFF
1
2
CONNECTION TERMINAL
3
4
5
6
* Electrical Contact Type
OFF
0
SET POINT Max. PRESSURE
CONNECTION BOX ELECTRIC CONTACT
HIGH
COMMON
GROUND
ON
1
2
CONNECTION TERMINAL GROUNDING
3
1
2
4
4
5
6
,
2 3
,
1 2 4
Questo manuale è adatto per i seguenti modelli
2
Indice
Altri manuali Wise Interruttore


