
Xterra 1640755US Manuale utente

Retain For Future Reference
Owner’s Manual
Model No.
1640755US
- Assembly
- Operation
- Adjustments
- Parts
- Warranty
CAUTION:
Read and
understand this
manual before
operating unit

CUSTOMER SERVICE 1-888-707-1880 ©2012
1
TABLE OF CONTENTS
Important Safety Instructions…………………………………………………………….. 2
Important Electrical Information………………………………………………………….. 4
Assembly instructions…………….……………………………………………………….. 6
Operation of Your Treadmill…………………………………….………………..……….11
Folding Instructions ………………………………………………………………………..18
Part list ………………………………………………………………………………………19
Parts diagram ………………………………………………………………………………22
General Maintenance.……………….………………………………………….…………24
Manufacturer’s Limited Warranty…………………………………………………………28
CUSTOMER SERVICE 1-888-707-1880 ©2012
2
IMPORTANT SAFETY INFORMATION
THIS UNIT IS INTENDED FOR HOUSEHOLD USE ONLY
READ ALL INSTRUCTIONS BEFORE USING THIS TREADMILL
▲CAUTION: Before starting any exercise program, it is recommended that you consult your
physician.
▲WARNING: Connect this unit to a properly grounded outlet only.
▲DANGER: To reduce the risk of electric shock, always unplug the treadmill from the
electrical outlet immediately after using and before cleaning.
WARNING
To reduce the risk of burns, fire, electric shock, or injury to persons:
1. Use 120 volt a.c. household current on a dedicated circuit.
Grounding Instructions
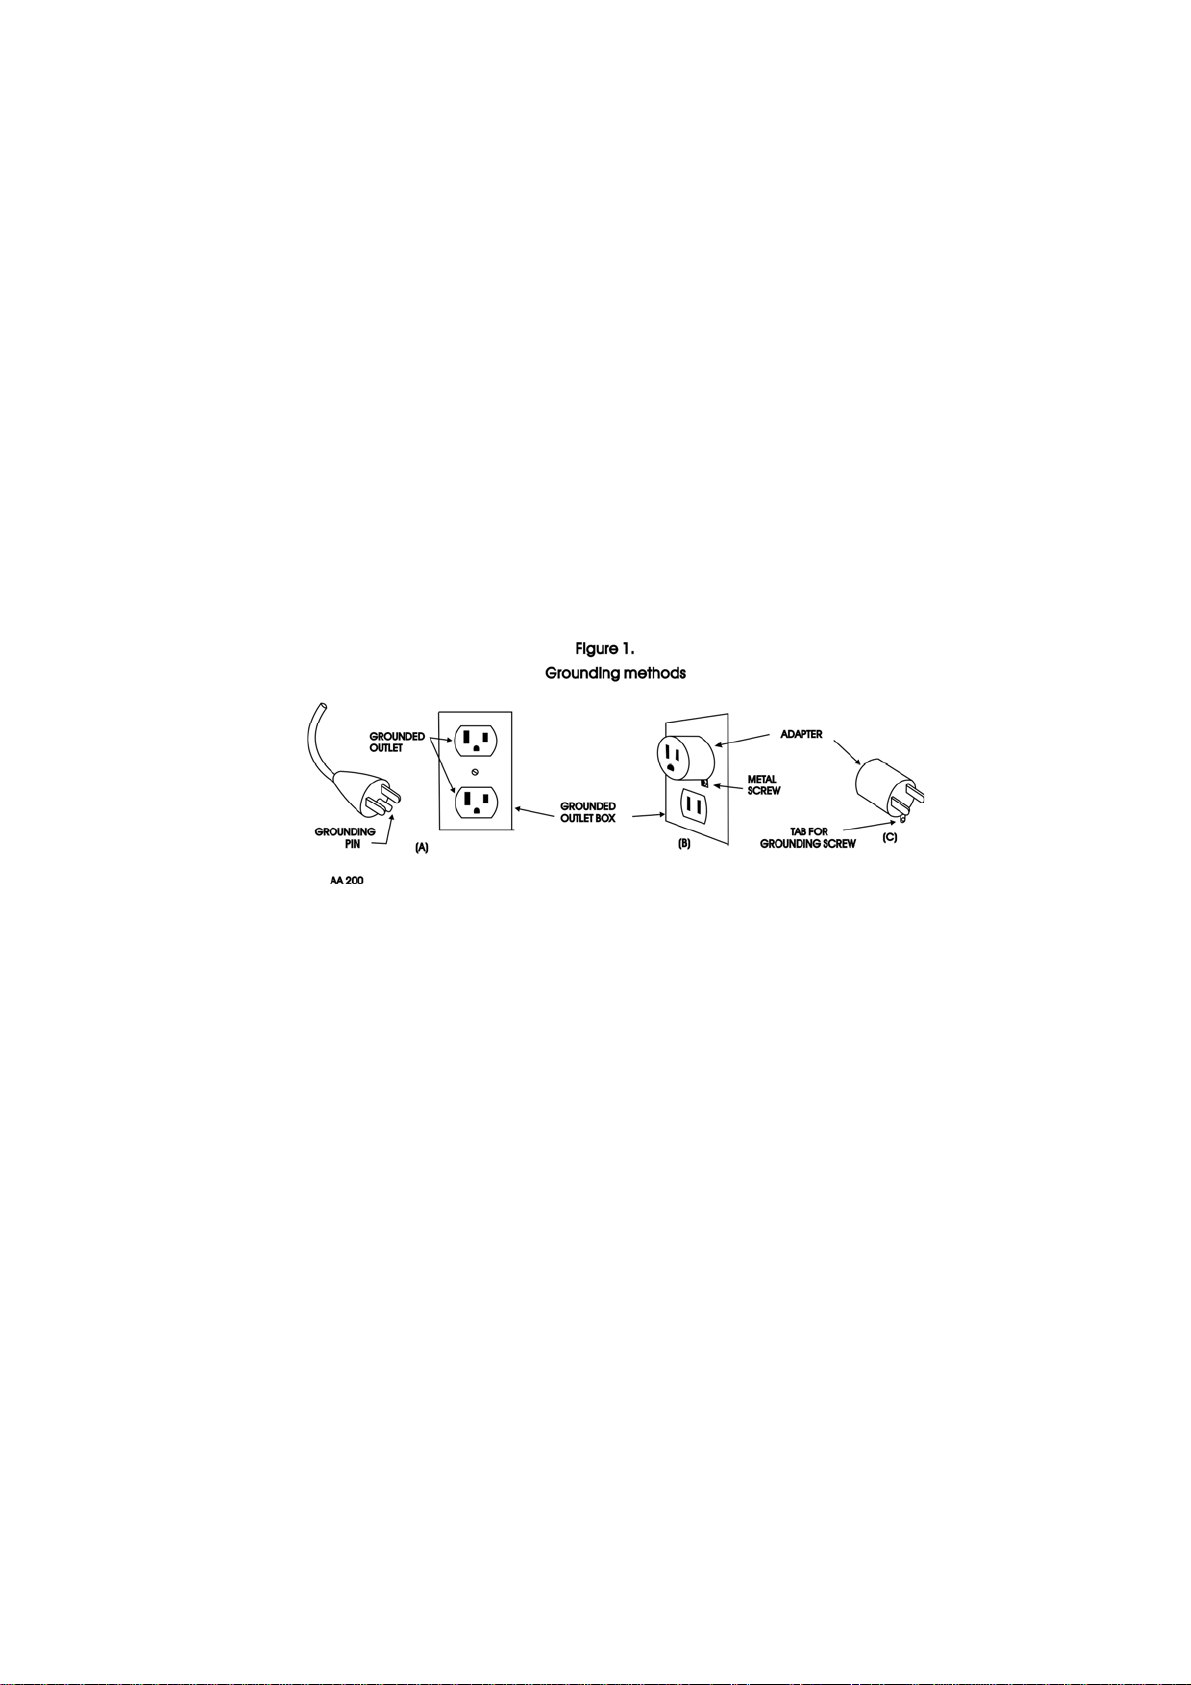
This product must be grounded. If it should malfunction or breakdown, grounding provides a path of least
resistance for electric current to reduce the risk of electric shock. This product is equipped with a cord having
an equipment-grounding conductor and a grounding plug. The plug must be plugged into an appropriate outlet
that is properly installed and grounded in accordance with all local codes and ordinances. See diagram below
for grounding methods.
2. It is the responsibility of the owner to ensure that all users of this treadmill are adequately informed of all
warnings and precautions.
3. The use of an extension cord with this product is not recommended. If an extension cord is needed,
use a short (less than 10 feet) heavy gauge (14 gauge or better) extension cord with a three prong
(grounded) plug and receptacle.
4. Never leave the treadmill unattended when plugged in. Remove the safety key and unplug the unit from
the outlet when not in use and before removing or replacing parts.
5. Never operate the treadmill if it has a damaged cord or plug, if it is not working properly, if it has been
dropped, damaged, or exposed to water. Never move the treadmill belt while the power is turned off.
6. Do not pull the treadmill by the power supply cord or use cord as a handle. Keep cord away from
heated surfaces and open flames.
7. Fitness equipment must always be installed and used on a flat surface. Do not use outdoors or near
water. Do not place the unit on a loose rug or uneven surface. It is recommended to use an equipment
mat to prevent the unit from moving while it is being used, which could possibly scratch or damage the
surface of your floor. It is recommended to have a minimum of 3 metres safe clearance on all sides of
the treadmill while in use.
8. Keep the treadmill indoors, away from moisture and dust. Do not put the treadmill in a garage, covered
patio or near water.
9. Do not operate the treadmill where aerosol products are used or where oxygen is being administered.
10. Read, understand and test the emergency stop procedure before using the treadmill).(see page5)
11. Do not insert any objects into any openings.
12. Inspect and properly tighten all parts of the treadmill regularly.
13. Keep children and pets away from this equipment at all times while exercising.
14. Handicapped individuals should have medical approval and close supervision when using this treadmill.
15. Do not place hands or feet under the treadmill. Always keep hands and legs off of the treadmill when
others are using it.

CUSTOMER SERVICE 1-888-707-1880 ©2012
3
16. Never turn on treadmill while standing on treadbelt. Always hold the handrails while using the treadmill.
Always return the treadmill to the slowest speed to provide for safe dismount and low speed restart.
17. To disconnect, turn all controls to the off position, then remove plug from outlet.
18. Do not attempt to raise, lower or move the treadmill until it is properly assembled. See assembly on page
6 and to fold and move the treadmill on page 18. Care must be taken when lifting or moving the
equipment, so as not to injure your back. Always use proper lifting techniques.
19. Use the treadmill only for its intended use as described in this manual. Do not use any attachments that
are not recommended by the manufacturer.
20. User weight should not exceed 350 (159kg).
21. Never allow more than one person on the treadmill at once.
22. Warm up 5 to 10 minutes before each workout and cool down 5 to 10 minutes afterward. This allows
your heart rate to gradually increase and decrease and will help prevent straining muscles.
23. Never hold your breath while exercising. Breathing should remain at a normal rate in conjunction with
the level of exercise being performed.
24. Start your program slowly and very gradually increase your speed and distance.
25. Always wear suitable clothing and footwear while exercising. Do not wear loose fitting clothing that
could become entangled with the moving parts of your treadmill. Do not walk or jog barefoot, in
stocking feet or loose fitting shoes or slippers.
▲WARNING: Before beginning any exercise program consult your physician. This is especially important for
individuals over the age of 35 or persons with pre-existing health problems. Read all instructions before using
any fitness equipment. We assume no responsibility from personal injury or property damage sustained by or
through the use of this product.
SAVE THESE INSTRUCTIONS
CUSTOMER SERVICE 1-888-707-1880 ©2012
4
WARNING!
●NEVER use a ground fault circuit interrupt (GFCI) wall outlet with this treadmill.
Route the power cord away from any moving part of the treadmill including the elevation
mechanism and transport wheels.
●NEVER remove any cover without first disconnecting AC power.
●If voltage varies by ten percent (10%) or more, the performance of your treadmill may
be affected. Such conditions are not covered under your warranty. If you suspect
the voltage is low, contact your local power company or a licensed electrician for proper
testing. See Diagnosis Guide, page 27.
●NEVER expose this treadmill to rain or moisture. This product is NOT designed for
use outdoors, near a pool or spa, or in any other high humidity environment.
This product must be grounded. If the treadmill should malfunction or breakdown,
grounding provides a path of least resistance for electric current, reducing the risk of
electric shock. This product is equipped with a cord having an equipment-grounding plug.
The plug must be plugged into an appropriate outlet that is properly installed and
grounded in accordance with all local codes and ordinances.
DANGER - Improper connection of the equipment-grounding conductor can result
in a risk of electric shock. Check with a qualified electrician or serviceman if you
are in doubt as to whether the product is properly grounded. Do not modify the
plug provided with the product if it will not fit the outlet, have a proper outlet
installed by a qualified electrician.
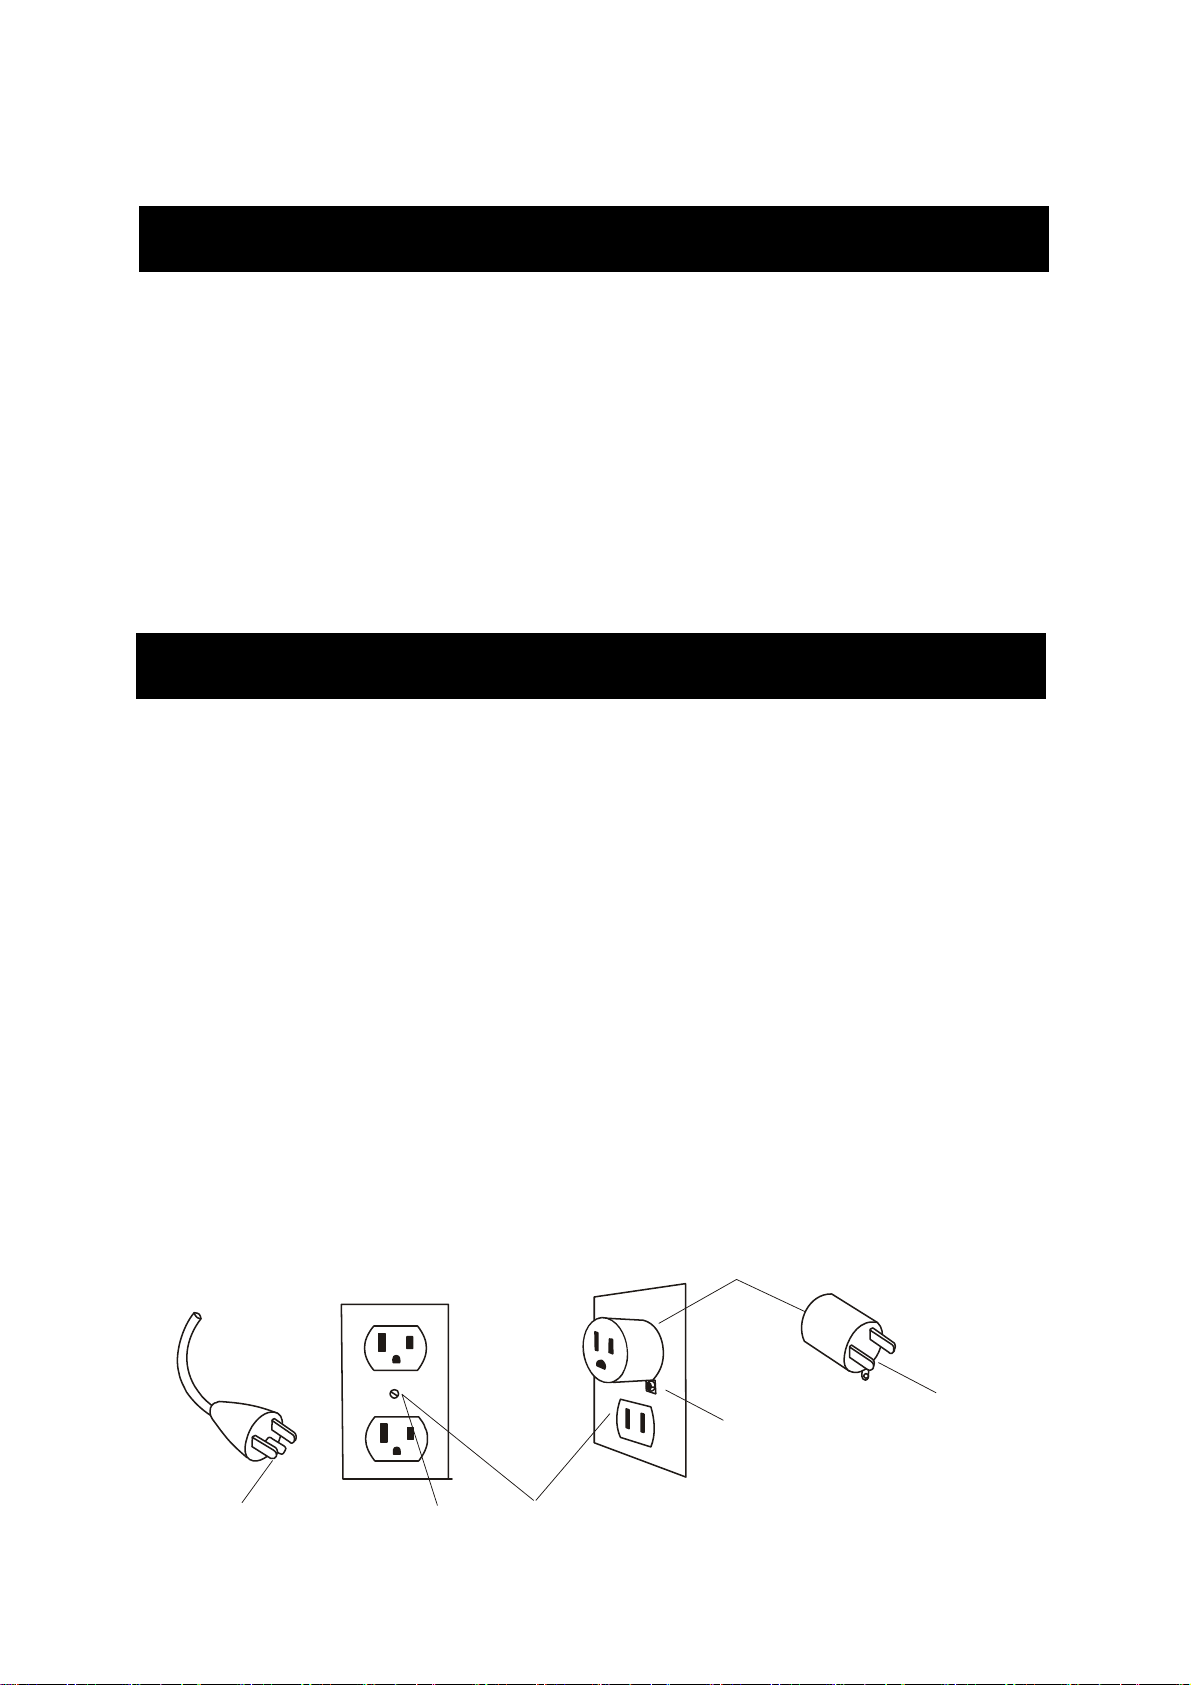
This product is for use on a nominal 120-volt circuit, and has a grounding plug that looks
like the plug illustrated below. A temporary adapter that looks like the adapter illustrated
below may be used to connect this plug to a 2-pole receptacle as shown below if a
properly grounded outlet is not available. The temporary adapter should be used only
until a properly grounded outlet (below) can be installed by a qualified electrician. The
green colored rigid ear-lug, or the like, extending from the adapter, must be connected to
a permanent ground such as a properly grounded outlet box cover. Whenever the
adapter is used, it must be held in place by a metal screw.
Important Electrical Information
Grounding Instructions
Grounded Outlet
Grounding Pin Grounded Outlet Box
Metal Screw
Adapter
Tab of
Grounding
Screw

CUSTOMER SERVICE 1-888-707-1880 ©2012
5
●NEVER operate this treadmill without reading and completely understanding the
results of any operational change you request from the computer.
●Understand that changes in speed and incline do not occur immediately. Set your
desired speed on the computer console and release the adjustment key. The computer
will obey the command gradually.
●NEVER use your treadmill during an electrical storm. Surges may occur in your
household power supply that could damage treadmill components.
●Use caution while participating in other activities while walking on your treadmill; such
as watching television, reading, etc. These distractions may cause you to lose balance
or stray from walking in the center of the belt; which may result in serious injury.
●NEVER mount or dismount the treadmill while the belt is moving. Spirit treadmills start
with at a very low speed and it is unnecessary to straddle the belt during start up.
Simply standing on the belt during slow acceleration is proper after you have learned
to operate the unit.
●Always hold on to a handrail or hand bar while making control changes (incline, speed,
etc.).
Do not use excessive pressure on console control keys. They are precision set to
function properly with little finger pressure. Pushing harder is not going to make the unit
go faster or slower. If you feel the buttons are not functioning properly with normal
pressure contact your Spirit dealer.
A safety tether cord is provided with this unit. It is a simple magnetic design that should
be used at all times. It is for your safety should you fall or move too far back on the
tread-belt.
Pulling this safety tether cord will stop tread-belt movement.
To Use:
1. Place the magnet into position on the round metal portion of the console control head.
Your treadmill will not start and operate without this. Removing the magnet also secures
the treadmill from unauthorized use.
2. Fasten the plastic clip onto your clothing securely to assure good holding power. Note:
The magnet has strong enough power to minimize accidental, unexpected stopping. The
clip should be attached securely to make certain it does not come off. Be familiar with its
function and limitations. The treadmill will stop, depending on speed, with a one to two
step coast anytime the magnet is pulled off the console. Use the red Stop / Pause switch
in normal operation.
Safety Tether Cord
CUSTOMER SERVICE 1-888-707-1880 ©2012
6
Assembly Instructions
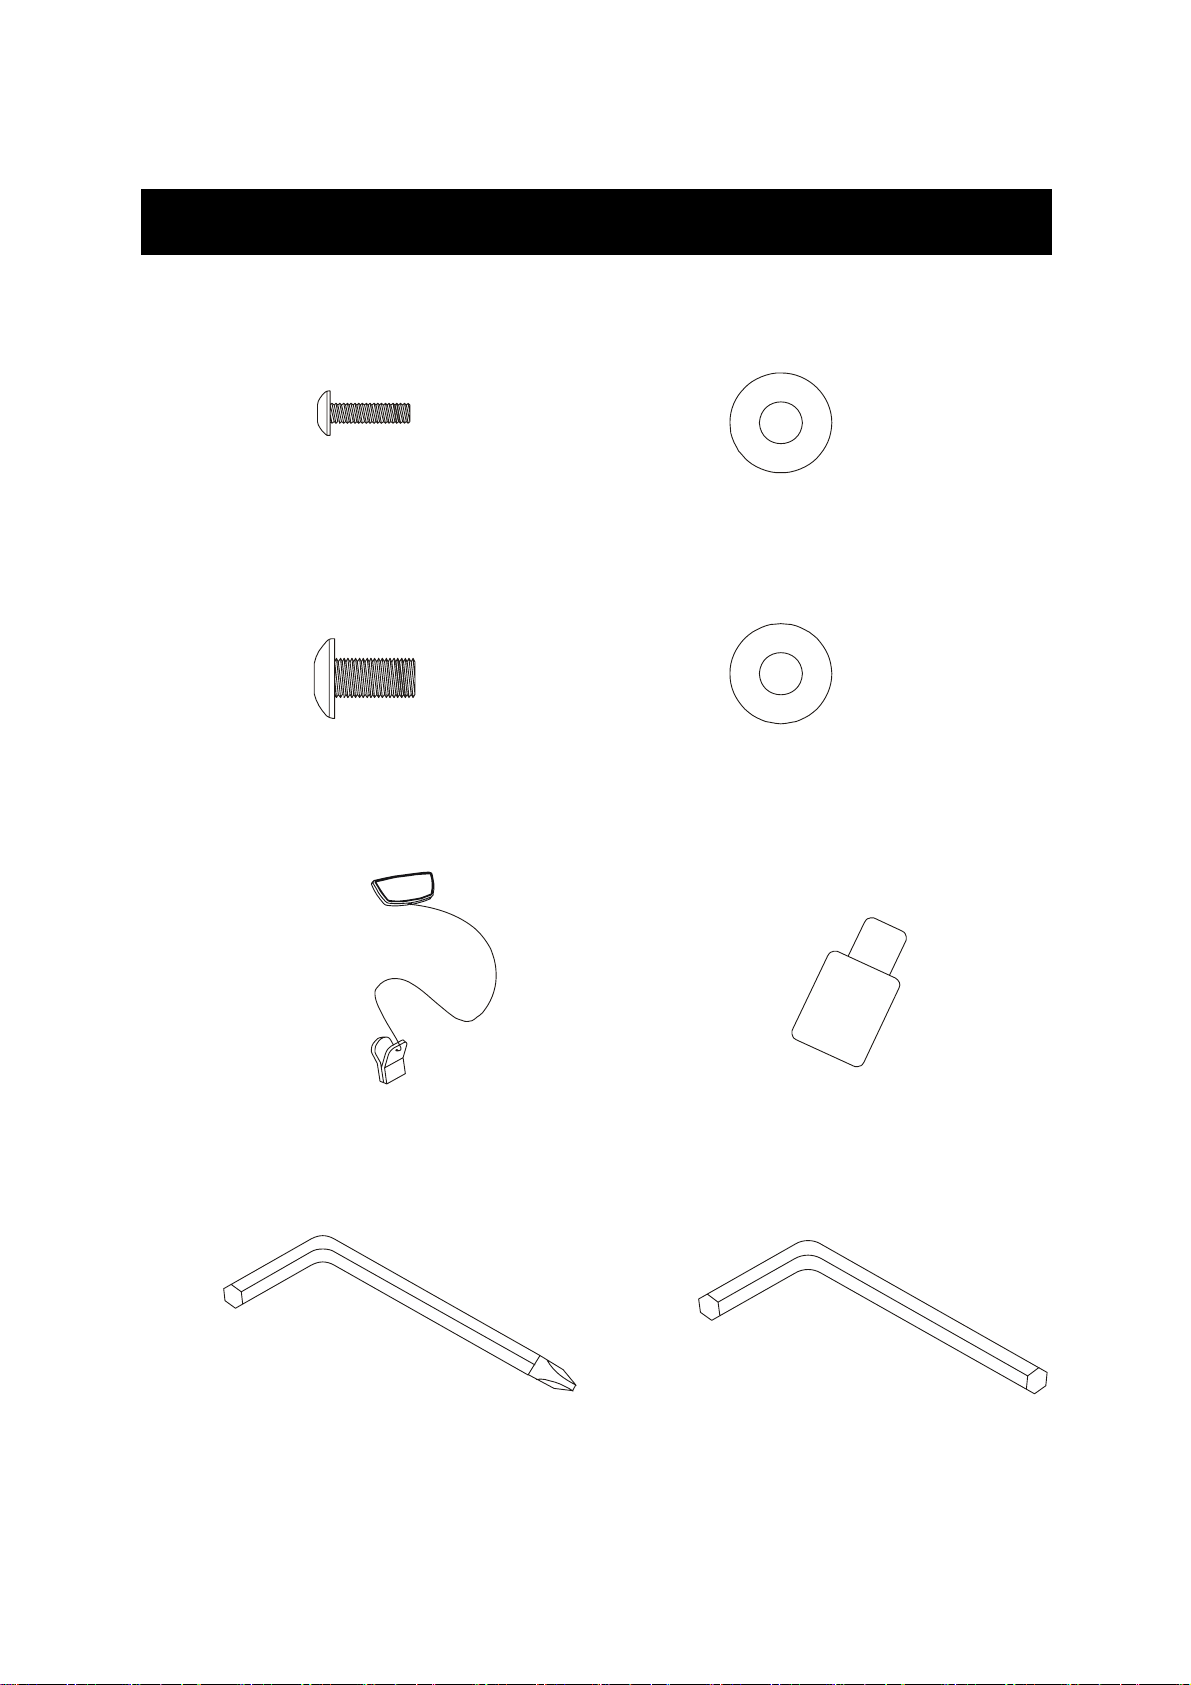
ASSEMBLY PACK CHECK LIST
#111 - M5 x 15mm
Philli
p
s Head Screw
(
12
p
cs
)
#95 - 5/16” x 19mm
Curved Washer (4pcs)
#94 - 5/16” x 15mm
Button Head Socket Bolt
(
14
p
cs
)
#102 - Safet
y
Ke
y
(
1
p
c
)
#93 - Lubricant (1pc)
#97 - Combination M5 Allen Wrench
& Phillips Head Screw Driver (1pc)
#98 - M6 Allen Wrench (1pc)
#110 - 5/16” x 19mm
Flat Washer (10pcs)

CUSTOMER SERVICE 1-888-707-1880 ©2012
7
■STEP 1
Remove all the parts from the carton and lay the main base frame on a flat level surface.
■STEP 2
Feed the lower computer cable from the base frame (38) through the right upright (5) and
insert the upright (5) into the frame base tube (38). Be careful not to pinch the wire
harness.
Secure the side of the right upright using three 5/16” x 15mm button head bolts (94), three
5/16” x 19mm flat washers (110). Secure the front of the upright using one 5/16” x 15mm
bolt (94) and one 5/16” x 19mm curved washer (95). Repeat for the left upright (4).
Ensure to tighten all eight bolts as tight as possible.
5
38
94
95
94
4
5
97
2
95
94

CUSTOMER SERVICE 1-888-707-1880 ©2012
8
■STEP 3
It will take two people for this step.
Connect the lower computer cable (38) to the upper computer cable (36).
36
38
■STEP 4
1. Attach the console support (6) to the right and left uprights (4 / 5).
Secure the console support (6) using six 5/16” x 15mm button head bolts (94) , four 5/16" x
19mm flat washers (110) and two 5/16" x 19mm curved washers (95).
2. Install the fan assembly (112) on to the console support (6) using four M5 x 15mm phillips
head screw (111) and using the combination m5 allen wrench & philliips head screw driver
(97).
97
95
95
4
5
94
110
94
110
110
110 94
6
111
112
6
CUSTOMER SERVICE 1-888-707-1880 ©2012
9
■STEP 5
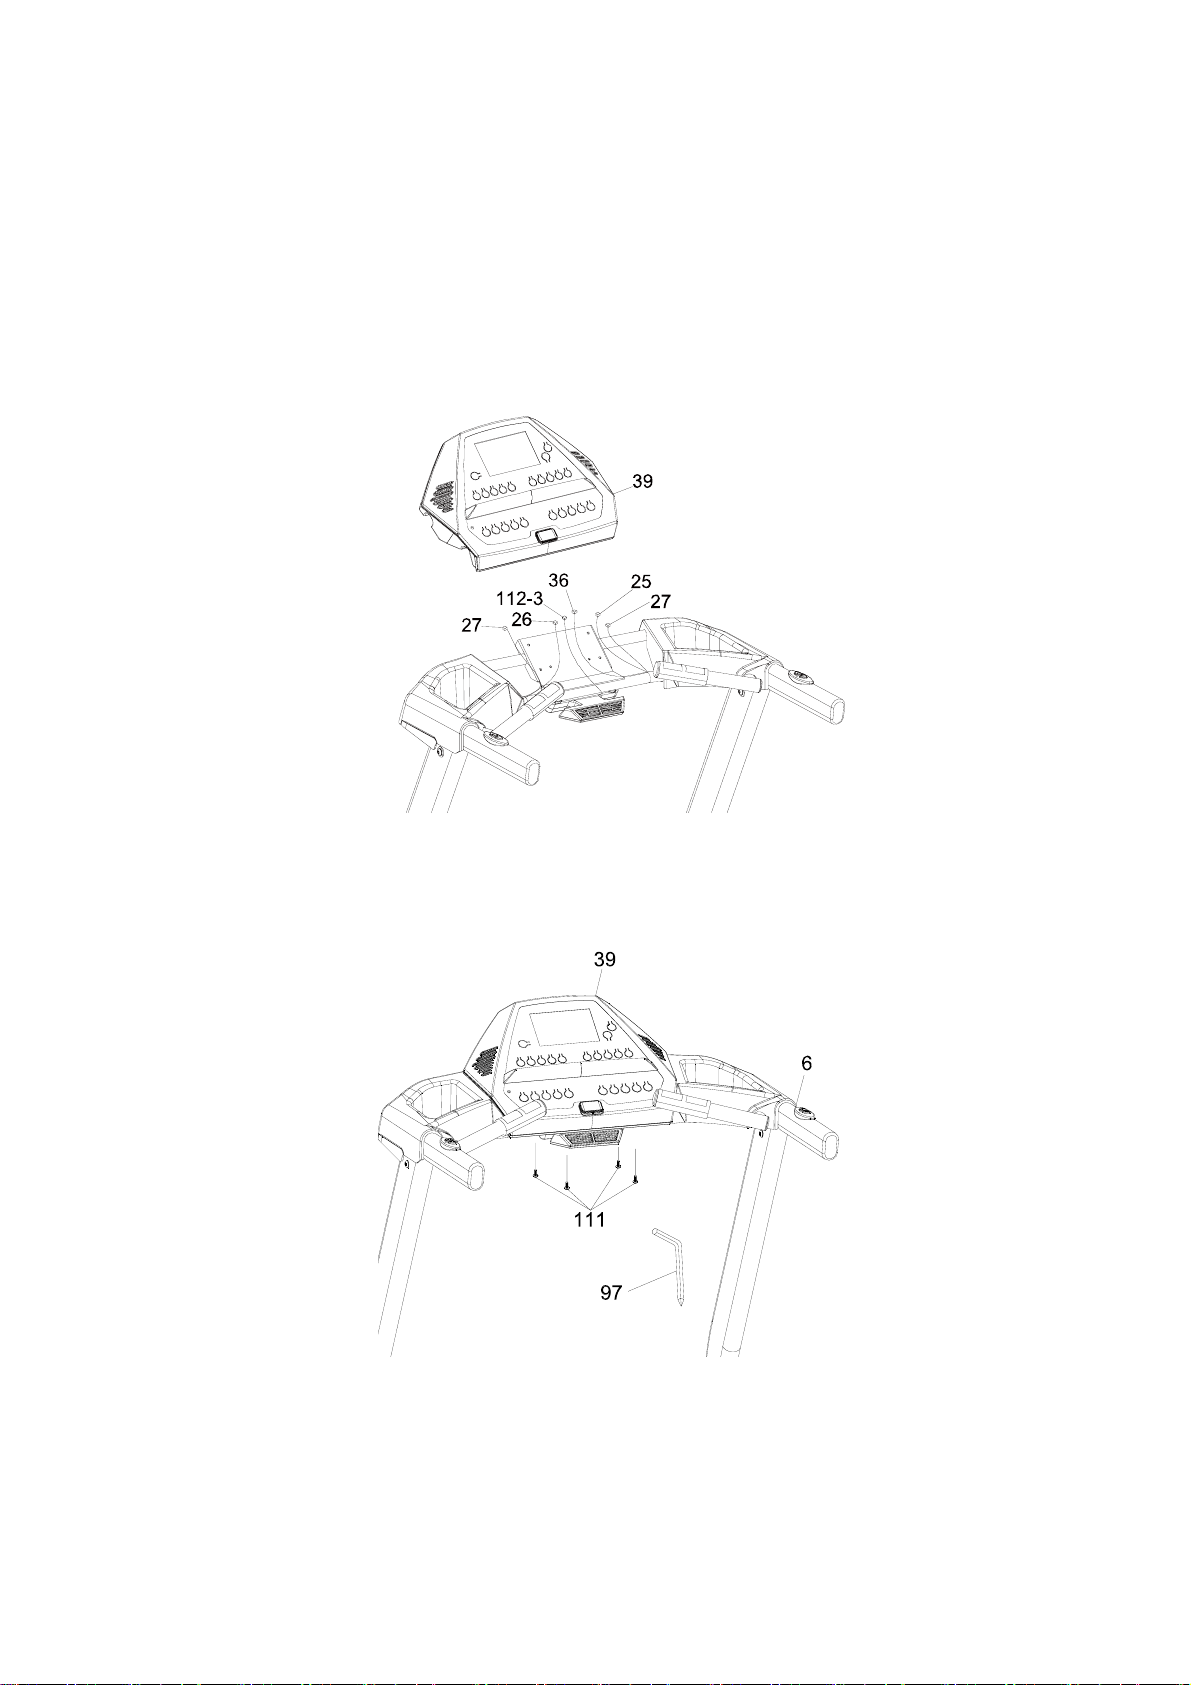
Connect the speed adjustment cable (25) to the back of the console (39).
Connect the incline adjustment cable (26) to the back of the console (39).
Connect the two handpulse wires (27) to the back of the console (39).
Connect the fan wire (112-3) to the back of the console (39).
Connect the upper computer wire (36) to the back of the console (39).
Secure the console (39) to the console support (6) using four M5 X 15mm (111) screws by
using Combination M5 Allen Wrench & Phillips Head Screw Driver (97).
Indice
Altri manuali Xterra Tapis roulant

Xterra
Xterra 16004000960 Manuale utente

Xterra
Xterra TR150 Manuale utente

Xterra
Xterra TR6.55 Manuale utente

Xterra
Xterra TR250 Manuale utente

Xterra
Xterra TR600 Manuale utente

Xterra
Xterra TR700 Manuale utente

Xterra
Xterra TR6.6 Manuale utente

Xterra
Xterra TR450 Manuale utente

Xterra
Xterra ET94 Manuale utente

Xterra
Xterra TRX5500 Manuale utente

Xterra
Xterra TL200 Manuale utente

Xterra
Xterra ET94 Manuale utente

Xterra
Xterra 1644958US Manuale utente

Xterra
Xterra TR200 Manuale utente

Xterra
Xterra TR6.6 Manuale utente

Xterra
Xterra XT95-NT17 Manuale utente

Xterra
Xterra TR6.5 Manuale utente

Xterra
Xterra Wave Deck T9 Manuale utente

Xterra
Xterra TR6.3 Manuale utente

Xterra
Xterra TR6.65 Manuale utente


