
Abit IS-20 Manuale utente

IS-10/IS-11/IS-12/IS-20
Intel Pentium 4 System Board
Socket 478
User’s Manual
4200-0383-03
Rev. 1.01

Copyright and Warranty Notice
The information in this document is subject to change without notice and does not
represent a commitment on part of the vendor, who assumes no liability or
responsibility for any errors that may appear in this manual.
No warranty or representation, either expressed or implied, is made with respect to the
quality, accuracy or fitness for any particular part of this document. In no event shall
the manufacturer be liable for direct, indirect, special, incidental or consequential
damages arising from any defect or error in this manual or product.
Product names appearing in this manual are for identification purpose only and
trademarks and product names or brand names appearing in this document are
property of their respective owners.
This document contains materials protected under International Copyright Laws. All
rights reserved. No part of this manual may be reproduced, transmitted or transcribed
without the expressed written permission of the manufacturer and authors of this
manual.
IS-10 / IS-11 / IS-12 / IS-20

Table Of Contents
Chapter 1. Introduction .................................................... 1-1
1.1. Features & Specifications....................................................... 1-1
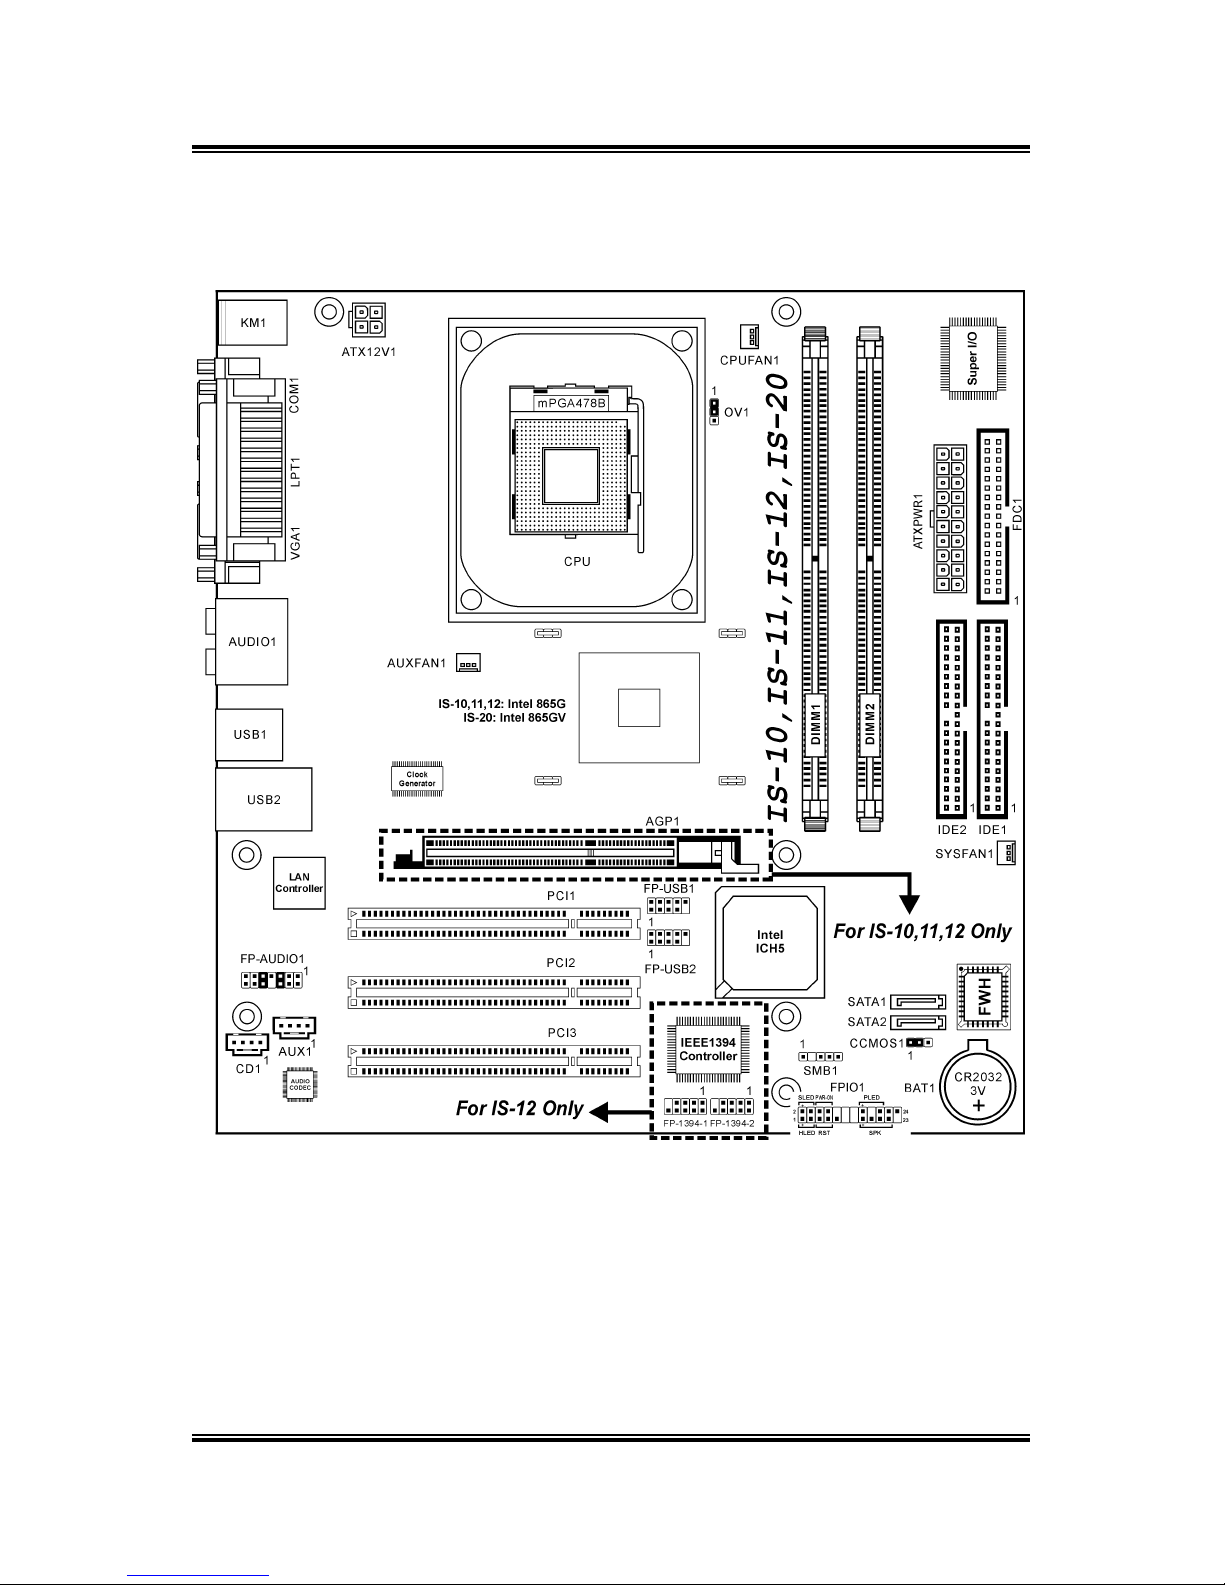
1.2. Layout..................................................................................... 1-3
1.3. Jumpers & Connectors Description........................................ 1-4
Chapter 2. Hardware Setup.............................................. 2-1
2.1. Install The Motherboard......................................................... 2-1
2.2. Install Pentium®4 CPU and Heatsink Supporting-Base........ 2-2
2.3. System Memory ..................................................................... 2-3
2.3.1. Memory Configuration Table...................................2-3
2.3.2. Installing and Removing Memory Modules............. 2-4
2.4. Connectors, Headers, and Switches ....................................... 2-5
2.4.1. ATX Power Connectors............................................ 2-5
2.4.2. FAN Power Connectors............................................ 2-6
2.4.3. CMOS Memory Clearing Header............................. 2-7
2.4.4. AGP Display Card Slot (IS-10/IS-11/IS-12)............. 2-8
2.4.5. Front Panel Switches & Indicators Connection
Headers ..................................................................... 2-9
2.4.6. Front Panel Audio Connection Header...................2-10
2.4.7. Additional USB Port Connection Headers ............. 2-11
2.4.8. System Management Bus Connection Header ....... 2-12
2.4.9. Additional IEEE1394 Port Connection Headers
(IS-12) ..................................................................... 2-13
2.4.10. Internal Audio Source Connectors .........................2-14
2.4.11. Floppy and IDE Disk Drive Connectors................. 2-15
2.4.12. Serial ATA Connectors........................................... 2-16
2.4.13. CPU Core Voltage Selector.................................... 2-17
2.4.14. External I/O Panel Connectors ............................... 2-18
User’s Manual

Chapter 3. BIOS Setup...................................................... 3-1
3.1. Standard CMOS Features....................................................... 3-2
3.2. Advanced BIOS Features ....................................................... 3-6
3.3. Advanced Chipset Features.................................................... 3-8
3.4. Integrated Peripherals........................................................... 3-10
3.5. Power Management Setup.................................................... 3-17
3.6. PnP/PCI Configurations ....................................................... 3-19
3.7. PC Health Status................................................................... 3-21
3.8. Load Fail-Safe Defaults........................................................ 3-22
3.9. Load Optimized Defaults ..................................................... 3-22
3.10. Set Supervisor Password ...................................................... 3-22
3.11. Set User Password ................................................................ 3-22
3.12. Save & Exit Setup ................................................................ 3-22
3.13. Exit Without Saving ............................................................. 3-22
Chapter 4. Driver Installation .......................................... 4-1
4.1. Setup Items ............................................................................. 4-2
Appendix A. How to Get Technical Support ..................... A-1
IS-10 / IS-11 / IS-12 / IS-20

Introduction 1-1
Chapter 1. Introduction
1.1. Features & Specifications
Processor
• Supports Intel Pentium 4 Socket 478 processors with 800/533/400MHz
Front Side Bus
• Supports Intel Hyper-Threading Technology
Chipset
• Intel 865G / ICH5 (IS-10/IS-11/IS-12)
• Intel 865GV / ICH5 (IS-20)
• Integrated Intel Extreme Graphics 2
• Supports Advanced Configuration and Power Interface (ACPI)
Memory
• Two 184-pin DIMM sockets
• Supports 2 DIMM Single / Dual Channel DDR 400/333/266 memory
(Max. 2GB)
Graphics
• Integrated Intel Extreme Graphics 2
• Accelerated Graphics Port connector supports AGP 8X/4X (0.8V/1.5V)
(IS-10/IS-11/IS-12)
Serial ATA
• 2-Channel Serial ATA with 150MB/s data transfer rate
Audio
• 6-Channel AC 97 CODEC on board
• Professional digital audio interface supports optical S/PDIF Output
System BIOS
• Supports Plug-and-Play (PNP)
• Supports Advanced Configuration Power Interface (ACPI)
• Supports Desktop Management Interface (DMI)
• Write-Protect Anti-Virus function by AWARD BIOS
LAN
• Onboard 10/100Mb LAN (IS-10/IS-12/IS-20)
User’s Manual

1-2 Chapter 1
• Onboard Gigabit LAN (IS-11)
Internal I/O Connectors
• 1x AGP (IS-10/IS-11/IS-12)
• 3x PCI slots
• 1x Floppy Port supports up to 2.88MB
• 2x Ultra DMA 33/66/100 Connectors
• 2x Serial ATA 150 Connectors
• 2x USB 2.0 Headers (Each header support two USB 2.0 devices)
• 1x CD-IN, 1x AUX-IN Header
• 1x FP-Audio header
• 2x IEEE1394 Headers (IS-12)
External I/O Connectors
• 1x PS/2 Keyboard, 1x PS/2 Mouse
• 1x Printer Port, 1x COM Port
• 1x VGA Port
• 1x AUDIO Connector (Rear-Left / Rear-Right, Center/Subwoofer,
S/PDIF Output, Mic-In, Line-In, Front-Left/Front-Right)
• 2x USB 2.0 Connectors
• 2x USB 2.0 Connectors, 1x RJ-45 LAN Connector
Miscellaneous
• Micro ATX Form Factor (244mm x 234mm)
• Hardware Monitoring - including Fan Speed, Voltages, CPU and
System Temperature
Specifications and information contained herein are subject to change
without notice.
IS-10 / IS-11 / IS-12 / IS-20
Introduction 1-3
1.2. Layout
User’s Manual
1-4 Chapter 1
1.3. Jumpers & Connectors Description
Jumpers Description Default Setting
CCMOS1 CMOS Memory Clearing Header Pins 1-2 Closed (Normal)
OV CPU Core Voltage Selector Pins 1-2 Closed (Normal)
Connectors Description
AGP1 AGP Display Card Slot (IS-10/IS-11/IS-12)
ATXPWR1/ATX12V1 ATX Power Connectors
CD1/AUX1 Internal Audio Sources Connectors
CPUFAN1
SYSFAN1
AUXFAN1
CPU Fan Power Connector
System Fan Power Connector
Auxiliary Fan Power Connector
DIMM1/DIMM2 DDR DIMM Slots
FDC1 Floppy Disk Drive Connector
FP-1394-1/FP-1394-2 Additional IEEE1394 Port Connection Headers (IS-12)
FP-AUDIO1 Front Panel Audio Connection Header
FPIO1 Front Panel Switches & Indicators Connection Headers
FP-USB1/FP-USB2 Additional USB Port Connection Header
IDE1/IDE2 Hard Disk Drive Connectors
PCI1/PCI2/PCI3 32bit/33MHz PCI Slots
SATA1/SATA2 Serial ATA Connectors
SMB1 System Management Bus Connection Header
IS-10 / IS-11 / IS-12 / IS-20

Hardware Setup 2-1
Chapter 2. Hardware Setup
Before the Installation: Turn off the power supply switch (fully turn off the +5V
standby power), or disconnect the power cord before installing or unplugging any
connectors or add-on cards. Failing to do so may cause the motherboard components
or add-on cards to malfunction or damaged.
2.1. Install The Motherboard
Most computer chassis have a base with many mounting holes to allow motherboard
to be securely attached on and at the same time, prevented from short circuits. There
are two ways to attach the motherboard to the chassis base:
1. use with studs
2. or use with spacers
In principle, the best way to attach
the board is to use with studs. Only
if you are unable to do this should
you attach the board with spacers.
Line up the holes on the board with
the mounting holes on the chassis. If
the holes line up and there are screw
holes, you can attach the board with
studs. If the holes line up and there are only slots, you can only attach with spacers.
Take the tip of the spacers and insert them into the slots. After doing this to all the
slots, you can slide the board into position aligned with slots. After the board has been
positioned, check to make sure everything is OK before putting the chassis back on.
ATTENTION: To prevent shorting the PCB circuit, please REMOVE the metal studs
or spacers if they are already fastened on the chassis base and are without
mounting-holes on the motherboard to align with.
User’s Manual
2-2 Chapter 2
2.2. Install Pentium®4 CPU and Heatsink Supporting-Base
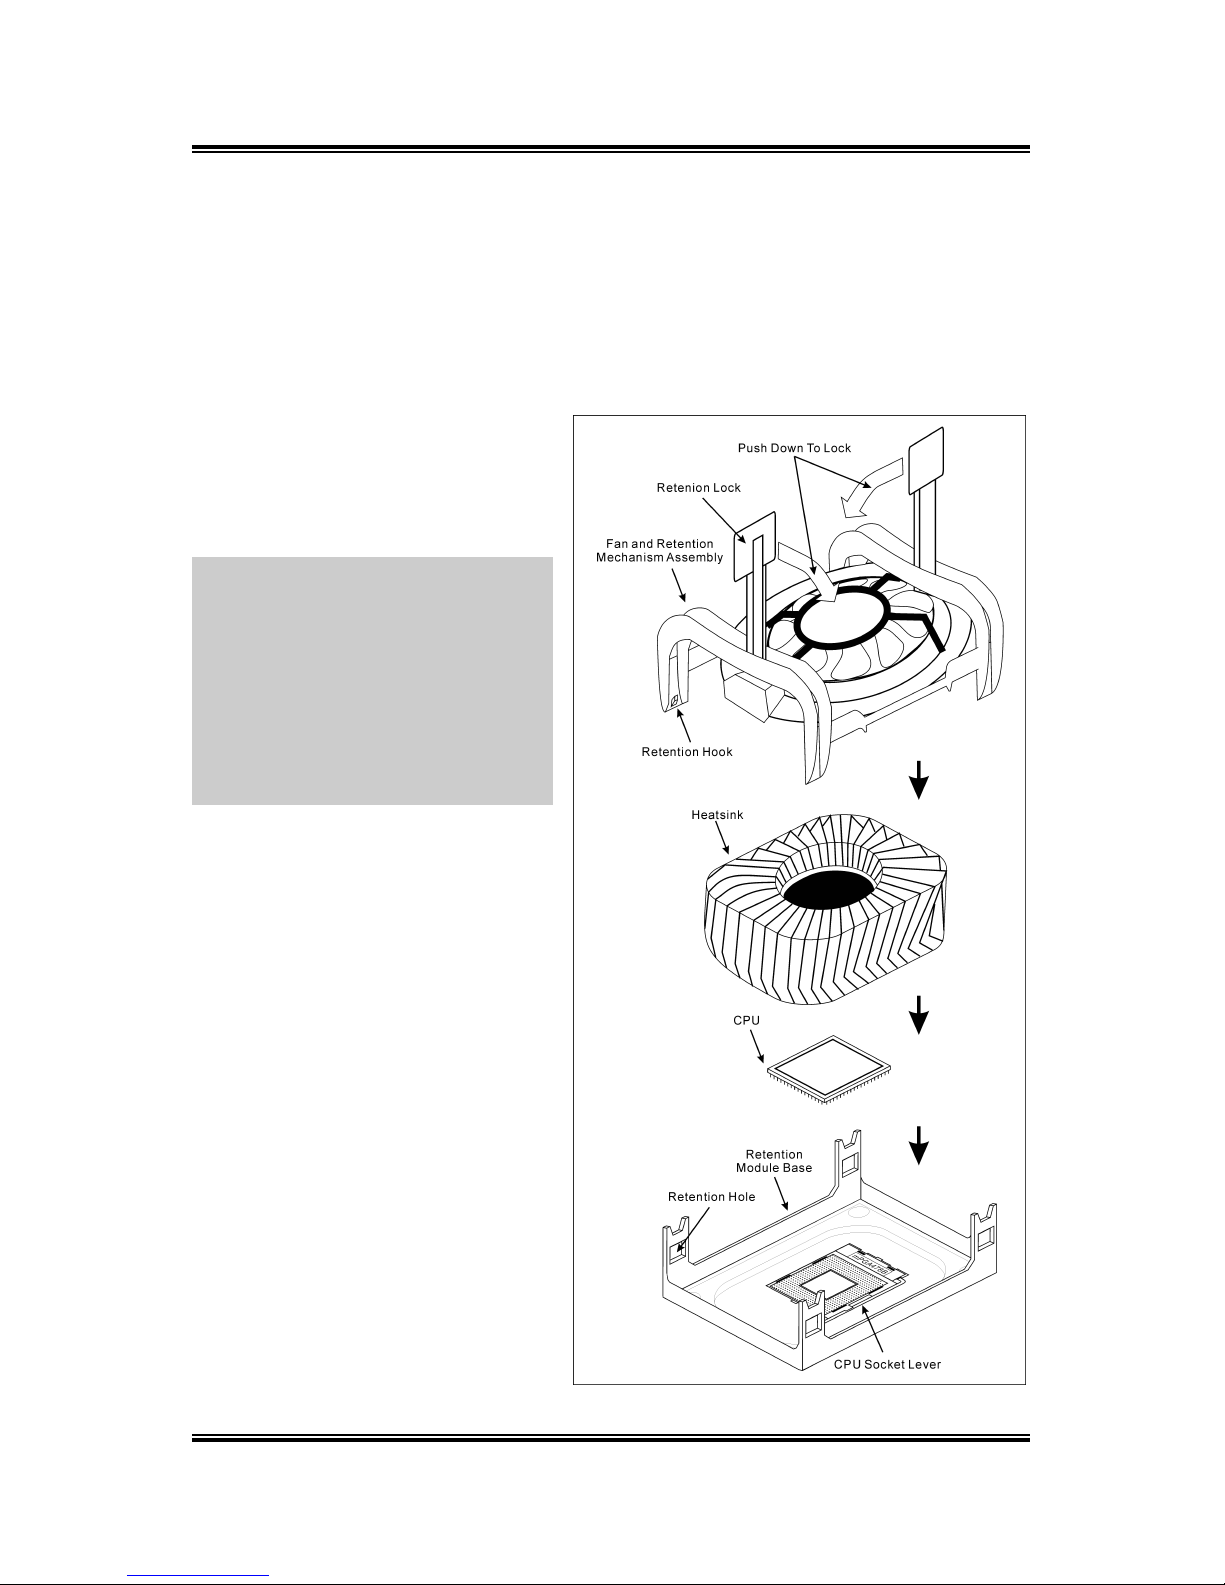
This motherboard provides a ZIF (Zero Insertion Force) Socket 478 to install Intel®
Pentium®4 CPU. The CPU you bought should have a kit of heatsink and cooling fan
along with. If that’s not the case, buy one specially designed for Pentium®4 Socket
478.
1. Locate the 478-pin ZIF socket
on the motherboard. Fasten the
Retention Module Base onto the
motherboard.
ATTENTION: If you are using
chassis specially designed for
Pentium®4, please pay attention to
the location of Metal Studs or
Spacers if they are already installed
on the chassis. Be careful not let the
Metal Studs or Spacers contact the
printed circuit wire or parts on the
PCB.
2. Pull the CPU socket lever
sideways away from the socket
and then upwards to 90 degree.
Insert the CPU with the correct
orientation. Do not use extra
force to insert CPU; it only fits
in one orientation. Close down
the socket lever while holding
down the CPU.
3. Put the heatsink faces down
onto the CPU until it completely
covers the CPU.
4. Put the Fan and Retention
Mechanism Assembly onto the
heatsink. Make sure all the four
Retention Locks at each side of
the Fan and Retention
Mechanism Assembly snap into
the Retention Holes.
IS-10 / IS-11 / IS-12 / IS-20
Questo manuale è adatto per i seguenti modelli
3
Indice
Altri manuali Abit Scheda madre

Abit
Abit SI7 Manuale utente

Abit
Abit SA6 Manuale utente

Abit
Abit WX6 Manuale utente

Abit
Abit BG-72 Manuale utente

Abit
Abit TH7-RAID Manuale utente

Abit
Abit AX8 Series Manuale utente

Abit
Abit AR5 Manuale utente

Abit
Abit KR7A-133R Manuale utente

Abit
Abit KT7E Manuale utente

Abit
Abit AH6E Pentium II Manuale utente


Manuali Scheda madre popolari di altre marche


Telit Wireless Solutions
Telit Wireless Solutions SL869-3DR Manuale utente

Gigabyte
Gigabyte GA-9IVDT Manuale utente

Texas Instruments
Texas Instruments ADS8372EVM Manuale utente

Commell
Commell MS-C73 Manuale utente

IBT Technologies
IBT Technologies MB860 Manuale utente

Nvidia
Nvidia TEGRA DG-04927-001_V01 Manuale utente


