Bibo 2 TOUCH Manuale utente
BIBO 2 TOUCH 3D PRINTER
---Operation Manual
SHAOXING BIBO AUTOMATIC EQUIPMENT CO., LTD.
V3.0a
Please operate the machine strictly according to this operation manual to
have a promised warranty from BIBO! As the warranty is based on the
correct operation according to the operation manual.
REVISION RIGHTS RESERVED

Shaoxing Bibo Automatic Equipment Co., Ltd.
Tel:+86 575 88918283 Mobile:+86 133 25759139
Url: www.ourbibo.com E-Mail: bibo@ourbibo.com
1
Content
1. Caution.......................................................................................... 2
2. What's in the box?.........................................................................3
3. Initial Hardware Installation.........................................................4
4. First Print.................................................................................... 10
5. Some Notices for Printing.......................................................... 29
6. Software Installation...................................................................32
7. Slicing for A Gcode File.............................................................35
8. Acrylic Cover Installation.......................................................... 51
9. Function Introduction(including copy printing).........................53
10. USB Driver Installation (not necessary).................................. 57
11. WIFI (optional function).......................................................... 60
12. Maintenance/Optimal Operational Tips................................... 83
Shaoxing Bibo Automatic Equipment Co., Ltd.
Tel:+86 575 88918283 Mobile:+86 133 25759139
Url: www.ourbibo.com E-Mail: bibo@ourbibo.com
2
1. Caution
Please be careful for human electrostatic especially in winter when touching the
motherboard or extruders. The easiest way to solve this problem is that we can
touch the metal part nearby by hand first before touching the motherboard or
extruders. So the electrostatic usually will be gone before touching the
motherboard or extruders.
SD card or USB drive for the printer should be smaller than 16GB. SD card should be class 4.
★★★If unloading the filament, please load it first, then unload it AT ONCE.
1. Do not leave the extruder heated for long time, just stay with the printer for heating.
The filament might decompose after leaving it at high temperatures, leaving a layer of
contaminants behind in the hot-end nozzle, and the extruder will be clogged.
2. Printing PLA not more than 200 degree, usually 180-190 degree is the best. Setting a
printing temperature above 230-245 degree for PLA is starting to get into bad territory as
the plastic will start to change properties if left in the nozzle for too long and can cause
clogs.
3. During heating or close heating or stop the printing on touch screen or inserting
SD card to the printer, the other operation on touch screen will be not responded as
the former action (heating or close heating or reading the sd card) should be finished first,
and temperature reading will not be correct. You can power off the printer and power
on again, everything will be ok too. Touch screen sometimes may have crash fault
like computer or phone. Restart the printer and it will be ok.
4. It is strongly not recommended to replace the parts, as replacing the parts usually
causes the damage or the new problem. Please kindly contact bibo@ourbibo.com first
before replacing, as there may be much easier way to solve your problem without
disassembling anything. For example, pushing down filament or the metal stick to the
heated extruder is much easier then replacing the hot ends for the extruder clog problem.
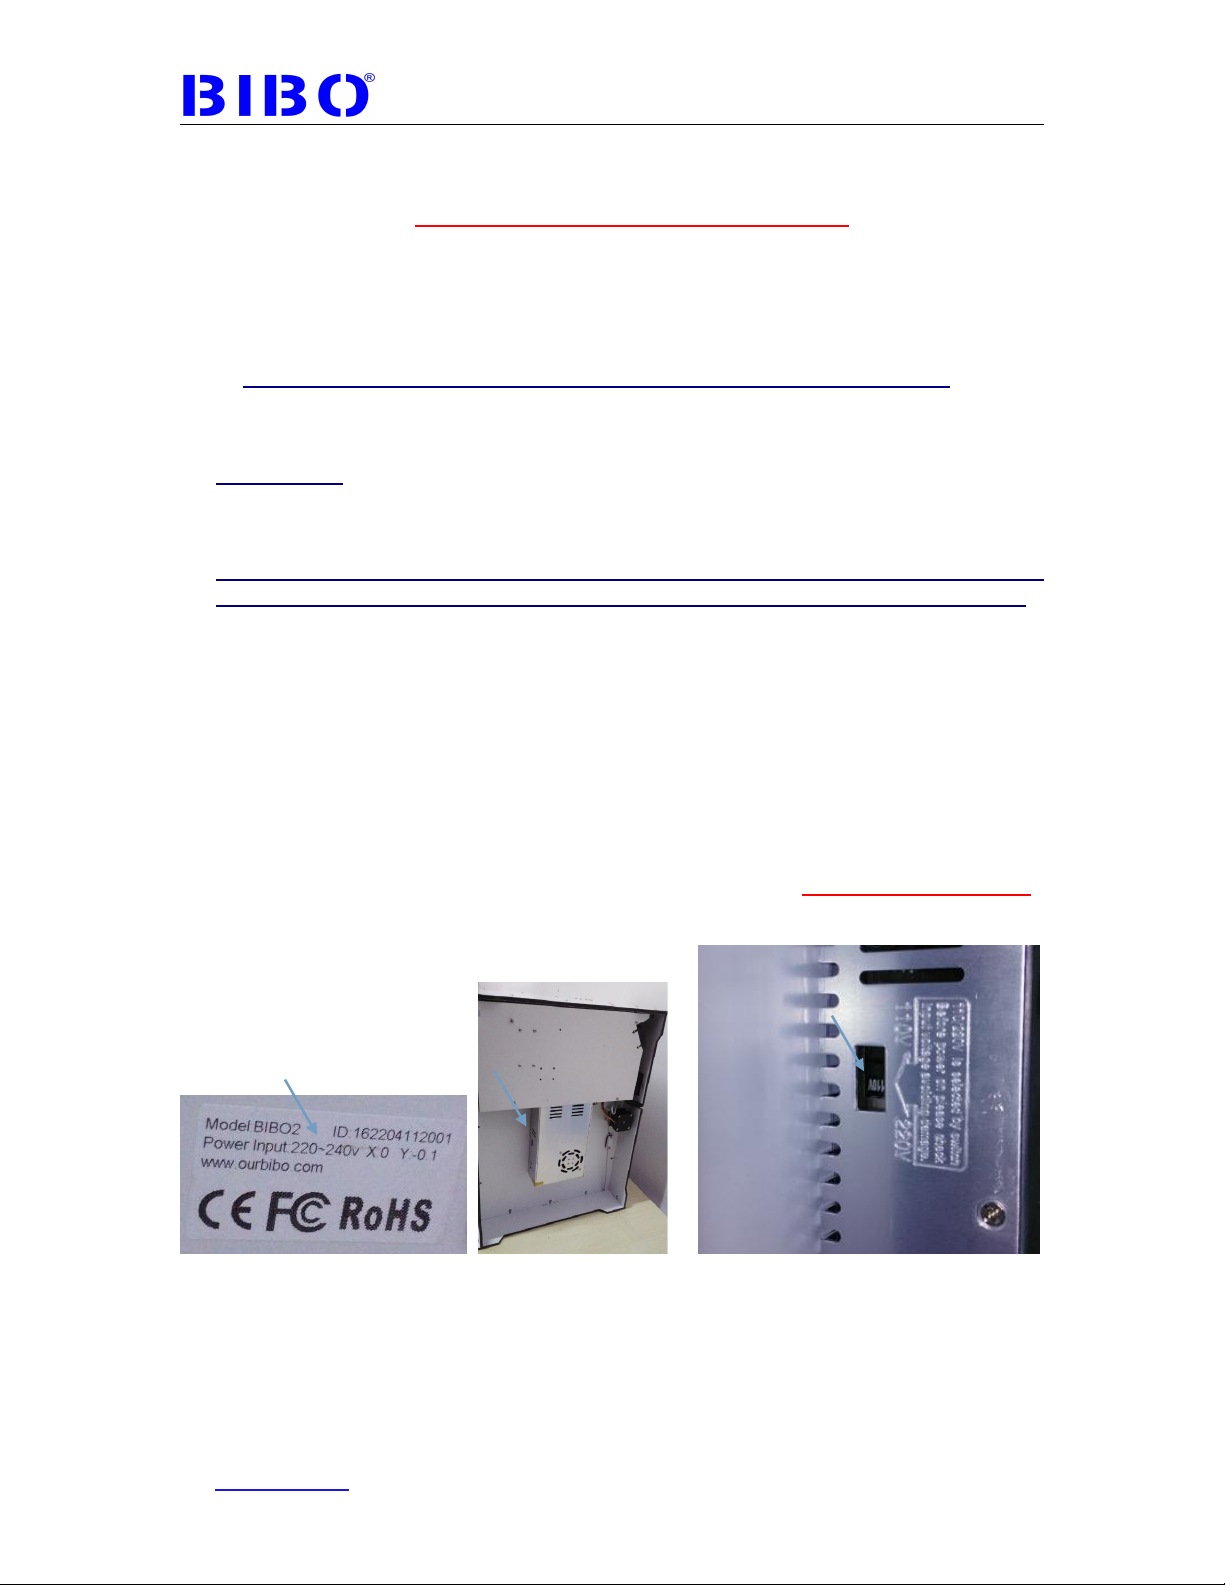
NOTE: Before power on the printer, please check printer input voltage showed on
nameplate whether fit for your local power supply. Nameplate is stick on the backside
or two sides of printer. If not fit for your local power supply or no power to the printer,
change the switch position on power source under the bottom plate of the printer to
avoid damage.
Before repairing or making any alterations to the BIBO 3D printer, it is essential that the machine is turned off
and the power cord is unplugged.
The BIBO 3D printer operates at very high temperature; allow the nozzle, the extruded plastic and heating.
Do not wear gloves when operating or repairing, as entanglement may occur and cause injury.
Do not leave the machine unattended when in operation.

Shaoxing Bibo Automatic Equipment Co., Ltd.
Tel:+86 575 88918283 Mobile:+86 133 25759139
Url: www.ourbibo.com E-Mail: bibo@ourbibo.com
3
2. What's in the box?
The printer may be re-taped during inspection at the customs.
There is troubleshooting files in the SD card which can also help you.
The frame of BIBO 3D printer is CNC machined, and we cleaned the printer
before delivery. But during violent transportation vibration, there maybe some
machining powder of the aluminum composite panel come out from the frame
junctions or some dust from the cartons. Sorry for this trouble. Please blow the
dust away.
Along with your BIBO 3D printer, this package contains the following which are
in the small carton above the build platform, there are(the words and pictures are
lined in the same order ):
1 roll PLA filament, 1 or 2 filament holders, some allen wrenches (packed with
black clamps), some bolts and nuts, 1 glue stick, 1 power cord, 1 USB A to B
cable, 1 or 2 filament guide tubes (may already fixed on the filament tube couplers
support), 1 filament tube couplers support, 2 extruder wire clamps, 1 spare
thermistor, acrylic cover bolts and nuts, 1 cross screwdriver, 1 SD card(not inside
this small box, but above it ).
Please remove all the files we sent to you in SD card to your computer, or
SD card printing may not run. When you want to print something, please
copy the gcode files to SD card.
Red acrylic cover panels and clear door may have paper or film protected.
If you need to transport the printer to other place, please
keep all the packing carton and material, and take the photos
step by step when you do unboxing. In this way, you can
pack the printer the same as us, and the transportation of
the printer will be safe.
The packing manual is here:
https://drive.google.com/file/d/1-CAvBgYopazYT4lmRduwQr
P8KD-b0Q7L/view?usp=sharing

Shaoxing Bibo Automatic Equipment Co., Ltd.
Tel:+86 575 88918283 Mobile:+86 133 25759139
Url: www.ourbibo.com E-Mail: bibo@ourbibo.com
4
3. Initial Hardware Installation
BIBO 3d printer’s working principle is Fused Filament Fabrication(FFF). FFF is the
most common method of 3D printing. It works by melting plastic material called
filament onto a print surface in high temperature. The filament solidifies after it
cools down, which happens instantaneously after it is extruded from the nozzle.
3D objects are formed with the filament laying down multiple layers. 3d printing is
similar to building a house.
3D printing involves three steps:
1. Create or download a 3D model (usually in stl format).
2. Slice the 3D model in the slicing software (repetier host, cura or simplify 3d)
and export the 3D file in gcode format file.
3. The printer recognizes the gcode format file and builds the 3D model.
We have the BIBO parts assembly video and acrylic cover assembly video,
and you can copy it from the SD card which is sent with the printer to you or
download from this link:
https://drive.google.com/file/d/1e02U8qIDgyE1xym4yPbTf_fmFDw2x0-b/view?us
p=sharing
The file is ZIP format which was compressed, and you can use winrar or other
software to open these videos. There may be some difference, but the
operation principle is similar.
The printer is usually transported by courier. If the printer is all assembled, its
volume will be much bigger, and the courier freight will be much more as freight
depends on its volume, not actual weight. So we will let big volume part such as
acrylic cover (fragile for shipping), filament run-out detection part not be
assembled, to reduce the expensive transportation freight and let the
transportation be more safe. These parts are easy to assemble.
The first step is to take the machine from carton , also taking the parts out from
the small carton in the printer first , then take the small carton out from the
printer, and remove all the protection bubble wrap and zip ties.
Now raise the build platform by rotating clockwise the lead screw. Then take out
the packed acrylic cover. Please check the photo below:

Shaoxing Bibo Automatic Equipment Co., Ltd.
Tel:+86 575 88918283 Mobile:+86 133 25759139
Url: www.ourbibo.com E-Mail: bibo@ourbibo.com
5
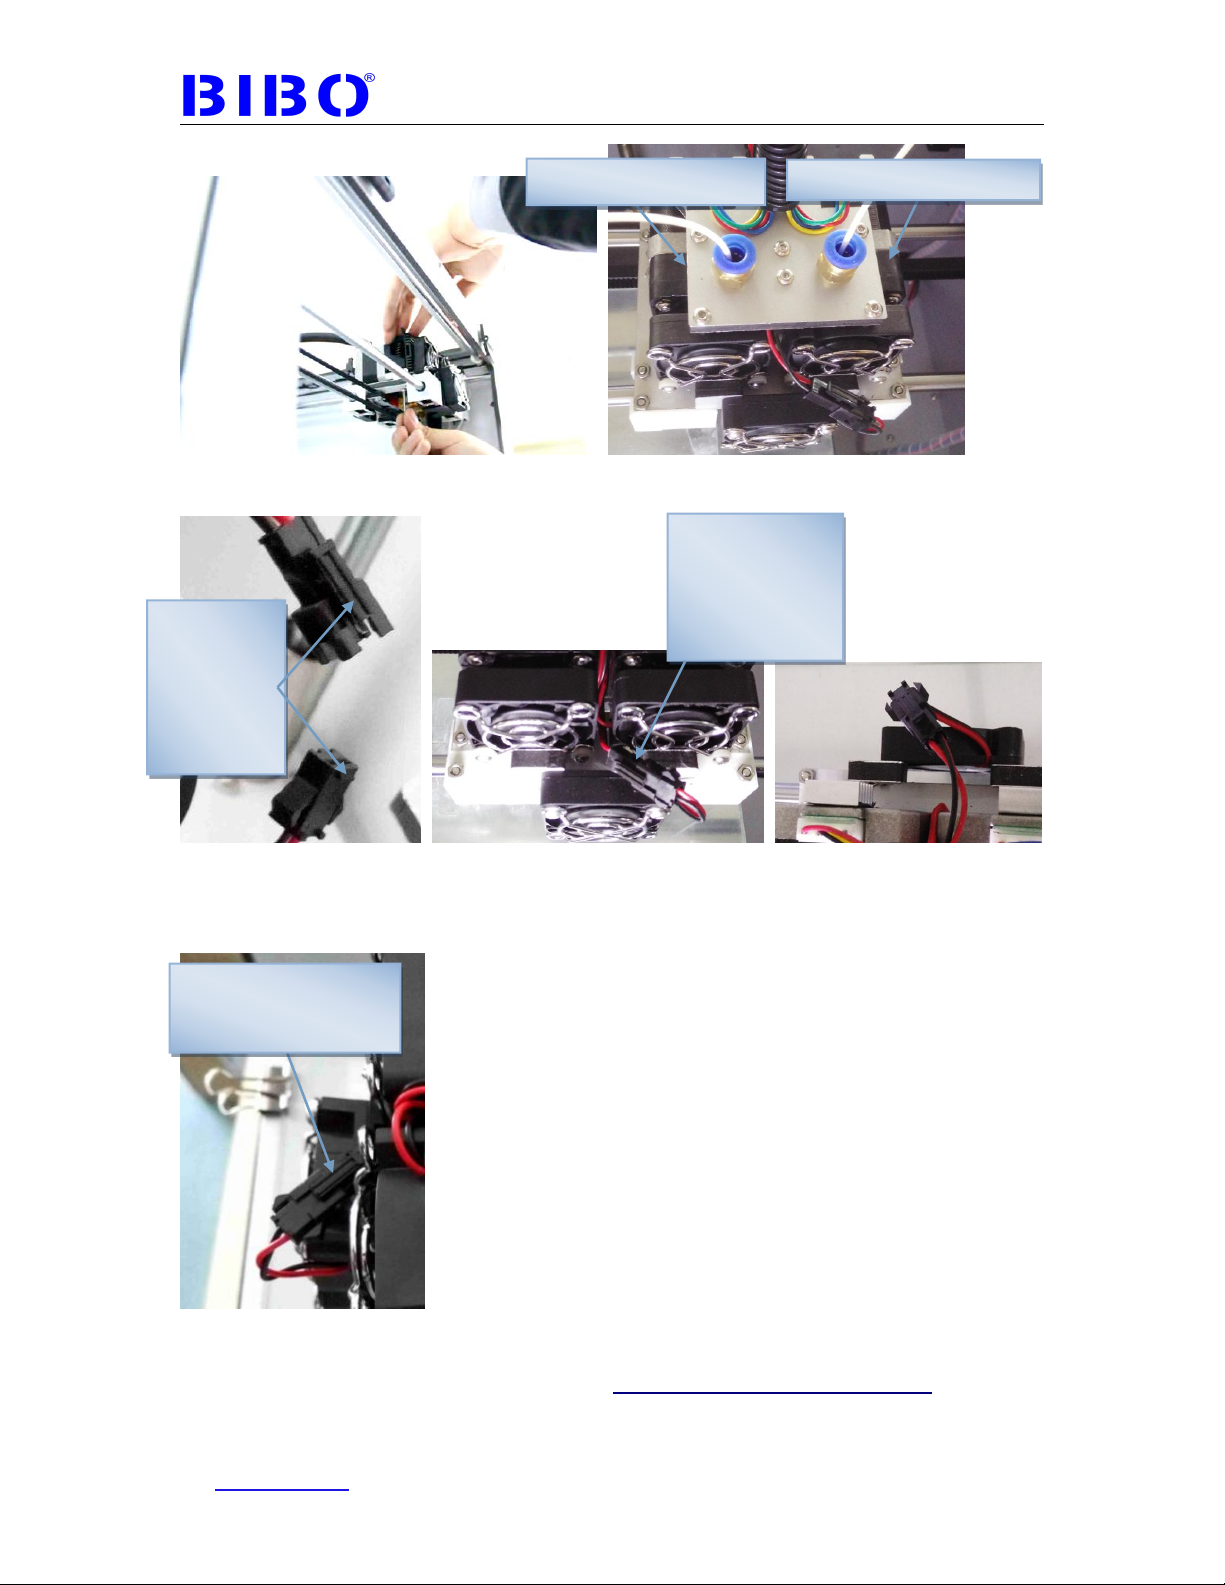
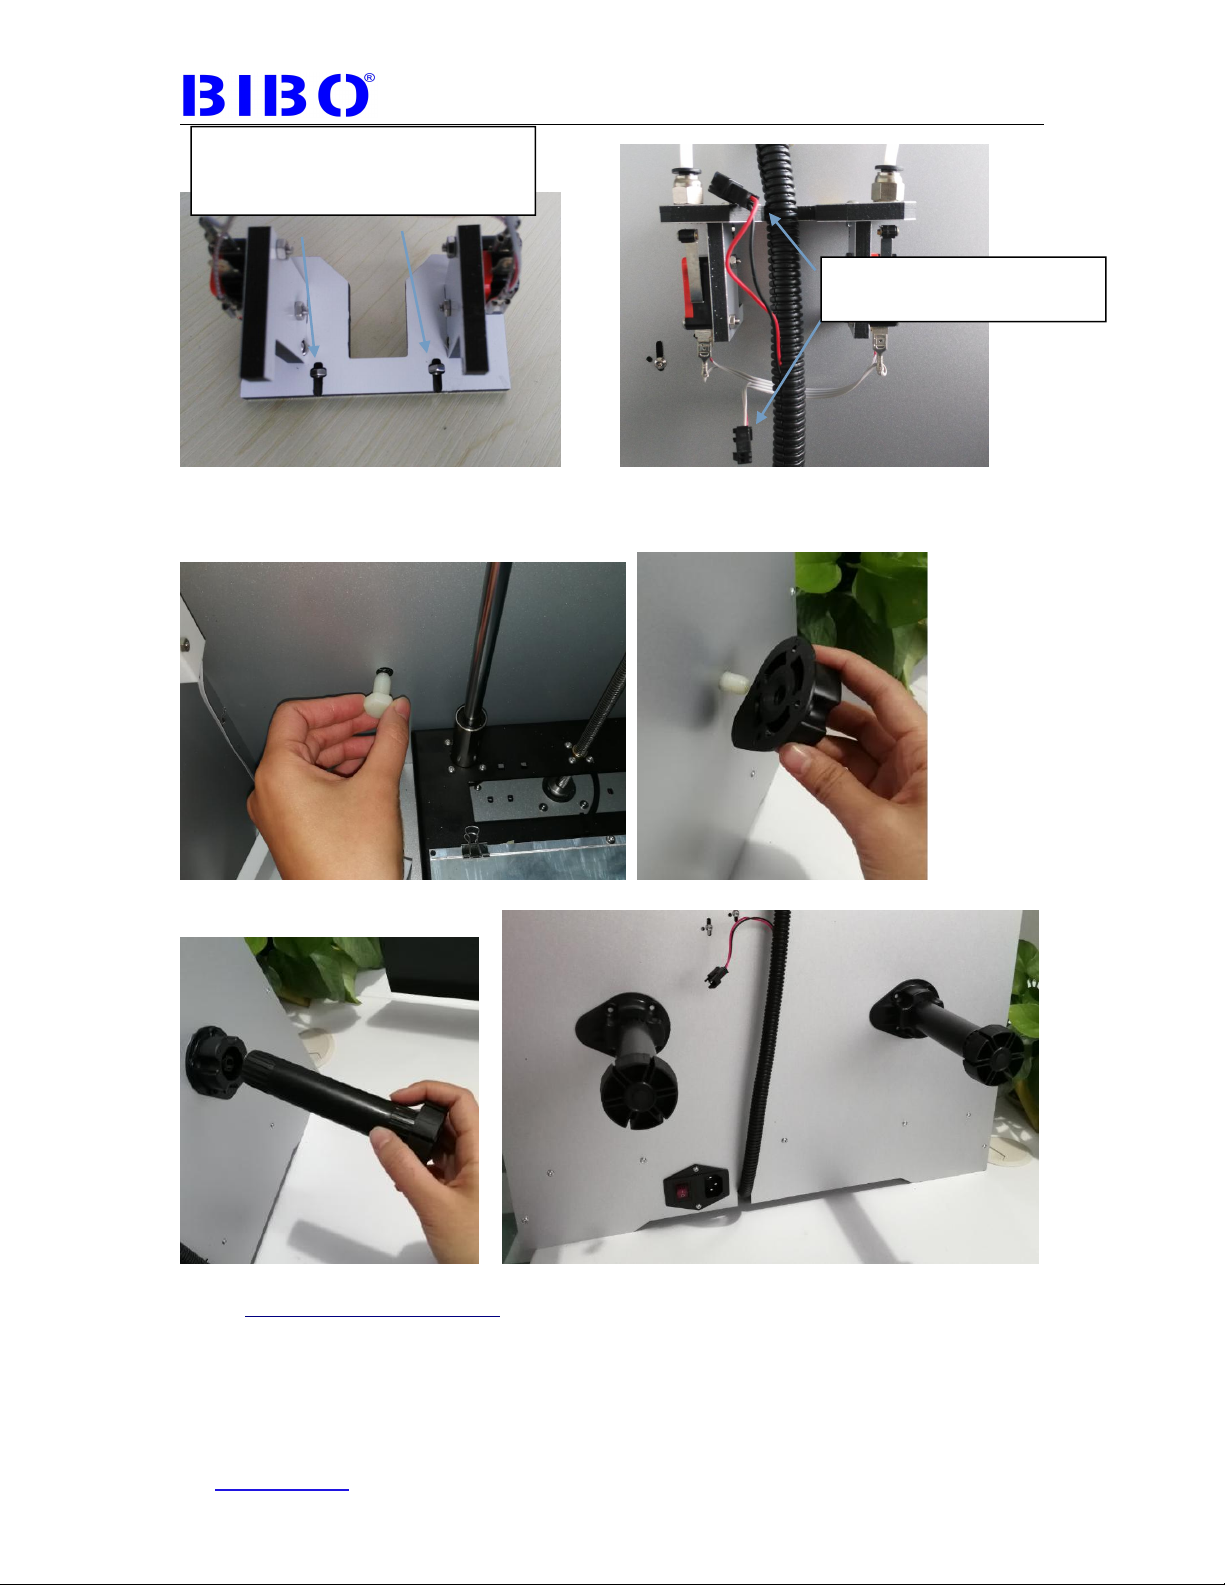
Then install the extruders with two bolts in 10mm or 8mm length (in a bag marked
with 10 or 8), and connect two fans with black coupler. See the photo below:
Do not touch the red wires and
transparent wires
Shaoxing Bibo Automatic Equipment Co., Ltd.
Tel:+86 575 88918283 Mobile:+86 133 25759139
Url: www.ourbibo.com E-Mail: bibo@ourbibo.com
7
If you want to take the extruders down form the printer, just unlock two black
coupler, no need to remove the cooling fan support, the same as you assemble
the extruder. When you unlock two black coupler, please push the button first then
unlock the black coupler as the photo below:
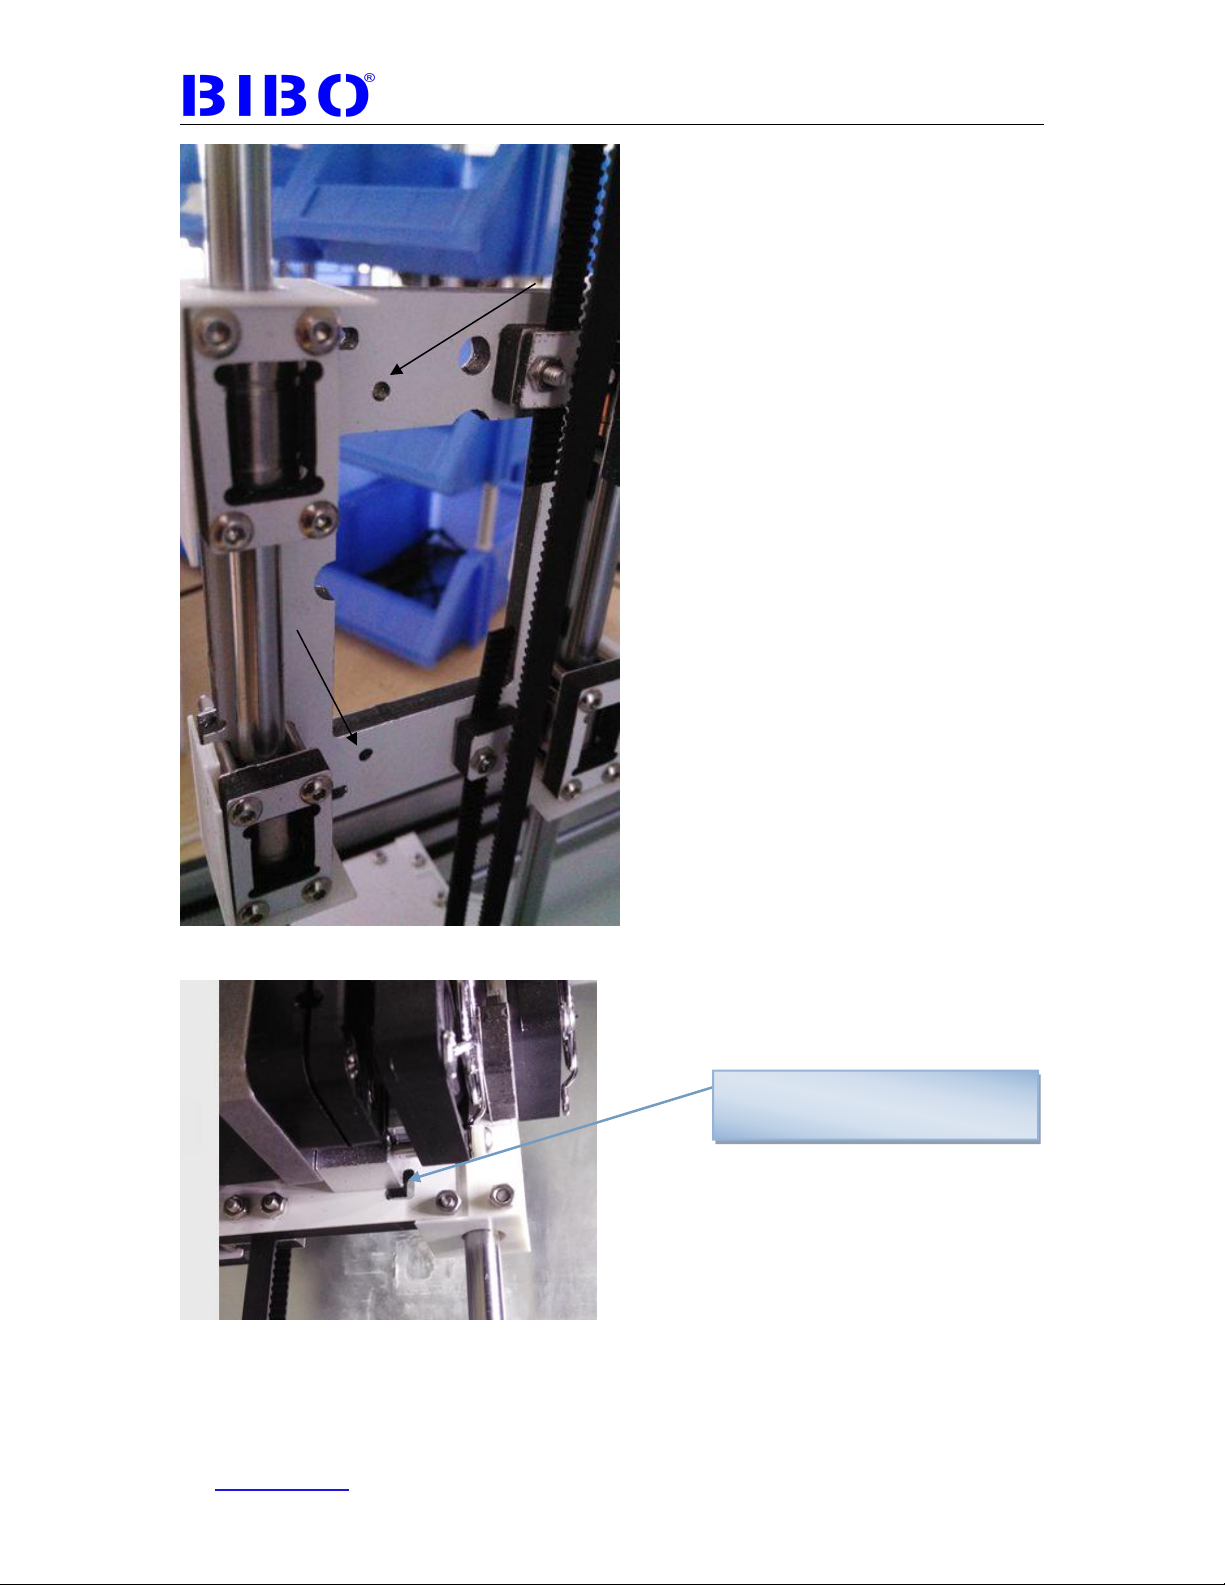
The second step is to install the filament guide tube support on the back of the
printer with 16mm length bolts and nuts (bolts in a bag marked with 16 ), and do
not connect the black coupler first as the photo below.
These raised
edge sides
should be
connected in
the same
direction
Push this first when
unlock the black
coupler
Extruder1(right extruder)
Extruder2(left extruder)
Put this
connector down
to avoid
knocking the
front panel
Shaoxing Bibo Automatic Equipment Co., Ltd.
Tel:+86 575 88918283 Mobile:+86 133 25759139
Url: www.ourbibo.com E-Mail: bibo@ourbibo.com
8
The third step is to install filament holders on the back of printer with two big white
bolts.
Some printers’ filament holders are fixed in a different way, with 12mm length
bolts (in a bag marked with 12). Please kindly check the photo as below:
Pleas press two nuts by two fingers
during assembly to avoid nuts falling
down.
Please do not connect the
black coupler first
Shaoxing Bibo Automatic Equipment Co., Ltd.
Tel:+86 575 88918283 Mobile:+86 133 25759139
Url: www.ourbibo.com E-Mail: bibo@ourbibo.com
9
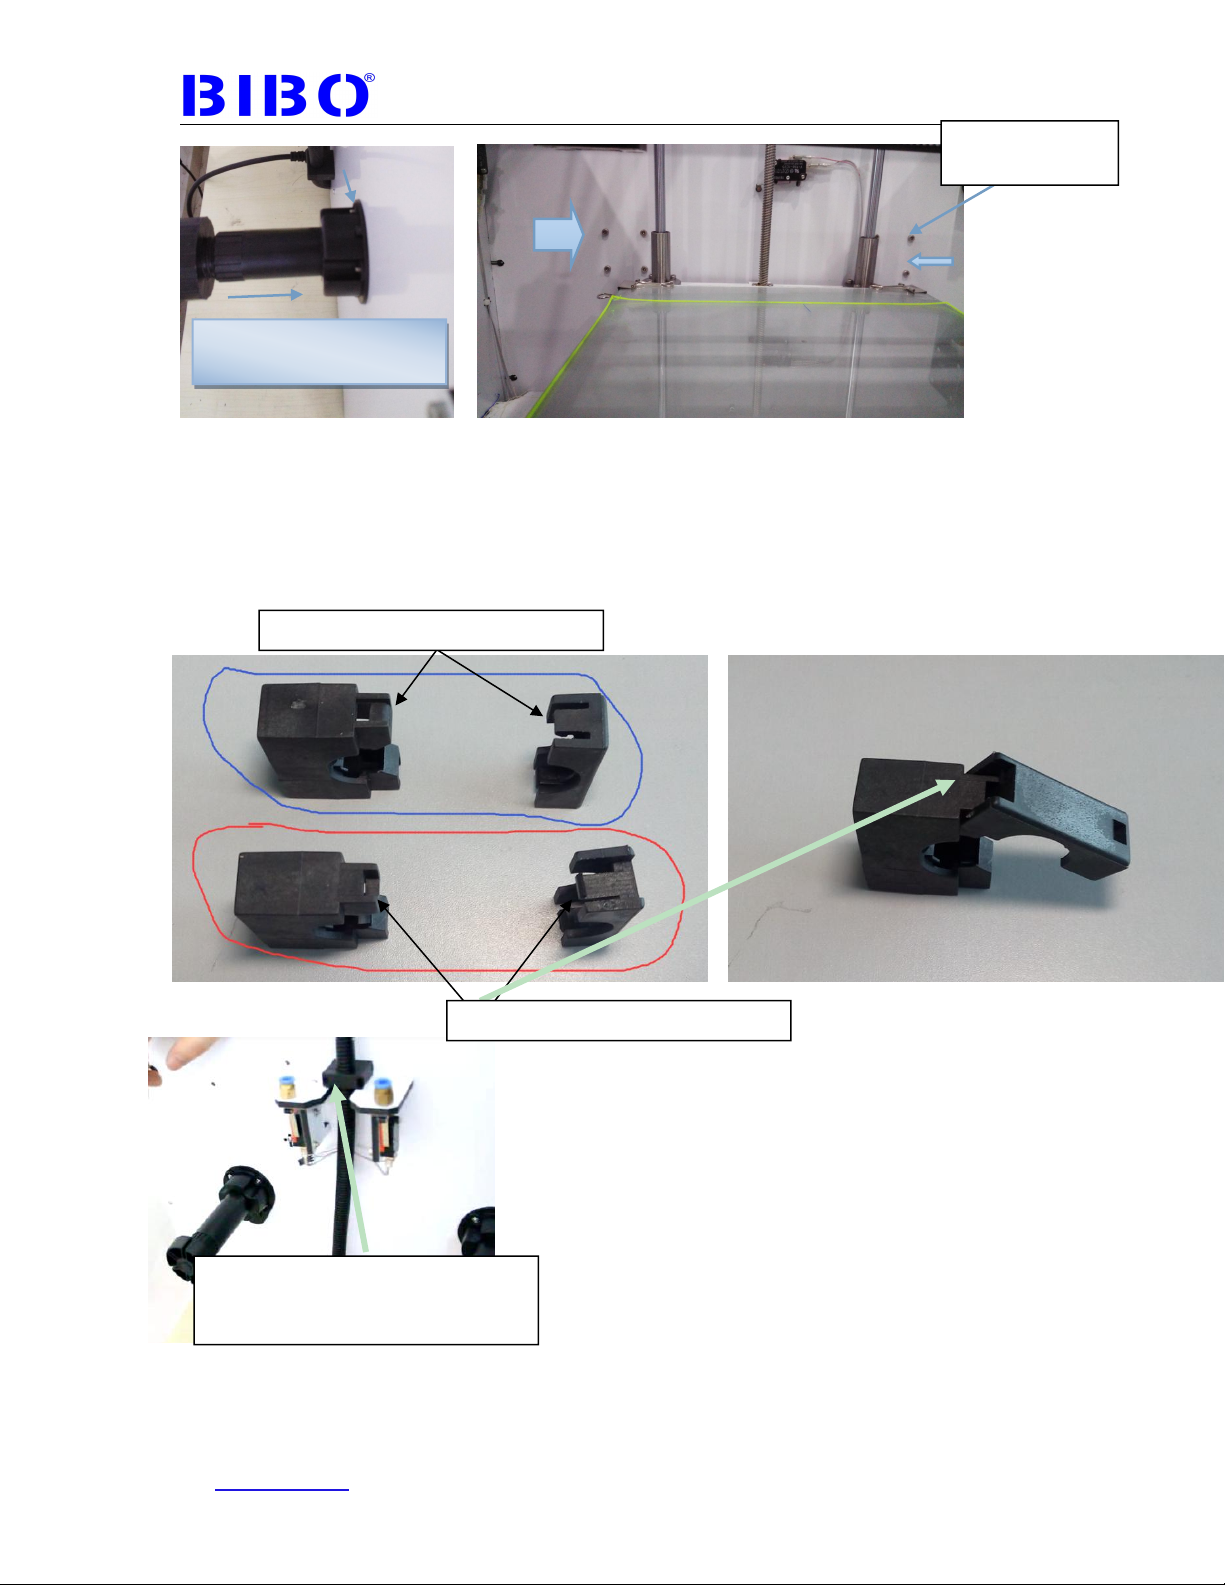
The fourth step is to assemble the extruder wire clamp with 16mm or 12mm
length bolt. We have sent you two clamps. One is to be assembled on the top side
of the printer’s back panel, and the other one is for spare. Please kindly check
the photoes as below. Let the black wire cable be straight (just only a little
tight) . If too loose, the black wire may be not long enough for extruders to travel
inside the printer.
Congratulations! You have completed the initial hardware installation!
For acrylic cover installation, it is in chapter 8. You can install it after first printing
test.
Black tube can be inserted
into black support
Bolt cap this
side
This two sides should be locked first
This two side should be locked later
If you want to unlock the clamp, you
can insert allen wrench or
screwdriver to the hole of the clamp
Indice


