Denver CCT-1301 MK2 Manuale utente

ENG-1
CCT-1301 MK2
USER MANUAL
www.facebook.com/denverelectronics
de nv er- e le c t ro n ic s. c om

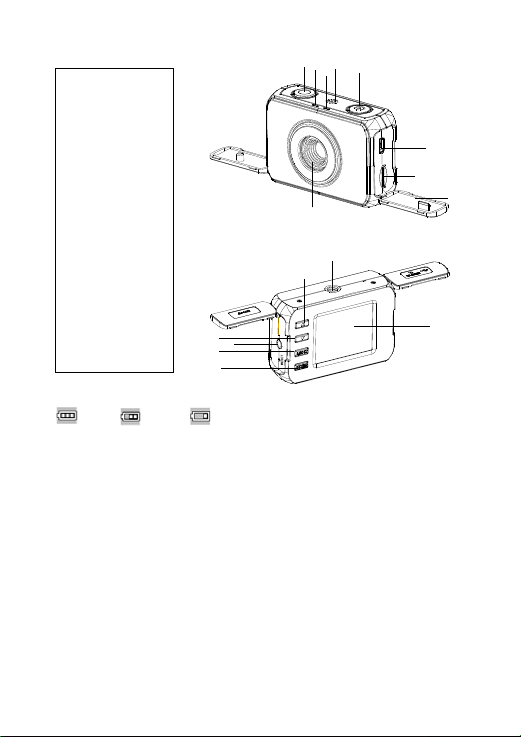
1.Shutter
2.Speaker
3.ON/OFF
4.USB port
5.Micro SD card slot
6.Lens
7.Charging indicator
light
8.Busy indicator light
9.Cover
10.Screen
11.Mode
12.Menu
13.AV port
14.Down (Zoom out)
15.Up (Zoom in)
16.Tripod slot
For the power capacity in the battery, refer to the following icons:
Full Middle Low
1 .Connect device to car adaptor through Mini-USB port, device will power on automatically &
enter standby mode and start charging with red indicator light ON. Once device has been fully
charged, red indicator light goes out.
2. Connect device to PC via USB cable, device will power on automatically and start charging.
Once device has been fully charged, red indicator light goes out.
Installation and Removal of micro SD card
1. In the direction as indicated, insert the micro SD card into the slot until it is held firmly.
2. To take the micro SD card out, slightly press the micro SD card to eject it out.
[Note]:
1. Observe the direction to insert the micro SD card; if the direction is wrong, the device and/or
the micro SD card may be damaged.
2. When the micro SD card is inserted into the device, the machine will set the micro SD card as
preset storage.
3. If the micro SD card is incompatible with the device, please insert the card again or replace it
for retry.
ENG-2
17823
4
5
9
6
16
15
11
14
12 13
10

ENG-3
4. PLEASE USE 8GB-32GB/CLASS 10 (C10) MICRO SD CARDS ONLY.
5. Please insert the micro SD card ONLY when device is OFF.
Operation Instructions
Turn ON/OFF Device
1. Press the ON/OFF key for 1 second to switch ON and hold for 1 seconds to switch OFF device
manually.
2. Connect the device with car charger in the car. When car engine starts up, device will be
switched ON automatically. When car engine shuts off or car charger been disconnected,
device switches OFF with 10 seconds delay.
How to Enter System Setup
In Video / Photo / Vehicle mode, continuous press the Menu key to select the System Setup, press
the UP/Down - shutter key to setting:
-Sound Effect: Shutter: [on]/[off]
Start-up: [on]/[off]
Beep: [on]/[off]
-Frequency: [50HZ]/ [60HZ]
-Auto Power Off:[OFF]/[1min]/[2min]/[3min]
-Language: You may set the desired OSD language menu.
[German]/[Danish]/[Spanish]/[French]/[Italian]/[Dutch]/[Polish]/[Portuguese]/[Swedish]/
[Finnish]/[English]
-TV Mode: [NTSC] / [PAL]
-Format: Format the memory card. [YES ]/[NO]
-Default Setting:[YES ]/[NO]
Take Video and Set Video Menu
1. Take video
When its powered of enter the Vehicle mode as default; press the Mode key to enter the video
mode with icon displaying at the upper-left corner of screen. Press the ‘Shutter’ key to start
video recording after proper Micro SD card been inserted. During recording, the red icon
flashes. To stop, press and hold power 2 second.
2. Set Video Menu
Press Menu to switch this options.
-Video Resolution :[1280*720 HD]/[640*480 VGA]
-Loop recording time: [3 Minutes]/[5 Minutes]/[10 Minutes]/[off]. To record, store and recycle the
video file by 3/5/10 minutes per section.
-Date: [on]/[off]/[Set Date].
-Setup: Refer to setting the System Setup.

ENG‐4
Recording Movie Clips in a car
1. Take Movie Clips
Press the power key to enter the Vehicle mode as default with icon displaying on the
upper-left corner of the screen. Press the ‘Shutter’ key to start recording movie clips after proper
Micro SD card been inserted. During recording, the red icon flashes.
[Note]:
- When the device is mounted on the windshield with car charger connected, it will power ON
and start recording automatically once car engine starts up.
- During charging with car charger connected, it supports simultaneous recording.
2. Set Vehicle menu
Press the MENU button to switch between all the menus.
- Video Resolution: [1280*720 HD]/[640*480 VGA].
- Loop recording: [Off]/[3minutes]/[5minutes]/ [10minutes]. To record, store and recycle the
video file by 3/5/10 minutes per section.
- G Sensor: Off/ low/ Middle/High. Once G sensor turned ON to low/Middle/High sensitivity and
triggered, press 'MODE' button while recording ,the icon turn red and appearing on LCD
screen ,current video file will be locked as important file. Such locked files won’t be recycled by
loop recording function.
- Parking Monitor Mode: [On]/[Off].
- Rotate:[on]/[off]
- Motion detection: [on]/[off]. When car is parked and motion detection turned On, DVR will
detect moving objects in front of car and trigger recording automatically, or stay at standby
state if there’s no object moving.
- Date & Time: [on]/[off]/[Set Date].
- Setup: Refer to setting the System Setup.
Take Photo and Set Photo Menu
1. Take Photos
Press the power key to enter the Vehicle mode as default; press the Mode key to enter the Photo
mode with icon displaying on the upper-left corner of the screen. Then, hold the device firmly,
then press Shutter key to take photos. Photos will be stored into memory card automatically.
2. Set Photo Menu
During photo mode, press MENU key to enter photo menu settings.
- Resolution:[5M 2592*1944] / [3M 2048*1536] / [2M 1600*1200]/[VGA 640*480].
- Image Quality:[Fine]/[Normal]
- Date: [on]/[off]/[Set Date].
- Setup: Refer to setting the System Setup.

ENG-5
Playback Mode
1. Browse files
After the device powers ON and enters the Vehicle mode, press the mode key to enter the
PLAYBACK mode, press the UP/DOWN key to browse the all files.
In the playback mode, press the UP/DOWN key to choose the photo or video to be previewed;
Press the SHUTTER key to play the video, Press the shutter key again to pause, press the UP key to
stop replaying.
2. Delete
In playback mode, press the Menu button to have the Delete/Protect options appearing. Choose
Delete and its submenu ‘Delete one’or ‘Delete all’or ‘Cancel’ file in the memory card.
[Note]: The important files that have been locked by G-sensor or Emergentkeycan’t be deleted.
3. Protect
In playback mode, press the Menu button to have the Delete/Protect options appearing. Choose
Protect and display’ Lock/Unlock One Video’/’Lock all’/’Unlock all’. The locked file cannot be
deleted (except formatting).
[Note]: The G-Sensor locked file may be deleted via menu unlocking.
Connection to PC via USB Cable
1. USB Backup Mode (SDHC)
Connect the DVR and PC with the USB cable, then the device will automatically power on and the
“SDHC” word display on the screen, then one mobile disc will appear on “My Computer” on the
desktop and you may find the desired file in the Mobile Disc/DCIM folder.
2. PC-CAM
1. Press and hold the shutter key, connect the DVR and PC with the USB cable, when the device
power on automatically, the “PC-CAM” display on the screen. At this time, you can enter the
PC functions.
2. PC operation system: Windows 2000/XP/Vista/Windows 7 or above.
3. Choose “PC-CAM”, then the DVR may be used as a camera.
4. Remove the USB cable to turn off the DVR.
Reset
Improper operation or incorrect memory card can cause DVR to freeze. Please press the RESET hole
on the bottom side of DVR to power OFF the DVR. Power ON DVR manually and DVR will
automatically restore the factory default settings.
Connecting the Camcorder to a TV
1. Connect the camcorder to a TV via the AV cable.

ENG‐6
2. Turn on the TV and the camcorder, and then set the TV to “AV” mode.
3. When the camcorder is set to record mode, you can preview the subjects you want to record
on the TV screen.
4. When the camcorder is set to Playback mode, you can review all the files storedin the camera
on the TV.
Technical Specifications
Sensor 1.3 Mega Pixels CMOS
LCD display 1.77" TFT Screen
Lens F/2.8 f=5.3mm
Shutter Electronic Shutter: 1/2 ~ 1/800 sec
Digital zoom 4×
Resolution Image:[5M 2592*1944] / [3M 2048*1536] / [2M 1600*1200]/[VGA640*480]
Video: [1280*720 HD]/[640*480 VGA].
Storage External memory: micro SD card(not included),up to 32GB
Power source Li-ion battery(built in)
Ambient
temperature
Operating: 0° C to 40° C
Storage: -20 to 60° C
Microphone Built-in
Speaker Built-in
Dimension 71.8x46.6x26(mm)
Weight About 55 g
Warning
•Lithiumbatteryinside!
•Donottrytoopentheproduct!
•Donotexposetoheat,water,moisture,directsunlight!
•Onlychargewiththeoriginaladaptorsuppliedwiththisproduct!
CAUTION!

ENG-7
ALL RIGHTS RESERVED, COPYRIGHT DENVER ELECTRONICS A/S
Electric and electronic equipment and included batteries contains materials,
components and substances that can be hazardous to your health and the
environment, if the waste material (discarded electric and electronic equipment
and batteries) is not handled correctly.
Electric and electronic equipment and batteries is marked with the crossed out
trash can symbol, seen below. This symbol signifies that electric and electronic
equipment and batteries should not be disposed of with other household waste,
but should be disposed of separately.
As the end user it is important that you submit your used batteries to the
approriate and designated facility. In this manner you make sure that the batteries
are recycled in accordance with legislature and will not harm the environment.
All cities have established collection points, where electric and electronic
equipment and batteries can either be submitted free of charge at recycling
stations and other collection sites, or be collected from the households. Additional
information is available at the technical department of your city.
Imported by:
DENVER ELECTRONICS A/S
Stavneagervej 22
DK-8250 Egaa
Denmark
www f
a
cebook.. com/denverelectronics

DA-1
CCT-1301 MK2
BETJENINGSVEJLEDNING
www.facebook.com/denverelectronics
de nve r- e le c t ro n ic s. c om
DA-2
1. Udløser
2. Højttaler
3. ON/OFF (tænd/
sluk)
4. USB-port
5. Micro SD kortindstik
6. Linse
7. Ladeindikator
8. Arbejdsindikator
9. Dæksel
10. Skærm
11. Mode-knap
12. Menu-knap
13. AV-port
14. Ned (Zoom ud)
15. Op (Zoom ind)
16. Stativgevind
Batteriets ladetilstand kan aflæses på de herunder viste ikoner:
Fuld Middel Lav
1. Forbind kameraet til 12V bil-adapteren gennem Mini-USB porten, hvorefter kameraet automatisk
tænder, går på standby og begynder at oplade. Under opladningen lyser den røde
ladeindikator.
Når kameraet er fuldt opladet, slukker den røde ladeindikator.
2. Forbind kameraet til en PC via USB-kablet, hvorefter kameraet automatisk tænder og begynder
at oplade.
Når kameraet er fuldt opladet, slukker den røde ladeindikator.
Isætning og udtagning af micro SD-kort
1. Vend micro SD-kortet som anvist og skub det forsigtigt ind i kortindstikket, indtil det klikker på
plads.
2. Når du vil tage micro SD-kortet ud, skal du trykke det blidt ind, til det udløses, hvorefter du kan
tage det ud.
[Bemærk]:
1. Vær opmærksom på at vende kortet rigtigt, når du sætter micro SD-kortet i; hvis du vender kortet
forkert, kan det medføre, at kameraet og/ eller micro SD-kortet tager skade.
17823
4
5
9
6
16
15
11
14
12 13
10
Indice
Lingue:
Altri manuali Denver Telecamera da cruscotto


