Lithe Audio LWF1V2 Manuale utente

WWW.LITHEAUDIO.COM/REGISTER
DONT FORGET TO REGISTER YOUR SPEAKER:
INSTRUCTION MANUAL
THANK YOU FOR
CHOOSING LITHE AUDIO
Innovative design and advanced engineering are built in to our wireless Wi-Fi ceiling mount
speakers. Designed for easy installation and high quality sound, within seconds each room is setup
and ready.This manual describes the installation of the speakers within conventional stud and
sheetrock (Joist and plasterboard) ceilings.
1

IMPORTANT SAFETY WARNING
BEFORE USE PLEASE READ COMPLETELY AND USE THE PRODUCT
IN ACCORDANCE WITH THESE SAFETY INSTRUCTIONS.
Before commencing any electrical work ensure the supply is switched OFF at the mains. Either
by switching off the consumer unit or by removing the appropriate fuse.This product should
be installed in accordance with the relevant sections of the building regulations code and in
accordance with the latest edition of IEE regulations (BS 7671).
If the unit is to be used as a replacement for an existing product, remove the existing unit from its
location and disconnect the wiring. Connect the wires as shown in diagram. Ensure terminals are
properly tightened and ensure no bare wires are visible. When tting the speaker into the ceiling,
ensure no wires are trapped.
READ THE INSTRUCTIONS CAREFULLY BEFORE STARTING THE
INSTALLATION PROCESS AND KEEP THEM SAFE FOR FUTURE
REFERENCE.
• Failure to follow the instructions in this guide voids all warranties on your speakers.
• Warning: Do not use the product in water.
• Warning: Do not install speaker directly above any heat sources such as radiators, or other
apparatus that produce heat.
• Warning: To reduce the risk of re or electric shock, do not expose this speaker to rain or
moisture (directly above bath or shower area) or in Bathroom Zone 0 or Zone 1.
• Protect the power cable from being damaged, do not over stretch cable.
• Only use attachments/accessories specied by the manufacturer Lithe Audio.
• Turn off the power to the speaker when unused for long periods of time.
• A Fire and Acoustic speaker hood must be used in accordance with UK building and IEE
Regulations with a re rating of up to 60 minutes, is Parts B, L, C and E compliant.
• Do not open the back cover to the speaker as this protects the PCB as this will invalidate the
warranty and could cause electric shock.
• Ensure speaker location is free from obstructions such as electrical conduit, HVAC ducts or
Water lines.
2

IMPORTANT SAFETY WARNING
USA REGULATIONS
BEFORE USE PLEASE READ COMPLETELY AND USE THE PRODUCT
IN ACCORDANCE WITH THESE SAFETY INSTRUCTIONS.
The Power adaptor (supplied) should not be placed in a dead space such as a wall or ceiling. In
accordance with US National Electrical Code. A DC extension cable must be used in conjuction
with the power adaptor supplied and placed inside / on top of cabinet or anywhere where you
have accessibility. (Each situation is unique to the install, consult your local building codes or con-
tact Authorized Dealer or Installer)
If the unit is to be used as a replacement for an existing product, remove the existing unit from its
location and disconnect the wiring. Connect the wires as shown in diagram. Ensure terminals are
properly tightened and ensure no bare wires are visible. When tting the speaker into the ceiling,
ensure no wires are trapped.
READ THE INSTRUCTIONS CAREFULLY BEFORE STARTING THE
INSTALLATION PROCESS AND KEEP THEM SAFE FOR FUTURE
REFERENCE.
• Failure to follow the instructions in this guide voids all warranties on your speakers.
• Warning: Do not use the product in water.
• Warning: Do not install speaker directly above any heat sources such as radiators, or other
apparatus that produce heat.
• Protect the power cable from being damaged, do not over stretch cable.
• Only use attachments/accessories specied by the manufacturer Lithe Audio.
• Turn off the power to the speaker when unused for long periods of time.
• A Fire and Acoustic speaker hood must be used in accordance with UK building and IEE
Regulations with a re rating of up to 60 minutes, is Parts B, L, C and E compliant.
• Do not open the back cover to the speaker as this protects the PCB as this will invalidate the
warranty and could cause electric shock.
• Ensure speaker location is free from obstructions such as electrical conduit, HVAC ducts or
Water lines.
3
3
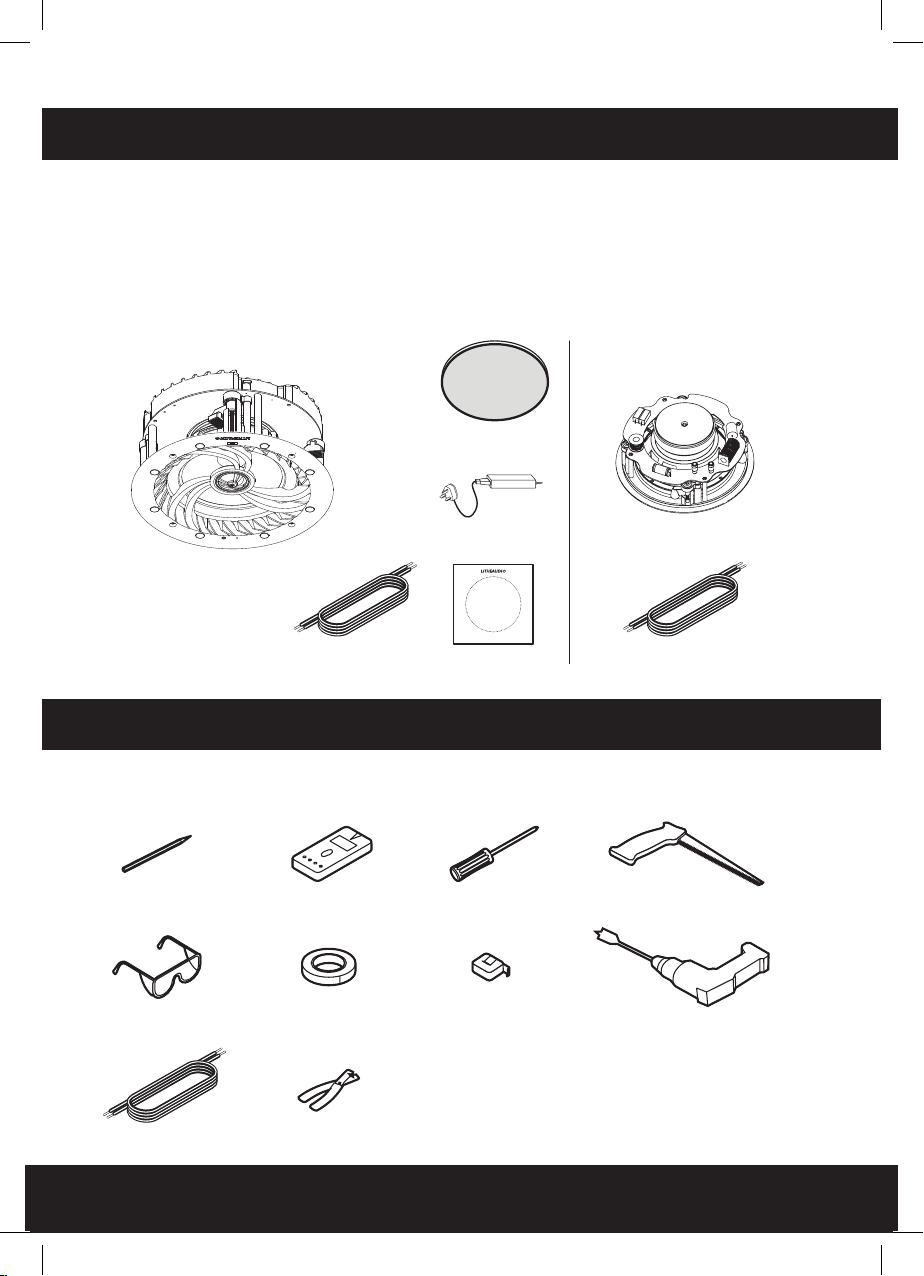
Please ensure you read the entire instruction manual carefully before you commence any work.
Carefully unpack the speakers from the packaging. Please check to ensure all the parts shown
below are included.
If any parts of the speaker appear damaged, please contact your dealer/reseller immediately or
contact www.Litheaudio.com for contact details.
BOX CONTENTS
Listed below is the hardware equipment needed to install the speaker, with the addition of
a ladder to ensure the installation is done safely. A cutting template is included in the box.
PREPARATION EQUIPMENT YOU WILL NEED
WI-FI CEILING
SPEAKER
CUTTING GUIDE 5M SPEAKER CABLE
SCREWDRIVER
MEASURING TAPE
PENCIL
PROTECTIVE EYEWEAR
SPEAKER CABLE
POWER ADAPTOR
CUTTING SAW
DRILL
STUD FINDER
TAPE
WIRE CUTTERS
SPEAKER GRILLE
MODEL LWF1V2 PAIR MODELS
ALSO INCLUDE
PASSIVE CEILING SPEAKER
4
20’ DC EXTENSION
CABLE (OPTIONAL)
5
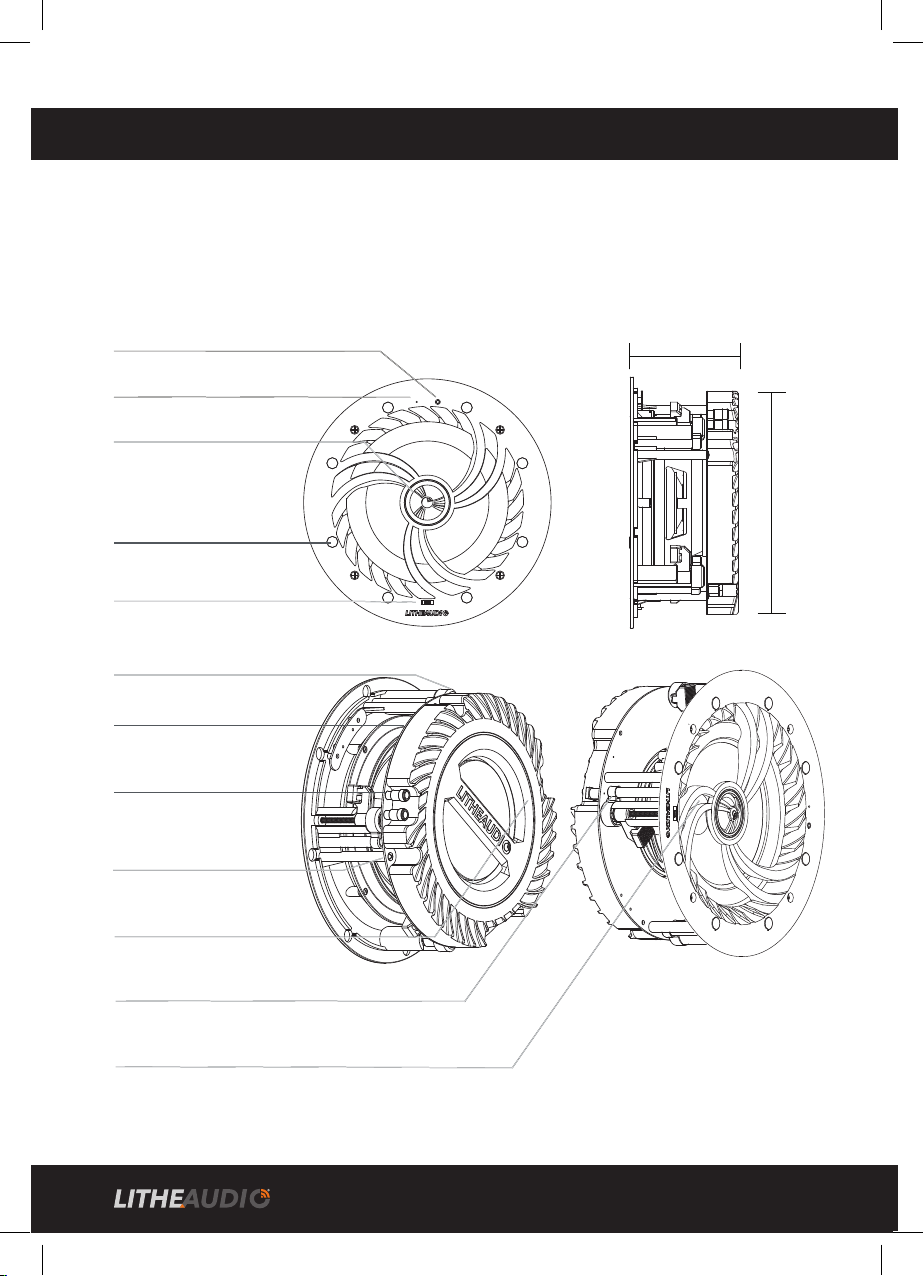
KNOW YOUR SPEAKER
The Lithe Audio LWF1V2 range of Wi-Fi ceiling wireless speakers have various inputs and outputs:
SPEAKER OUTPUT - To connect one additional passive (Slave) speaker (Gold Plated)
RCA INPUT - To connect directly from existing Hi-Fi equipment
POWER INPUT - To connect (as supplied) transformer
6.5” (165mm) Glass Fibre Woven/Polyproplene cone
In built over voltage, under voltage, over temperature, and short circuit protection, if there is an electrical fault,
the power supply to the amplier will cut off automatically and restart when the speaker has stabilised.
Power input 24V/2.5A
RCA-(Black)
Left for Stereo and Right for Mono
R+ (Red) R- (Black)
RCA+(Red)
Speaker output (Right)
RCA Input
Dog leg easy install xings (4)
Titanium tweeter
Stereo & Mono switch
Built in Amplier
& Wi-Fi chipset
Magnets for Cover (8)
Environmental equalizer
(+/- 3db)
LED indicator
Connection Reset Button
97mm ceiling
depth required
210mm
hole
cutout
(template
supplied)
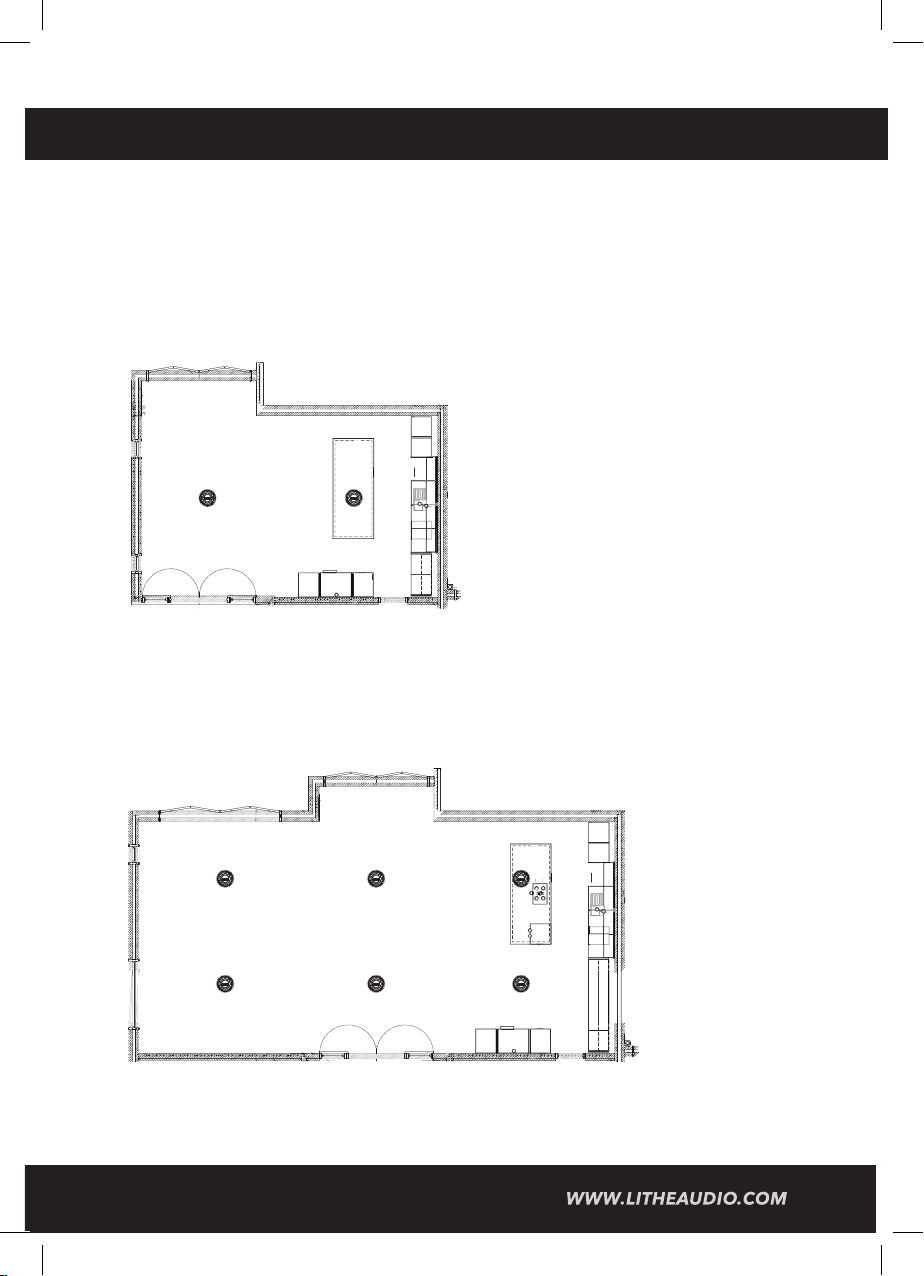
SPEAKER PLACEMENT
IMPORTANT: BEFORE COMMENCING ANY WORKS, DETERMINE YOUR PRIMARY
LISTENING POSITION. IF YOU ARE UNSURE SEEK HELP FROM AN AV INSTALLER
FOR OPTIMUM RESULTS.
2 SPEAKER PLACEMENT
In an ideal scenario, the two speakers should be spaced equally apart from the primary listening
position.Where posible, place the speakers approx 3” / 1m from the wall
4 SPEAKER PLACEMENT
Ideally, the two speakers to the front and two speakers to the rear should be spaced equally apart
from the primary listening position to provide balanced listening experience. Where posible, place
the speakers approx 3” / 1m from the wall.
NOTE: For optimal sound when using speaker in vaulted ceilings switch the environmental equaliser
switch to +3dB, when using speakers in a tiled environment (Bathroom) switch equaliser to -3dB.
5 6
210mm
hole
cutout
(template
supplied)
A
B
B
B
A
B
B
B
INSTALLATION
IMPORTANT: BEFORE COMMENCING ANY ELECTRICAL WORK ENSURE
THE SUPPLY IS SWITCHED OFF AT THE MAINS. IF YOU ARE UNSURE HOW TO
FIT SEEK HELP FROM A PROFESSIONAL ELECTRICIAN / AV INSTALLER
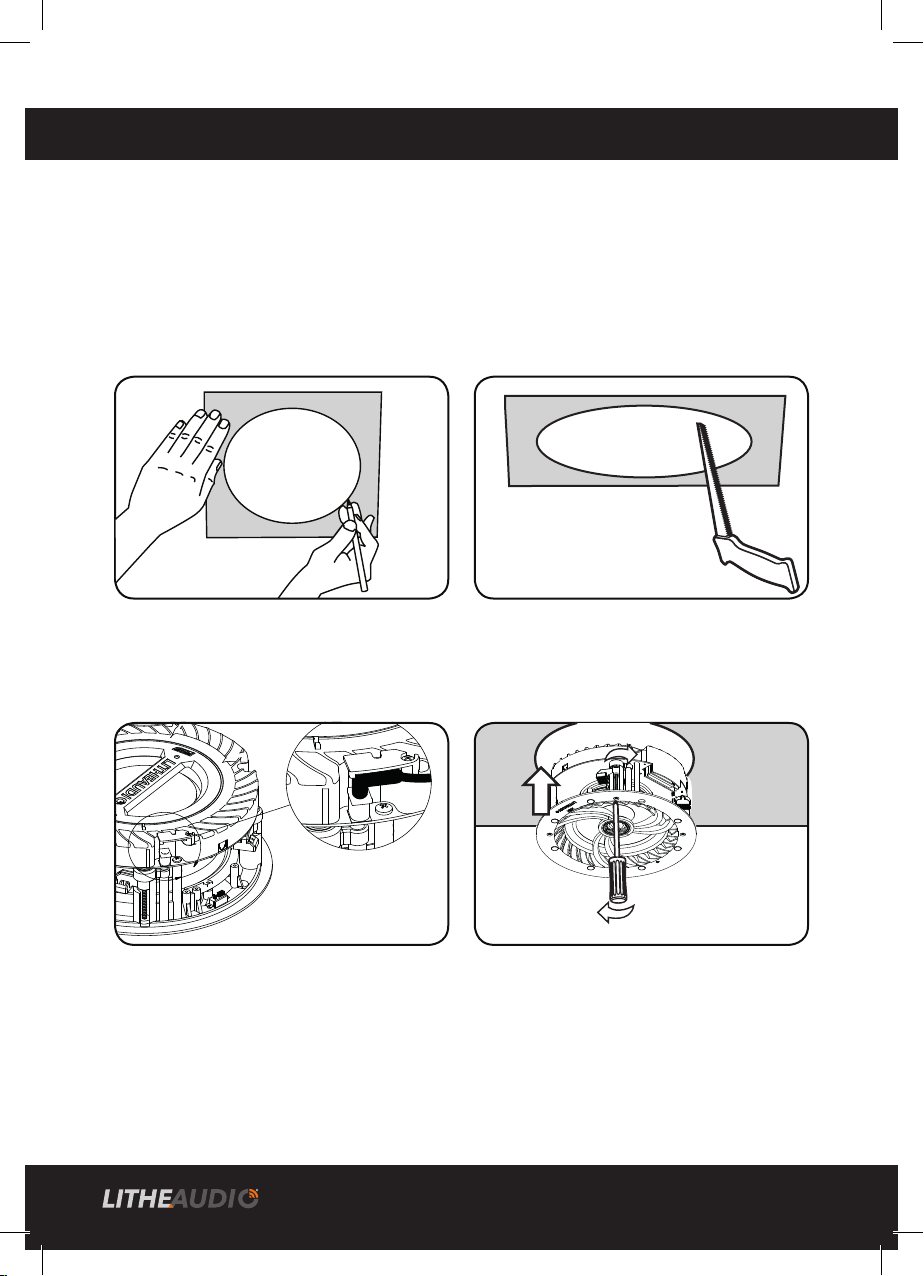
1. Mark out the position of the speaker using a
tape measure and mark using a pencil with the
template supplied. Check using a stud nder to
make sure no obstruction is present prior to
cutting.
3. Connect the power lead from the
transformer (supplied) to a 13A mains plug
socket or terminate to a dedicated 3A fused spur.
Ensure the power lead is not overstretched.
2. Drill a pilot hole and cut the speaker hole
using a cutting saw. Take caution when
cutting to keep ngers away from cutting
blade and wear protective eyewear.
4. Insert speaker into the ceiling then using a
screwdriver lock the 4 dog leg xings to secure
the speaker in place, do not over tighten.
Attach the magnetic grille to the speaker front.
PAINTING THE SPEAKER GRILLE
Do not paint the speaker grilles whilst attached to the speaker. Lithe Audio reccomends spray
painting using 5 parts thinning agent to 1 part paint. Spray thinly to ensure speaker cover grille holes
are not blocked as this will effect the sound quality of the speakers.
INSTALLATIONS IN FIRE-RATED CEILINGS
If you plan to mount your speakers in a re-rated ceiling, you should purchase a re hood for the
speaker.Visit www.litheaudio.com for more information and reccomended hoods.
INSTALLATION USA
IMPORTANT: BEFORE COMMENCING ANY ELECTRICAL WORK ENSURE
THE SUPPLY IS SWITCHED OFF AT THE MAINS. IF YOU ARE UNSURE HOW TO
FIT SEEK HELP FROM A PROFESSIONAL ELECTRICIAN / AV INSTALLER
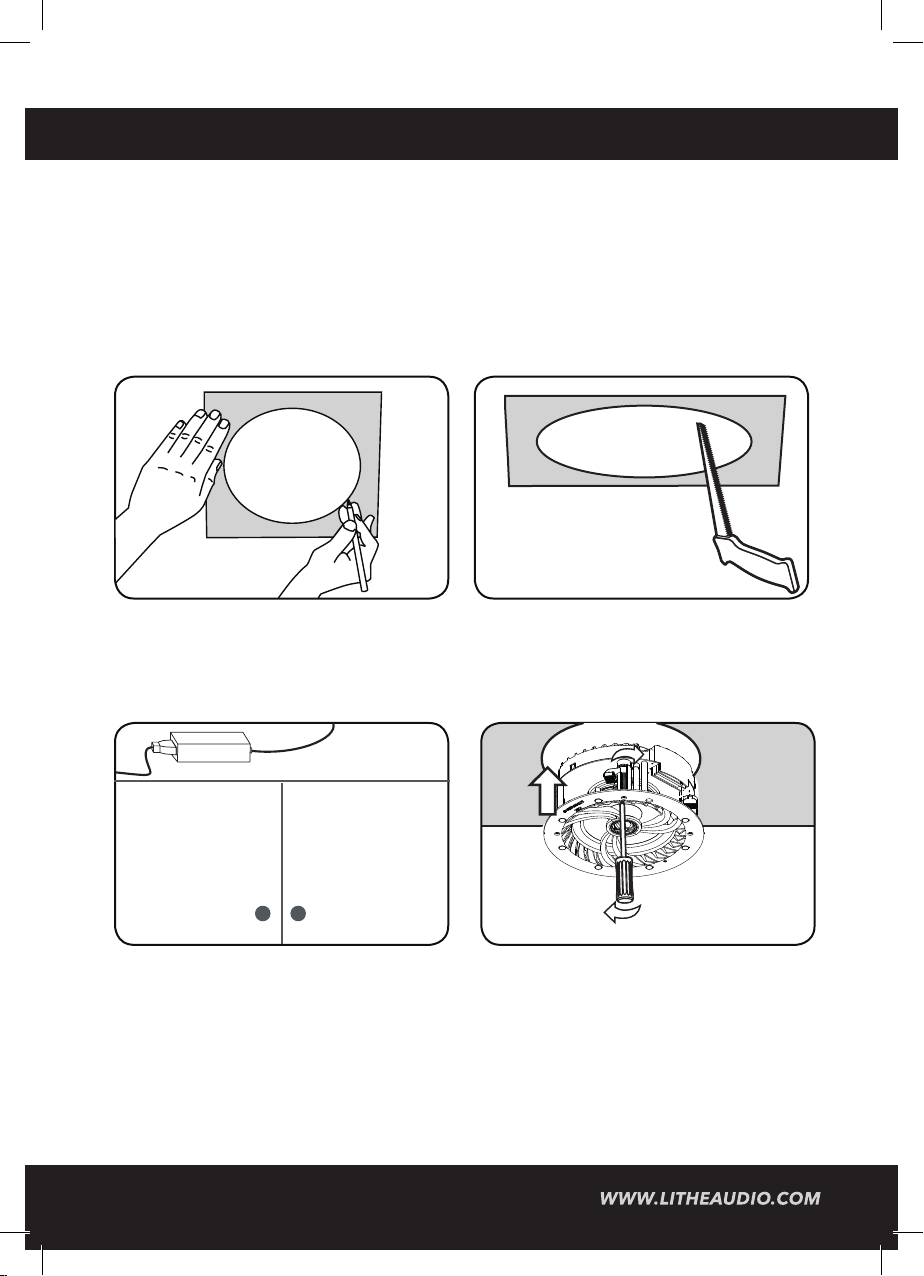
1. Mark out the position of the speaker using a
tape measure and mark using a pencil with the
template supplied. Check using a stud nder to
make sure no obstruction is present prior to
cutting.
3. To meet the NEC code for this type on install,
connect the DC extension cable to power adap-
tor and place power adapter inside/ on top of
cabinet or anywhere you have easy access.
2. Drill a pilot hole and cut the speaker hole
using a cutting saw. Take caution when
cutting to keep ngers away from cutting
blade and wear protective eyewear.
4. Insert speaker into the ceiling then using a
screwdriver lock the 4 dog leg xings to secure
the speaker in place, do not over tighten.
Attach the magnetic grille to the speaker front.
PAINTING THE SPEAKER GRILLE
Do not paint the speaker grilles whilst attached to the speaker. Lithe Audio reccomends spray
painting using 5 parts thinning agent to 1 part paint. Spray thinly to ensure speaker cover grille holes
are not blocked as this will effect the sound quality of the speakers.
INSTALLATIONS IN FIRE-RATED CEILINGS
If you plan to mount your speakers in a re-rated ceiling, you should purchase a re hood for the
speaker.Visit www.litheaudio.com for more information and reccomended hoods.
A
B
B
B
8

YOUR HOME WI-FI NETWORK
To enable the Lithe Audio Wi-Fi ceiling speakers, your device must be on the same network.
• Ensure your network has a high speed internet connection, as the speakers are designed to
provide you with free online software/rmware updates.
• High speed DSL / cable modem, or ber to the home broadband is recommended for best
possible playback of music services.
• Lithe Audio communicates over a 2.4GHz & 5GHz Wi-Fi home network supporting 802.11
a, b, g, n, ac wireless technology only.
• For larger homes where Wi-Fi signal is not stable, we suggest adding access points/mesh
network to strengthen the network or updating your router to a higher specication model
to suit the demand.
LITHE AUDIO APP
• To enhance your listening experience download Lithe Audio app via the app store on your
device follow the setup procedures within this instruction manual.
• The app will allow you to setup singular rooms, groups of speakers or play in Party Mode.
• You can connect multiple speakers simultaneously and control them all from the app.
STATUS INDICATOR LIGHT
Located on the front face of the speaker, the LED Indicates the status of your speaker:
• Red solid: Speaker booting up
• Red quick ash (1s 4 times): Speaker under restart operation
• Red slow ash (3s 1 time): Speaker under standby mode, waiting for user operation
• Green solid: Speaker is active and connected to Wi-Fi
• Blue Solid: Bluetooth speaker connected
• Green slow ash(1s 1 time): Speaker trying to connect to the precongured Wi-Fi
• Solid purple: Speaker under RCA mode
• Green quick ash(1s 4 times): Speaker in WAC/SAC mode, user to congure Wi-Fi
Altri manuali per LWF1V2
1
Questo manuale è adatto per i seguenti modelli
4
Indice
Altri manuali Lithe Audio Altoparlanti

Lithe Audio
Lithe Audio LBT2 Manuale utente

Lithe Audio
Lithe Audio LHS300 Manuale utente

Lithe Audio
Lithe Audio LBT2 Manuale utente

Lithe Audio
Lithe Audio LWF1 Manuale utente

Lithe Audio
Lithe Audio LBT2 Manuale utente

Lithe Audio
Lithe Audio LWF2/IP Manuale utente

Lithe Audio
Lithe Audio iO1 Series Manuale utente

Lithe Audio
Lithe Audio PRO Series Manuale utente

Lithe Audio
Lithe Audio Garden Rock Manuale utente

Lithe Audio
Lithe Audio LWF1V2 Manuale utente


