Obvius A8911-23 Manuale utente

A8911-23 Modbus Pulse Input Module
Obvius, LLC
Installation and Operation Manual
Date Nov 3, 2 11
Page 1 A8911-23
www. .com information@itm.com1.800.561.8187

Copyright Information
Copyright © 2006 - 2011 by Obvius
Obvius and AcquiSuite are trademarks of Obvius Holdings LL
Other brand and produ t names are trademarks or registered trademarks of their respe tive holders.
U.S. Government Restricted Rights: Use, dupli ation or dis losure by the Government is subje t to restri tions set fourth in subparagraph (a) through
(d) of the Commer ial Computer Restri ted Rights lause at FAR 52.227-19 when appli able, or subparagraph ( ) (1) (ii) of the Rights in Te hni al Data
and Computer Software lause at DFARS 252.227-7013, and in similar lauses in the NASA FAR Supplement.
Limited Warranty
OBVIUS IS PROVIDING THIS WARRANTY IN LIEU OF ALL OTHER EXPRESS OR IMPLIED WARRANTIES, INCLUDING ANY WARRANTY
OF MERCHANTABILITY OR FITNESS FOR A PARTICULAR PURPOSE. THIS WARRANTY IS BUYER'S EXCLUSIVE REMEDY FOR ALL
CLAIMS AGAINST OBVIUS. OBVIUS SHALL NOT BE LIABLE FOR ANY CONSEQUENTIAL OR INCIDENTAL DAMAGES. OBVIUS'S TOTAL
LIABILITY FOR ALL CLAIMS SHALL BE LIMITED TO THE PRICE PAID FOR ITS PRODUCT.
Obvius promises buyer that any standard produ t manufa tured by Obvius shall be free from all material defe ts in design, material, or manufa turing for
a period of 2 years from the manufa ture date; provided, however, that the warranty shall not extend to ordinary wear and tear or to normally repla eable
omponents (e.g., batteries). During the warranty period, Obvius may repair or repla e (in its sole dis retion) any produ t suffering from a warranty defe t
and returned freight prepaid by buyer, with no harge to buyer for any warranty repair or repla ement. The warranty shall remain in full for e and effe t
for su h 2 year period, provided that the produ t: (1) was installed, operated, and maintained properly; (2) has not been abused or misused; (3) has not
been repaired, altered, or modified outside of Obvius's authorized fa ilities; (4) has not been sold subje t to other warranty terms spe ified at the time of
sale; and (5) is still owned by the original pur haser. This warranty provides spe ifi legal rights that may be varied by state law. Obvius's produ ts are not
designed for life or safety appli ations.
Product Application Limitation
Obvius produ ts are not intended for use in riti al appli ations su h as nu lear fa ilities, human implantable devi es or life support. Obvius is not liable,
in whole or in part, for any laims or damages arising from su h uses.
Obvius strongly believes in ontinuous improvement, therefore we must reserve the right to hange spe ifi ations and produ t offerings without noti e.
Where possible, we will substitute produ ts with equivalent fun tionality when ne essary.
NOTICE
●This product is not intended for life safety applications.
●Do not install this product in hazardous or classified locations.
●The installer is responsible for conformance to all applicable codes.
FCC Part 15 Information
Note: This equipment has been tested by the manufacturer and found to comply with the limits of a class A digital device, pursuant to part
15 of the FCC rules. These limits are designed to provide reasonable protection against interference when the equipment is operated in a
commercial environment. This equipment generates, uses, and can radiate radio frequency energy and, if not installed and used in
accordance with the instruction manual, may cause harmful interference to radio communications. Operation of this equipment in a
residential area is likely to cause harmful interference in which case the user will be required to correct the interference at his own expense.
Modifications of this product without the express authorization of Obvius nullify this statement.
Page 2 A8911-23
www. .com information@itm.com1.800.561.8187

Table of Contents
Markings and Symbols:...............................................................................................................................................................3
Overview......................................................................................................................................................................................4
Features and Spe ifi ations.........................................................................................................................................................4
Installation Che klist...................................................................................................................................................................4
Ele tri al Conne tions.................................................................................................................................................................5
Hardware Installation...................................................................................................................................................................5
Configuration...............................................................................................................................................................................6
Operation.....................................................................................................................................................................................6
Troubleshooting...........................................................................................................................................................................7
Register Listing......................................................................................................................................................................7
Register Fun tions..................................................................................................................................................................9
A8911-23 Firmware Update......................................................................................................................................................10
Me hani al Drawings................................................................................................................................................................11
Markings and Symbols:
WARNING: A potential risk exists if the operating instru tions are not followed
General Warning Symbol: This symbol indi ates the need to onsult the operating instru tions provided with the
produ t.
This symbol indi ates the presen e of ele tri sho k hazards.
This symbol indi ates: Do not apply to or remove from hazardous live ondu tors.
Dire t Current symbol.
Page 3 A8911-23
www. .com information@itm.com1.800.561.8187

Overview
The A8911-23 is designed for pulse ounting appli ations where large number of pulse output devi es need to be onne ted
to a Modbus network. The A8911-23 will ount onta t losures on 23 separate inputs and store the totalized pulse ount
internally using non-volatile memory. The pulse ount totals are then read using the RS485/Modbus proto ol. Appli ations
in lude reading gas/water/ele tri meters in ommon building areas for energy information and reporting purposes.
Features and Specifications
Pro essor Arm7, field upgradeable firmware.
LED 23 input status LEDs (red), 2 Modbus TX/RX (yellow), 1 power/alive status. (green)
Proto ols Modbus/RTU
Power Supply 9VDC to 30VDC, 200mA, Required (not in luded)
The unit is to be sour ed by a NEC Class 2 power supply, or Listed ITE power supply marked LPS and
rated from 9 to 30Vd , 200 mA minimum but not to ex eed 8A
Serial Port1RS-485 two wire, 19200 or 9600 baud. N81
Pulse Inputs123 independent pulse ount inputs.
Intended for use with isolated dry onta t outputs.
Pulse rate/width user sele table to 10hz, 50hz or 100hz.
Pulse rate option: 10hz, minimum pulse width 50ms
Pulse rate option: 50hz, minimum pulse width 10ms
Pulse rate option: 100hz, minimum pulse width 5ms
Conta t losure threshold 100Ω to 2.5kΩ user sele table
Pulse ount values are stored in non-volatile memory.
Isolation2: Pulse inputs, power input and RS485 are non-isolated.
Environmental Pollution Degree 2, Altitude up to 2000M.
For indoor and outdoor use when used in an appropriate en losure.
The A8911-23 must be mounted inside a NEMA rated ele tri al en losure for safety and isolation
requirements.
North Ameri a: Indoor, temperature -30º - +70º , 0 - 95% humidity, non- ondensing. 4
Safety UL61010 Re ognized4
File: E320540 (Model A8911-23)
EMC FCC CFR 47 Part 15, Class A
EN 61000, EN 61326
Size 4.13” x 3.39” x 1.18” (105mm x 86mm x 30mm)
Mass 3.7 oz (105 g)
1 inputs are intended for low voltage NEC Class 2 or equivalent outputs.
2 if the produ t is used in a manner not spe ified by the manufa ture, the prote tion provided by the equipment may be
impaired.
4 Devi es manufa tured before Nov 1, 2011 are rated to
0 ~ 50 , and are not UL re ognized.
Installation Checklist
The following omponents are required for a omplete A8911-23 I/O module installation:
●A8911-23 I/O module
●Modbus/RTU master devi e su h as an A quiSuite™ A8812 server
●Pulse output meter
●Power supply: 24VDC typi al. (9VDC to 30VDC ok)
●Wire. Typi ally 18 to 24 gauge 3 for pulse meter onne tion.
●2 wire, twisted pair with shield for Modbus/RS485 onne tion. (Belden 1120A or equivalent)3
●Optional: Termination resistor (120 ohm) for long RS485 runs over 200ft.
3 Wire onne ted to pulse meters inside high voltage panels should have an insulation rating in ex ess of the servi e voltage.
Consult a li ensed ele tri ian and lo al building odes for further requirements that may apply.
Page 4 A8911-23
www. .com information@itm.com1.800.561.8187

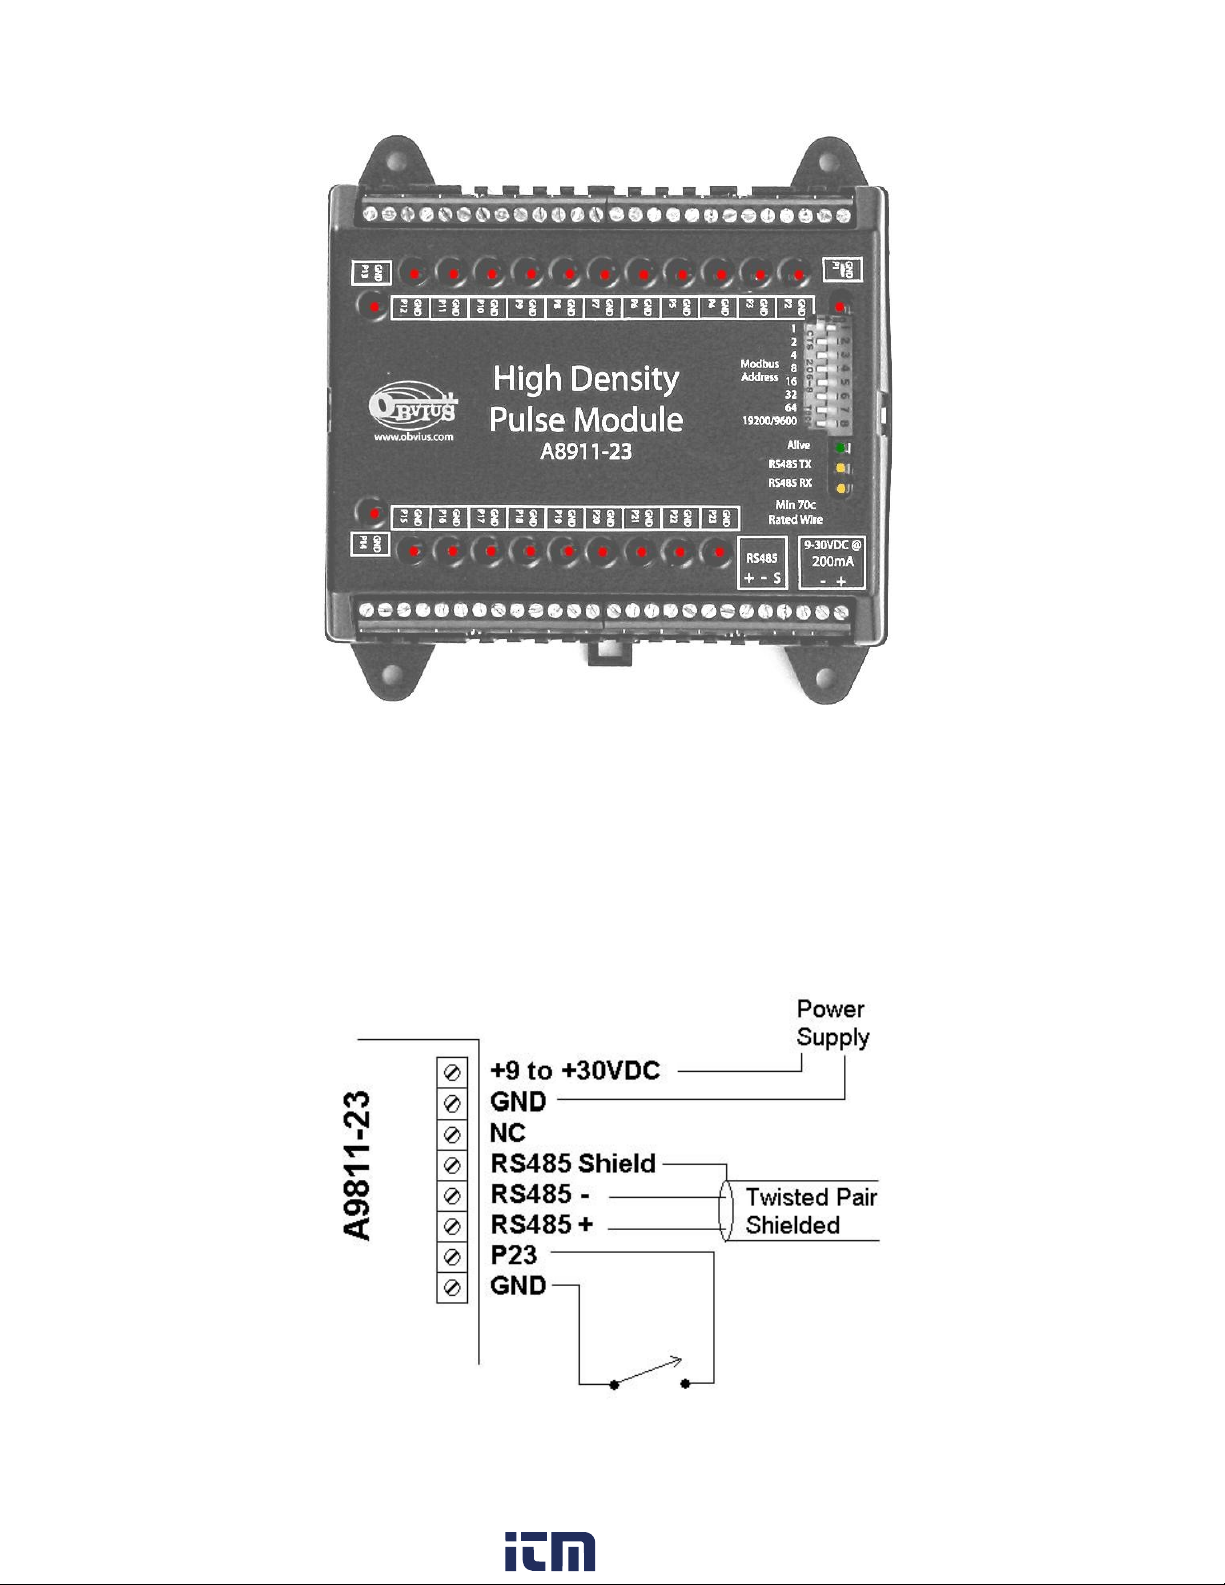
lectrical Connections
Hardware Installation
1) Mount the A8911-23 on a DIN-Rail or appropriate mounting en losure.
2) Atta h the power supply to the input terminals on the A8911-23 module.
3) Turn on the power supply. Confirm the green Alive LED starts blinking. Turn off the power to the module.
4) Atta h the RS485 +, - and shield wires to the A8911-23 module. Atta h the other end of the RS485 line to the
Modbus master devi e, su h as an A quiSuite. Be areful to observer polarity on both ends of the RS485
onne tion. RS485 wiring runs should be limited to 4000 ft.
Page 5 A8911-23
www. .com information@itm.com1.800.561.8187

5) Set the Modbus address dipswit hes and baud rate dipswit h. For more information on the swit h options, see the
se tion below for onfiguration.
6) Turn on the power supply. Confirm the green Alive LED starts blinking. Also he k the RS485 yellow LEDs.
- If the A8911-23 re eives any Modbus traffi on the RS485 port, the yellow RX led should blink.
- If the A8911-23 re eives a Modbus query that is addressed to it spe ifi ally, the yellow TX LED should blink and
it will respond to the query.
If you are using an A quiSuite Data A quisition Server, the A9811-23 should appear in the Modbus devi e list after
about 2 minutes. Cli k on the devi e, and sele t “Configure” to give the A8911-23 a logi al name. This will allow
the A quiSuite to begin logging data for the devi e.
7) With the power dis onne ted, atta h the pulse input lines to the pulse terminals. Ea h pulse input should have a
GND and a P# terminal. If the pulse output devi e is polarity sensitive, atta h the pulse – terminal to the A8911-23
GND terminal, and the pulse + terminal to the A8911-23 P# terminal. The A8911-23 provides 3-5 volts on the P#
terminal for sensing. The remote pulse output devi e must not supply voltage to the terminals.
Wiring runs to pulse input terminals should be kept as short as possible. Wiring runs longer than 200 ft should be
avoided. Wiring should avoid proximity to sour es of ele tri al noise su h as running in parallel to ele tri al
able, and VFD systems.
8) Power up the A8911-23. The Input LEDs for ea h onne ted input should now blink. The input LED will be on
when the onta ts are losed.
WARNING: After wiring the A8 11-23, remove all scraps of wire or foil shield from the electrical panel. This
could be dangerous if wire scraps come into contact with high voltage wires.
Configuration
Modbus Address: Before the A8911-23 an be used, you must set the Modbus address of
the A8911-23. This address must be unique among all Modbus devi es in the system. The
A8911-23 supports address 1 through 127.
Sele t an address, and set the dipswit hes to mat h.
The sum of the value of the swit hes is the address. In the example to the right, address 52
is set by pla ing swit h 4, 16 and 32 to the on position.
Note: 4 + 16 + 32 = 52
Baud Rate: This option sets the serial port speed for the RS485 port. Set this option to
“off” for 19200. Set the swit h to “on” for 9600 baud.
Operation
The devi e should power up and be ready in a few se onds. The LEDs should blink in the following manner.
●The green "Alive" LED should start to blink approximately on e per se ond.
●The yellow RS485 TX and RX LEDs will blink for lo al Modbus a tivity.
●The red input status LEDs will blink when input onta t losures are dete ted. Input status LEDs are adja ent to the
orresponding input s rew terminals.
If the A8911-23 is atta hed to an A quiSuite Data A quisition Server, you will need to onfigure ea h pulse input with a
Name, Engineering Unit, and Multiplier.
Page 6 A8911-23
www. .com information@itm.com1.800.561.8187

Troubleshooting
Pulse count not incrementing:
Che k the input LED for the spe ifi input that is not working. The LED should blink when the pulse meter loses the
onta t output. If th not blinking, try bridging the input terminals with a short pie e of wire to onfirm the LED omes on .
Try bridging the terminals at the other end of the pulse wiring run. This will onfirm there are no breaks in the wire.
Verify the pulse output devi e is operating.
Dis onne t the A8911-23 input and use a hand held digital meter and measure resistan e of the pulse output devi e. Verify
that the pulse output devi e is operational and the onta t losure reads less than 1000 ohms when losed. For high
resistan e pulse devi es su h as intrinsi barriers, the “ onta t losure threshold” register may need to be onfigured to a
larger value. The default is 1k however up to 2.5k is allowed. If using the A quiSuite data a quisition server, use the
advan ed onfiguration page of the A8911-23 in the Modbus/devi e list to set this option.Modbus registers
Register Listing
The A8911-23 responds to the following Modbus/RTU fun tions:
0x11 Report slave id.
0x03 read holding registers (multiple)
0x06 preset single register
All Modbus registers are read-only unless otherwise noted. Registers listed as “NV” are options that are stored in non-
volatile memory and will be preserved when power is removed from the devi e.
Modbus 40xxx registers (read registers)
Data points:
------- ------- ------- ------------------
offset point type desc
0 40001 UINT32 pulse count 1 MSW (N Mem, all pulse counts)
1 40002 UINT32 pulse count 1 LSW
2 40003 UINT32 pulse count 2 MSW
3 40004 UINT32 pulse count 2 LSW
4 40005 UINT32 pulse count 3 MSW
5 40006 UINT32 pulse count 3 LSW
6 40007 UINT32 pulse count 4 MSW
7 40008 UINT32 pulse count 4 LSW
8 40009 UINT32 pulse count 5 MSW
9 40010 UINT32 pulse count 5 LSW
10 40011 UINT32 pulse count 6 MSW
11 40012 UINT32 pulse count 6 LSW
12 40013 UINT32 pulse count 7 MSW
13 40014 UINT32 pulse count 7 LSW
14 40015 UINT32 pulse count 8 MSW
15 40016 UINT32 pulse count 8 LSW
16 40017 UINT32 pulse count 9 MSW
17 40018 UINT32 pulse count 9 LSW
18 40019 UINT32 pulse count 10 MSW
19 40020 UINT32 pulse count 10 LSW
20 40021 UINT32 pulse count 11 MSW
21 40022 UINT32 pulse count 11 LSW
22 40023 UINT32 pulse count 12 MSW
23 40024 UINT32 pulse count 12 LSW
24 40025 UINT32 pulse count 13 MSW
25 40026 UINT32 pulse count 13 LSW
26 40027 UINT32 pulse count 14 MSW
27 40028 UINT32 pulse count 14 LSW
28 40029 UINT32 pulse count 15 MSW
29 40030 UINT32 pulse count 15 LSW
30 40031 UINT32 pulse count 16 MSW
31 40032 UINT32 pulse count 16 LSW
Page 7 A8911-23
www. .com information@itm.com1.800.561.8187

32 40033 UINT32 pulse count 17 MSW
33 40034 UINT32 pulse count 17 LSW
34 40035 UINT32 pulse count 18 MSW
35 40036 UINT32 pulse count 18 LSW
36 40037 UINT32 pulse count 19 MSW
37 40038 UINT32 pulse count 19 LSW
38 40039 UINT32 pulse count 20 MSW
39 40040 UINT32 pulse count 20 LSW
40 40041 UINT32 pulse count 21 MSW
41 40042 UINT32 pulse count 21 LSW
42 40043 UINT32 pulse count 22 MSW
43 40044 UINT32 pulse count 22 LSW
44 40045 UINT32 pulse count 23 MSW
45 40046 UINT32 pulse count 23 LSW
System information points:
------- ------- ------- ------------------
offset point type description
1000 41001 UINT16 Serial Number (bytes 1,2) (our serial number)
1001 41002 UINT16 Serial Number (bytes 3,4)
1002 41003 UINT16 Serial Number (bytes 5,6)
1003 41004 UINT16 firmware version major
1004 41005 UINT16 firmware version minor
1005 41006 UINT32 mfg date MSW
1006 41007 UINT32 mfg date LSW
1007 41008 UINT32 up time (seconds) MSW.
1008 41009 UINT32 up time (seconds) LSW.
1009 41010 UINT16 Our modbus address
1010 41011 UINT16 Hardware ersion major (8911)
1011 41012 UINT16 Hardware ersion minor. HighByte=pcb-rev(0=rev A, etc),
lowbyte = part-rev (0=rev A, etc)
1012 41013 UINT16 (N /r/w) contact closure threshold in ohms, default 1000 =
1kohm. 100-2550 ohms allowed.
1013 41014 UINT16 (N /r/w) contact closure speed, pulse speed:
0=10hz/default, 1=50hz, 2=100hz
1014 41015 UINT16 (N /r/w) Pulse KYZ flag bitmap. channels 1-16 0x01 =
pulse1 kyz mode, 0x02 = p2, etc.
1015 41016 UINT16 (N /r/w) Pulse KYZ flag bitmap. channels 17-23
1016 41017 UINT16 power supply voltage monitor. scale: x100
1017 41018 INT16 pcb temperature monitor. scale: x100
1018 41019 UINT16 5 internal power supply voltage monitor. scale: x100
1019 41020 UINT16 RS485 baud rate. 2=9600, 3=19200.
1020 41021 UINT16 reason for reboot. 0x01=POR, 0x02=EXTR 0x04=WDTR
0x08=BODR, 0x8000=WDTOF
Modbus fun tion 0x11 Slave ID response will report the following:
"Obvius, A8911-23, pulse counter, 23 channel", id=47
Page 8 A8911-23
www. .com information@itm.com1.800.561.8187

Register Functions
Pulse Count: The pulse ount is stored as an unsigned 32bit integer. This allows for 2^32 pulses (4.2billion) to be ounted
before rollover. On Modbus systems that do not allow you to read 32bit values, you an al ulate the pulse ount as follows:
ount = (MSW * 65536) + LSW
or
ount = (MSW << 16) | LSW [bit shift high order word by 16 bits and xor against low order word ]
Pulse ount registers a umulate a total number of pulses re eived on ea h pulse input. The pulse ount totals always
in rement and an not be leared or set to an arbitrary value to prevent tampering. All pulse ount totals are stored in non-
volatile memory to preserve ounts during power failure. The unsigned 32 bit ounter values an a umulate up to 4.29
billion (2^32) pulses before rollover.
All 32 bit data point values are en oded in 2 Modbus registers (16bits ea h). Modbus master systems should always query
the A8332-8F2D using a single query to read an entire blo k of registers. Never use two queries to read one register and
then ombine the two results into a single 32 bit value. Doing so will allow the pulse ount to in rement in the middle of the
two Modbus queries, and will ause intermittent data readings that are in orre t.
For example, a pulse input has a ount of 65534. This is represented as a 32 bit hex number 0x0000FFFE. The first 4 digits
are the MSW register, the se ond 4 digits are the LSW register. The Modbus Master reads the first (MSW) register and gets
0x0000. In between the two readings, the pulse input ounts 2 more pulses, making the total 65536 or 0x00010000 in hex.
Next the Master reads the se ond (LSW) register and gets 0x0000. When the two registers are ombined, the result is
0x00000000. The proper way to handle this situation is to simply read both registers in a single Modbus query.
Page 9 A8911-23
www. .com information@itm.com1.800.561.8187

A8911-23 Firmware Update
From time to time, Obvius may release firmware updates with additional features and system hanges. To find out what
firmware your A8911-23 has installed, read the firmware version register with a Modbus utility, or use the “Advan ed
onfiguration” page in the A quiSuite setup menu. Firmware update files may be obtained from Obvius te hni al support.
The firmware update pro ess requires an RS232 serial port and a windows omputer to run the firmware update utility.
Before starting this pro ess, verify your omputer has a serial port available. You may need to dea tivate other software
su h as the palm pilot utility or ups monitor software. USB onne ted serial ports may be used, however these are not as fast
or reliable as standard omputer serial ports and may fail to upgrade the firmware orre tly.
To update the firmware, use the following pro edure.
Step 1: Install the Philips LPC2000 software as provided by Obvius.
Step 2: Remove power and DC load urrent from the A8911-23. Power an be dis onne ted by removing the +24V wire
from the s rew terminal from the A8911-23 power onne tion.
WARNING: Disconnect power and lock-out all power sources during installation.
DO NOT CONNECT RS232 PORT WITH CURRENT INPUTS LIVE
Step 3: Remove the plasti lid from the A8911-23 module. The plasti lid is held in pla e with two plasti lips, one on
ea h side.
Step 4: Atta h the A8911-23 to your omputer with an RS232 serial able. The A8911-23 programming onne tor is the 9
pin RS232 onne tor on the top of the devi e.
Step 5: Power up the power supply to the A8911-23. The Green Alive LED should light up and blink.
Step 6: Run the LPC2000 Flash Utility. The following s reen will be displayed.
Step 7: Set the following ommuni ations options:
COM1 or COM2 depending on your omputer serial port.
Use baud rate: 38400 or slower.
Che k “Use DTR/RTS for Reset”
XTAL Freq[kHz] = 14745
Step 8: Cli k the “Read Devi e ID” button. The PartID and BootLoaderID fields will be shown if su essful. Also, the
“Devi e” dropdown menu should swit h to LPC2131. The bottom of the window will display “Read Part ID Su essfully.”
Step : Cli k the “Filename” “...” button. A dialog box will appear. Lo ate and sele t the A8911-23 firmware image file.
In the example above, this is named “A8911-23_v1.07.hex”.
Step 10: Cli k the “Erase” button. This will remove the existing firmware from the A8911-23 devi e.
Step 11: Cli k the “Upload to Flash” button. The firmware update will start, and a blue progress bar will be shown a ross
the bottom of the s reen. While the upload is in progress, the green Alive LED on the A8911-23 will stop blinking and stay
on solid.
Step 12: when the update is omplete, dis onne t power from the A8911-23. Remove the RS232 serial able.
Step 13: pla e the lid ba k on the body of the A8911-23. The lid should snap into pla e.
Step 14: Re-atta h any signal and data onne tions. Power up the A8911-23. The new firmware should now operate. To
onfirm the new firmware is installed, use the A quiSuite devi e details page, li k the “ onfigure” button, and then the
“Advan ed” button. The firmware version number will be displayed on the lower right side of the advan ed details page.
Page 10 A8911-23
www. .com information@itm.com1.800.561.8187
Indice
Manuali Unità di controllo popolari di altre marche

Festo
Festo Compact Performance CP-FB6-E Manuale elenco delle parti

Elo TouchSystems
Elo TouchSystems DMS-SA19P-EXTME Manuale utente

JS Automation
JS Automation MPC3034A Manuale utente

JAUDT
JAUDT SW GII 6406 Series Guida rapida

Spektrum
Spektrum Air Module System Manuale utente

BOC Edwards
BOC Edwards Q Series Manuale utente