Spacerails Level 1 Manuale utente
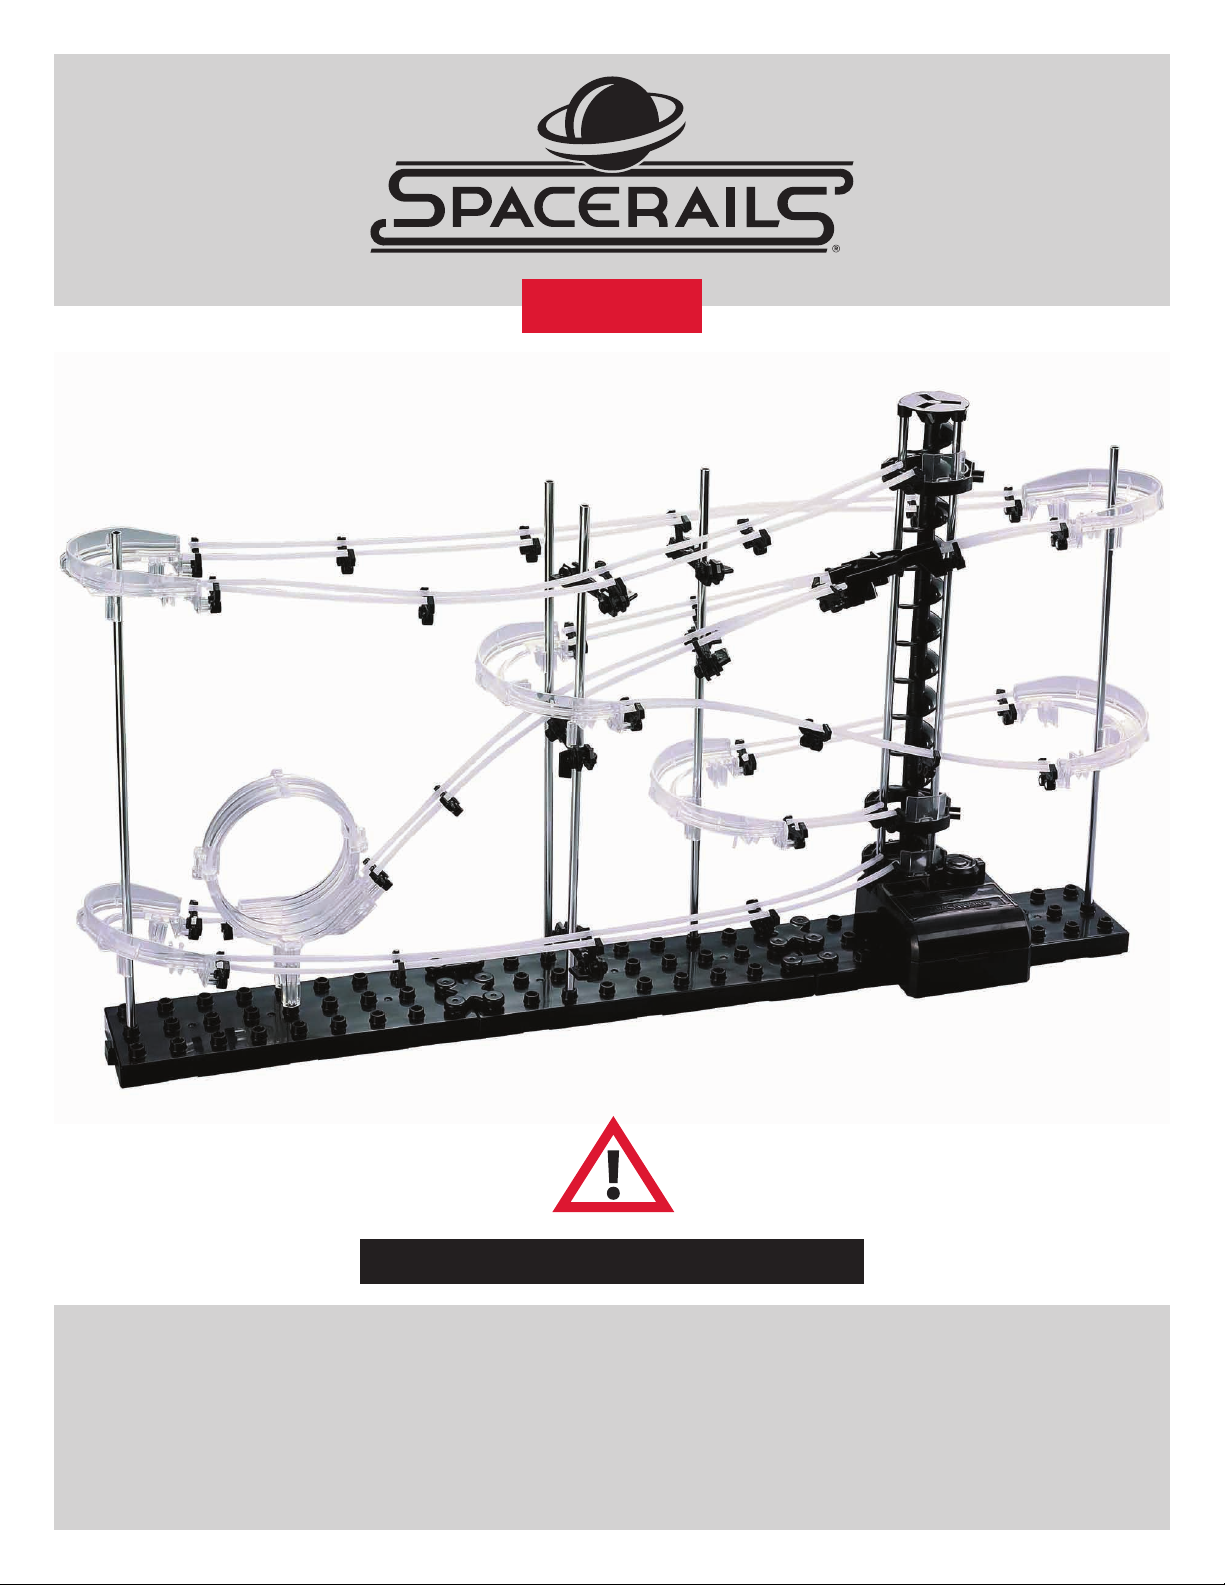
LEVEL 1
PRODUCT AND CONSUMER WARNING
CHOKING HAZARD: This product contains small parts and is not intended for children under 3.
• This product is intended for users 8 years of age and older.
• To avoid choking, keep small parts away from children.
• Use caution—this product contains parts with sharp edges.
• To avoid potential damage to the product, only insert the included marbles into the elevator.
Page 2 Seaich Corporation, LLC. All rights reserved. www.seaich.com |Spacerails, LLC. www.spacerails.com
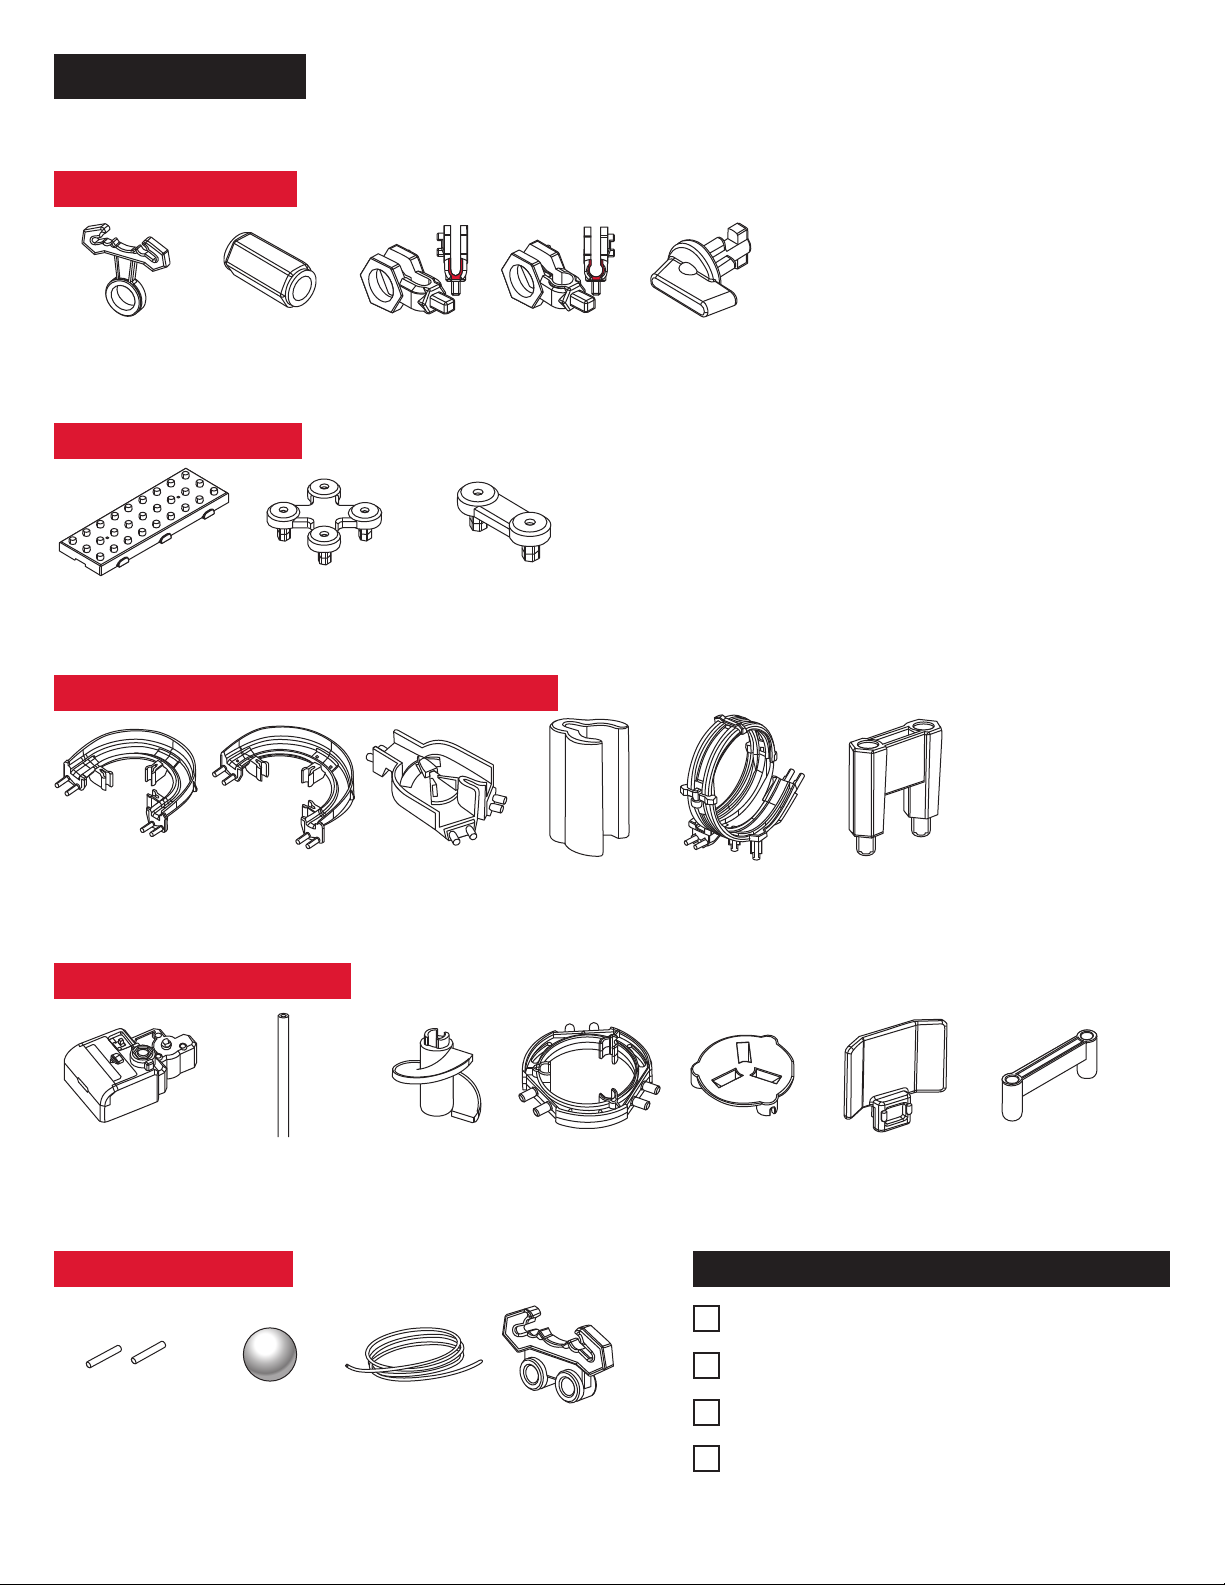
PARTS INCLUDED
Keep parts together to avoid misplacing them.
ARM COMPONENTS
Arm Clip
x5
Arm Sheath
x5
Arm Holder A
x5
Arm Holder B
x5
Arm Lock
x10
LOOPS, CORNERS, AND SPLIT COMPONENTS
Corner A
x3
Corner B
x3
Rail Splitter
x1
Shaft Clip
x6
Loop
x1
Loop Stand
x1
BASE COMPONENTS
RAIL COMPONENTS
Rail Coupling
x2
Marble
x2
Rail
5000 mm
Rail Clip
x29
REQUIRED TOOLS & ITEMS NOT INCLUDED
Wire Cutters or Utility Scissors
Pen or Marker
3 AA Batteries (newer models) or 1 C Battery
Ruler (in centimeters)
ELEVATOR COMPONENTS
Power Box
x1
Shaft (300mm)
x9
Elevator Helix
x12
Elevator Ring
x3
Elevator Cover
x1
Elevator Guard
x3
Power Box Stand
x1
Base
x3
Base Holder A
x2
Base Holder B
x2
Seaich Corporation, LLC. All rights reserved. www.seaich.com |Spacerails, LLC. www.spacerails.com Page 3
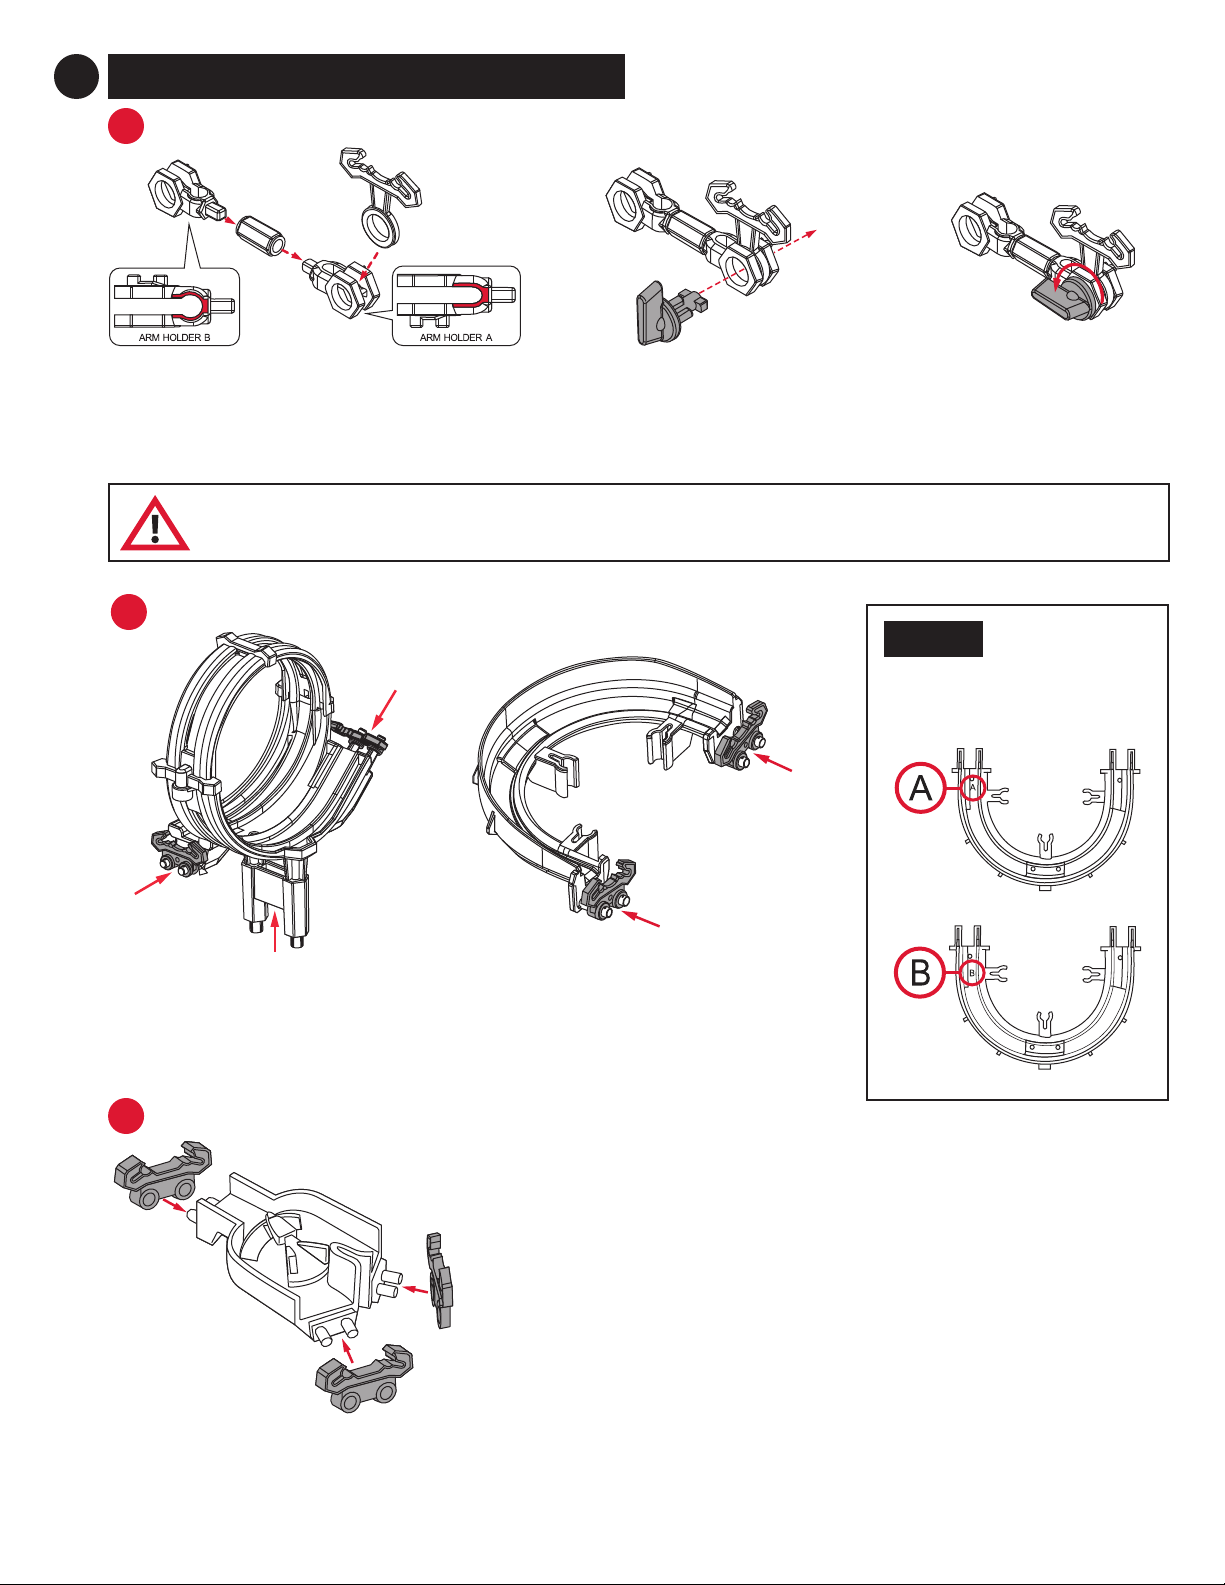
1PREPARE THE COASTER COMPONENTS
Prepare the Loop: Press one
Rail Clip to both sides of the Loop
Assembly. Attach the Loop Stand
to the bottom of the Loop.
Prepare the Turns: Press one
Rail Clip to both sides of all six
Corner pieces.
BLOOP & TURNS
NOTE:
Corners are identied on the
bottom of each piece.
CRAIL SPLITTER
Prepare Rail Splitter: Attach one Rail
Clip to each of the Rail Splitter posts.
Step 1: Attach one Arm Holder A and one
Arm Holder B with one Arm Sheath. Insert
one Arm Clip into Arm Holder A.
Step 3: Turn the Arm Lock
counter-clockwise to secure
the Arm Clip in place.
Step 2: Insert Arm Lock through
Arm Holder A and Arm Clip.
AARMS QTY: 5
To avoid damaging parts, do not move or adjust the Rail Clip while locked in the arm. To move the Rail Clip, release
Arm Lock by turning clockwise, position Rail Clip as desired, then secure Arm Lock again.
Page 4 Seaich Corporation, LLC. All rights reserved. www.seaich.com |Spacerails, LLC. www.spacerails.com
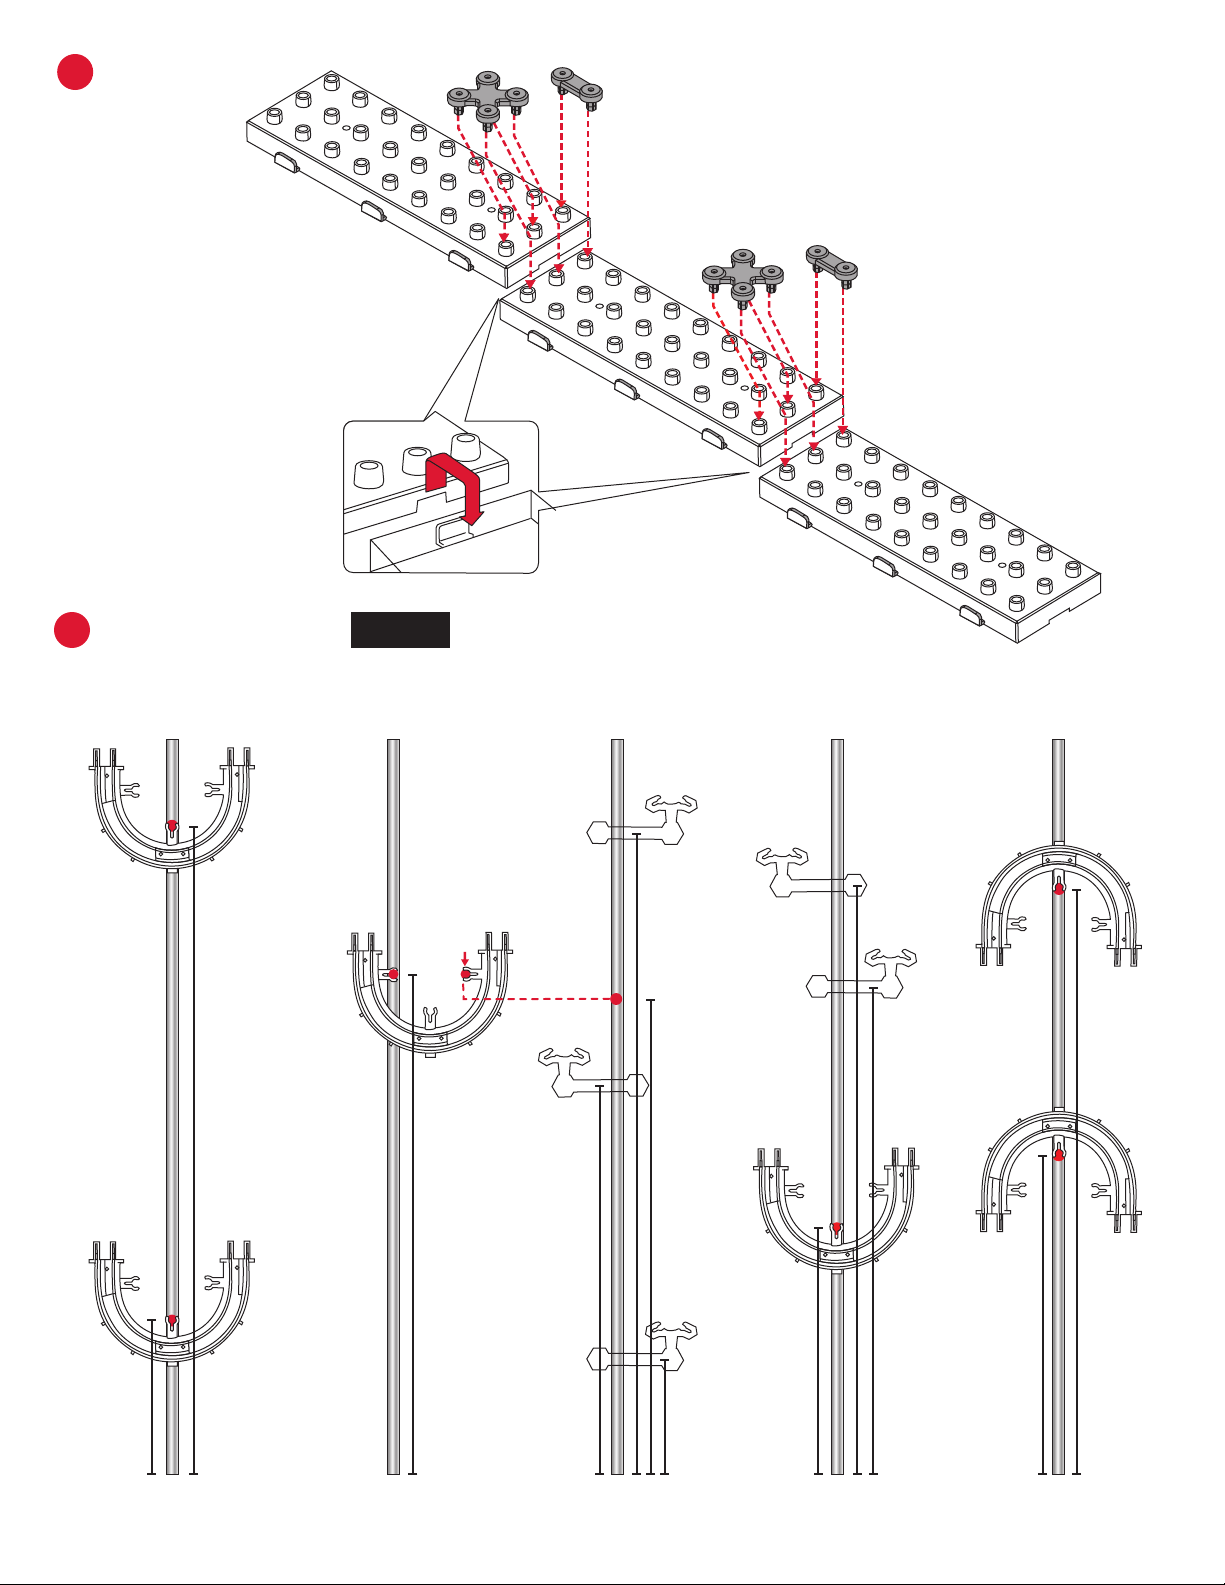
2
1
2
Step 1: Interlock Base block tabs
as shown below.
Step 2: Press Base Holder A and
Base Holder B pieces into the Base
blocks for a more secure hold.
NOTE:
Illustration of Shafts are 1:2.3 or (approximately 43%) of scale.
ESHAFT ASSEMBLY
A B C D E
63 mm
264 mm
204 mm
261 mm
194 mm
47 mm
159 mm
238 mm
129 mm
101 mm
240 mm
199 mm
DBASE ASSEMBLY
Seaich Corporation, LLC. All rights reserved. www.seaich.com |Spacerails, LLC. www.spacerails.com Page 5
Step 3: Once the corkscrew
is built, attach three support
shafts to the Power Box.
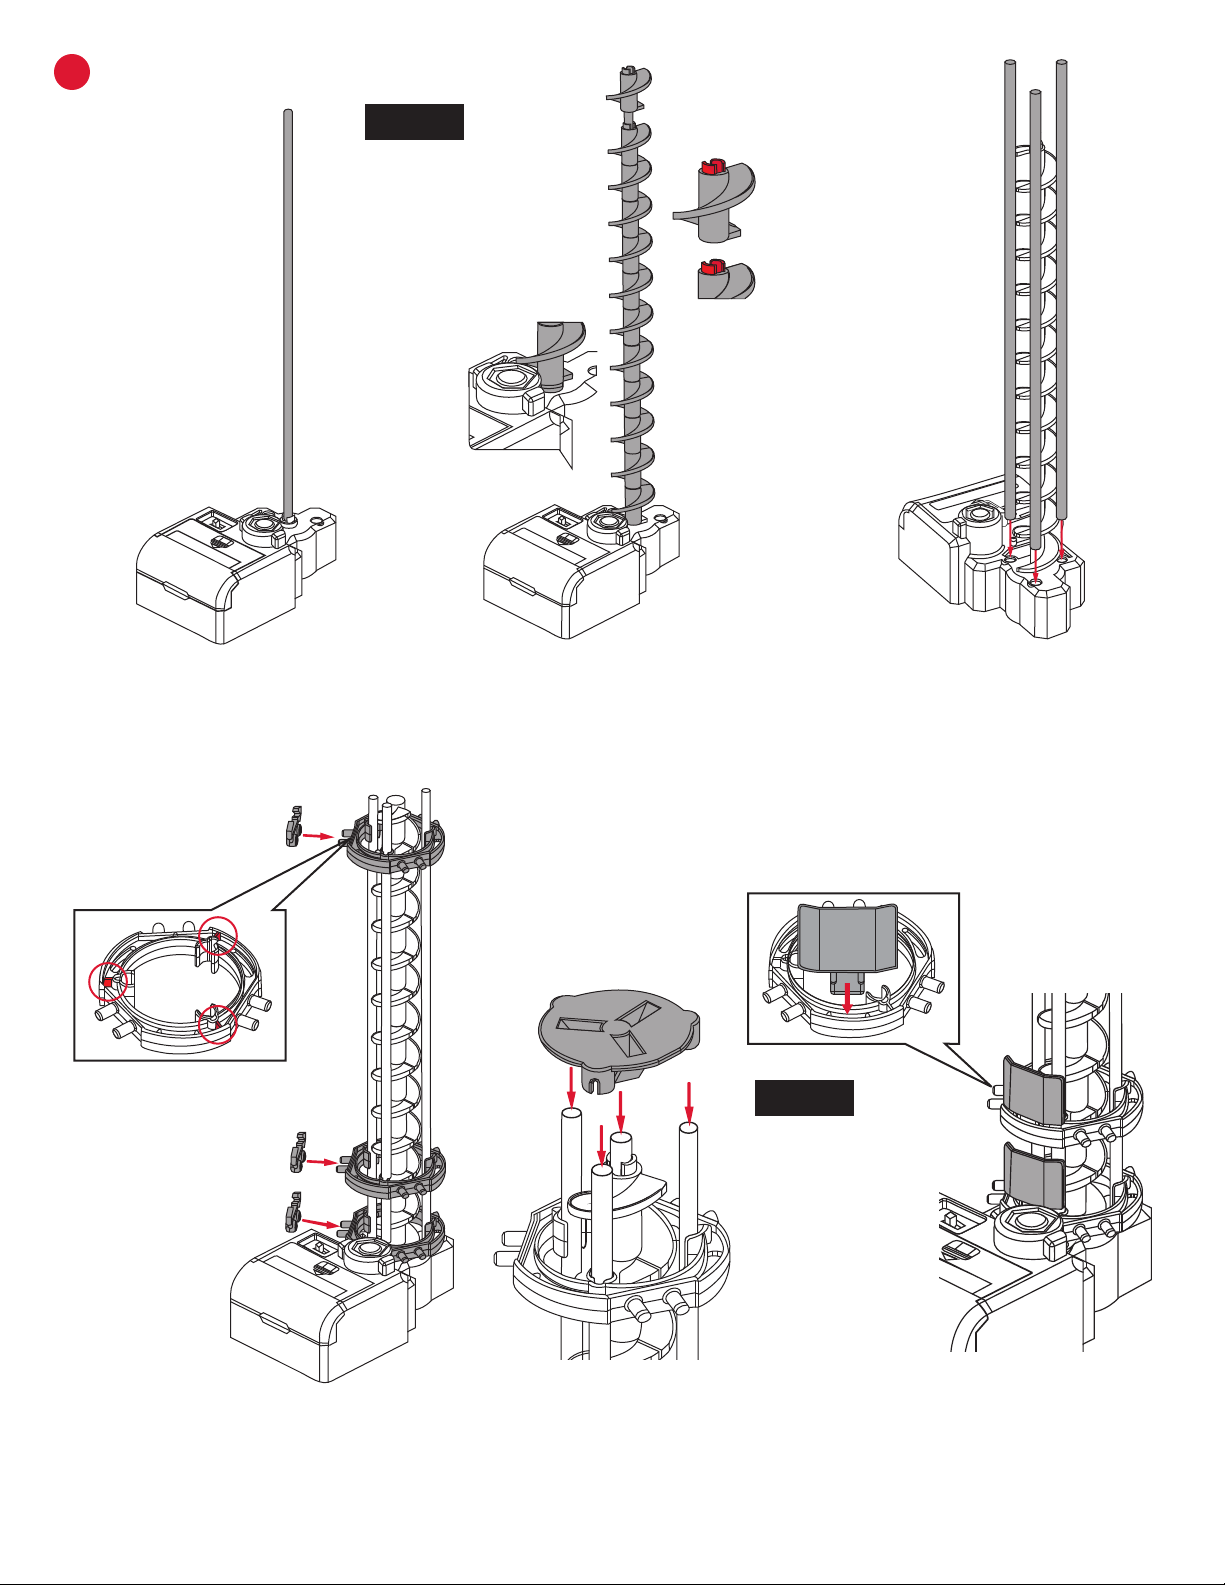
FELEVATOR ASSEMBLY
Step 2: Connect Elevator Helix
pieces together with the male part
facing up to ll the shaft.
NOTE:
Install the rst Elevator
Helix piece male side
up and rotate it until
it slides in place and
engages with driver at
the base of Power Box.
Step 1: Place a shaft in the
white hole on the Power Box.
Step 6: Place the Elevator Cover
onto the top of the elevator
assembly.
Step 7: Attach an Elevator Guard to
each of the Elevator Rings, then to
the right side of the Rail Clip.
Step 5: Place the three
Elevator Rings over the
three shafts.
NOTE:
The Marble may fall
out of the elevator if it
enters too fast.
Step 4: Connect
one Rail Clip to each
Elevator Ring. Install
Elevator Ring with
tabs facing up, as
shown above.
Page 6 Seaich Corporation, LLC. All rights reserved. www.seaich.com |Spacerails, LLC. www.spacerails.com
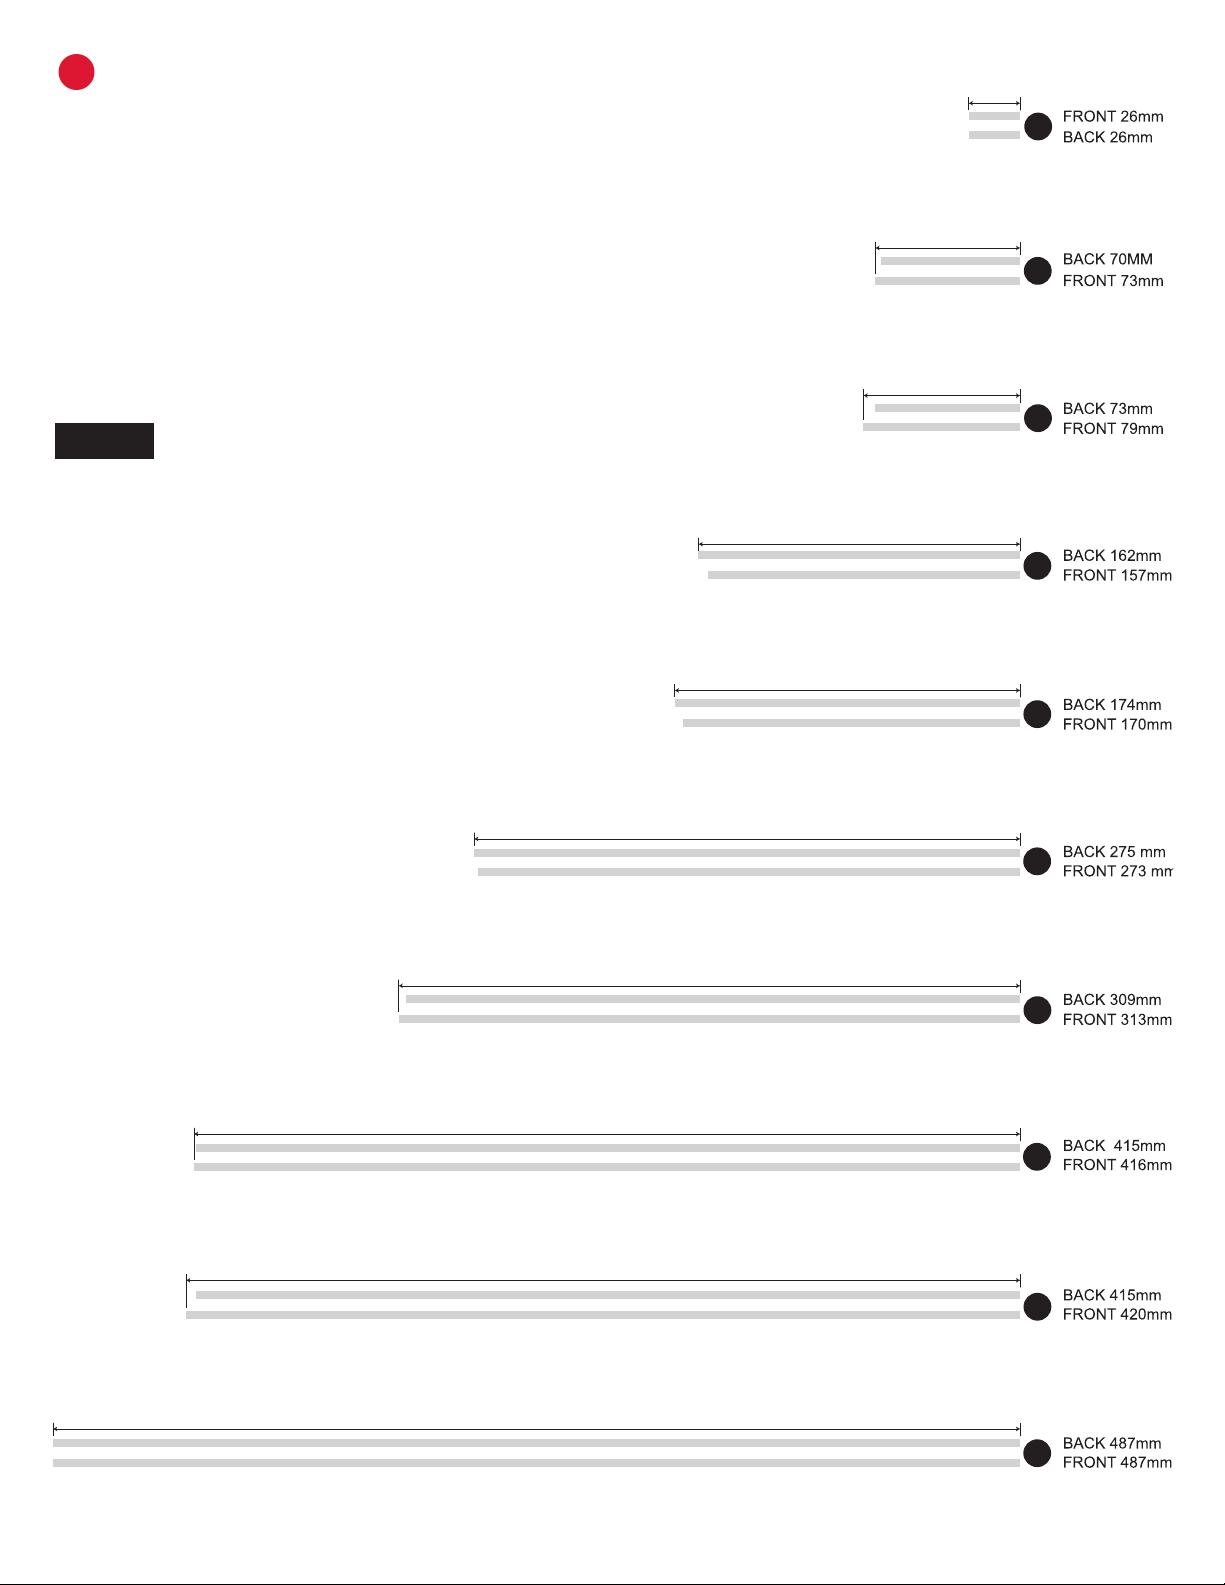
CUT THE RAIL TO SIZE 26mm
73mm
79mm
162mm
174mm
275mm
313mm
416mm
420mm
487mm
Step 1: Measure each section and mark the cutting point with a pen.
Step 2: Cut each section according to your measurement. Make sure
to cut at a 90° angle.
Tip: To help avoid do-overs and using too much rail, cut generously
(slightly longer than required) to begin with. You can always cut a
long rail shorter.
NOTES:
Illustration of rail lengths is 1:2.84 or
(approximately 35%) of scale.
Please see the included addendum
showing the 1:1 ratio. This will help
with rail cuts and positioning of arms
and corners.
G
Seaich Corporation, LLC. All rights reserved. www.seaich.com |Spacerails, LLC. www.spacerails.com Page 7
LOOP
A
BC
DE
ELEVATOR
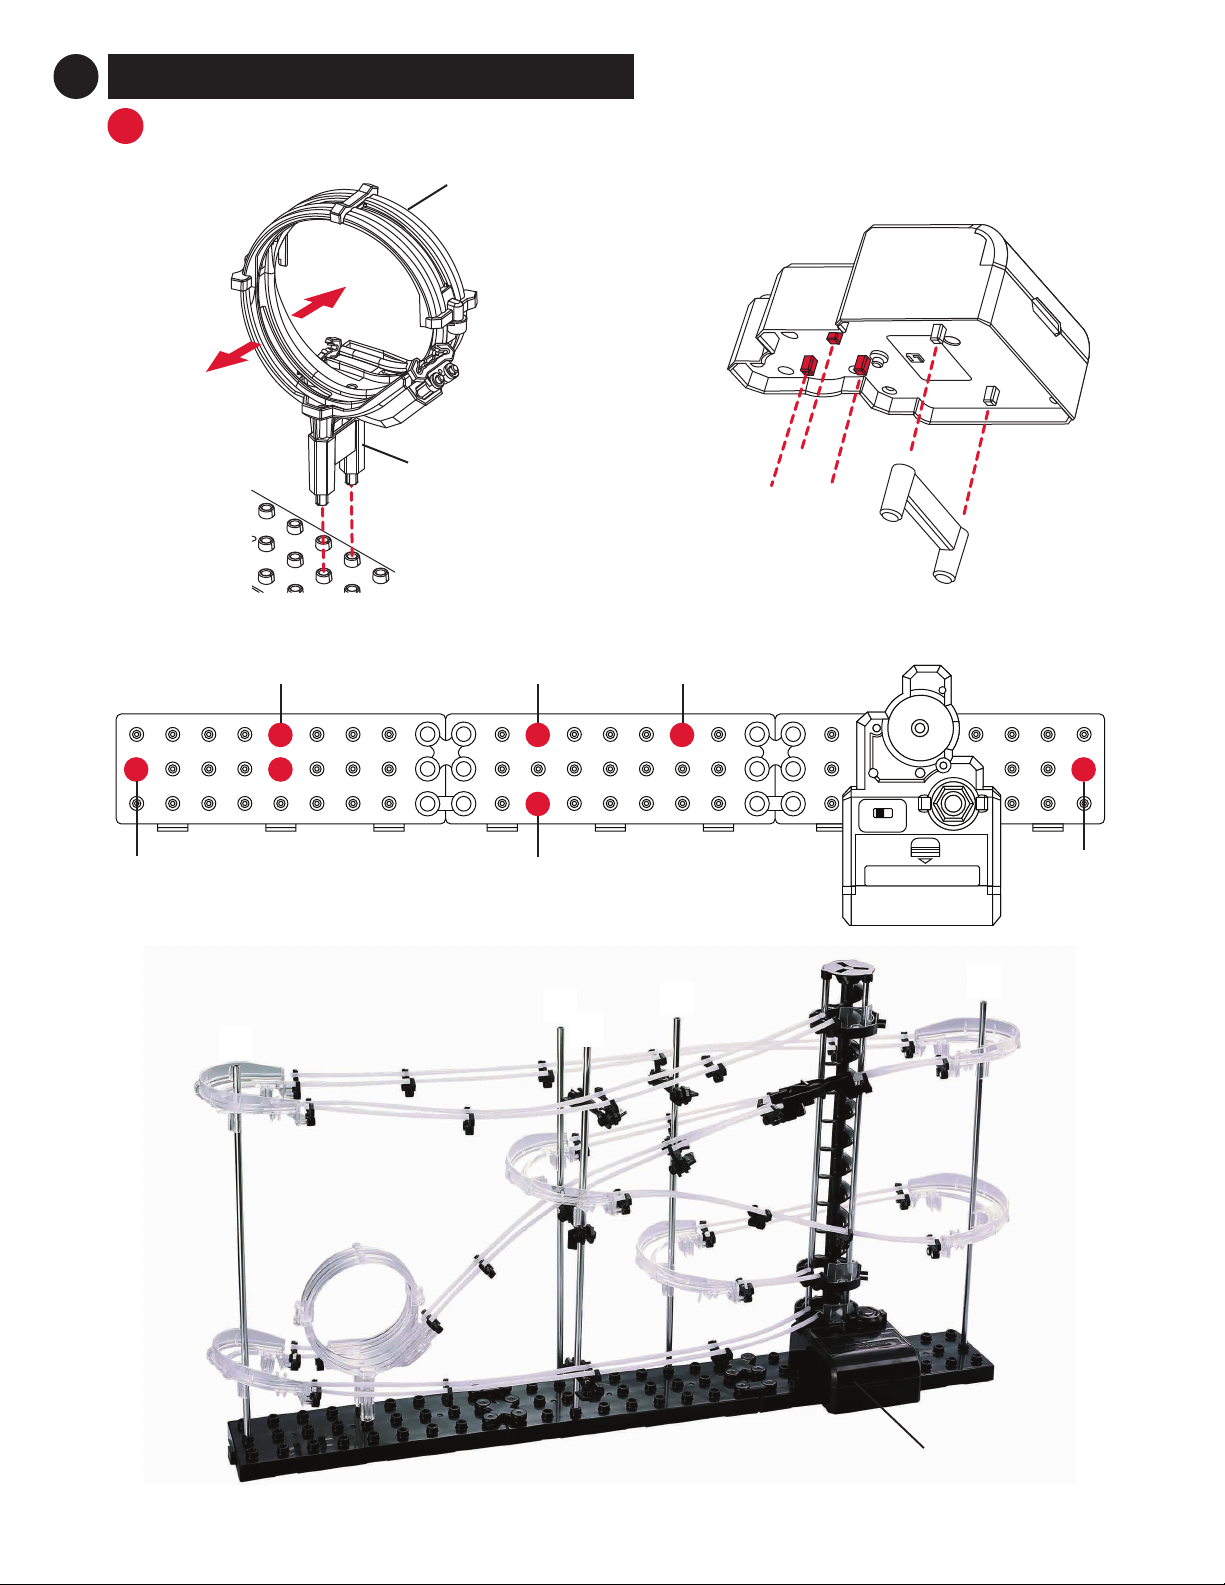
2CONSTRUCTING THE ROLLERCOASTER
INSTALL THE COASTER SHAFTS, LOOP AND ELEVATOR
Step 2: Attach Power Box to the Power Box Stand.
BACK
FRONT
LOOP
LOOP STAND
Step 1: Attach Loop Stand to the bottom of the Loop.
Step 3: Attach the Loop, Power Box and all shafts to the base.
A
OFF ON
PUSH
LOOP PART
SHAFT A
SHAFT B
SHAFT C
SHAFT D
SHAFT E
Page 8 Seaich Corporation, LLC. All rights reserved. www.seaich.com |Spacerails, LLC. www.spacerails.com
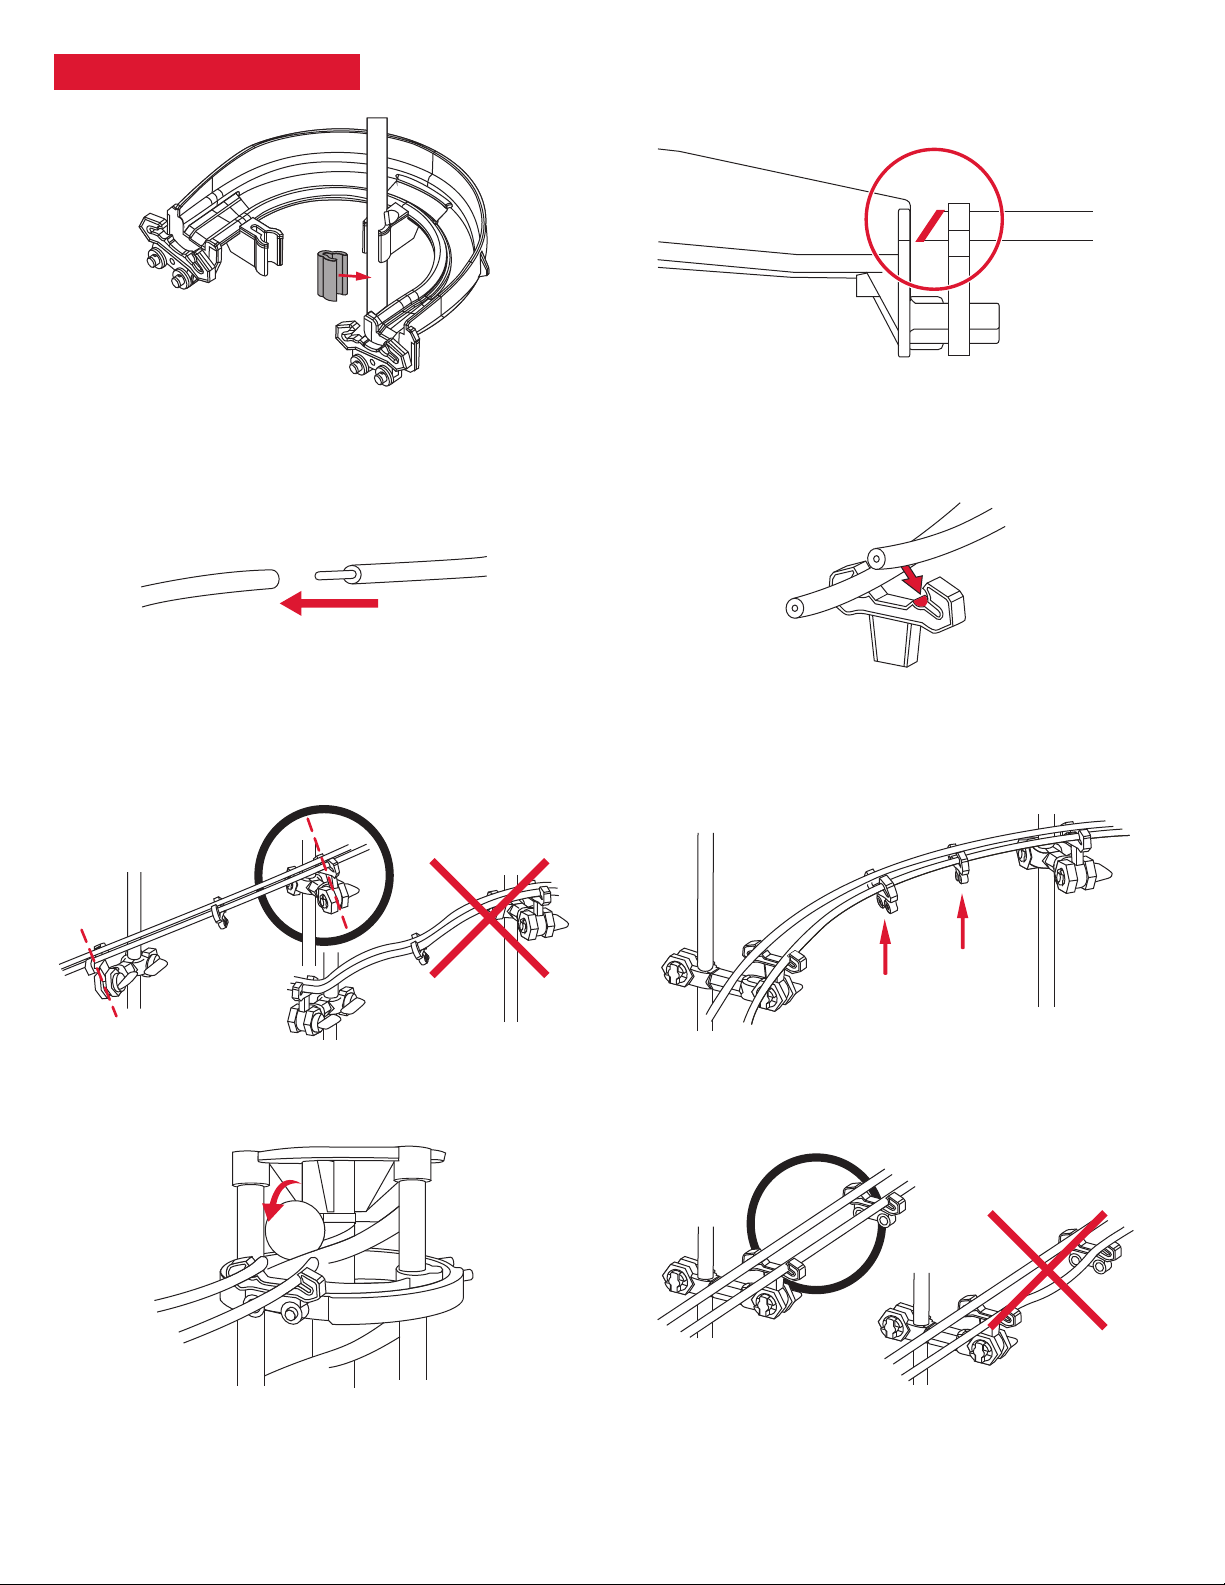
Rail joining for custom designs: To adjust your
designs with the rails, use the Rail Couplings to increase
the length of your rail sections.
Connecting rails to arms: To install the rails, press them
into the arm as shown. You should hear a click when the
rail is locked in place.
Angling the Arms: Install the arms at the angle of the
incline the rails will travel along.
Railroad stability: To maintain stability on longer track
segments, attach Rail Clips as needed.
Elevator Exit: When installing the elevator exit rails, pull
the rails close to the Elevator Helix to ensure the Marble
enters the rollercoaster smoothly.
Smooth rails for ecient travel: Make sure the rails
connect smoothly and are free of any bumps, twists,
or kinks.
Corner stability: To provide extra stability on the
Corners, place Shaft Clips directly below the Corners.
Rail and Corner connections: Cut the rail at a 45° angle
where it meets a Corner. This will help smooth out the
transition as the Marble ies around the track.
ASSEMBLY TIPS & TRICKS
Seaich Corporation, LLC. All rights reserved. www.seaich.com |Spacerails, LLC. www.spacerails.com Page 9
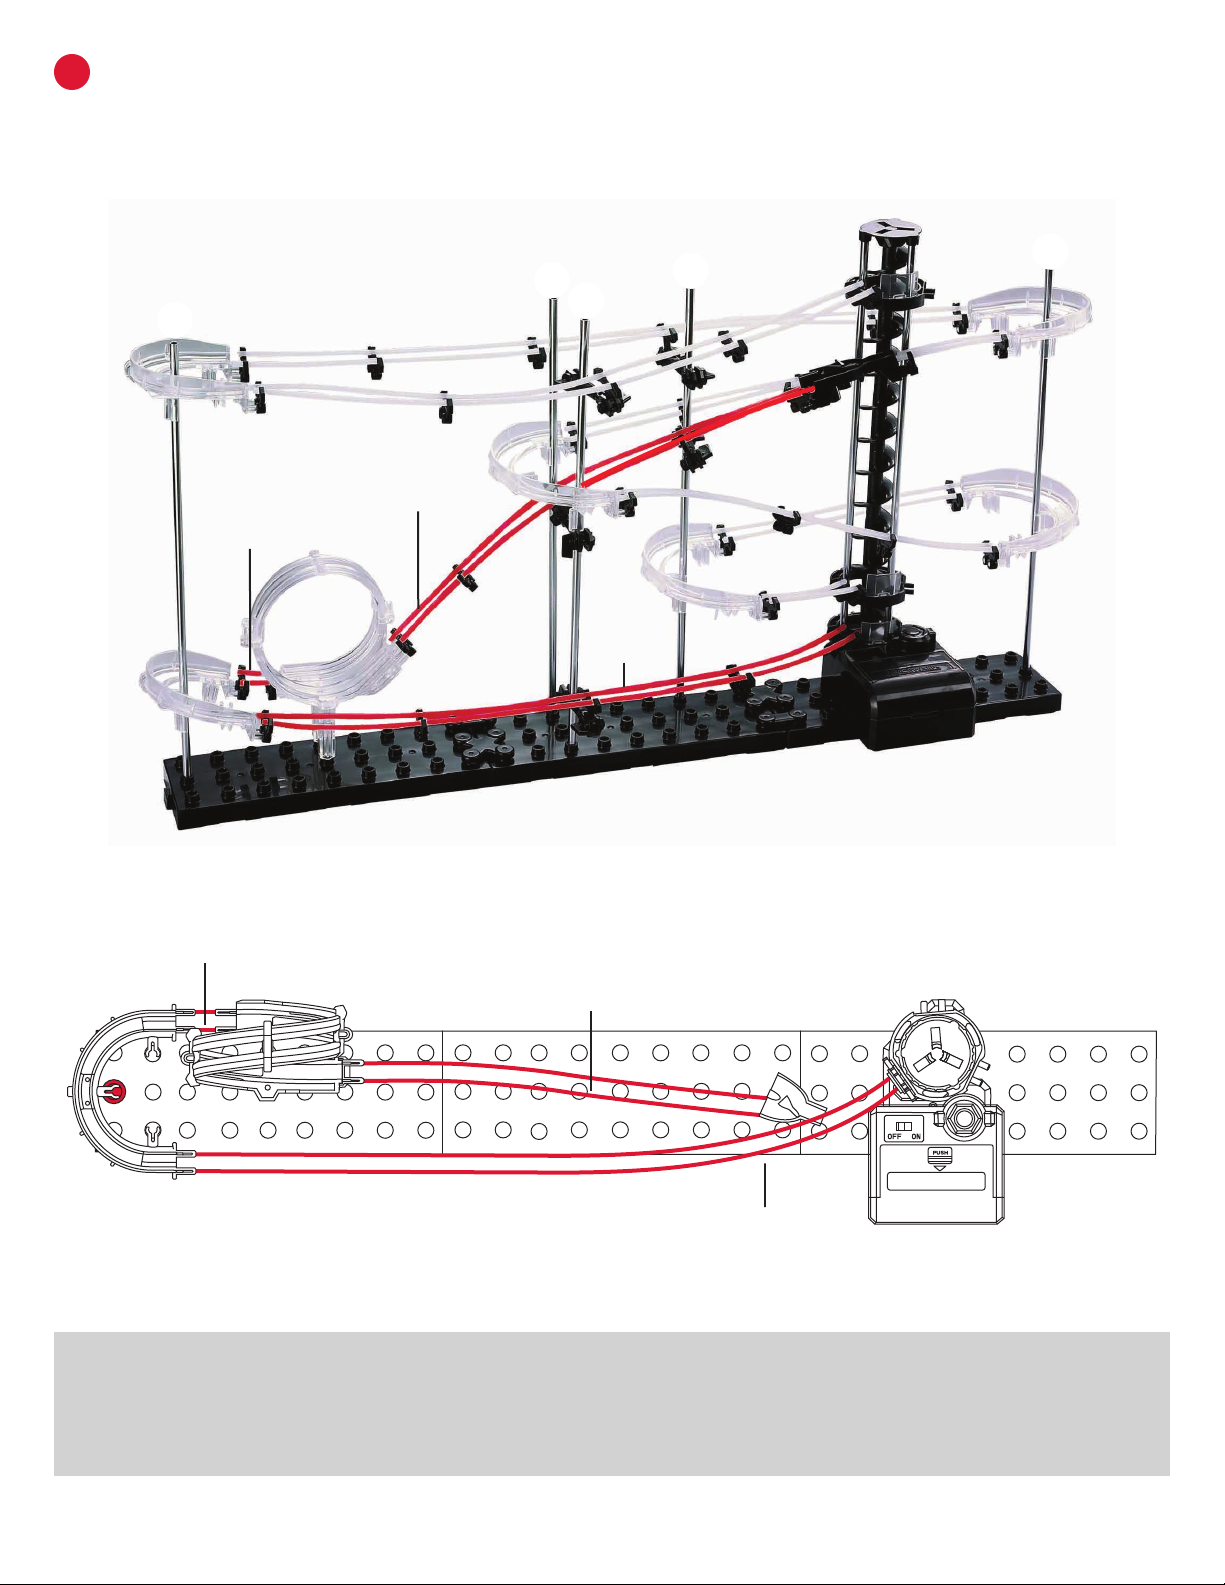
CONNECT RAILS A, G AND I
Use the following illustrations and pictures as references for attaching the rails to the structure:
Step 1: Connect both A Rail sections between the Loop and the back bottom corner of shaft A.
Step 2: Connect both G Rail sections between the entrance of the loop and the front section of the Rail Splitter.
Step 3: Connect both I Rail sections between the bottom entrance of the elevator and the bottom front corner of shaft A.
A
BC
DE
STEP 1
(A Rail)
STEP 2
(G Rail)
STEP 3
(I Rail)
STEP 1
A Rail) STEP 2
(G Rail)
STEP 3
(I Rail)
A
B
Page 10 Seaich Corporation, LLC. All rights reserved. www.seaich.com |Spacerails, LLC. www.spacerails.com
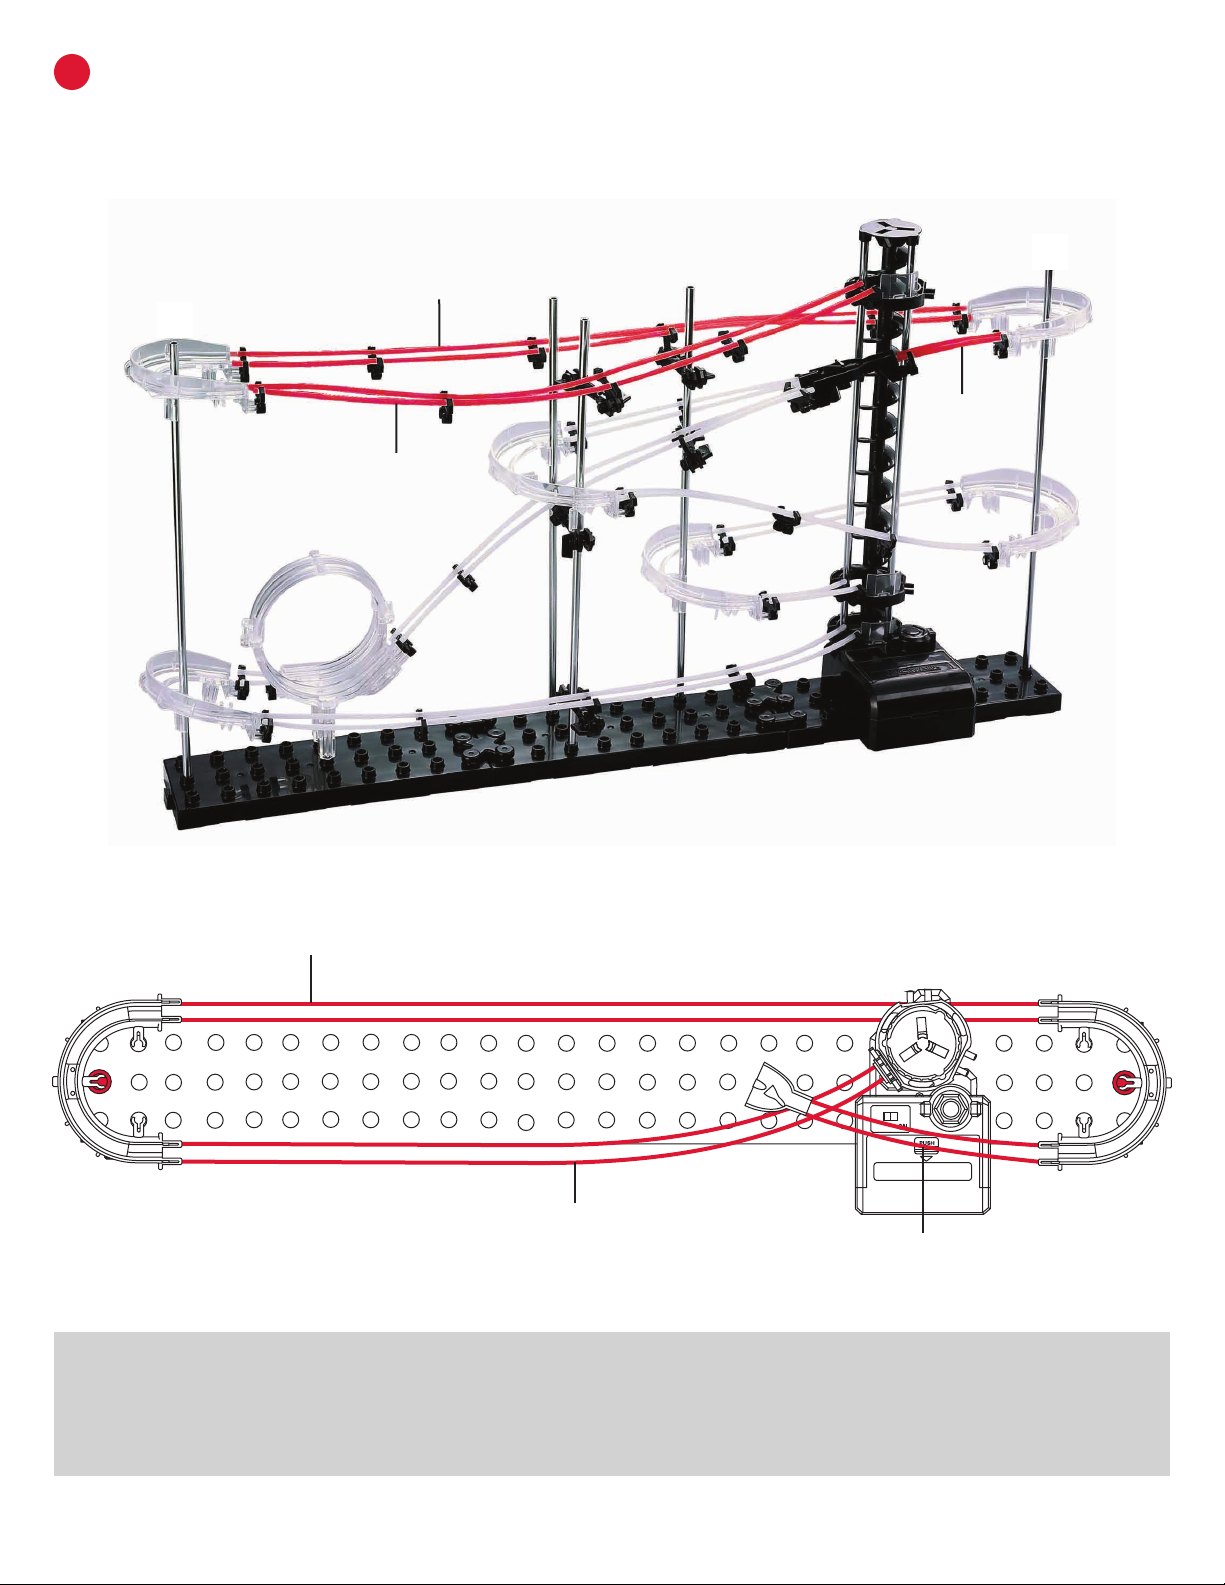
CONNECT RAILS J, B AND H
Use the following illustrations and pictures as references for attaching the rails to the structure:
Step 4: Connect both J Rail sections between the back top corner of shaft A and the back top corner of shaft E.
Step 5: Connect both H Rail sections between the exit of the elevator and the front top corner of shaft A.
Step 6: Connect both B Rail sections between the front top corner of shaft E and the single side of the
Rail Splitter
.
A
BC
DE
STEP 4
(J Rail)
STEP 5
(H Rail)
STEP 6
(B Rail)
STEP 4
J Rail
STEP 5
H Rail STEP 6
B Rail
EA
C
Indice
Altri manuali Spacerails Giocattolo

Spacerails
Spacerails Level 2 Manuale utente

Spacerails
Spacerails LEVEL 6 Manuale utente

Spacerails
Spacerails Level 7 Manuale utente

Spacerails
Spacerails Level 5 Manuale utente

Spacerails
Spacerails Level 3 Manuale utente

Spacerails
Spacerails Level 8 Manuale utente

Spacerails
Spacerails Level 9 Manuale utente

Spacerails
Spacerails LEVEL 4 Manuale utente


