Supelco Reflectoquant RQflex 20 Manuale utente

Operating manual
Reflectoquant®
RQflex®20
Reflectometer
EN
Analytical
10/2017

3
Table of contents
1 Intended use ..................5
2 Getting started ...............5
2.1 Description of the instrument ............ 5
2.2 Package contents ......................6
2.3 Inserting the batteries ..................7
2.3.1 Replacement of batteries .............8
2.3.2 Saving data – Important notes .........8
2.4 Operation buttons and display ............9
2.4.1 Operation buttons ...................9
2.4.2 Display .........................10
2.4.3 Menu items ......................10
2.5 Starting the RQflex®20 the first time .....11
2.6 Settings ............................12
2.6.1 Overview .......................13
2.6.2 Setting the language ...............14
2.6.3 Setting the date format .............15
2.6.4 Setting the time format .............16
2.6.5 Setting the date ..................17
2.6.6 Setting the time ..................18
2.6.7 Setting the auto power off time .......19
2.6.8 Setting the audible signal (ON or OFF) ..20
2.6.9 Setting the acoustical countdown warning ..21
2.6.10 Setting the memory capacity warning
(ON or OFF) . . . . . . . . . . . . . . . . . . . . .22
2.7 Initial calibration .....................23
3 Measurement.................27
Method list ..............................27
3.1 Add a new method ....................28
3.1.1 Guided way .....................28
3.1.2 Shortcut........................30
3.2 Measuring with test kits................31
Continue with the last used method .........31
Choose from method list .................31
Shortcut.............................32
Measurement procedures .............. 33
3.2.1 Measurement procedure A ...........33
3.2.2 Measurement procedure B ...........35
3.2.3 Skip the timer....................39
3.2.4 Serial measurements ...............39
3.2.5 General notes on measurement .......40
3.3 Method details .......................40
3.4 Delete all methods ....................42

54
4 Result ..........................43
Result list ..............................43
5 Quality assurance ...........46
5.1 Recalibration ........................46
5.1.1 Procedure.......................47
5.1.2 Calibration results .................50
5.2 Checking the instrument ...............51
5.2.1 Analytical quality assurance (AQA) .....51
Monitoring of the instrument .........51
Total system monitoring.............51
5.2.2 RQcheck procedure ................52
5.2.3 RQcheck results ..................54
6 System information ........57
7 Maintenance of the
instrument ....................59
7.1 Handling............................59
7.2 Cleaning the strip adapter ..............60
7.2.1 Procedure .......................60
8 Trouble-shooting ............61
8.1 User messages on the display ...........61
8.2 Error messages ......................63
8.3 Other faults .........................65
9 Technical data................66
10 Accessories ...................67
11 Service / Warranty .........68
1Intented use
The Reflectoquant® RQflex®20 reflectometer is intented to be used exclusively according to
the operating manual.
The reflectometer was developed for performing analyses of chemical parameters in water,
food & beverage samples, and environmental samples using Reflectoquant®test strips in
the laboratory, on the production line or in the field.
Any other use is considered to be unauthorized.
2Getting started
2.1 Description of the instrument
Your RQflex®20 is a versatile, precise instrument. It is part of the
Reflectoquant®system with the components:
• instrument RQflex®20
• Reflectoquant®tests
• test- and batch-specific barcode strip
According to the principle of reflectometry (remission photometry),
reflected light from the test strip is measured. Just as in classical photo-
metry, the difference in intensity of emitted and reflected light allows a
quantitative determination of the concentration of specific analytes.

76
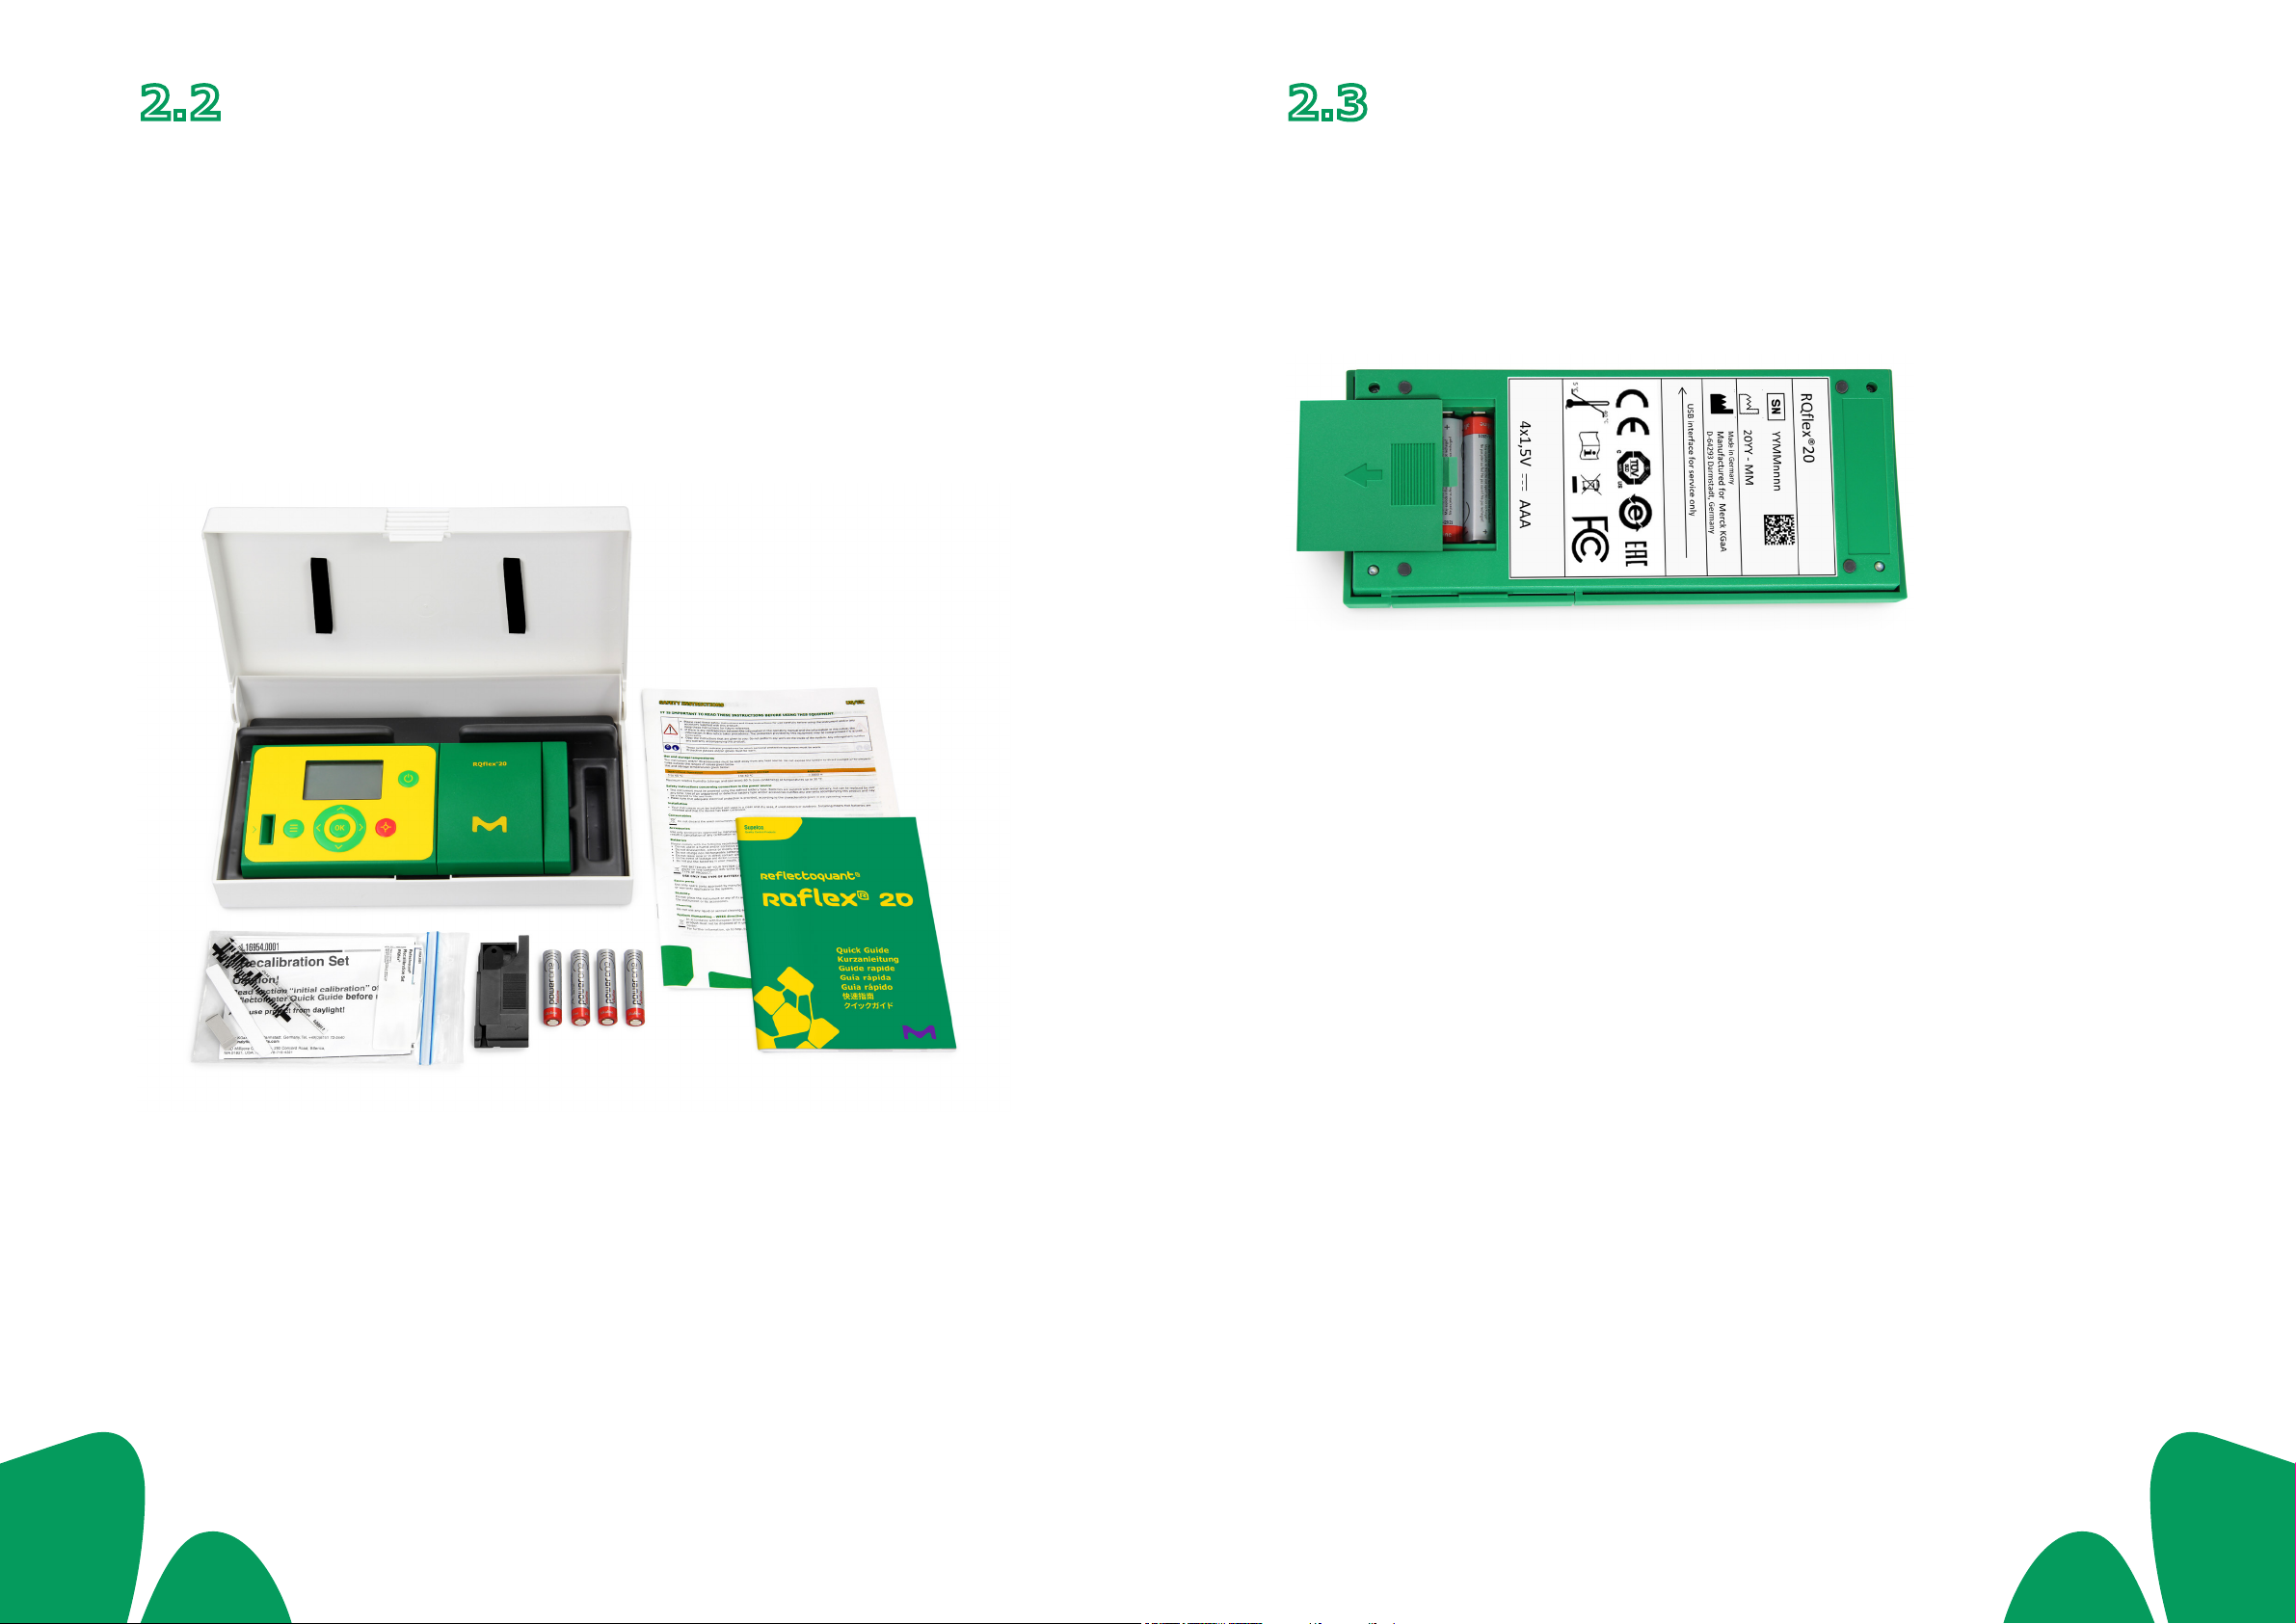
2.2 Package contents
The standard contents of the Reflectoquant®
RQflex®20 Reflectometer package comprise the
following items:
1 Reflectometer inclusive strip adapter,
Cat. No. 1.17246.0001
1 Recalibration set
1 Quick Guide
4 1.5-V batteries (AAA)
1 Safety Instructions
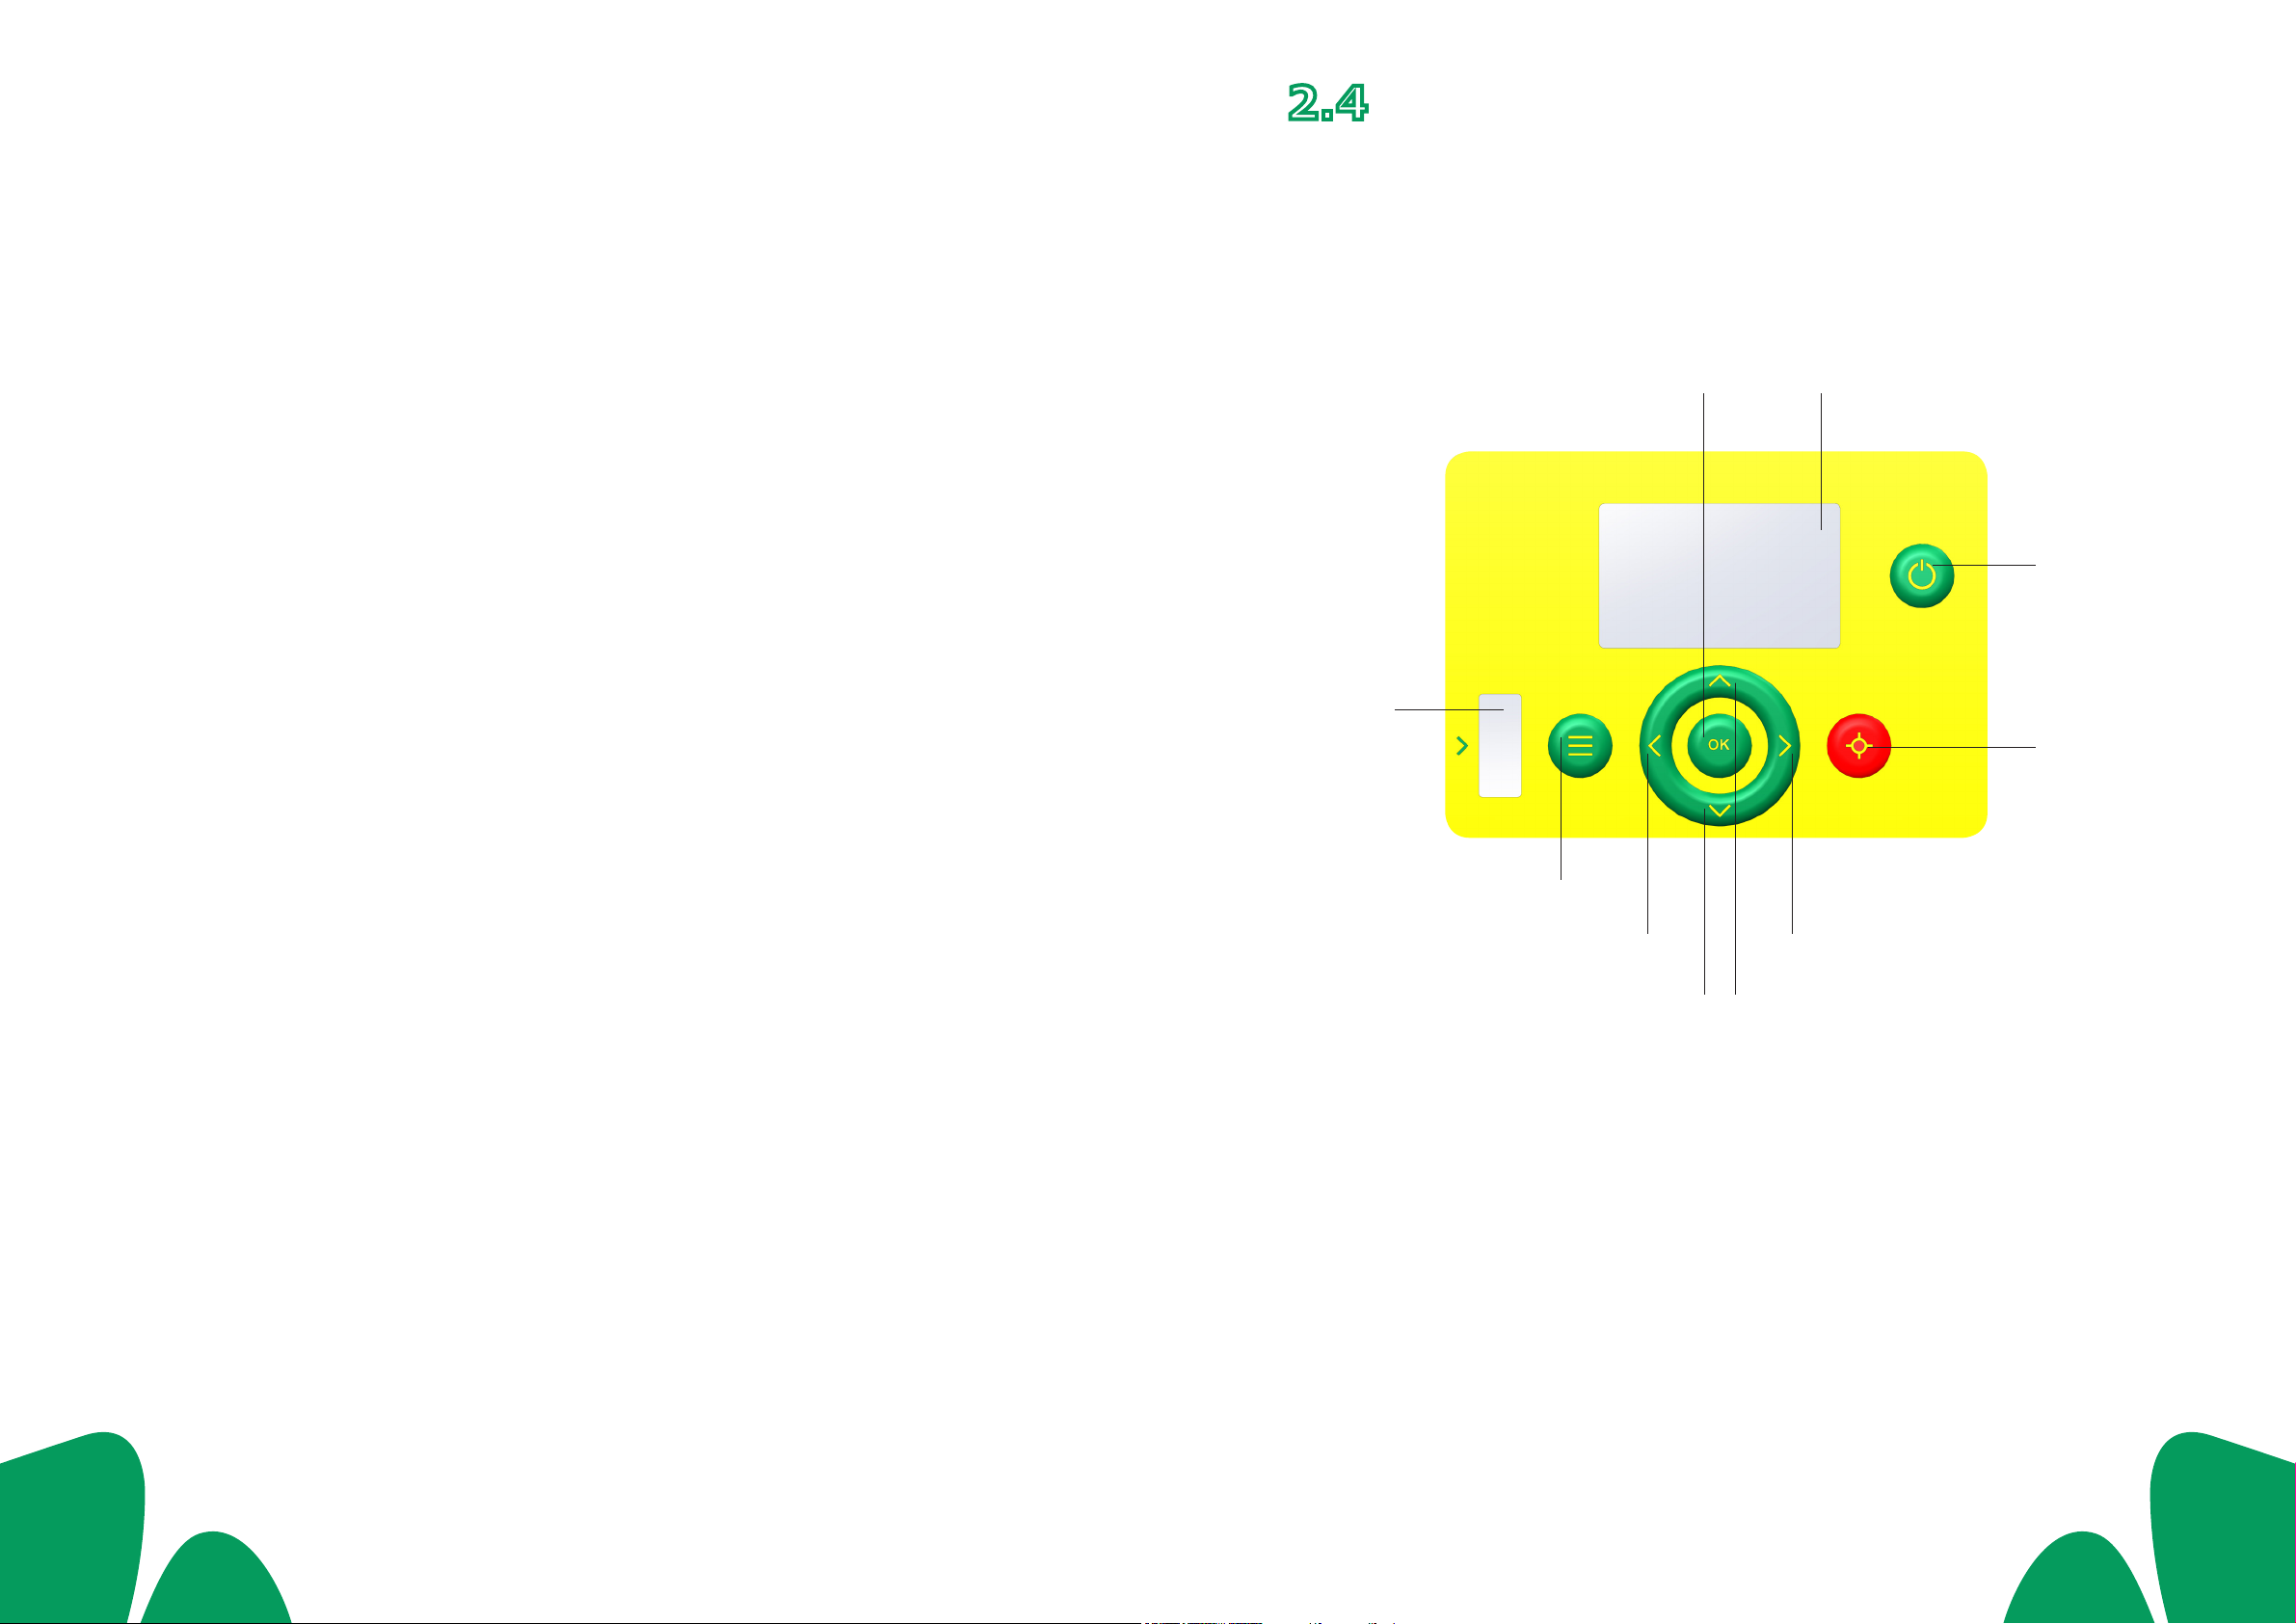
2.3 Inserting the
batteries
Before operating the system for the first time,
the batteries included in the package must be
installed.
1. Remove the lid of the battery compartment
on the back of the instrument by pressing
carefully in the indicated direction.
2. Insert the batteries into the compartment,
heeding the + and – pole indicators.
3. Close the battery compartment.
Dispose of used batteries in
accordance with the local
regulations.

98
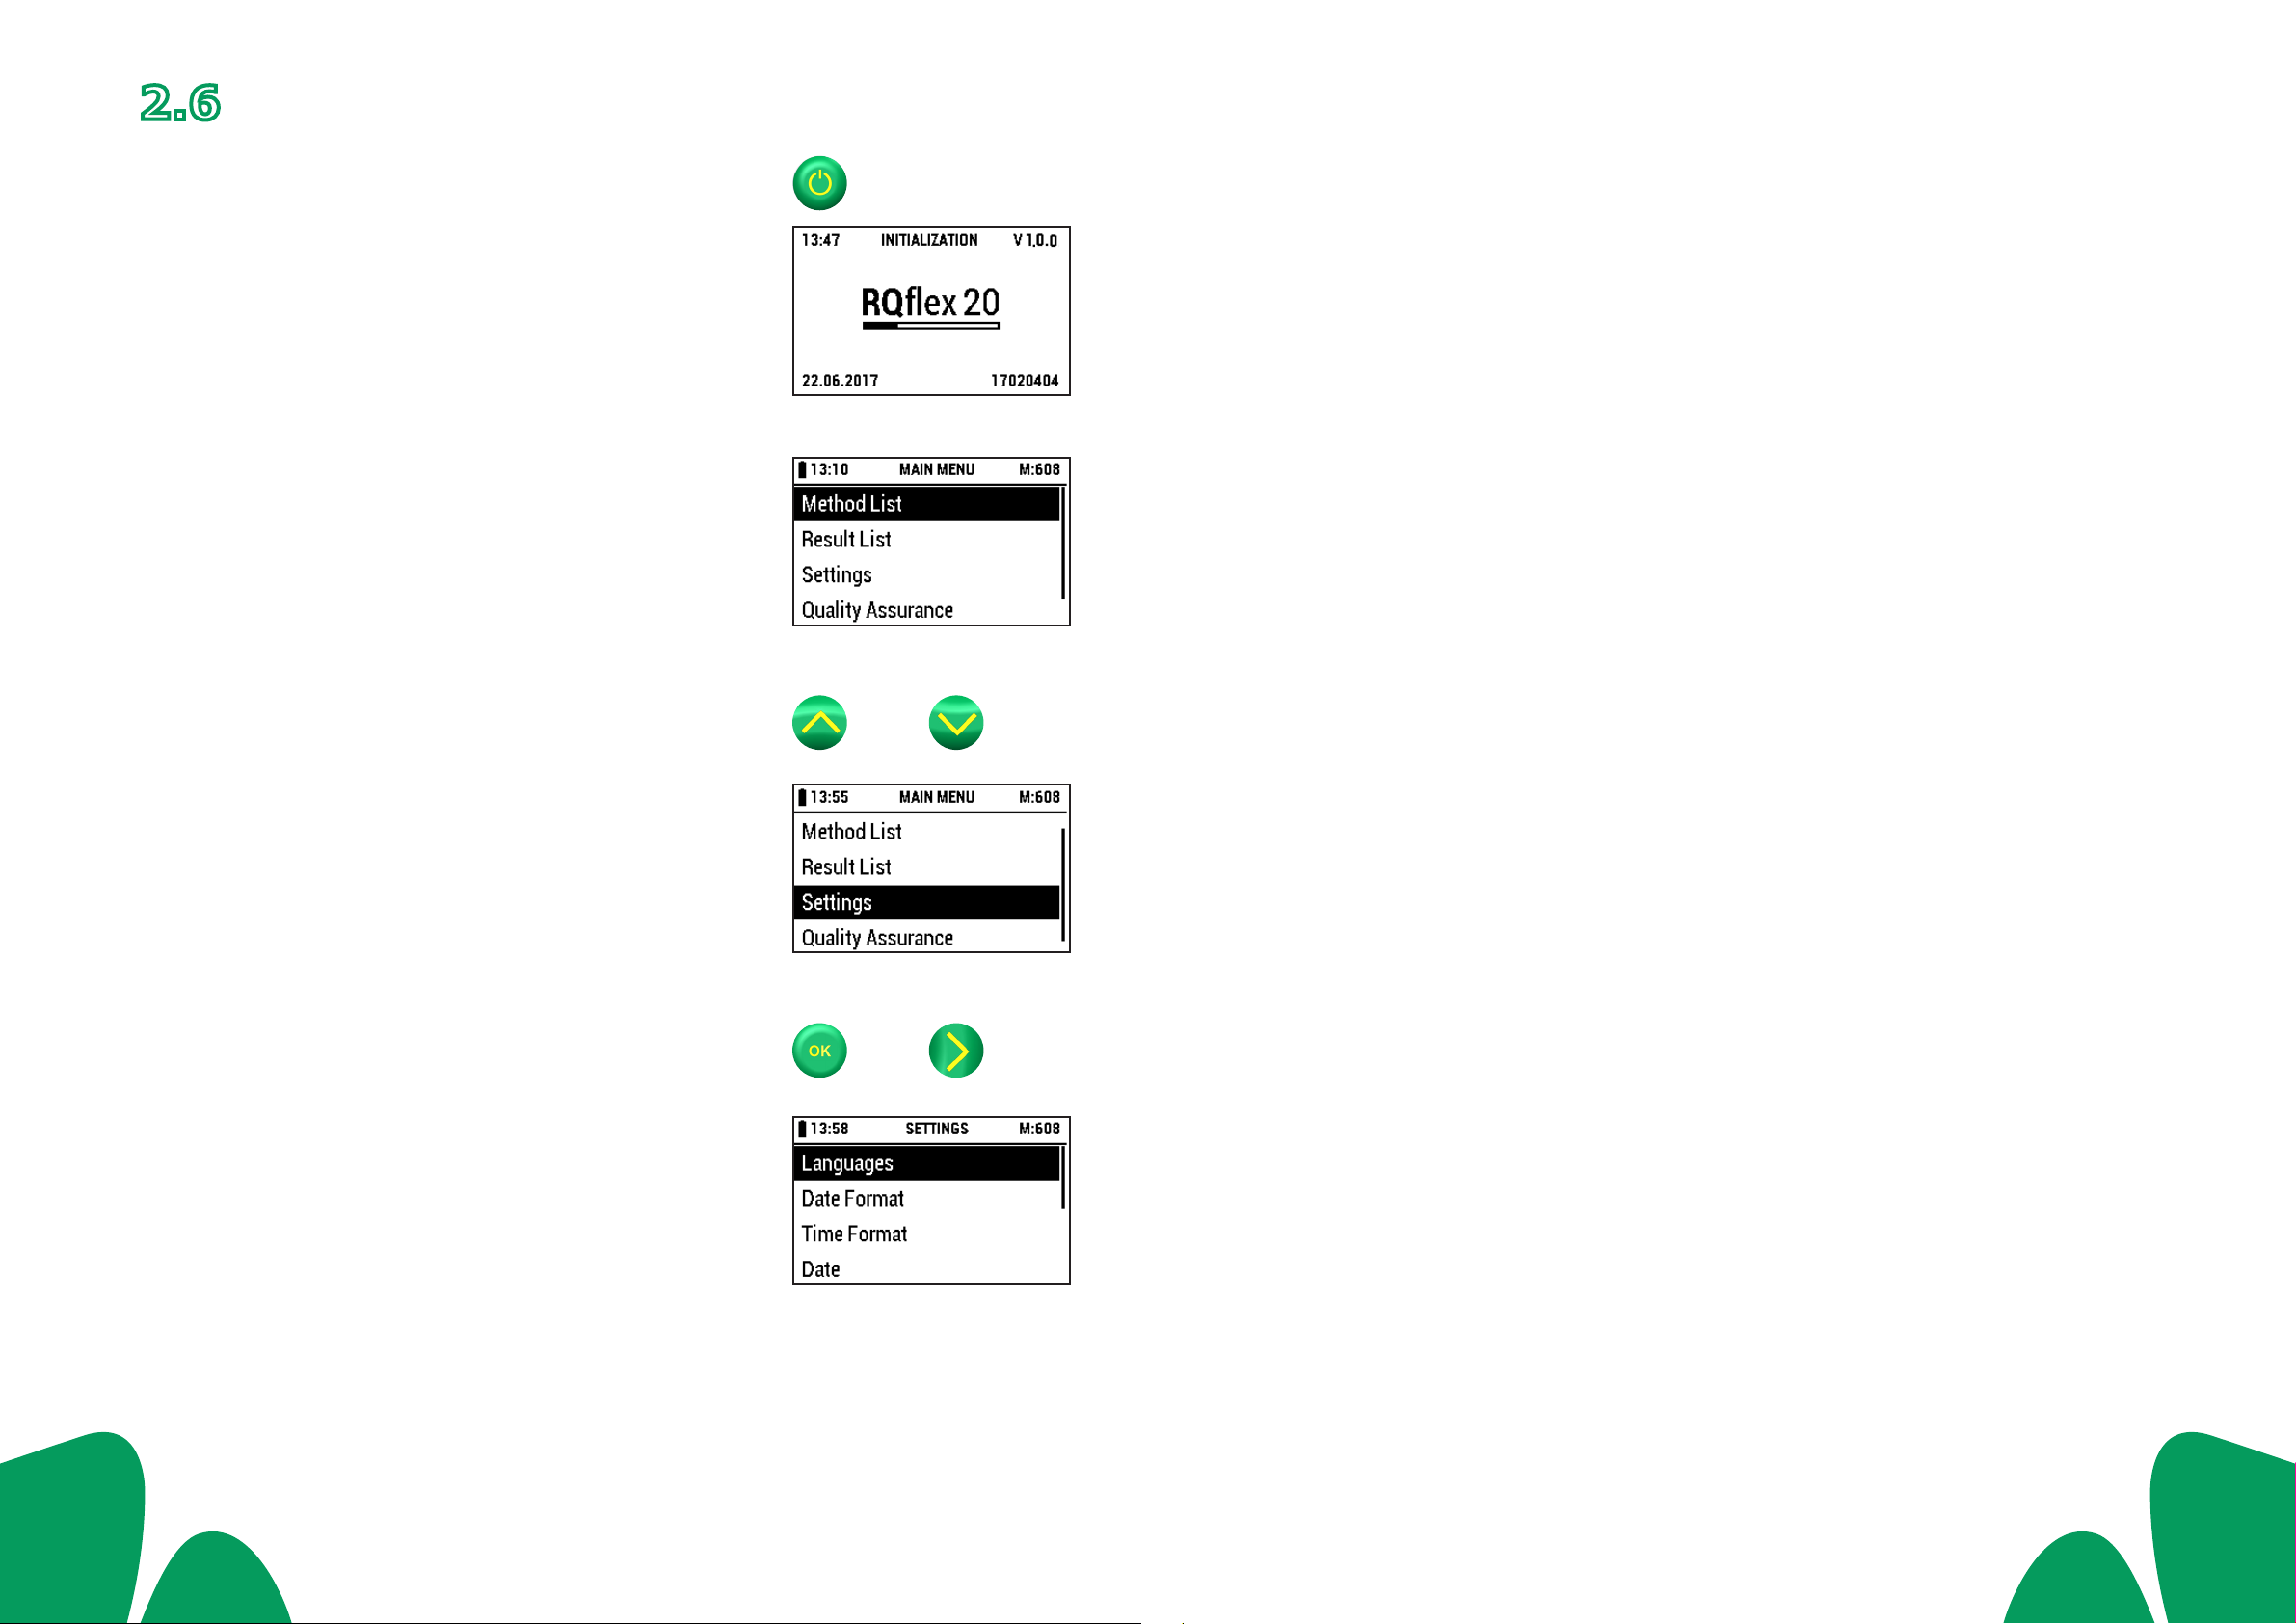
2.4 Operation buttons
and display
2.4.1 Operation buttons
2.3.1 Replacement of batteries
Refer to page 7 for how to replace used
batteries.
Recommendation
Do not use rechargeable batteries!
2.3.2 Saving data - Important notes
Before changing the batteries, please shut down
the instrument first. Otherwise the date and time
settings are lost.
During battery change, data in the RQflex®20
reflectometer is saved for 60 seconds. If the
change time exceeds 60 seconds only date and
time are lost, all stored data and settings are still
stored.
Recommendation
Replacement batteries (AAA non-rechargeable
alkaline batteries, 1.5 V) must be on hand for
immediate insertion. Barcode
reader
Left (Back) Right (Next)
Menu
OK
START
measure-
ment
Power
On/Off
Display
Down Up

1110
2.5 Starting the
RQflex®20
the first time
Before working with the RQflex®20 insert the
batteries (delivery contents). See chapter 2.3
"Inserting the batteries".
Switch on the reflectometer by pressing the
[Power On/Off] button.
The unit runs an electronic self-check test.
The serial number of the RQflex®20 is displayed
at the bottom right.
The display then shows the main menu:
Pressing the [Up] and [Down] buttons takes the
RQflex®20 to the different submenus.
The RQflex®20 is supplied with English preset
as the standard language setting. Before making
the first measurement you should therefore reset
the unit to the language of your choice (see sec-
tion 2.6.2, "Setting the language").
The date and time should be set (see sections
2.6.3 and 2.6.4, "Setting the date" and
Setting the time").
The instrument needs to be calibrated before the
first measurement is performed (see section 2.7,
"Initial calibration").
2.4.2 Display
General structure
Example
2.4.3 Menu items
The following items are displayed in the main menu:
Method List list of all stored methods
Result List list of all stored results
Settings list of instrument settings
Quality Assurance list of all Analytical Quality
Assurance options
Information list of instrument information
Battery
status
Time
Menu item
Method
number
Timer area
Status bar
Content
area
Info bar

1312
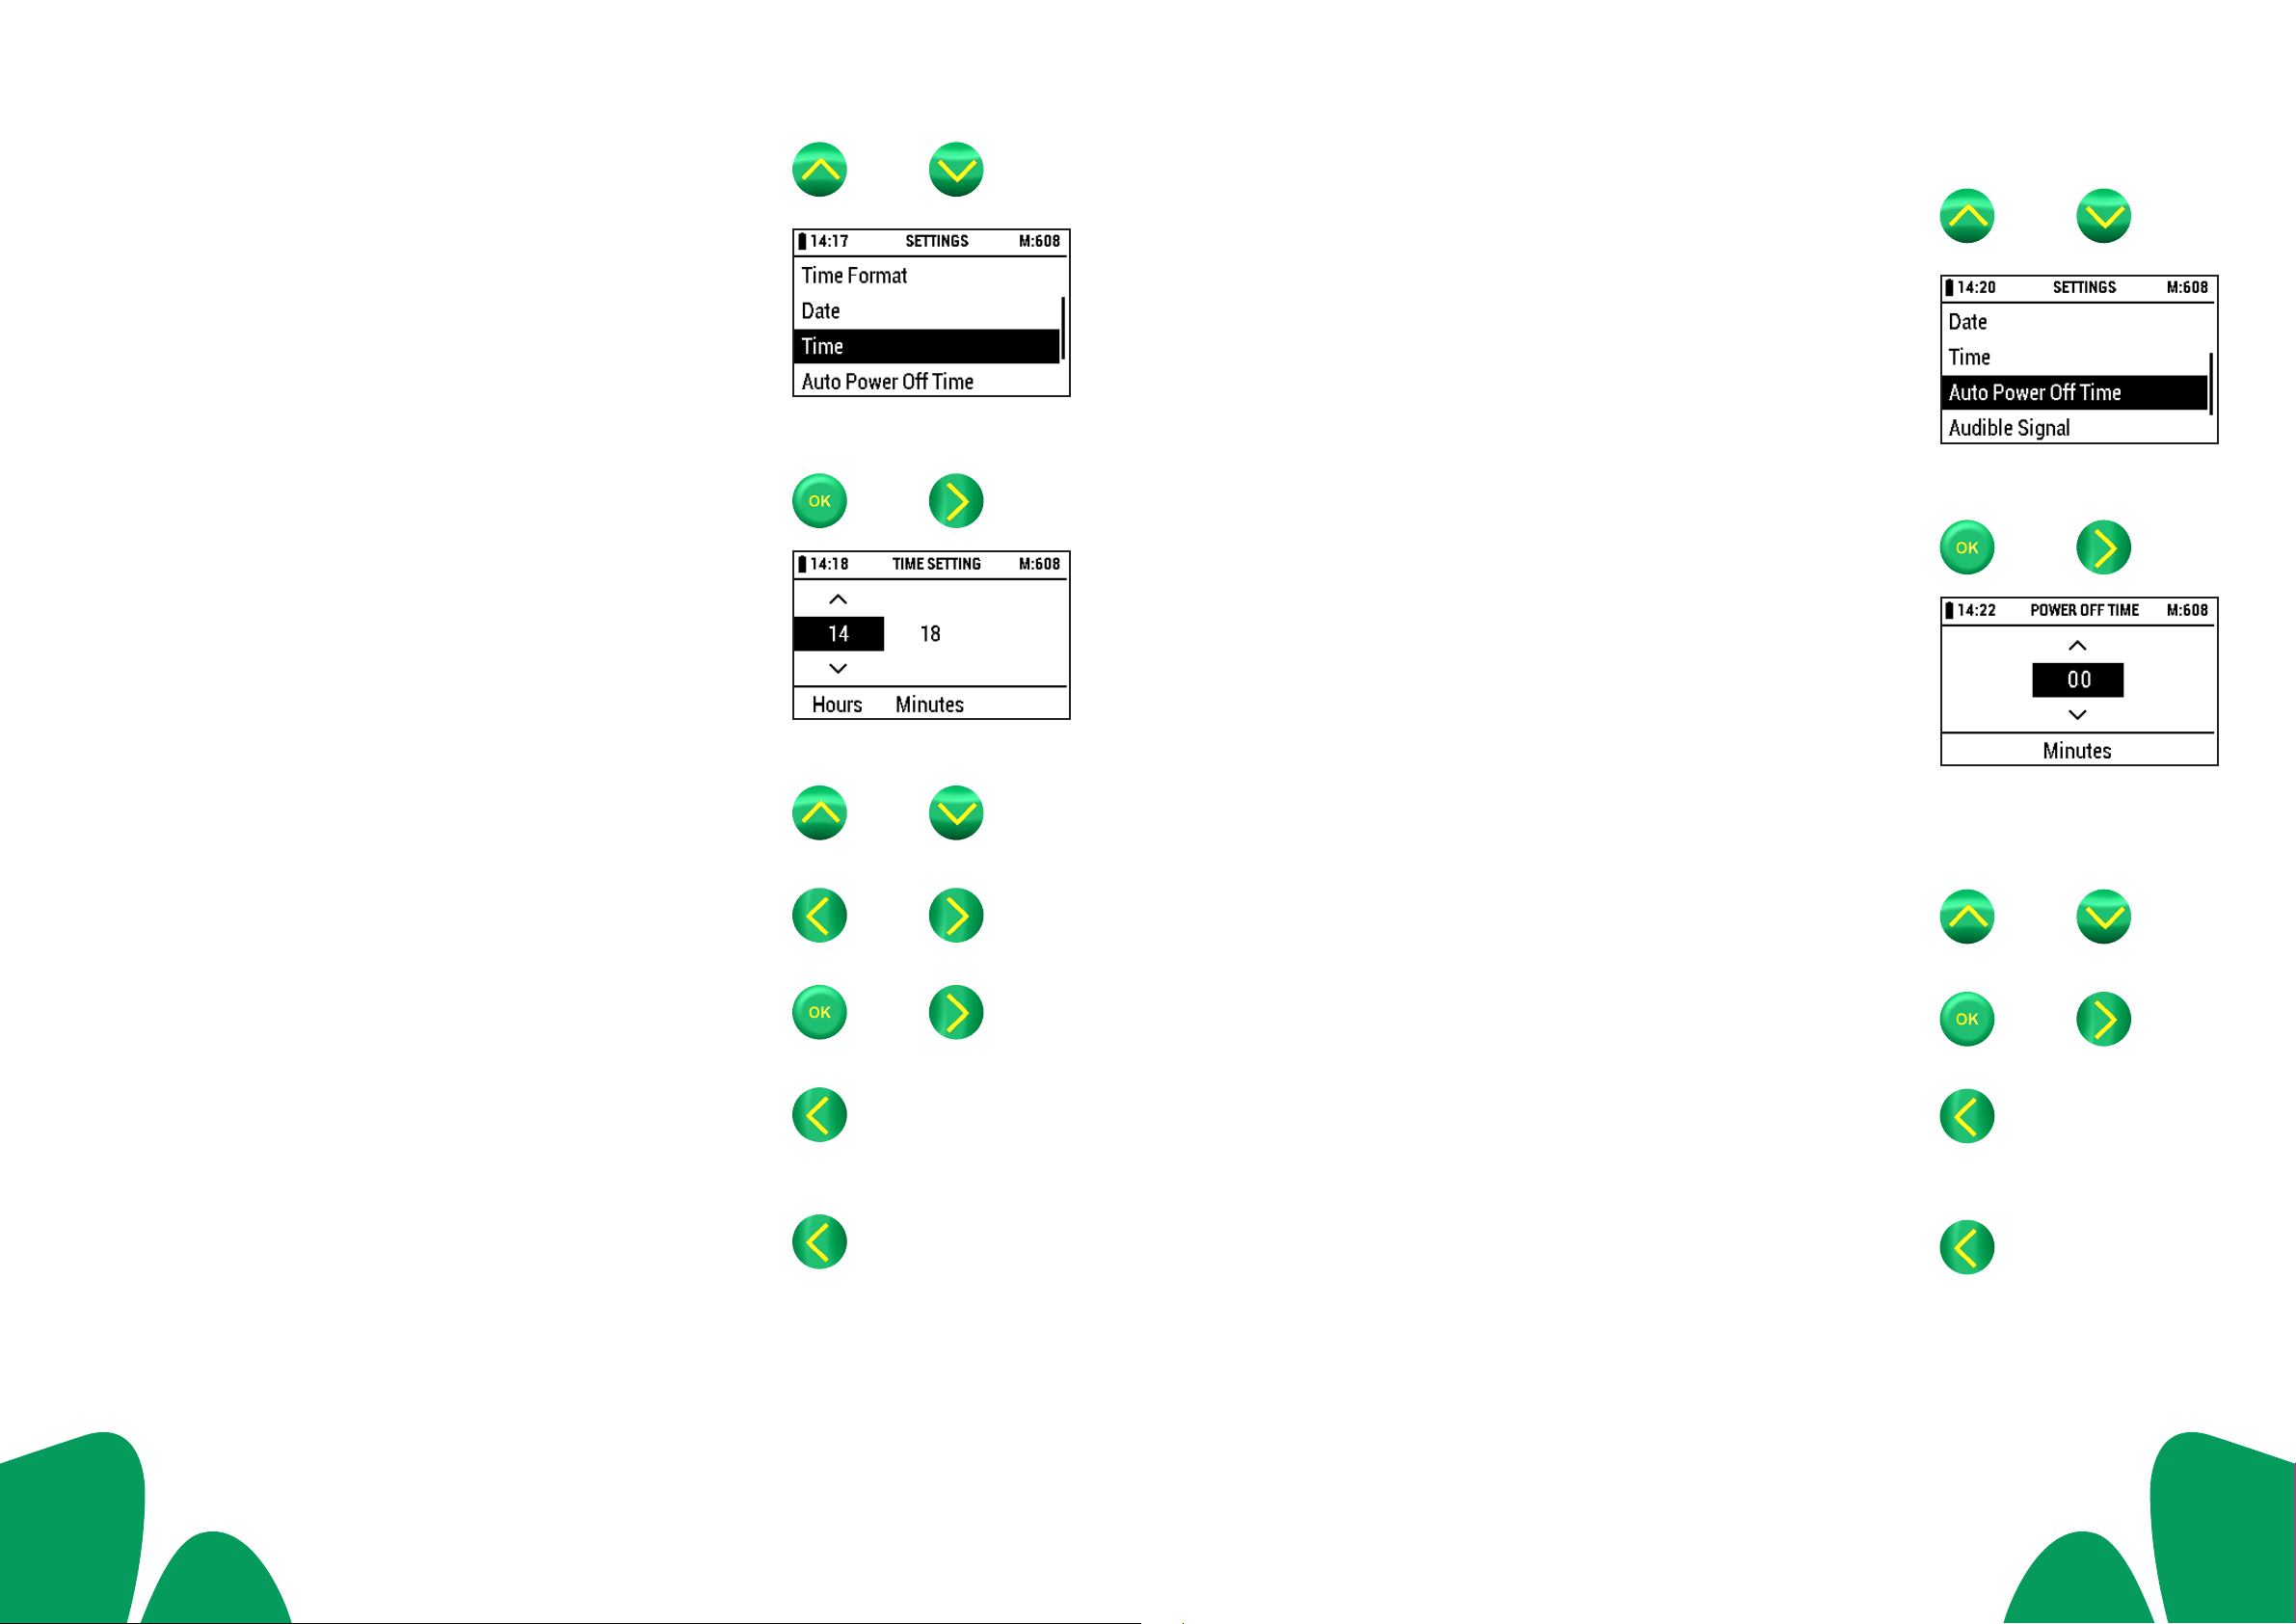
2.6 Settings
Switch on the reflectometer by pressing the
[Power On/Off] button.
The unit runs an electronic self-check test.
The display then shows the main menu:
Select [Settings] in the [MAIN MENU] using
the [Up] and [Down] buttons.
The display shows:
Confirm your selection by pressing [OK] or
[Right (Next)].
The display shows:
2.6.1 Overview
The following items are displayed in the settings menu:
Languages for setting the desired language
(EN - DE - FR - ES - PT - JP - CN)
Date Format for setting the desired date format
(yyyy-mm-dd - dd.mm.yyyy - mm/dd/yyyy)
Time format for setting the desired time format
(24 h - am/pm)
Date for setting the current date
Time for setting the current time
Auto Power for setting the desired power off time
Off Time (00 (= Off) - 15 - 30 - 45 - 60 min)
Audible Signal for setting the audible alert
(On / Off)
Acoustic. for setting the desired duration of the
Countdown warning signal for the countdown
Warning (00 (= Off) - 5 - 10 - 15 - 20 - 25 - 30 sec)
Memory for setting the memory capacity warning
Capacity (On / Off)
Warning

1514
2.6.2 Setting the language
Select [Languages] using the [Up] and [Down]
buttons if necessary.
The display shows:
Confirm your selection by pressing [OK] or
[Right (Next)].
The display shows:
Select the desired language using the [Up] and
[Down] buttons.
Confirm your selection by pressing [OK] or
[Right (Next)] and return to [SETTINGS].
Press the [Left (Back)] button to return to
[MAIN MENU].
Abort:
Press the [Left (Back)] button to abort if
desired, and return to [SETTINGS].
2.6.3 Setting the date format
Select [Date Format] using the [Up] and
[Down] buttons.
The display shows:
Confirm your selection by pressing [OK] or
[Right (Next)].
The display shows:
Select the desired date format using the [Up]
and [Down] buttons.
Confirm your selection by pressing [OK] or
[Right (Next)] and return to [SETTINGS].
Press the [Left (Back)] button to return to
[MAIN MENU].
Abort:
Press the [Left (Back)] button to abort if
desired, and return to [SETTINGS].

1716
2.6.4 Setting the time format
Select [Time Format] using the [Up] and
[Down] buttons.
The display shows:
Confirm your selection by pressing [OK] or
[Right (Next)].
The display shows:
Select the desired time format using the [Up]
and [Down] buttons.
Confirm your selection by pressing [OK] or
[Right (Next)] and return to [SETTINGS].
Press the [Left (Back)] button to return to
[MAIN MENU].
Abort:
Press the [Left (Back)] button to abort if
desired, and return to [SETTINGS].
2.6.5 Setting the date
Select [Date] using the [Up] and [Down]
buttons.
The display shows:
Confirm your selection by pressing [OK] or
[Right (Next)].
The display shows:
Select the desired date using the [Up] and
[Down] buttons.
Change the column with the [Left (Back)] and
[Right (Next)] buttons.
Confirm your selection by pressing [OK] or
[Right (Next)] and return to [SETTINGS].
Press the [Left (Back)] button to return to
[MAIN MENU].
Abort:
Press the [Left (Back)] button to abort if
desired, and return to [SETTINGS].

1918
2.6.6 Setting the time
Select [Time] using the [Up] and [Down]
buttons.
The display shows:
Confirm your selection by pressing [OK] or
[Right (Next)].
The display shows:
Select the desired time using the [Up] and
[Down] buttons.
Change the column with the [Left (Back)] and
[Right (Next)] buttons.
Confirm your selection by pressing [OK] or
[Right (Next)] and return to [SETTINGS].
Press the [Left (Back)] button to return to
[MAIN MENU].
Abort:
Press the [Left (Back)] button to abort if
desired, and return to [SETTINGS].
2.6.7 Setting the auto power off
time
Select [Auto Power Off Time] using the [Up]
and [Down] buttons.
The display shows:
Confirm your selection by pressing [OK] or
[Right (Next)].
The display shows:
Possible selections:
(00 (= Off) - 15 - 30 - 45 - 60 min)
Select the desired auto power off time in
minutes using the [Up] and [Down] buttons.
Confirm your selection by pressing [OK] or
[Right (Next)] and return to [SETTINGS].
Press the [Left (Back)] button to return to
[MAIN MENU].
Abort:
Press the [Left (Back)] button to abort if
desired, and return to [SETTINGS].
Altri manuali per Reflectoquant RQflex 20
1
Indice
Altri manuali Supelco Apparecchiature di prova
Manuali Apparecchiature di prova popolari di altre marche

SMART
SMART KANAAD SBT XTREME 3G Series Manuale utente

Agilent Technologies
Agilent Technologies BERT Serial Manuale utente

Agilent Technologies
Agilent Technologies N3280A Manuale utente

Vernier
Vernier Go Direct Voltage Manuale utente

Lifeloc
Lifeloc R.A.D.A.R. Manuale utente

Fluke
Fluke T5-600 Istruzioni per l'uso e l'installazione