vaetrix HTG Series Manuale utente

Vaetrix HTG Series User Manual
•Table of Contents
Operation and Quick Start Guide 2-3
Safety 4
Admin 5-8
Alarms 9
Clock 11
Damping and Datalogging 12
Datalogging 13
Display 14-15
Leak Test and Min/Max 16
Sensor 17
Snapshot 18
Tare 19
Units and Temperature 20-21
Data Management Application 22-27
Specifications 28-31
Range Options 32-33
Model Configurator 33
Range and Resolution 35
Service and Warranty 36
•Introduction
Thank you for choosing the Vaetrix Test Gauge. Vaetrix is
engineered by individuals that have been in the process
control industry for well over twenty years. We take pride in
the fact that our products are designed and manufactured in
the USA. The gauge itself is backed by an industry leading
four-year warranty. Our products are designed and built to
take abuse. We would have it no other way.
The only way we can get better is by listening to you, the
customer. If you have any comments or suggestions feel free
to send us an email at sales@vaetrix.com or call at 888-797-
3740.
•Brief Overview
The gauge is powered by 3 AA alkaline batteries that provide
over 1000 hours of continuous use. To replace the batteries
just remove the screw located in the battery door or use a
coin for the HTGX Series. Communications for datalogging
and downloads is handed by USB. A standard USB to Micro B
cable will work for the HTG Series or A Standard USB to B for
the HTGX (printer-style cable). For further details on all
important measurement parameters consult the
specifications section in the manual.
1

Operation and Quick Start Guide
When the power key is pressed down the gauge enters the
boot-up sequence.
Gauge firmware revision, range, serial number, and contact
information will be displayed for two seconds.
Once complete the gauge is actively reading pressure and
temperature in Measure Mode.
There are two modes of operation:
(Measure)
The Measure Mode keys ZERO, UNITS, and SNAPSHOT are
active.
The backlight will automatically turn On with any key
press and remain on for 60 seconds. Backlight settings
can be changed in Program Mode under DISPLAY.
(Program)
Simply press and hold the DOWN arrow to access
Program Mode. Use the ARROW keys to navigate and
SELECT to confirm. The quick overview below shows you
all the available menu options.
12/10/2020 2

Operation and Quick Start Guide
MAIN MENU OPTIONS
ADMIN Control Features, Reduce Resolution, Adjust Calibration,
Restore Factory Calibration
ALARMS On/Off/Set High or Low
CLOCK Set Date, Time, Time Zone, and Format
DAMPING On/Off
DATALOGGING Start, Configure
DISPLAY Timeouts, Contrast, Refresh Interval, Color
LEAKTEST Start, Stop
MINMAX Reset
SENSOR Gauge or Absolute
SNAPSHOT View
TARE Live, Offset, Reset
TEMPERATURE Cel or Far
UNITS Lock, Scroll, Unlock
12/10/2020 3

Vaetrix HTG Series User Manual
•Safety
We use the International Electrical Symbols on our products
and in the manuals to alert users of key criteria that must be
followed when operating the product.
•Use a #2 phillips screwdriver when tightening the battery
door screws to prevent stripping and provide adequate
sealing.
•Use backup wrench on pressure sensor to install or
remove fitting.
•Gauge is not approved for use in hazardous locations.
•To clean the gauge, wipe down with damp cloth and small
amount of dish soap. Do not submerge the unit in water
at anytime.
•The RTD probe supplied with the product is designed to
measure temperature. Use a thermowell when
measuring temperature inside a pipe with live pressure to
ensure safety.
12/10/2020 4
Symbol Description
Power Off / Power On
Earth Ground
Warning, Risk of Danger or Damage
European Conformity
Hazardous Voltage
Battery Symbol
Wheelie Bin, Conforms to EC Directive
for Disposal
Vaetrix HTG Series User Manual
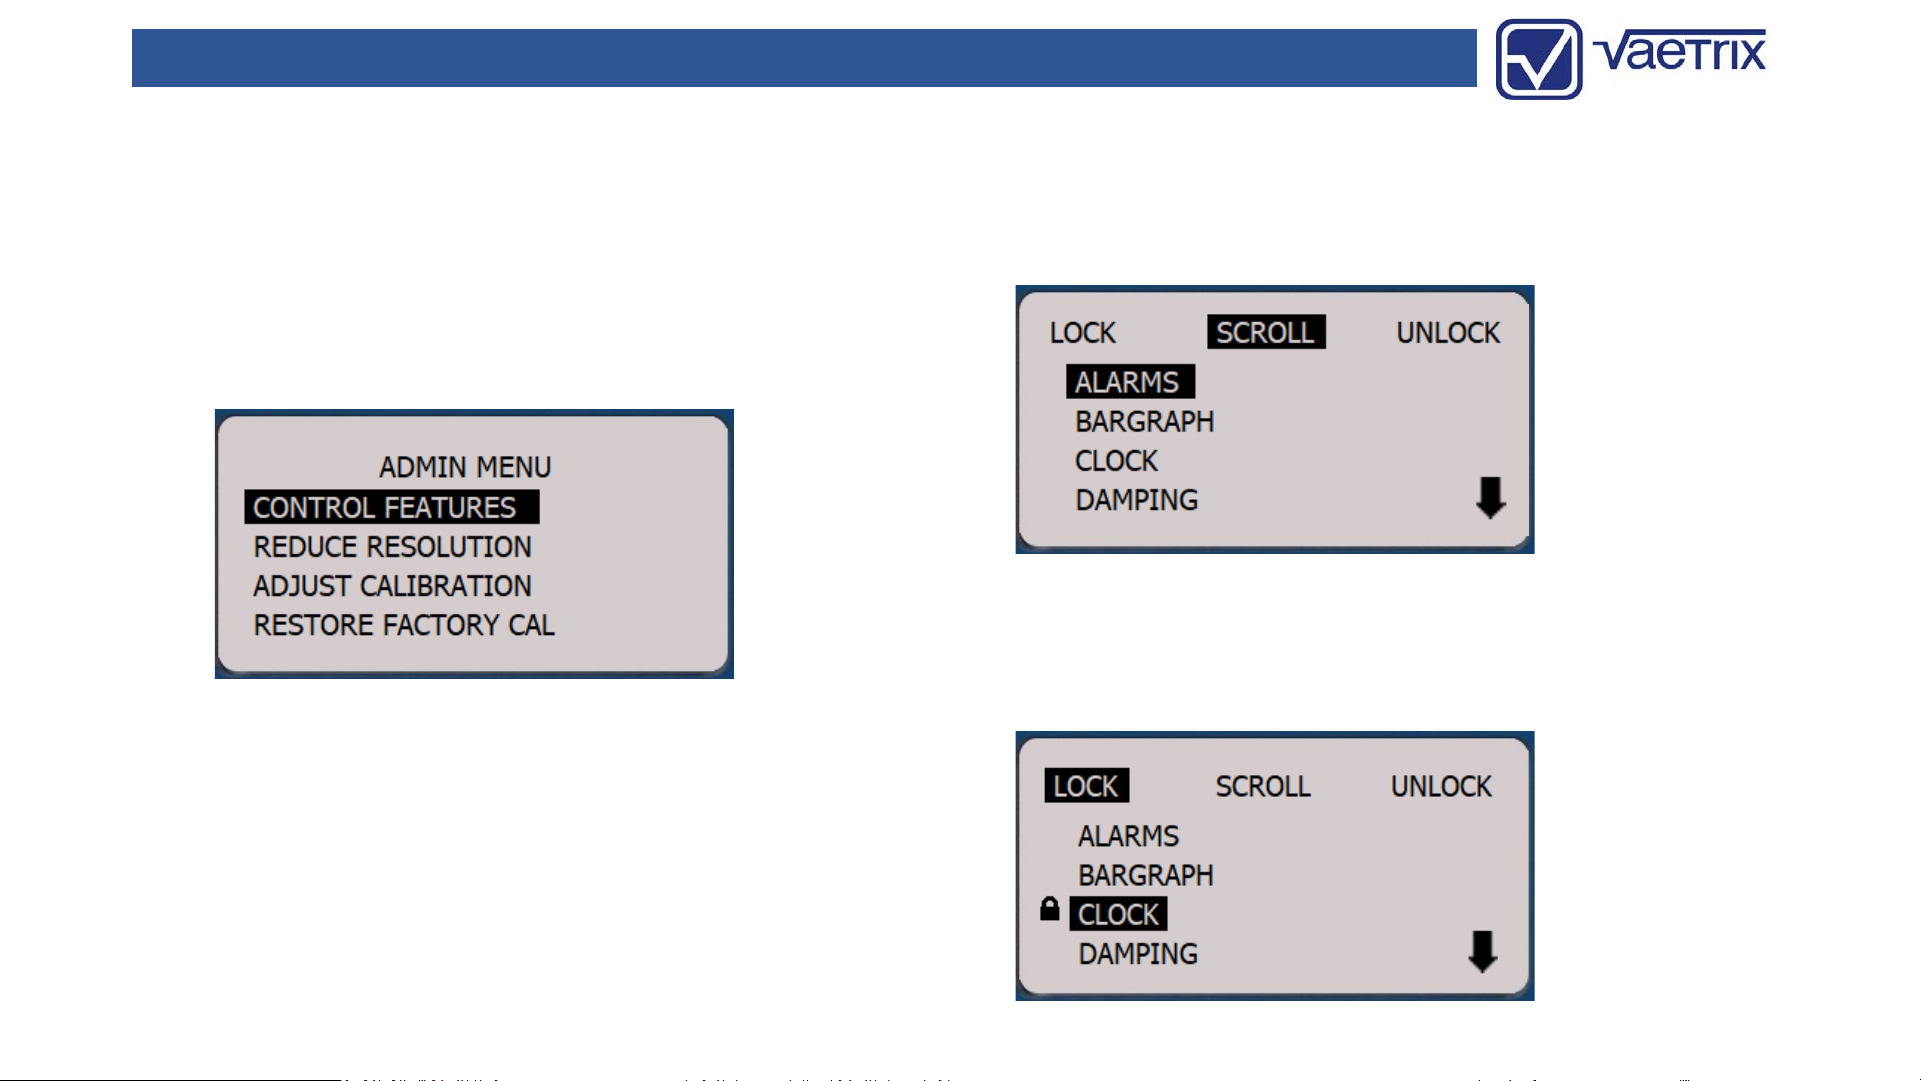
•Admin
In the Admin menu you have the ability to CONTROL
FEATURES, REDUCE RESOLUTION, ADJUST CALIBRATION, or
RESTORE FACTORY CAL. A password must be entered to gain
access to these features. The default password is 2017. Use
the ARROW keys enter in the value and press the SELECT
key.
•Admin -Control Features
The menu options in the gauge can locked out according to
your preferences.
SCROLL using the up or down ARROW keys to highlight the
options. Use the right or left ARROW keys to LOCK or
UNLOCK. The end user will enter password to UNLOCK.
12/10/2020 5

Vaetrix HTG Series User Manual
•Admin –Reduce Resolution
The least significant digit will removed from the display
when selecting REDUCE RESOLUTION. This feature can be
useful for recording values and pulsating pressure if
damping is not used. Full resolution can be restored by
entering back in Admin and selecting INCREASE
RESOLUTION.
•Admin –Adjust Calibration
We recommend calibration on an annual basis. Calibration
frequency should be determined by your quality system
based on history, usage, and other key criteria.
Although we suggest you return the HTG to factory for
calibration, you can field calibrate the unit with trained
personnel and equipment traceable to the National Institute
of Standards and Technology (NIST). To begin the process
select ADJUST CALIBRATION.
12/10/2020 6

Vaetrix HTG Series User Manual
•Admin –Adjust Calibration
The unit will prompt you to apply the high reference
pressure. We recommend that you are within 10% of the
high pressure reference setpoint. Enter in the known value
by using the ARROW keys to increase or decrease digits and
confirm with the SELECT key.
Follow the same steps for the low pressure reference
setpoint. Once again, we recommend you are with 10% of
the setpoint.
•Admin –Adjust Calibration
The unit will respond by with “Storing Calibration” and
return to Measure Mode.
Certain pressure ranges may have more than two pressure
reference setpoints. Follow the same procedure of entering
in the known value and confirming with SELECT key. Once
the calibration is complete verify the gauge is within
specification by the running the up and down scale
throughout range. Reference the original Certificate of
Calibration for cardinal points.
12/10/2020 7

Vaetrix HTG Series User Manual
•Admin –Restore Calibration
If you make a mistake during the calibration process or the
gauge is not within specification the factory defaults can be
restored. Navigate to RESTORE FACTORY CAL and press the
SELECT key. The unit will respond by with “Storing
Calibration” and return to Measure Mode.
Contact the factory if you are having any issues with
calibration.
12/10/2020 8
Vaetrix HTG Series User Manual
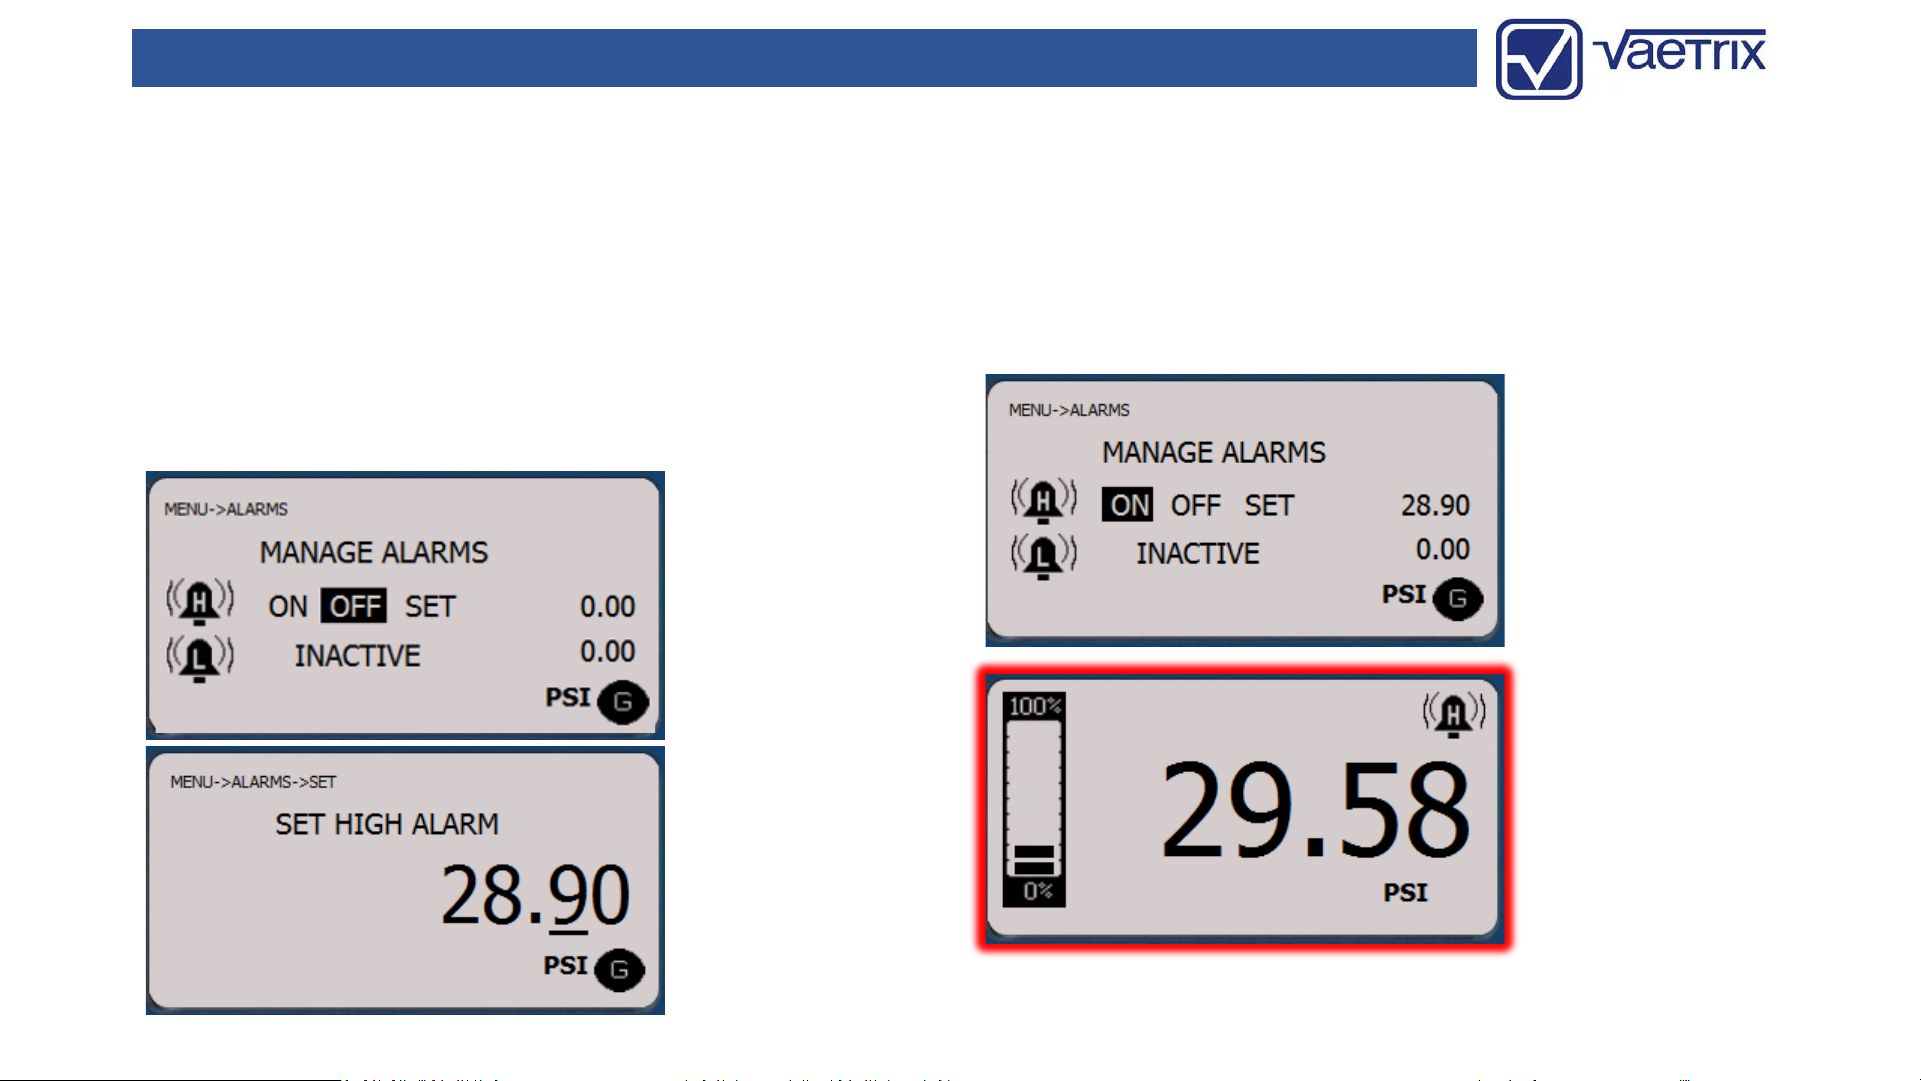
•Alarms
The HTG can be setup to indicate a Low and High Alarm.
Once the low or high value is reached the display or value
will turn red until the pressure changes. To adjust an alarm
select Low or High Alarm and then SET. To set the alarm
value use the right or left arrow keys to select the decimal
place and the up and down are keys increase or decrease
the value. Press SELECT to confirm the value and return to
the selection menu.
Once the alarm setpoint has been reached the high or low
alarm icon will show on the display and background color
will change to red to indicate an alarm status.
To disable an alarm, choose OFF and SELECT.
12/10/2020 9

Vaetrix HTG Series User Manual
•(Intentionally Left Blank)
12/10/2020 10
Questo manuale è adatto per i seguenti modelli
1
Indice
Altri manuali vaetrix Apparecchiature di prova

Manuali Apparecchiature di prova popolari di altre marche

SMART
SMART KANAAD SBT XTREME 3G Series Manuale utente

Agilent Technologies
Agilent Technologies BERT Serial Manuale utente

Agilent Technologies
Agilent Technologies N3280A Manuale utente

Vernier
Vernier Go Direct Voltage Manuale utente

Lifeloc
Lifeloc R.A.D.A.R. Manuale utente

Fluke
Fluke T5-600 Istruzioni per l'uso e l'installazione


