Active Thermal Management UVS-7111P Manuale utente


UVS-7111 User's Manual
Contents
2
Content
Contents ....................................................................................................................................2
Package Contents .....................................................................................................................3
System Requirements .............................................................................................................4
Introduction ...............................................................................................................................5
Features and Advantages ........................................................................................................5
System Introduction .................................................................................................................6
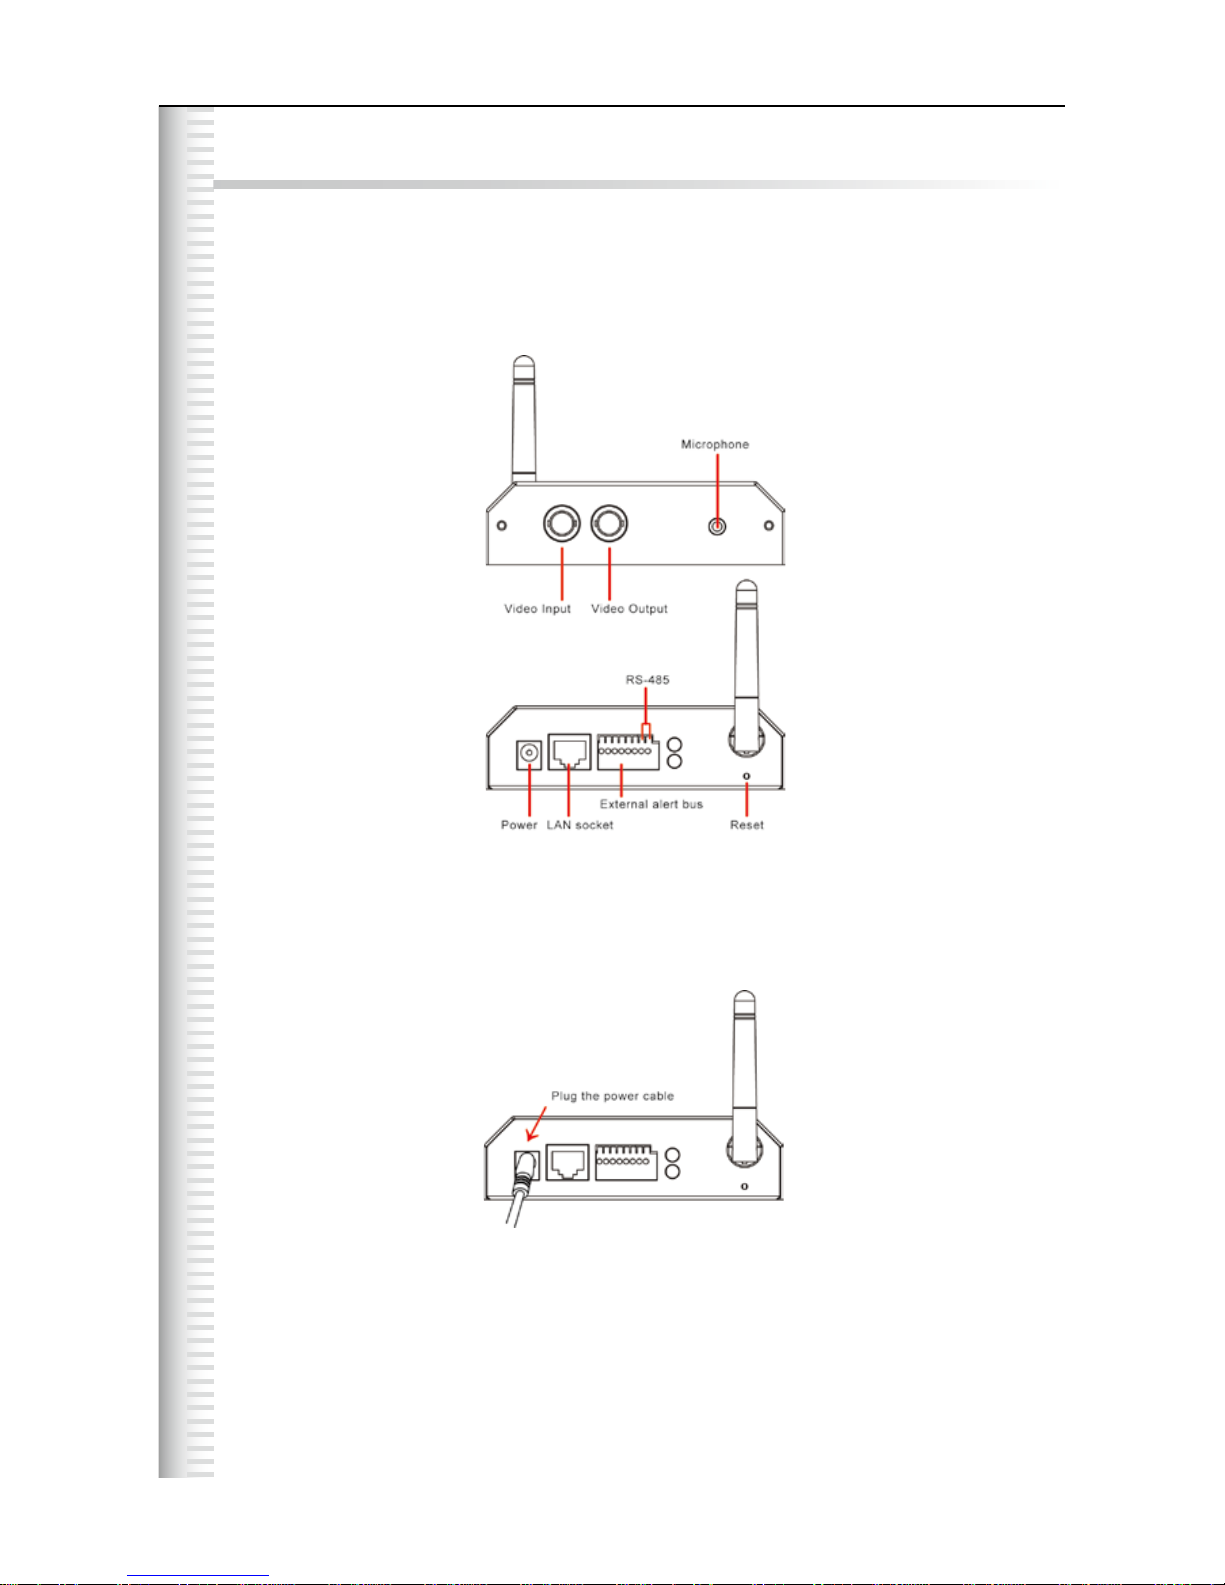
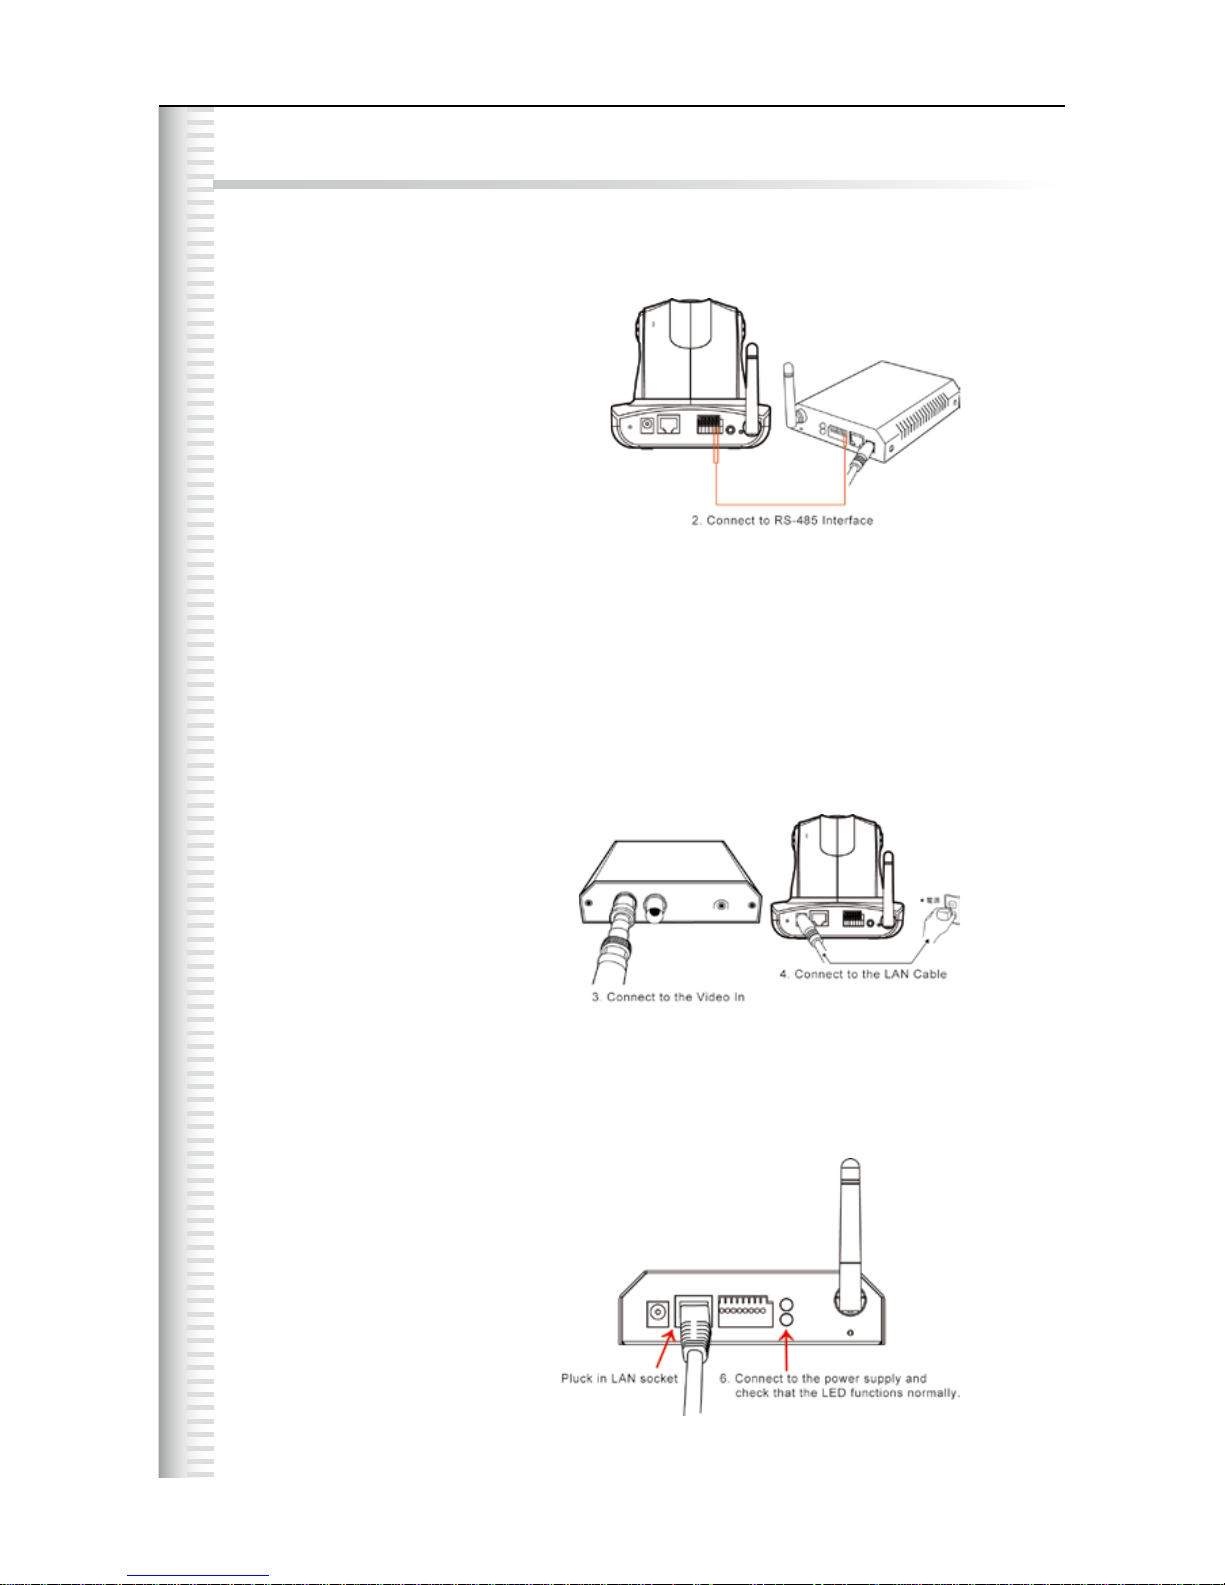
Hardware Installation ...............................................................................................................8
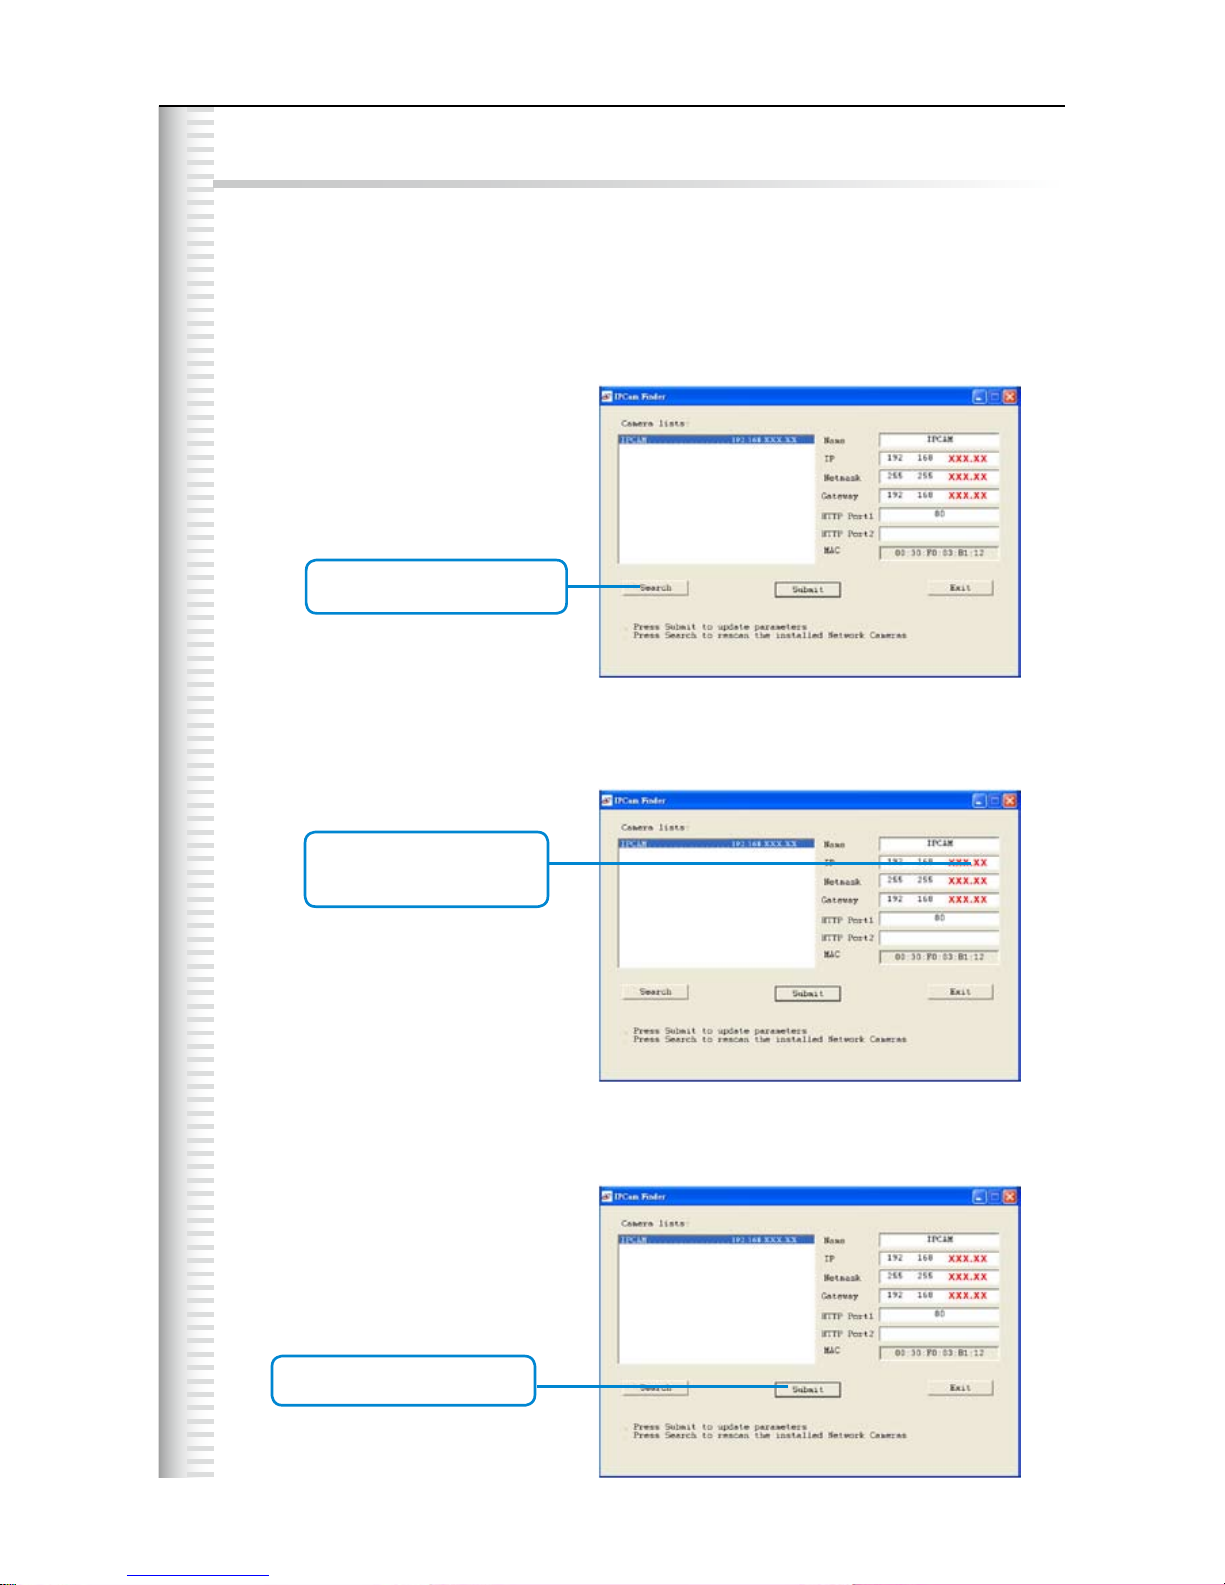
Camera Settings ......................................................................................................................9
Camera Setting from a Router................................................................................................11
Change the Internet Explorer Setting ....................................................................................12
Enter the Main Page ................................................................................................................13
Camera Main Page ..................................................................................................................15
System Settings ......................................................................................................................24
Basic Settings .........................................................................................................................24
System (System info) ........................................................................................................24
Video/Image .......................................................................................................................25
Audio (Sound) ....................................................................................................................30
PTZ ....................................................................................................................................31
User(User) ..........................................................................................................................34
Network (Network settings) ..............................................................................................36
Network (cable network setting page) .........................................................................36
Wireless (wireless network setting page)....................................................................37
Streaming (streaming setting)......................................................................................42
PPPoE (dial-up networking setting).............................................................................43
DDNS (Dynamic Domain Name Server Setting) .........................................................44
UPnP (Universal Plug and Play) ..................................................................................45
SMTP Server (mail server setting) ...............................................................................47
Network > Samba .........................................................................................................48
Date/Time (date/time setting) ...........................................................................................50
IP Filter ...............................................................................................................................51
Application Settings ...........................................................................................................52
Event (event trigger setting page) ....................................................................................52
Motion Detection ................................................................................................................57
Firmware upgrade ..............................................................................................................57
Factory Default ...................................................................................................................59
Reboot ................................................................................................................................61
Attachment A: External Alarm ..........................................................................................62
Attachment B: Bandwidth Estimation ............................................................................64
Attachment C: Troubleshooting and FAQs ...................................................................65

UVS-7111 User's Manual
Package Contents
The UVS-7111 Video Server is provided with the following accessories. Please contact your dealer if
any one of the following is missing.
1. UVS-7111 Video Server 2. 12V DC power cable
5. Warranty card/certicate 6.CD
7. Quick guide
3
Packaging Contents
(User's Manual/Quick Guide/NVR Manual/IP Finder)

UVS-7111 User's Manual
4
System Requirements
CPU: Pentium 4 2.4 GHz or later
Memory: 256 MB (512 MB recommended)
VGA card resolution: 800 x 600 or higher
UVS-7111/7111P/7111W Video Server
Internet Environment
LAN
Wireless LAN
Monitor System Requirements
10/100M Ethernet
802.11b or 802.11g
OS support Windows 2000 Professional SP4, XP Home SP2
Browser support Internet Explorer 6.x or later
Hardware
System Requirements

UVS-7111 User's Manual
Introduction
The UVS-7111/7111P/7111W Video Servers convert any digital camera into a full functional IP
camera. You can obtain all of the benefits that digital technology offers without scrapping your
investment in an analog system. These products digitize analog video signals and will send digital
images directly over any IP network, such as LAN, intranet and Internet. The UVS-7111/7111P/
7111W turns an analog video system into a network surveillance system enabling users to view
live images using a Web browser or video management software on any local or remote computer
on a network. Moreover, the UVS-7111/7111P/7111W MPEG4 Video Server supports 3GPP real-
time video streams that allow you to monitor your home or ofce environment using a 3G mobile
phone. The UVS-7111/7111P/7111W MPEG4 Video Server has a built-in CPU and the webpage
server enables you to secure people and property, or monitor equipment and facilities remotely from
anywhere there is a networked computer.
Features and Advantages
The UVS-7111 MPEG4 Video Server is a stand-alone facility and operates smoothly without the
need to install additional software or hardware. All that is needed is a PC equipped with IE browser
(6.0 or above) connected to the Video Server via the network to monitor pre-set places remotely.
The UVS-7111/7111P/7111W MPEG4 Video Server provides great remote accessibility of people,
property, and assets just as though you were really there.
The UVS-7111 MPEG4 Video Server features:
● MPEG4/MJPEG dual video compression mode and dual coding mechanism for multiple
applications;
● Support of 3GPP real-time video streams that allow you to control home or office environments
using a 3G mobile phone;
● Auto-pan camera with 270° (horizontal) and 135° (vertical) rotation angles and a maximum of 16
pre-set scan points;
● Built-in smart motion detection to monitor abnormal situations automatically and transmit real-time
according to pre-set trigger commands;
● Built-in webpage server that allows easy control via the Internet;
● Dynamic IP domain name support for use of the product at locations where xed IP is not
available;
● Access setting by level to ensure security and protection of life and property;
● Elegant style suitable for homes, studios, offices, clinics, and retail shops;
● Optional Ethernet Internet camera (UNC-9711P) and Wireless Version (UNC-9711W) to meet your
special requirements.
5
Introduction / Features and Advantages

UVS-7111 User's Manual
System Instructions
1. DC power cable: The DC input connector has a socket to connect the product to a power source.
2. Ethernet connector: An RJ-45 connector is provided for connection to the 10Base-T Ethernet cable
or 100 Base-T High Speed Ethernet cable. This port can automatically detect or coordinate the
transmission rate of the network.
3. Use a video/audio output cable for external video/audio transmission if required.
Wiring of the product
DC Power
Plug the power cable in the power socket on the product.
6
System Instructions

UVS-7111 User's Manual
Audio/Video Output
Plug the audio/video source of your camera into the Audio/Video input, and connect your monitor or
recording equipment to the Audio/Video output.
(Note: Most cameras use a BNC connector, if your camera does not use BNC, please consult your
dealer or retailer to purchase.)
LAN Socket
Connect the LAN cable into the LAN socket.
External alert bus (DI/DO)
For more information about DI/DO, refer to Attachment A.
RS-485 connector
If your camera supports RS-485 interface, please wire your cameras up to the RS-485 socket. The
UVS-7111 provides several drivers (Pelco-D, Pelco-P, and A-linking drivers). Refer to your camera
user manual and this manual (Basic Setting > PTZ) for further information.
Reset to factory settings
After turning on the power, insert a slim plastic object into the reset orice and press for ve seconds
to restore the unit to factory settings.
Link LED and Event LED
1. Link LED: The green LED lights up when you transmit images after turning on the
machine.
2. Event LED: The green LED ashes when motion or alert detection is implemented after
you turn on the machine.
7
System Instructions

UVS-7111 User's Manual
Hardware Installation
1. Select the installed place
This product can be installed on any convenient at surface, or concealed in a ceiling etc. .
(Note: Please do not install in an enclosed unventilated space. Doing so might cause abnormal
operation for the product.)
2. Connect to the RS-485 interface
Plug one end of your control cable in the RS-485 socket on the back of the camera and connect
the other end to your product.
3. Connect to the Video In
Plug one end of the video source of your analog camera and connect the other end to your
product.
4. Connect to the power source for your camera
Plug one end of the attached power cable in the power socket of your camera and connect the
other end to the AC power source.
(Note: Make sure your analog camera uses BNC connectors for the video in/out. If not, please
check with your dealer or retailer.)
5. Connect to the LAN cable
Plug one end of your LAN cable in the LAN socket on the back of the product and connect the
other end to the network that you want to access to.
6. Connect to the power source
Plug one end of the attached power cable in the power socket of the product and connect the
other end to the AC power source.
Note : You can specify three LED statuses by setting: 1.ON; 2.OFF; 3.Flash. For more information about
setting of LED status, refer to the “System Setting”.
8
Hardware Installation

UVS-7111 User's Manual
Camera Settings
After the hardware has been installed, insert the supplied CD in the computer and execute the le IP
FINDER.EX following the steps below to search for and change the IP address of the video server.
1. Start the machine.
Execute the IP Finder.exe from the supplied CD.
2. Find the camera (Search)
Search for the product from your LAN. The factory IP setting 192.168.0.20 appears on the screen.
3. Changing the IP address and related settings for the network environment
When you nd the camera, click it and the settings will appear on the right side.
Change the settings for the new network environment you need.
4. Submit data (Submit)
Click Submit to validate new settings.
9
Camera Settings
1. Click Search to nd
the Video Server on the LAN.
You must enter new settings in the IP, Netmask and Gateway elds
and keep the settigs in other elds unchanged.
2. Enter the settings for the
new network environment
you need.
3. Click Submit to validate new
settings.

UVS-7111 User's Manual
5. Conrmation
When all changes have been conrmed, click Exit to quit.
Note:
1. The IP FINDER can only nd the IP addresses of a video server that shares the same hub on the
LAN. For information about nding IP addresses on the Internet, refer to the “DDNS Setting”, or
“UpnP Setting”.
2. All UIC camera/network server products can be found and changed using the IP
FINDER software.
3. If the IP FINDER software cannot be executed, check your antivirus software
or rewall to remove the block.
4. Field description: You can give a name to your camera (such as “PT_IP” or “PT-IP”).
No spaces allowed (such as “PI IP”).
You can change the settings for IP, Gateway Address and Network Mask to meet the requirements
of your network environment. The product uses HTTP Port1 and does not support Port2 settings.
MAC: Factory default network identity of the machine.
10
4. When all changes have been
conrmed, click Exit to quit.
Camera Setting
Questo manuale è adatto per i seguenti modelli
2
Indice


