Aqara T1 Manuale utente

01
Single Switch Module T1 (No Neutral) Quick Start Guide
11
單開開關模塊T1(無中性線)快速入門指南20
Einzelschaltmodul T1 (ohne Neutrallinie) Schnellstartanleitung
32
Guide de démarrage rapide de Single Switch Module T1 (No Neutral)
Guía de inicio rápido de módulo de interruptor único T1 (sin neutro) 44
55
Guida Rapida dell’Avviamento Modulo Switch Singolare T1
(senza cavo neutro)
67
Руководство быстрого запуска для Одноканального
Реле-модуля T1 (без нейтрали)
79
シングルスイッチモジュールT1(ニュートラルラインなし)クイックスタートガイド
Product Introduction
Aqara Single Switch Module T1 (No Neutral) is based on the Zigbee 3.0 wireless
communication protocol. It can control the on/off status of lights. With the Aqara
Hub, it can realize functions such as app remote control and timing control. It can
work with other Aqara smart devices to realize more smart scenes.
* This device requires a compatible Zigbee 3.0 hub.
* To work with HomeKit, a specific hub is required.
Visit www.aqara.com/support for more details.
* This product is for indoor use only.
Single Press: Turn on/off
Long Press for 8s: Reset/
Connect to Network
Triple Press: Effective Range Test
* When the external switch is connected,
please turn it on and off 5 times, and then it enters the networking status.
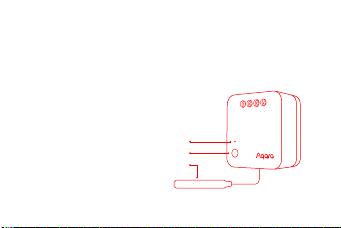
Indicator Light
Button
Antenna
01

Warnings
1.
2.
3.
4.
5.
6.
7.
8.
9.
Do not cover when the plug is working.
Make sure that the main switch of the power supply is off before removing plug.
Do not connect in series.
This product is NOT a toy. Please keep children away from this product.
This product is designed for indoor use only.
Do NOT use in humid environments or outdoors.
Beware of moisture, do NOT spill water or other liquids onto the product.
Do NOT place this product near a heat source. Do NOT place it in an enclosure
unless there is normal ventilation. Do NOT attempt to repair this product by
yourself. All repairs should be performed by an authorized professional.
This product is only suitable for improving the quality of your home life and
reminding you about the device status. If a user violates the product use
instructions, the manufacturer will NOT be liable for any risks and property
losses.
02

1.
Installation
Please make sure that the main switch of the power supply is off before
installation!
Aer the device powers on, all the conductors (including the antenna) of the
device may be connected with strong electricity. Please make sure that the
product is installed in a protective environment that cannot be reached by
hands, such as a switch pattress and a protective cover of the bulb.
According to the requirements, please connect the wires through any of the
following methods;
Method 1: L1 is connected to the load wire. S0 and S1 are connected to the two
ends of the external switch respectively. L is connected to the live wire(Diagram 1).
03
Recommended stripping length for terminal wiring: 6~8 mm.
Method 2: L1 is connected to the load wire. One end of the external switch is
connected to S0, and the other end is connected to the live wire. L is connected to
the live wire(Diagram 2). If the external switch is a dual-control switch, the end of
the original switch, which is connected to the load wire, can be connected to S0 to
realize an external dual control (Diagram 3).
Diagram 1
L
N
L1L S0 S1
04

* The maximum cross-sectional area of the conductor is 2.5mm².
* If no external switch is connected, S0 and S1 can be le in idle and the device can be
controlled by automation or the app.
Diagram 2 Diagram 3
L
N
L1L S0 S1
L
N
L1L S0 S1
05

2. The single switch module is fixedly embedded in the device (such as the
pendant lamp and the switch pattress) to avoid the danger of accidental touch;
3. Paste the fixed antenna;
* The inner conductor of the antenna is connected with strong electricity. Please do not put it
in an environment that could be touched in your daily life; if it is damaged, please do not
touch it, and replace or repair it in time.
* When the control module is installed in the switch pattress, it is recommended to paste the
antenna on the sidewall of the plastic pattress and keep it parallel to the wall; if the switch
panel bracket is made of plastic, it is recommended that the antenna is no more than
06

Quick Setup
1. Before activating the accessory, please make sure you have the Aqara Home
app downloaded and the Aqara Hub installed.
4. Turn on the main power switch, and press the button on the module or on the
external switch. If you can turn on/off the device normally, this indicates that it
works normally.
10mm away from the wall; if the switch panel bracket is made of metal, it is recommended
that the antenna be more than 15mm away from the wall (metal bracket).
* If it is installed in a metal pattress, it is recommended to paste the antenna inside the
plastic switch panel, but sufficient space is required for the panel.
* The pasting position should try to avoid the metal, wire, and module itself; if it is installed
on the ceiling or inside the lights, the antenna should avoid too much shielding.
* Please do not squeeze, bend or pull the antenna with force, otherwise the antenna may be
damaged.
07

Indicator Light Description
2. Please open the app, tap “Home” and then tap “+” in the top right corner to
enter “Add Device (Accessory)” page. Select “Single Switch Module T1 (No
Neutral)”, and add it according to instructions.
Effective Range Test: Quick press the push button on the accessory 3 times. If the
Hub makes voice prompts, it indicates that the accessory can communicate
effectively with the Hub.
* If the connection fails, please move the Hub closer to the Single Switch Module T1
(No Neutral), in and try again.
Indicator Light Status Status Description
Blue light flashes once Device power on
Blue light blinks quickly Zigbee network is connecting
Blue light keeps on Zigbee network works properly
Red light blinks quickly High-temperature alarm
08

Specifications
Model: SSM-U02
Dimensions: 42.9 × 40 × 21.4 mm( 1.69 × 1.57×0.84in.)Wireless Protocol: Zigbee 3.0
Electrical Rating: 100-250VAC,Max.5A,50/60Hz,Min 3W,Max 1250W (Resistive Load), μ
Operating Temperature: 0 – 35°C(32°F – 95°F)Zigbee Operation Frequency: 2405-2480 MHz
Zigbee Maximum Output Power ≤ 13 dBm
Online Customer Service: www.aqara.com/support
Manufacturer: Lumi United Technology Co., Ltd.
Address: 8th Floor, JinQi Wisdom Valley, No.1 Tangling Road, Liuxian Ave,
Taoyuan Residential District, Nanshan District, Shenzhen, China.
* This product is only suitable for non-remote control 3W+ lights.
Red light blinks slowly Zigbee network is not connected
09
Altri manuali per T1
9
Questo manuale è adatto per i seguenti modelli
1
Indice
Lingue:
Altri manuali Aqara Unità di controllo


Manuali Unità di controllo popolari di altre marche

Festo
Festo Compact Performance CP-FB6-E Manuale elenco delle parti

Elo TouchSystems
Elo TouchSystems DMS-SA19P-EXTME Manuale utente

JS Automation
JS Automation MPC3034A Manuale utente

JAUDT
JAUDT SW GII 6406 Series Guida rapida

Spektrum
Spektrum Air Module System Manuale utente

BOC Edwards
BOC Edwards Q Series Manuale utente


