bluelab BLU2210 Manuale utente

1
www.getbluelab.com
Care and use guide
Guía de uso y cuidados
Guía de uso y cuidado
Notice d’utilisation et d’entretien
Guide d’utilisation et d’entretien
Gebruikershandleiding
Bedienungs- und Pegeanleitung

Keep your probe tip wet
at all times to avoid permanent damage
La punta de la sonda debe estar húmeda
en todo momento para evitar daños permanentes
Mantenga húmeda la punta de la sonda
en todo momento para evitar daño permanente
Gardez votre sonde humide
en permanence pour éviter des dégâts irrémédiables.
Gardez la pointe de la sonde humide
en tout temps pour éviter de causer des dommages permanents
Zorg altijd dat de punt van de probe vochtig is
om permanente schade te voorkomen
Halten Sie die Spitze der Sonde stets feucht,
um Beschädigungen zu vermeiden

2
English
1.0 Before use begins
Hydrate in water for 24 hours before you start using the pen.
Calibrate the pen before you start using the pen.
See section 6.0
1
2
Features
Backlit LCD display Low battery warning
Hold reading function Fully waterproof
Fully guaranteed for 1 year Auto off function
Double junction probe
(not replaceable)
Automatic Temperature Compensation (ATC)
Successful calibration indicator Selectable units for
°C and °F
Power button / hold
Short press to turn on.
Short press to hold reading.
Long press to turn off.
Calibrate button
See calibration section.
Units button
Hold until units ash then
short press to change units.
Screen will change back
when no buttons have been
pressed for 3 seconds.
Quick guide
Storage
cap can be
placed onto
loop while
being used.
Low battery
warning
Appears when
batteries are low.
Check mark/tick to
indicate successful
calibration
Disappears 30 days after
calibrating probe as a
calibration due reminder.
ATTENTION
If it dries, it dies!
Storage cap
The probe must not be allowed to
dry out. Always place storage cap
back onto probe tip after each use
and ensure it contains either water
or pH 4.0 solution.
2.0 To operate
Turn pen on
Press power button. The last measurement is
recalled for 3 seconds.
To turn pen off
Press and hold the power button until OFF is
displayed.
NOTE: The pen will automatically turn off after
4 minutes to conserve battery power.
Measure pH
Remove storage cap, place probe in solution and
wait for reading to stabilize.
To hold reading
If you want to “hold” the reading on the screen,
short press the power button. To exit the hold
function press the power button again.
To change temperature units
Hold down the units button for 3 seconds until the
temperature units start flashing. Short press the
units button again to cycle between °F and °C. To
exit this mode don’t press anything for 3 seconds.
NOTE: You can change units while in hold mode by
holding down the units button.
Rinse and replace storage cap
To ensure accurate pH readings always rinse the
probe in clean fresh water before replacing the
cap. The cap is tight to ensure a good seal and
should click when on correctly.
1
2
3
4
5
1 second alternating displays
Power button

3
3.0 IMPORTANT - pen probe care
pH probes do not last forever. They age through normal use and will eventually
fail. The lifetime of a probe depends on the environment it is used in and the way
it is treated. To ensure you receive a long life from your pen, please ensure you
follow the guide below.
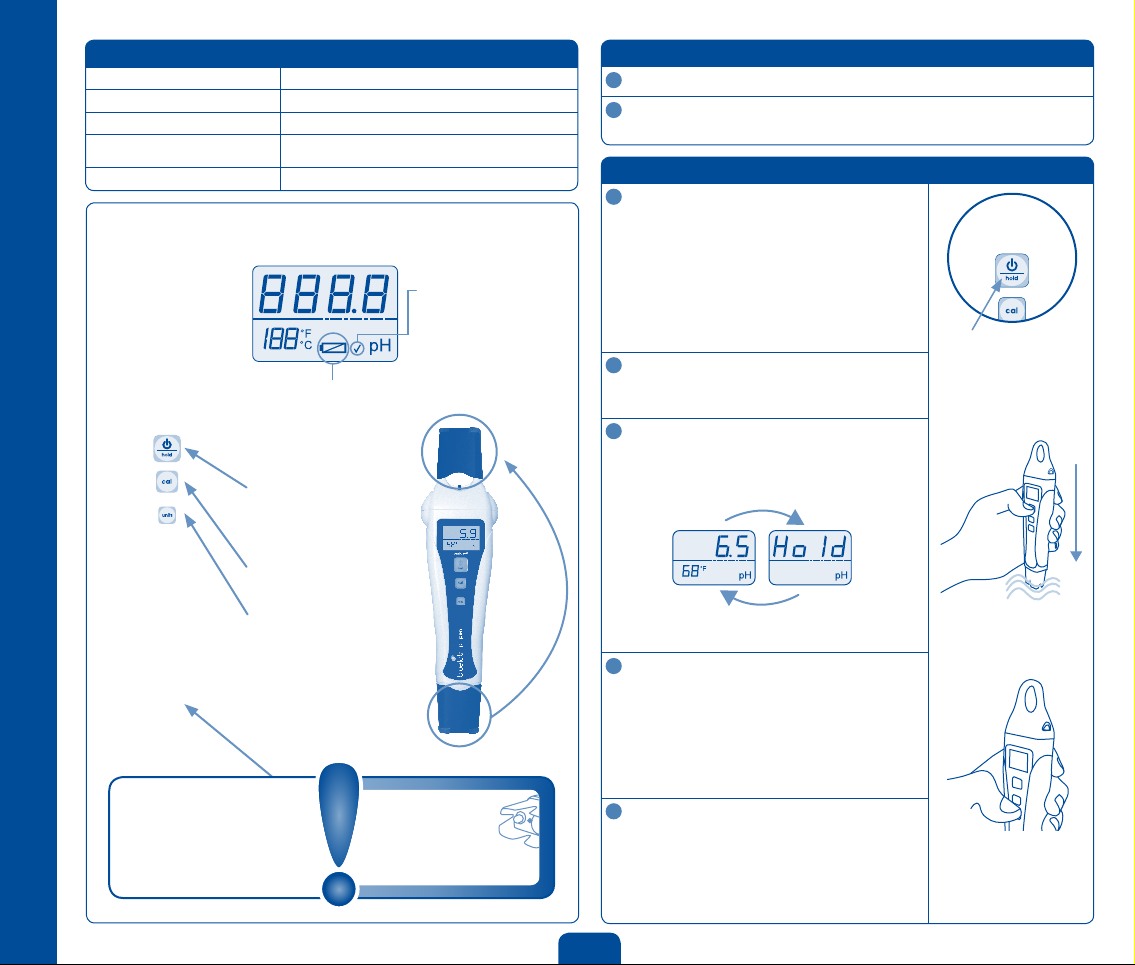
Storing the pen
When storing the pen the probe tip must be kept moist.
To prepare the probe for storage, place a small amount of clean water (never
distilled or deionised water) or pH 4.0 solution into the wetting seal inside the
storage cap. Then place the seal and cap over the probe tip.
Long term storage
For long term storage, place the pen upright in a glass of tap water with the
storage cap off to ensure constant hydration.
If the probe has been accidentally allowed to dry out:
The probe must be ‘hydrated’ for 24 hours in fresh clean water (never distilled
or deionised water). Following this; carry out a calibration to check if the probe
has already suffered permanent damage.
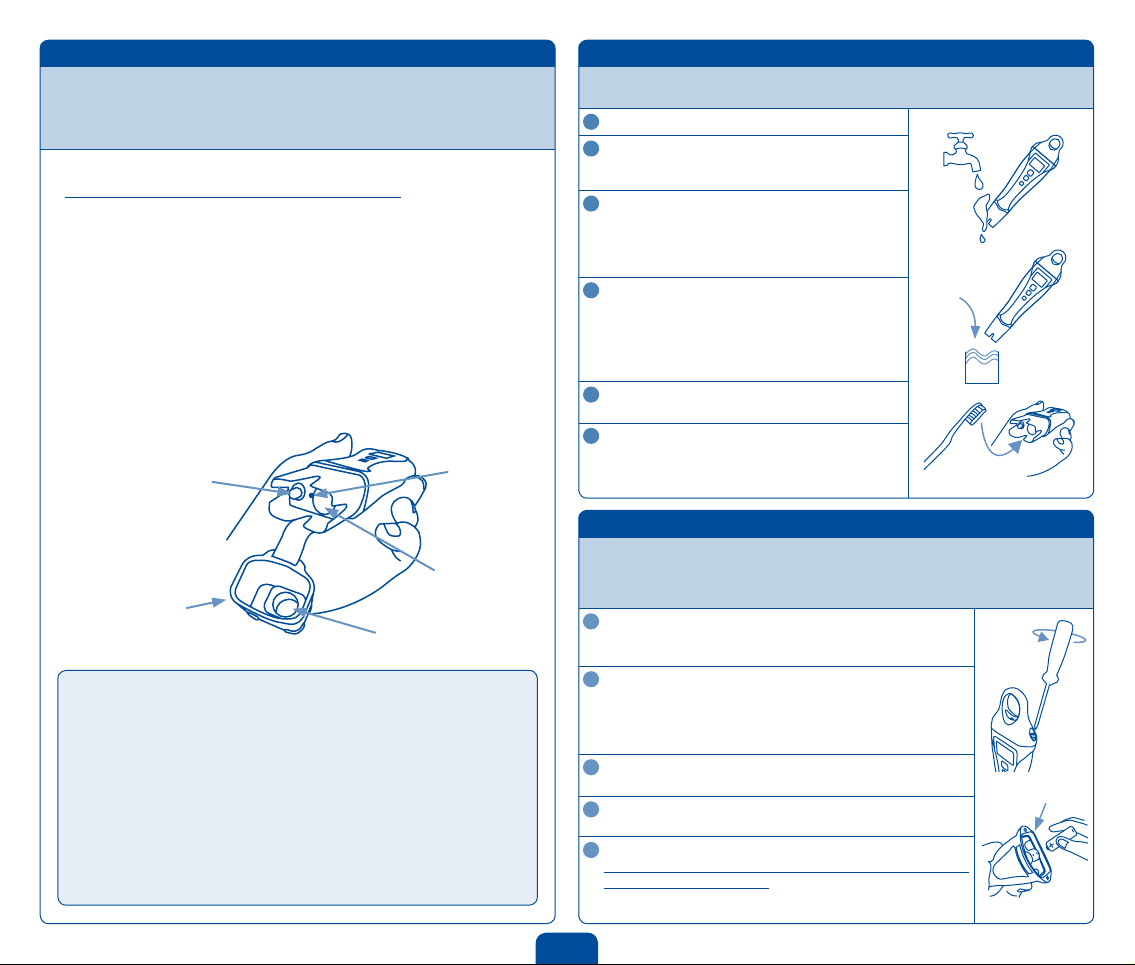
4.0 Cleaning
To ensure accurate readings the probe needs to be rinsed in water before
replacing the storage cap and cleaned regularly using the following instructions.
Rinse probe tip under fresh water.
Fill small container with clean water.
Add a small amount of Bluelab pH Probe Cleaner
or mild detergent (dish washing liquid).
Gently stir the probe tip in the mixture.
Ensure that you do not ‘knock’ the pen on the side
of the container as this may cause damage to the
glass probe. Rinse well under fresh running water
to remove all traces of the detergent mixture.
If the probe requires removal of heavy
contamination:
Gently brush around the glassware with a few
drops of Bluelab pH Probe Cleaner or mild
detergent (dishwashing liquid) and a soft
toothbrush.
Rinse well under fresh running water to
remove all traces of the detergent mixture.
Calibration of the probe is required after every
clean.
See the pH calibration in section 6.0. Place
storage cap back onto the probe.
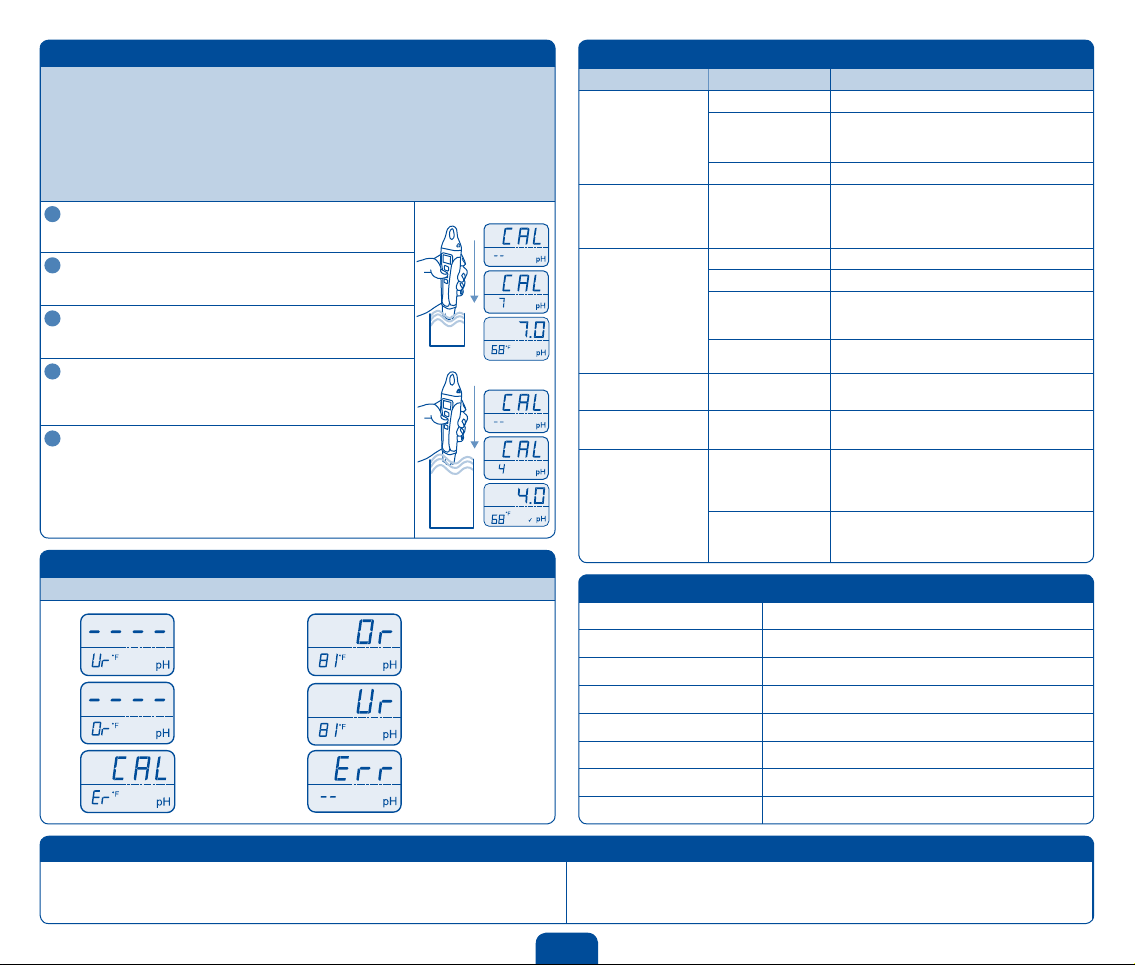
1
2
3
4
5
6
DO NOT let the probe tip dry. IF IT DRIES IT DIES!
DO NOT knock the pen; this will break its external glass bulb or
internal glass tube.
DO NOT touch the glass bulb with your ngers as this will
contaminate the glass.
DO NOT plunge a cold probe into a hot liquid (or visa versa) -
sudden temperature changes can crack the glass and permanently
damage the pen.
DO NOT immerse in oils, proteins or suspended solids that will leave
a coating on the glass bulb.
Temperature probe
Glass bulb
Wick
Storage cap
Wetting seal
Detergent
5.0 Battery replacement
The pH pen is powered with 1 x AAA alkaline battery. Do not use rechargeable
batteries. A low battery warning is indicated by a battery symbol appearing on the
screen. Only remove the battery cap when the batteries require changing. Battery
life is expected to be 350 hours.
To remove old battery
Undo battery cap fasteners. Remove battery cap and tip out
the old battery.
Check for corrosion
Flat batteries may leak and cause corrosion. Check battery
contacts and the battery for any sign of corrosion. Battery
contacts should be cleaned first if corrosion is found before
proceeding to step 3.
Fit new battery
Insert the new batteries positive (+) end down into the body.
Ensure waterproof battery cap seal is clean
Seal will fail if any dirt is present.
Replace battery cap
Tighten fasteners on battery cap until there is no space left
between the cap and body. This ensures the unit remains
100% waterproof.
1
2
3
4
5
Waterproof seal

4
Contact details Limitation of liability
Bluelab Corporation Limited, 8 Whiore Avenue, Tauriko Industrial Park, Tauranga 3110,
www.getbluelab.com
Under no circumstances shall Bluelab Corporation Limited be liable for any claims,
losses, costs and damages of any nature whatsoever (including any consequential loss)
that result from the use of, or the inability to use, these instructions.
8.0 Troubleshooting guide
Trouble Reason Correction
Drift - readings
slowly varying
Glassware not clean Clean glassware and calibrate
Wick contaminated
or blocked Soak probe in water for 24 hours and retest.
Do not measure proteins or oils with this unit.
Replace unit.
Glassware aged Replace unit.
Displays similar pH
reading in all buffers
no matter what the
buffer value is
Glassware broken Replace unit.
Unsuccessful
calibration
Buffers inaccurate Replace buffers.
Glassware not clean Clean glassware.
Glassware aged
(glassware will not
clean)
Replace unit.
Probe not hydrated Soak probe in water for 24 hours and retest.
Noisy - readings
jumping
Contact zone not
immersed Lower pen into solution at least 2cm/1”.
Displays pH 7
for all buffers
Broken glassware Replace unit.
Incorrect sample
reading following
successful
calibration
Ground loop (often
occurs in process
systems)
Verify by removing the sample from its
environment and measuring in a glass
beaker. May require electrical circuitry to be
checked in system.
Wick blocked Soak probe in water for 24 hours and retest.
Do not measure proteins or oils with this unit.
Replace unit.
9.0 Technical specications
Range 0.0 - 14.0 pH
Resolution 0.1 pH
Accuracy ± 0.1 pH @ 25°C
Temperature compensation Automatic
Operating temperature 0 - 50 °C, 32 - 122 °F
Calibration Manual calibration, 2 or 3 points
Units pH, °F and °C
Power source 1 x AAA alkaline battery
7.0 Error messages
The following error messages appear for the following reasons.
6.0 Calibration
pH calibration is required before first use to ensure that the first reading is accurate.
Calibration is also required when:
•Thecheckmark/tickhasdisappearedfromtheLCDscreen(30daysafterlastcalibration)
•Thereadingisdifferentfromwhatyouexpected
•Aftercleaning
•Afterchangingthebatteries
pH 7.0 and pH 4.0 solutions are required for calibration. You may also calibrate using
pH 7.0 and pH 10.0 solutions if your readings will normally be higher than 7.0 pH.
Excluding first use, YOU MUST CLEAN the probe
before calibrating.
See section 4.0.
Rinse probe in fresh water and place in pH 7.0
solution.
Wait for reading to stabilize.
Press the cal button until CAL is displayed.
Release button. When CAL 7 is displayed, 1 point
calibration is complete.
Rinse probe in fresh water and place it in either pH
4.0 or pH 10.0 solution (use pH 10.0 solution if you
expect to measure above 7.0 pH).
Wait for reading to stabilize.
Press the cal button until CAL 4 or CAL 10 is
displayed.
CAL 4 or CAL 10 should be displayed (depending on what
solution you are calibrating in). The check mark/tick is
displayed when a 2 point (or 3) calibration is completed.
NOTE: For a three point calibration repeat the steps using
4, 7 then 10 solution.
pH 4.0
or
pH 10.0
pH 7.0
1
2
3
4
5
Hold until
Hold until
Temperature
over range
pH calibration
failed
pH over range
Hardware error
pH under range
Temperature
under range

23
Please register your guarantee online at:
www.getbluelab.com
Or ll out the form below and post, email or fax to:
Bluelab Corporation Limited
8 Whiore Avenue, Tauriko Industrial Park,
Tauranga 3110, New Zealand
Phone +64 7 578 0849
Fax: +64 7 578 0847
Email: [email protected]
Product details
Product name
Serial number
Date purchased
Purchaser details
Purchaser’s name
Address
City
Country
Email (optional)
Purchased from (Dealers details)
Purchased from
Address
City
Country
Phone number
(optional)
Bluelab pH pen
Bluelab Corporation Limited guarantees this
product for a period of 1 year (12 months)
from the date of sale to the original purchaser.
The product will be repaired or replaced, should
it be found faulty due to component failure, or
faulty workmanship. The faulty product should
be returned to the point of purchase.
The guarantee is null and void should any
internal parts or xed external parts be
tampered with or altered in any way, or should
the unit have been incorrectly operated, or in
any way be maltreated. This guarantee does
not cover reported faults which are shown
to be caused by any or all of the following:
contaminated measuring tip (see instruction
manual for cleaning instructions), broken
glassware or drying of the pH probe glassware,
at or damaged batteries or batteries that have
been incorrectly inserted, or damaged battery
contacts or connections caused by incorrect
battery replacement or ingress of moisture
from incorrect positioning of the battery cap
and waterproof seal.
NO RESPONSIBILITY will be accepted by
Bluelab or any of its agents or resellers should
any damage or unfavourable conditions result
from the use of this product, should it be faulty
or incorrectly operated.
Product
guarantee
P
R
O
D
U
C
T
G
U
A
R
A
N
T
E
E

25
The instrument is only as accurate as the probe is clean!
Bluelab cleaning kits
Probe cleaning is one of the most important parts of owning and operating any Bluelab
meter, monitor or controller. If the probe is contaminated (dirty) it affects the accuracy of
the reading displayed.
The probe surface is where the instrument takes the reading of the solution. The information is sent back
from the probe to the electronic brain of the instrument.
A calculation is then done in the instrument’s brain or micro computer and a reading is displayed. If the
information sent back from the probe is inaccurate due to probe surface contamination then the reading will
be inaccurate. Cleaning the probes is a very easy task and will prolong the life of the probes.
The Bluelab cleaning kits have it all there for you:
Bluelab pH Cleaning and Calibration Kit:
Full colour instructions
Calibration solutions
Decanter vessels
Bluelab Probe Cleaner
Toothbrush
Full colour instructions
Conductivity standard
solution
Decanter vessel
Bluelab Probe Cleaner
Bluelab chamois (probe
cleaning instrument)
Bluelab Conductivity Probe Cleaning Kit:

26
guarantee.
The Bluelab product range all come with a free repair or replacement guarantee for your added benet.
If you need assistance or advice - we’re here to help you.
Phone: +64 7 578 0849 Fax: +64 7 578 0847
Email: [email protected]
Looking for specications or technical advice?
Visit us online @ www.getbluelab.com
Bluelab Corporation Limited
8 Whiore Avenue, Tauriko Industrial Park, Tauranga 3110, New Zealand
Bluelab pH pen
Under no circumstances shall Bluelab Corporation Limited be liable for any claims,
losses, costs and damages of any nature whatsoever (including any consequential loss)
that result from the use of, or the inability to use, these instructions.
Instruction Manual, Version 01: 260811/00774_0711
Copyright 2011, all rights reserved, Bluelab Corporation Limited
P
R
O
D
U
C
T
G
U
A
R
A
N
T
E
E
Indice
Altri manuali bluelab Strumento di misura

bluelab
bluelab Soil pH Pen Guida

bluelab
bluelab Truncheon Guida

bluelab
bluelab Multimedia pHMeter Guida

bluelab
bluelab Soil pH Pen Guida

bluelab
bluelab Soil pH Meter Guida

bluelab
bluelab Guardian Monitor Wi-Fi Manuale utente

bluelab
bluelab pH Pen Guida

bluelab
bluelab EC pen Guida

bluelab
bluelab Truncheon 124060 Guida

bluelab
bluelab pH Pen Guida all'installazione

bluelab
bluelab Combo Meter Guida

bluelab
bluelab Truncheon Guida

bluelab
bluelab Guardian Monitor Manuale utente

bluelab
bluelab CTRL50110 Guida

bluelab
bluelab Combo Meter Manuale utente

bluelab
bluelab conductivity pen Guida

bluelab
bluelab pH Pen Guida

bluelab
bluelab pH Probe Guida

bluelab
bluelab Truncheon Manuale utente

bluelab
bluelab pH pen Guida


