Car and Driver EAGLEEYE CDC-570 Manuale utente

HD Dash Cam
CDC-570
User Manual Manual de usuario
2.2
2.2
ENHANCED LOW LIGHT RECORDING
GRABACIÓN MEJORADA CON BAJA LUZ
2.2
2.2

Table of Contents
Precautions and Notices.................................................................................................2
1. Basics...........................................................................................................................3
1-1 In the Box......................................................................................................................................................3
1-2 Buttons and Parts........................................................................................................................................3
2. Getting Started...........................................................................................................4
2-1 Inserting a memory card..........................................................................................................................4
2-2 Mounting the Dash Cam..........................................................................................................................4
2-3 Connecting the Dash Cam to power supply........................................................................................5
3. Operations...................................................................................................................6
3-1 Turning the device on/off.........................................................................................................................6
3-2 Date and Time settings.............................................................................................................................7
3-3 Recording Mode.........................................................................................................................................7
3-3-1 Continuous recording..................................................................................................................................7
3-3-2 Manual recording........................................................................................................................................8
3-4 Photo Mode................................................................................................................................................8
3-5 Voice Recording Mode............................................................................................................................8
3-6 Playback Mode..........................................................................................................................................8
3-7 Connecting to Computer.........................................................................................................................9
3-7-1 Playback or backup on your computer ................................................................................................9
3-7-2
Use your Dash Cam as your computer’s webcam
.................................................................................9
3-8 Formating a memory card......................................................................................................................9
4. Settings.....................................................................................................................10
4-1 Video Recording Settings......................................................................................................................10
4-2 Capture Settings......................................................................................................................................11
4-3 Playback Settings....................................................................................................................................11
4-4 System Settings.......................................................................................................................................12
Specifications................................................................................................................13
FCC Statement...............................................................................................................14
Notice............................................................................................................................14
SUMMIT ELECTRONICS LLC One Year Limited Warranty............................................15
English
1 EN

Precautions and Notices
• Due to local laws and vehicle safety considerations, do not manually operate the device
while driving.
• Keep the windshield and the Dash Cam lens clean for optimal video quality. If there is a
foreign object attached to the lens, this might reduce the quality of the recorded videos.
• Before attaching to your windshield, please check in with your local DMV about trac
laws that dictate the positioning/method of mounting the device.
• Keep the device away from excessive heat, such as direct sunlight , fire or the like.
• Use original or certified cables.
• Do not use any corrosive cleaner/oil to clean.
• Keep out of reach of children. It contains small parts which may be a choking hazard.
• Observe local laws and regulations while using the device.
• To prevent damage to your device’s parts or internal circuits, do not use it in dusty,
smoky, damp or dirty environments.
• Do not use, store or transport the device where flammables or explosives are stored.
Using your device in these environments increases the risk of explosion or fire.
• CAR AND DRIVER is NOT responsible for the loss of any data/content during operation.
• CAR AND DRIVER does NOT guarantee recording of accidents where the impact may
cause the device to be damaged.
• Install the device near your vehicle’s rear-view mirror to obtain the best open-field
view.
• Do NOT install the Dash Cam in a location that will obstruct your view of the road
while you’re driving.
• Make sure that the lens is within wiping range of your windshield wipers to ensure a
clear view even when it rains.
• Do not touch the lens with your fingers. Finger grease left on the lens will result in
unclear videos or snapshots. Clean the lens on a regular basis.
• Do not install the device on a tinted window. Doing so may damage the tint film. Make
sure that the camera’s view is not hindered by a tinted window.
• For some vehicles, a DC power socket will keep providing power after the engine is
turned o. To avoid draining your car battery, please manually unplug the Dash Cam
when the engine is turned o.
• Do not disassemble this device.
• Do not expose this device to rain or moisture or submerge in water.
• Ideal temperatures are 0°C to 35°C. Avoid extreme temperatures.
2 EN
1. Basics
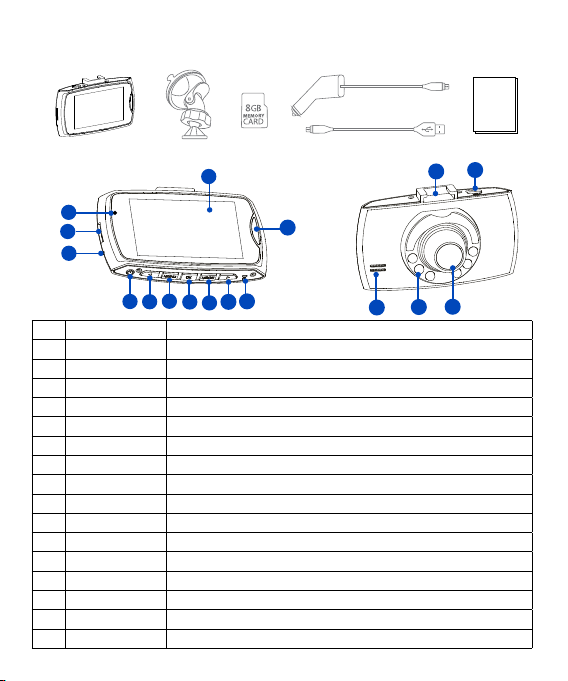
1-1 In the box
1-2 Buttons and Parts
Front View Rear View 13 14
15
16
17
1
No. Definition Description
1 Display Displays the recorded or captured contents.
2 LED Indicator Indicates the device operating status.
3 TF Card Slot Slot for included memory card.
4 Microphone For recording audio.
5 Power button Press and hold for 1 second to manually turn the device on/o.
6,10 Left/Right button Press to skip to previous/Next item.
7 Menu button Press to display settings menu.
8 OK button Press to confirm a selection or stop recording.
9 Mode button
Press to toggle between Recording/Photo/Voice Recording/ Playback mode.
11 Reset button Press to restore all the system settings to factory defaults.
12 Lock button Press and hold to save the current recording as undeletable file.
13 Mounting slot For mounting the device on your car’s windshield or dashboard.
14 Mini USB port For DC power input or connecting to computer.
15 Camera Lens Front facing camera for video recording.
16 Night Light LED For enhancing brightness when driving and recording at night.
17 Speaker For audio sound output
User Manual
10 11
12
56789
2
3
4
3 EN
User Manual
2. Getting started
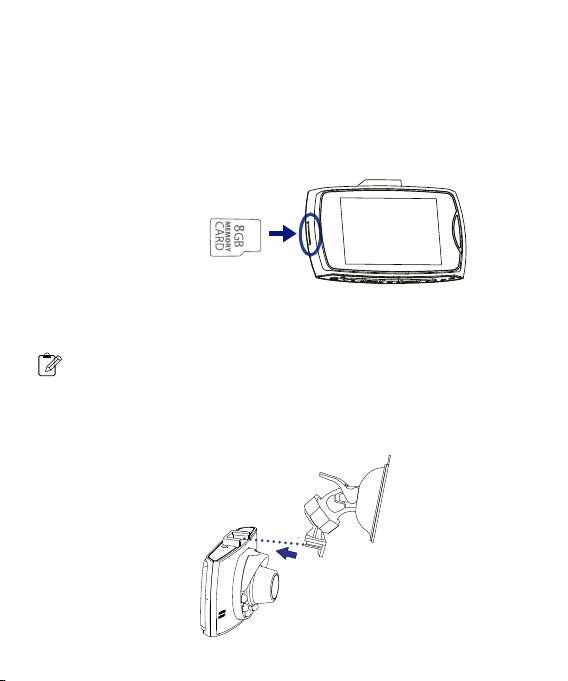
2-1 Inserting a memory card
2-2 Mounting the Dash Cam
Class 10 or higher TF memory card must be used with a storage capacity of 8GB ~ 32GB.
It is strongly recommended that minimum 8GB memory card is used for HD recording.
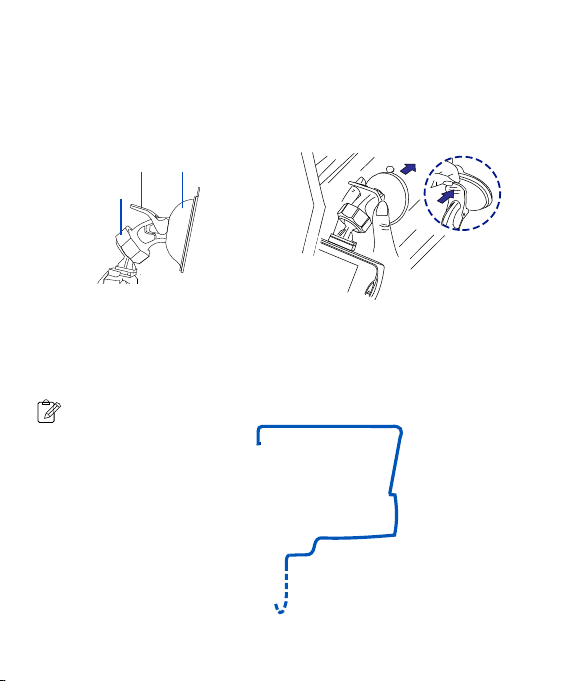
1. Place the mount so it is aligned with the mounting slot, and push it in until it clicks into
place. Then remove the protective film from the camera lens and protective film from the
suction cup.
1. As shown in the illustration, hold the edge of the TF memory card, and insert the TF
memory card into the slot with the label facing up and push until you hear a click.
To remove the TF memory card, gently push on the edge of the card in until it clicks out
from the slot, then pull out the card.
Make sure the label of the
TF memory card are facing
the same direction as the
display.
Inserting a TF card
Do not apply excessive force to the TF memory card or attempt to insert it in the
wrong direction. This may cause damage to the TF memory card and the card slot.
Note
5
-
Note
4 EN
1. Connect one end of the supplied power cable to the Mini USB port of the Dash Cam.
2. Plug the other end of the power cable into your car’s DC power outlet, and route the
power cable around the ceiling/passenger seat so that it does not interfere with driving.
You may tuck the cable between the paneling of your windshield and/or A-pillar
space if available.
4. Turn the knob of the mount to adjust the camera’s angle. Make sure the Dash Cam always
faces forward, and level with the vehicle and the road. Turn the Dash Cam on to check the
camera angle.
2. Clean the area on the windshield where the Dash Cam will be installed.
3. Press the Suction Cup of the mount down onto the windshield where it has unobstructed
view of the road but does not interfere with the driver’s view, then push the lock down to
secure it in place.
Suction Cup
Lock
Knob
2-3 Connecting the Dash Cam to power supply
5 EN
Note
5
-
Note
3. Operations
3-1 Turning the device on/o
The device will automatically turn on when you start your car’s engine, and automatically
turn o when you shut o your car.
To manually turn your Dash Cam on/o, press and hold the Power button for 1 second.
LED
Indicator
LED Indicator on the device Description
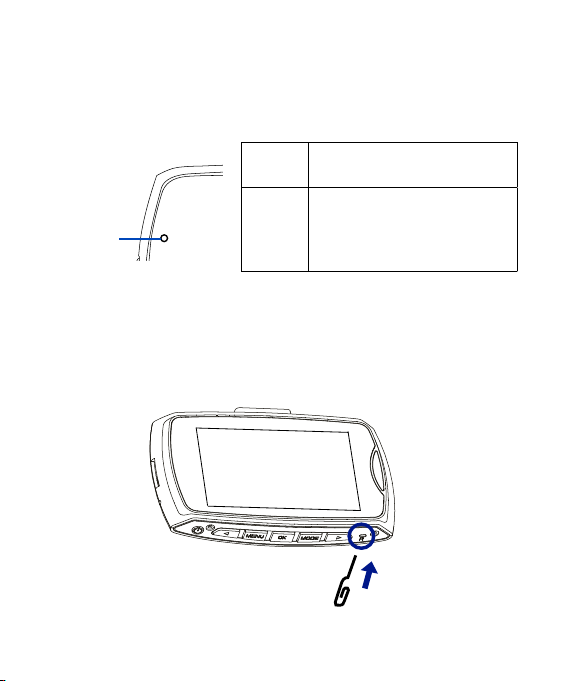
Restarting the Dash Cam
Occasionally, you may need to perform a hardware reset if the Dash Cam stops responding or
if it appears to be “frozen” or unresponsive. To restart the Dash Cam, press and hold the Pow-
er button until the system powers o. Press the Power button again to turn the Dash Cam on.
If the system does not shut down by holding the Power button, you may do a forced reboot
by inserting a paper clip into the “RESET” button hole on the device.
REC indicator
REC
indicator
When you turn on the device, the REC
indicator glows blue. While recording,
the REC indicator flashes blue to indi-
cate that recording is in progress.
6 EN

3-2 Date and Time Settings
3-3 Video Recording Mode
Make sure you set the date and time before your recording to “Protect Your Side of The Story”.
1. Press the MENU button to enter the menu screen. Press the Menu button again to go into
System settings, then select “Date Input” to enter date and time settings.
2. Press the Left/Right buttons on the Dash Cam to make changes to date or time, then
press the OK button to confirm.
By default, the system will automatically begin continuous recording a few seconds after
start-up. The Recording icon will appear on the upper right corner of the display screen.
The blue light should flash, indicating that recording is in progress. You can manually stop
the recording by pressing the OK button. Pressing the OK button again will restart contin-
uous recording.
The recorded video will be saved under the “DCIM” folder on your Dash Cam’s TF memory
card.
Night Mode
When recording at night, you can press the Power button to enable Night mode. The Night
Light LED will then enhance brightness for the recording.
• In Recording mode, press the Menu button to open video recording settings. You can
enable or disable voice recording along with video, and set recording time for video
clips: 1 mins / 3 mins / 5 mins/ 10 mins.
• When the memory card is full, new videos will record over the oldest videos.
3-3-1 Continuous Recording
7 EN
Notes
5
-
Note

You can press the OK button on the Dash Cam to begin manual recording.
Press the OK button again to stop manual recording.
Press the Mode button to exit the Recording mode.
1. When in Recording mode, press the Mode button once to select Photo mode, and the
icon will appear on the upper right corner of the display screen.
2. Press the OK button to take a picture. A shutter sound will indicate that a picture has
been successfully taken.
Press the Menu button to enter photo capture settings menu. Press the Mode button to exit
Photo mode.
1. When in Recording mode, press the Mode button three times to shift to Playback mode,
the icon will appear on the upper left corner of the display screen.
2. Press the Up/Down buttons to select your desired video clip or photo, and press the OK
button to start playback.
3. Press the Menu button to open playback settings. Press the Mode button again to exit
playback mode.
1. When in Recording mode, press the Mode button twice to shift to Voice Recording mode,
and the icon will appear on the upper right corner of the display screen.
2. Press the OK button to begin voice recording. You can stop the voice recording by press-
ing the OK button.
3. Press the Mode button again to exit the Voice Recording mode.
3-3-2 Manual Recording
3-4 Photo Mode
3-6 Playback Mode
3-5 Voice Recording Mode
8 EN

Your Dash Cam can act as a “Removable Disk”; you can copy recorded files for backup and
playback on your computer.
1. Press the Menu button twice to access System Settings on your Dash Cam, and select
USB > Disk Drive to enter Disk Drive mode.
2. Connect your supplied USB cable to the Mini USB port of the Dash Cam, and to your
computer’s USB Port, then the Dash Cam will be recognized on your PC.
3. Click to select your desired recorded files to copy and/or play back on your computer.
The Dash Cam can act as a secondary camera and take photos and videos via your desktop
computer or laptop.
To use this feature, make sure your computer’s built-in webcam is disabled.
1. Press the Menu button twice to access System Settings on your Dash Cam, and select
USB > PC Cam to enter PC Cam mode.
2. Connect the supplied USB cable to the Dash Cam’s Mini USB port, and to your comput-
er’s USB port. Click the Camera App Icon in the Start menu on your computer to open the
Camera, then the Dash Cam will be identified.
3-7-1 Playback on your computer
3-7-2 Use your Dash Cam as your computer’s webcam
3-7 Connecting to computer
3-8 Formatting TF Memory Card
We recommend you format the TF memory card every 2 weeks to maximize its lifetime.
To format the memory card, press the Menu button twice to enter system settings, select
Format, and all data will be erased.
9 EN
Indice
Lingue:
Altri manuali Car and Driver Telecamera da cruscotto

Car and Driver
Car and Driver CDC609 Manuale utente

Car and Driver
Car and Driver CDC-900 Manuale utente

Car and Driver
Car and Driver CAD-BUC100 Manuale utente

Car and Driver
Car and Driver CDC-646 Manuale utente

Car and Driver
Car and Driver CDC-E4000 Manuale utente

Car and Driver
Car and Driver CDC-629 Manuale utente

Car and Driver
Car and Driver MINIOPRO CDC-628 Manuale utente

Car and Driver
Car and Driver CDC-634 Manuale utente

Car and Driver
Car and Driver CDC-560 Manuale utente

Car and Driver
Car and Driver ZX-1222 Manuale utente


