Cissell PROHC Manuale utente
Instruction Manual
forthe
ProfessionalHumidityControlSystem
MANPROHC - 5/02

2
1 PRO/HC control system............................................................................ 3
2 Setting menu........................................................................... 4
Structure of setting menu....................................................... 4
Selection of setting menu .................................................... 4
Selection of submenus............................................................... 5
Technical menu ................................................................................ 7
Program menu ................................................................................. 1 1
Display menu..................................................................................... 2 2
3 Operating instructions .............................................................. 2 8
Selecting a program .................................................................... 2 8
Weighing of dry linen.................................................................. 2 8
Loading of the drum................................................................... 2 8
Starting the program .................................................................. 2 8
Program course............................................................................... 3 0
4 Technical remarks......................................................................... 3 4
Gas failure .......................................................................................... 3 4
Error messages................................................................................ 3 4
Serial error.......................................................................................... 3 5
Sale switch.......................................................................................... 3 5
Power breakdown ............................................................................ 3 5
Direct access to the program menu............................... 3 5
Table of Contents
3
1
The “PRO/HC” is a very powerful control system by means of which you can obtain
perfect drying results, especially when using the humidity control sensors (option).
It is possible to preprogram 30 fixed drying programs. They can be selected and started
directly by the user.
Furthermore,youcanalsopreprogram twovariableprograms-onemanual(MANU)and
oneautomaticprogram(SEnS),wheretheuserhimselfcaneasilyputincertainparameters
such as drying temperature, drying time or residual moisture level before starting the
program.
Therearealso 10standard programs(31 to40)available. Those standardprograms can
bestarteddirectly,butcannotbechanged. Howeveritispossibletocopythemtoanother
programnumberandthenchangethem. Thiswaytheycanthusserveasabaseforanother
program.
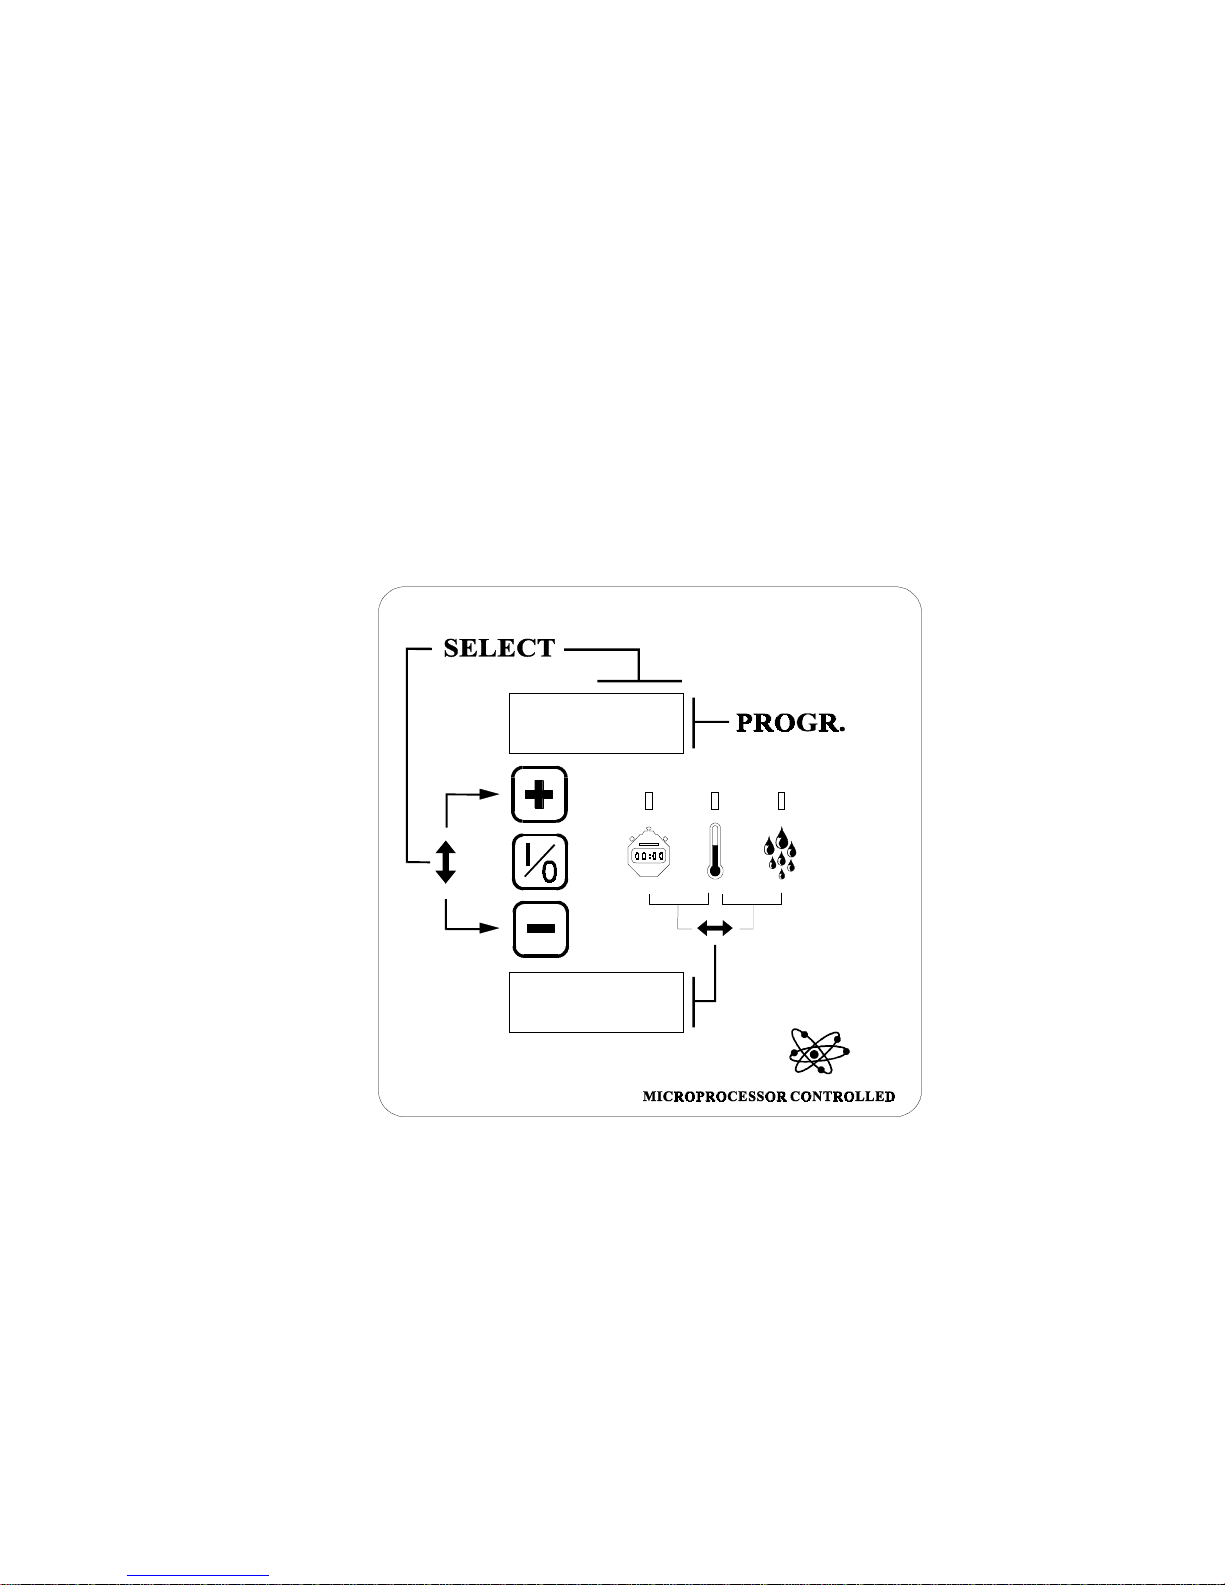
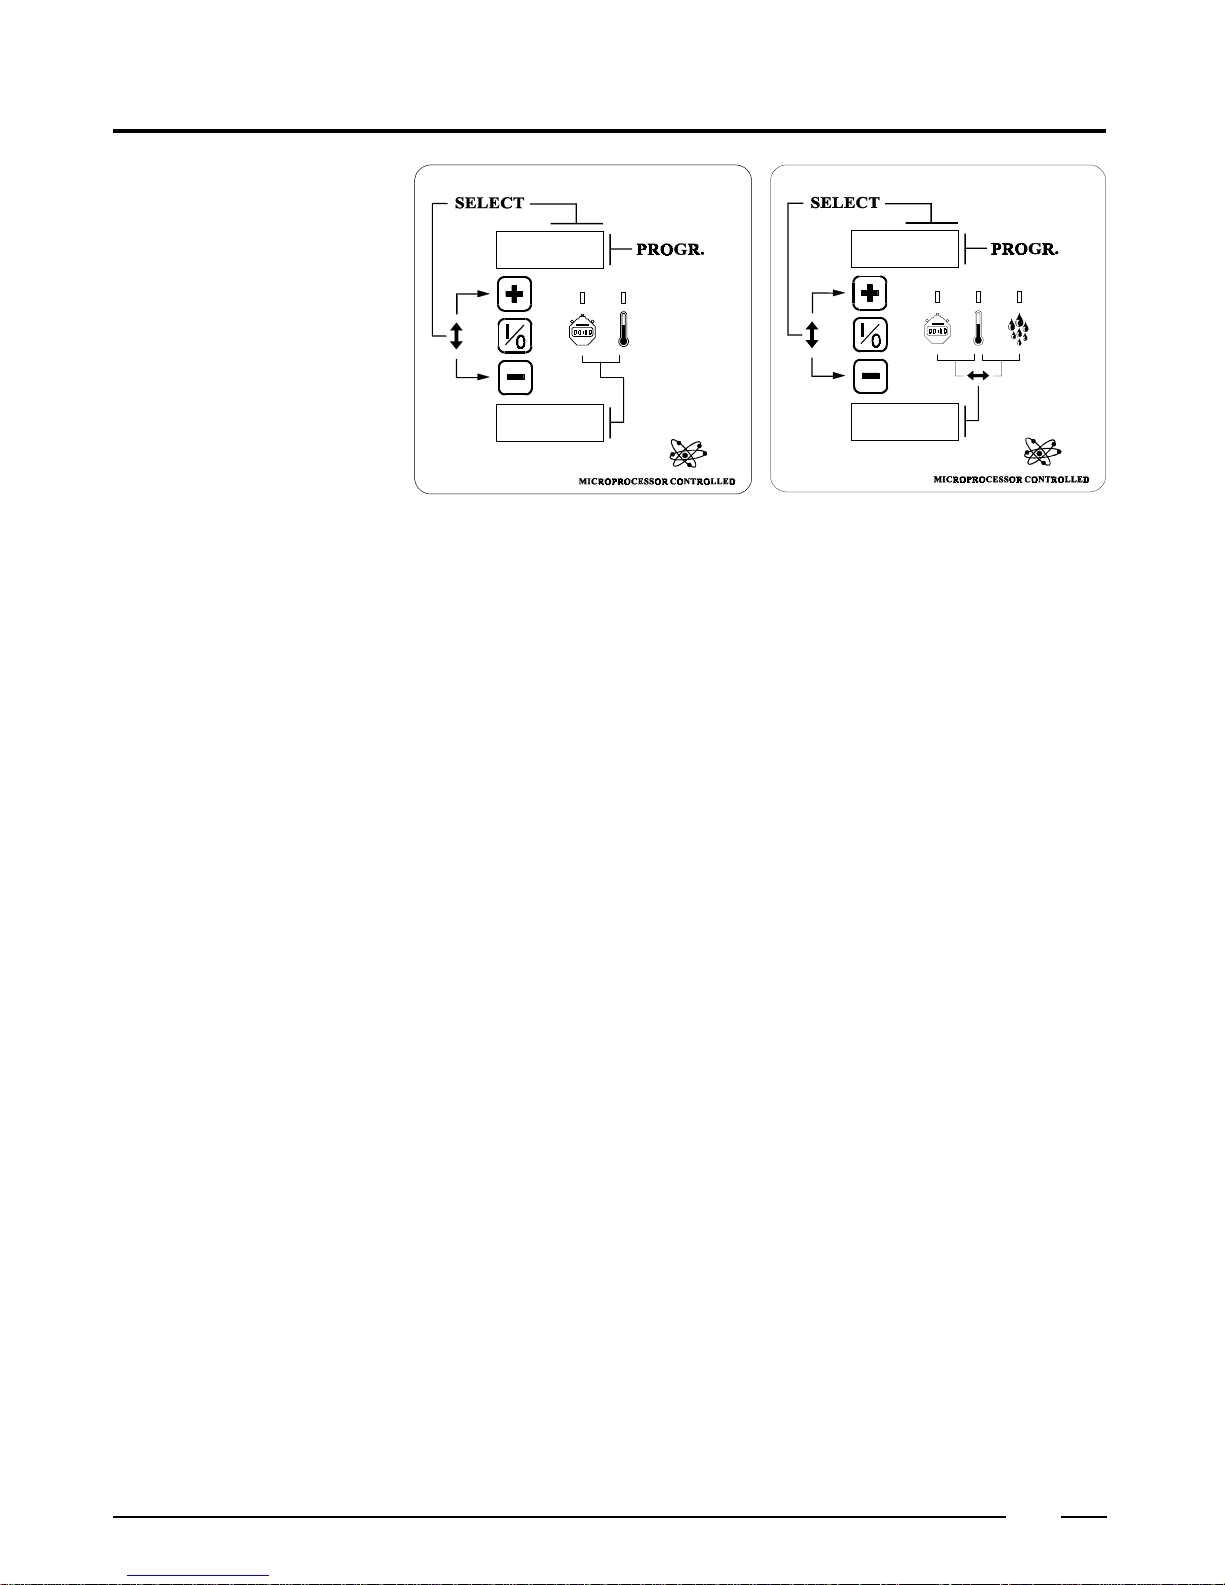
"PRO/HC" control system
4
A
B
D
EF
C
2
Setting menu
Structure of setting
menu The setting menu is subdivided in three submenus.
Technicalmenu.
A dryer can be configurated according it’s own technical characteristics.
For example, is it a dryer with reversing of the drum, is the dryer equipped with a resi-
dual moisture measuring system etc...
This menu is programmed by the manufacturer and does usually not have to be
modified.
Programmingmenu.
To program the programs.
Displaymenu.
To recall data such as supplied labor time of a dryer.
Selection of setting menu
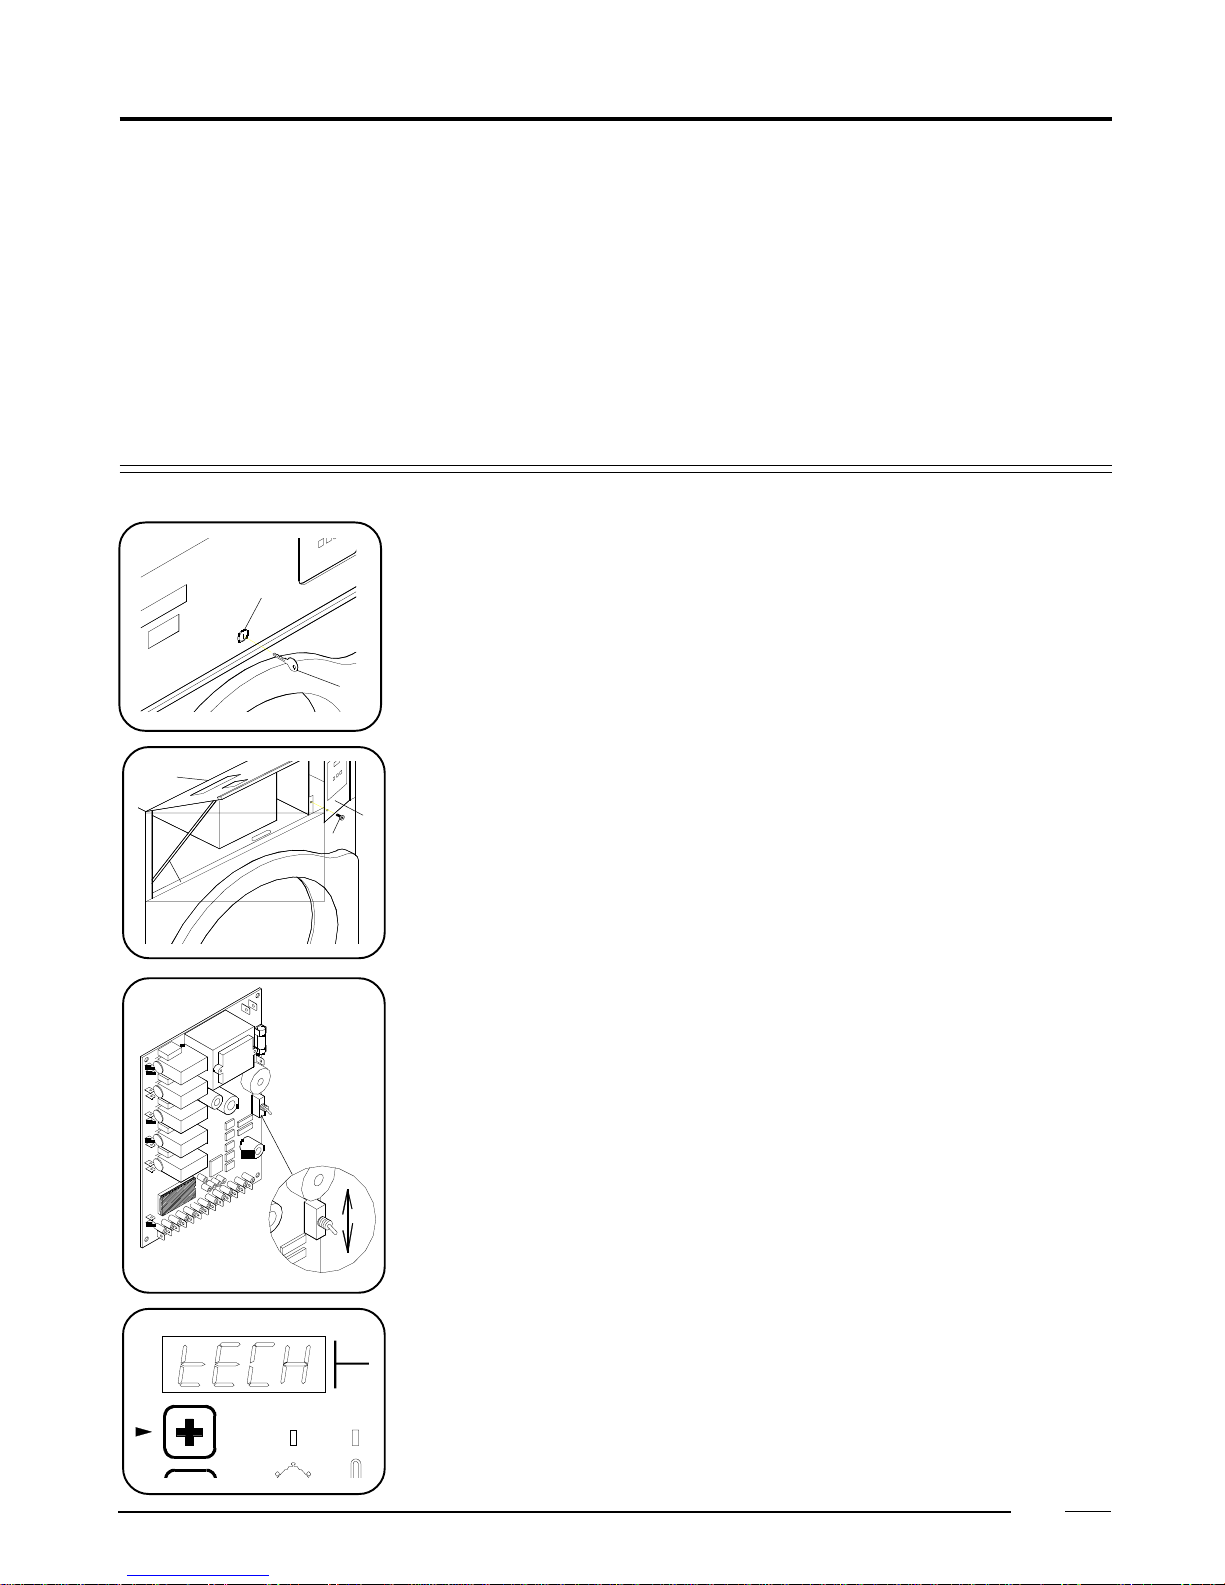
Inorder to select the setting menu, the switch atthebackoftheprintplate has to be pulled.
To reach the switch :
-Turn the lock (A) with the delivered key (B)90°counter-clockwise.
- Open the top front panel (C) and put the support (D) at the left side under this panel in
the provided clamp.
- Remove the screw (E) in the operating door (F).
- Then open this door.
Behind this, at the backside of the printplate you find the switch.
By pulling the switch downwards, you reach the setting menu.
When pulling the selection switch in the upper position, “IPSO” appears and afterwards
“TECH” on the upper display.
5
2
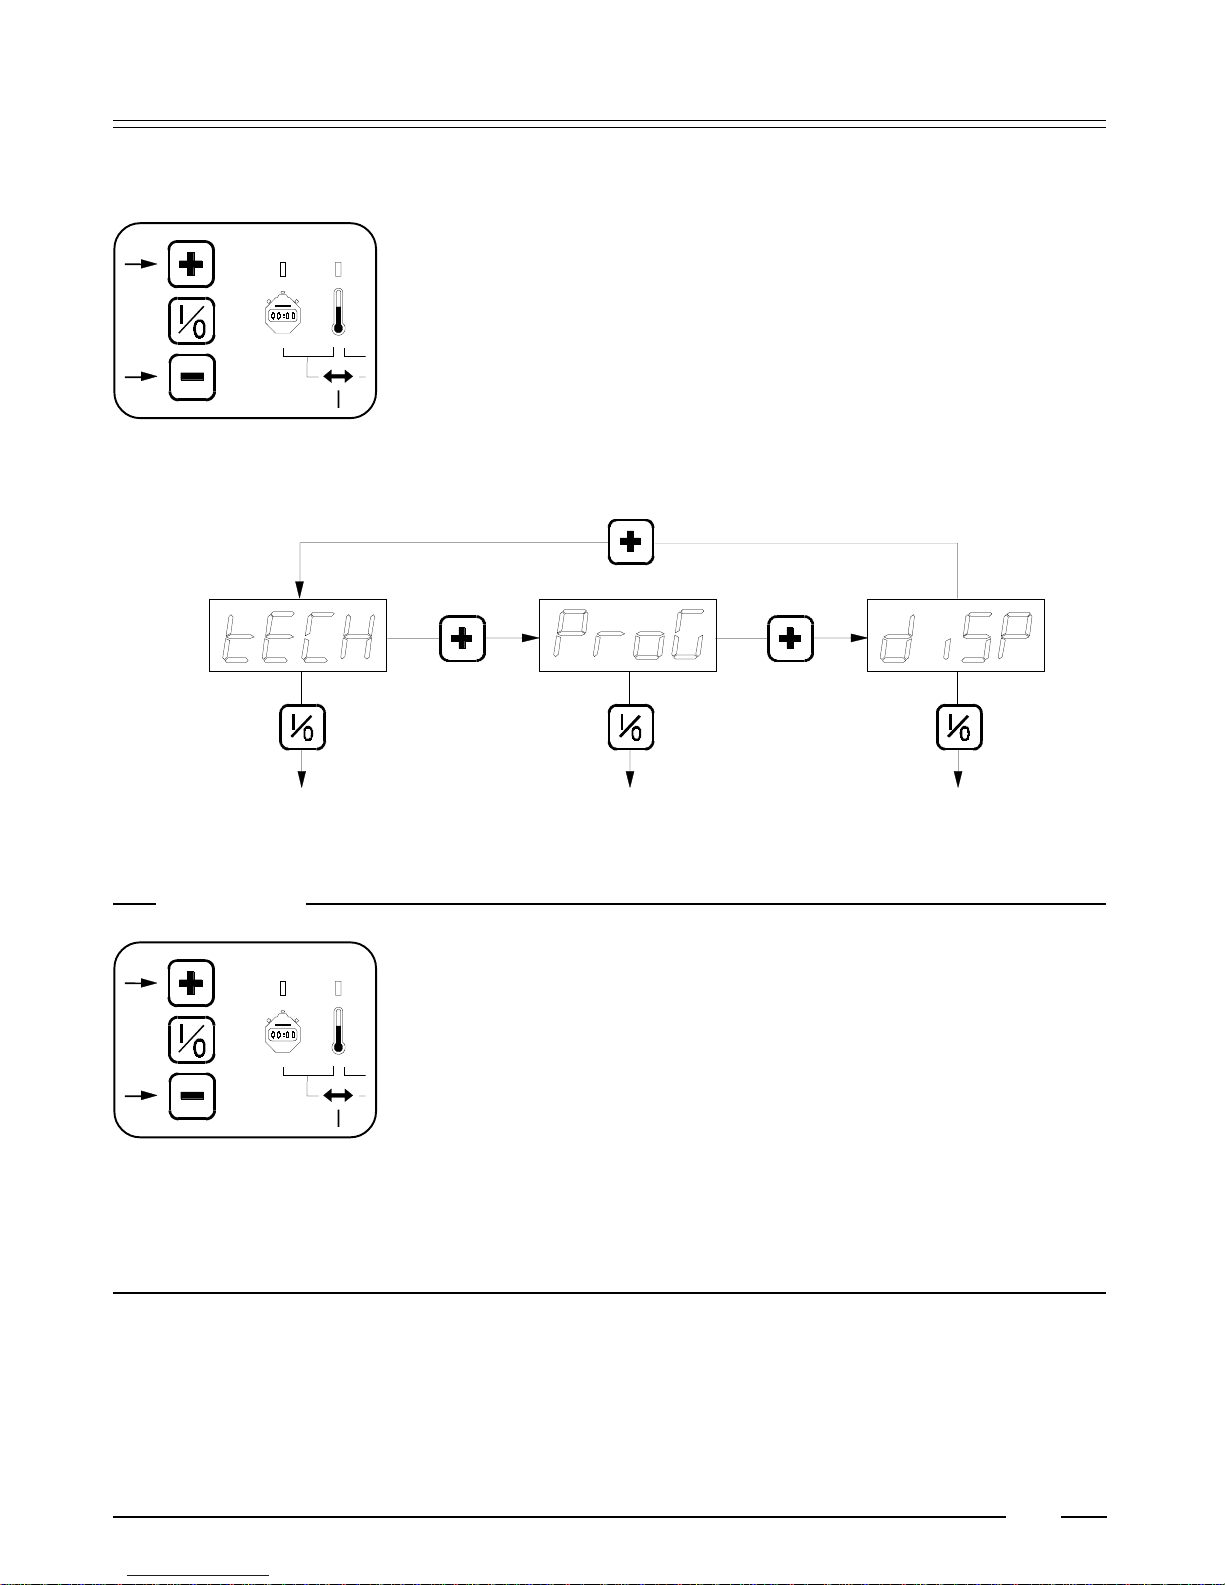
TECHNICAL MENU PROGRAMMING MEMU DISPLAY MENU
XX
If necessary, change this value (default 5 seconds) by means of the + or - button between
5 and 99 seconds.
Selection of submenus or programming parameters in these submenus is done by
means of the three push buttons in front of the operating panel.
Select with the “+” button one of the submenus and then push the middle button in
order to confirm the selection.
Selection of submenus
Remark
Operation of the push buttons.
Only when a button is pushed and released afterwards, the action is done.
Extremelyhard or longpressing the buttonsis totally useless. A light or short push
gives a correct operation.
Returntoselectionorprogramming
With the following action, it is always possible to return to the previous step of
selection or to program.
- Push the middle button and keep it pressed.
- Then push (while the middle button is still pressed) shortly the lower button.
- Next release the middle button and the previous step is shown.
6
2

7
2
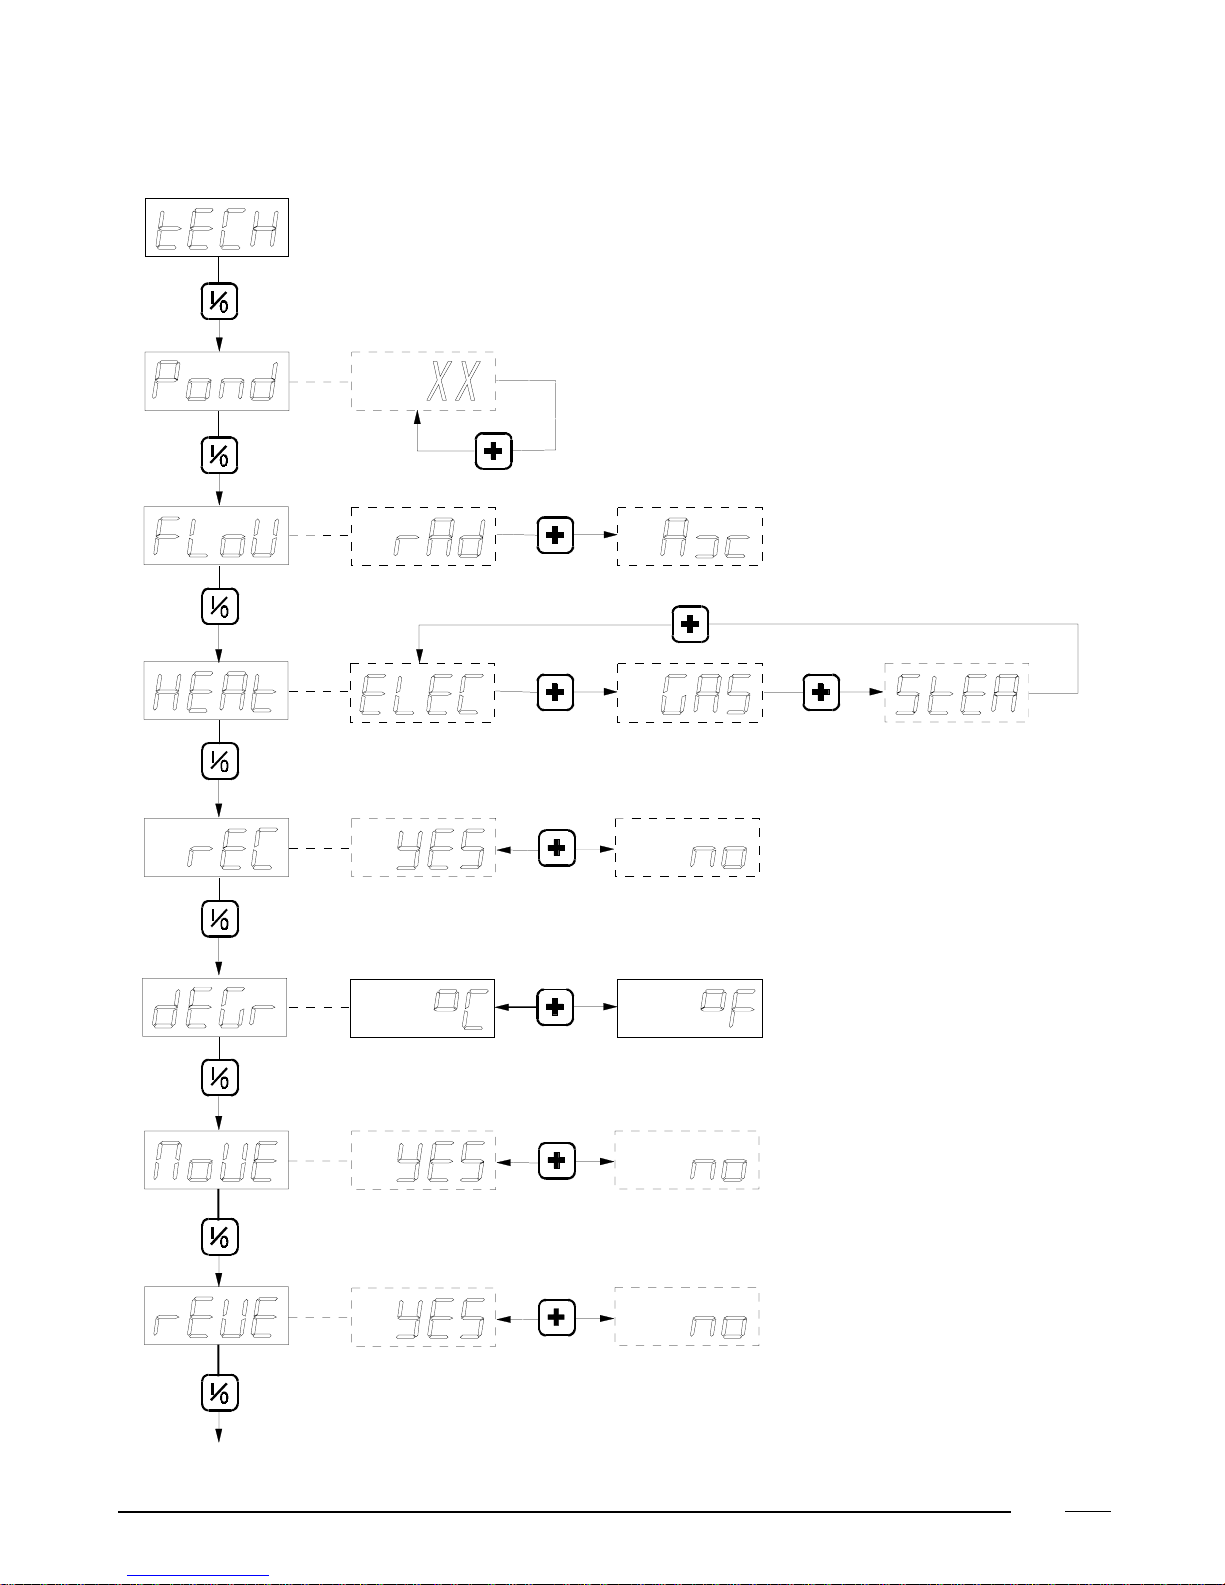
Technical menu
TECH
Press the middle button to continue.
Pond
The lower display shows the drum capacity of the dryer.
If necessary, select another value with the upper button.
Press the middle button to continue.
FloW
To program whether the dryer operates with radial or axial airflow in the drum.
- rAd: Radial current of air means that the air flows from the top to the bottom of the drum.
- Ax : Axial current of air means that the air flows from the back to the front of the drum.
If necessary, change this program with the upper button.
Press the middle button to continue.
HEAt
The lower display shows the kind of heating system that is built in.
- ELEC: electric heating.
- GAS: gas heating
- STEA: steam heating
If necessary, change this program with the upper button.
Press the middle button to continue.
rEC
Now the lower display shows (with YES or no) whether the dryer is equipped with heat reclaimer.
If necessary, change this program with the upper button.
Press the middle button to continue.
dEGr
The lower display shows whether the temperature indication will be in °C or °F.
If necessary, change this program with the upper button.
Press the middle button to continue.
MoVE
The lower display shows (with YES or no) whether the rotating detection is built in.
If necessary, change this program with the upper button.
Press the middle button to continue.
rEVE
Now the lower display (YES or no)shows whether the dryer can operate reversing (left-right movement).
If necessary, change this program with the upper button.
Press the middle button to continue.
When “no” was selected, you proceed to "bEEP "
8
2
9
2
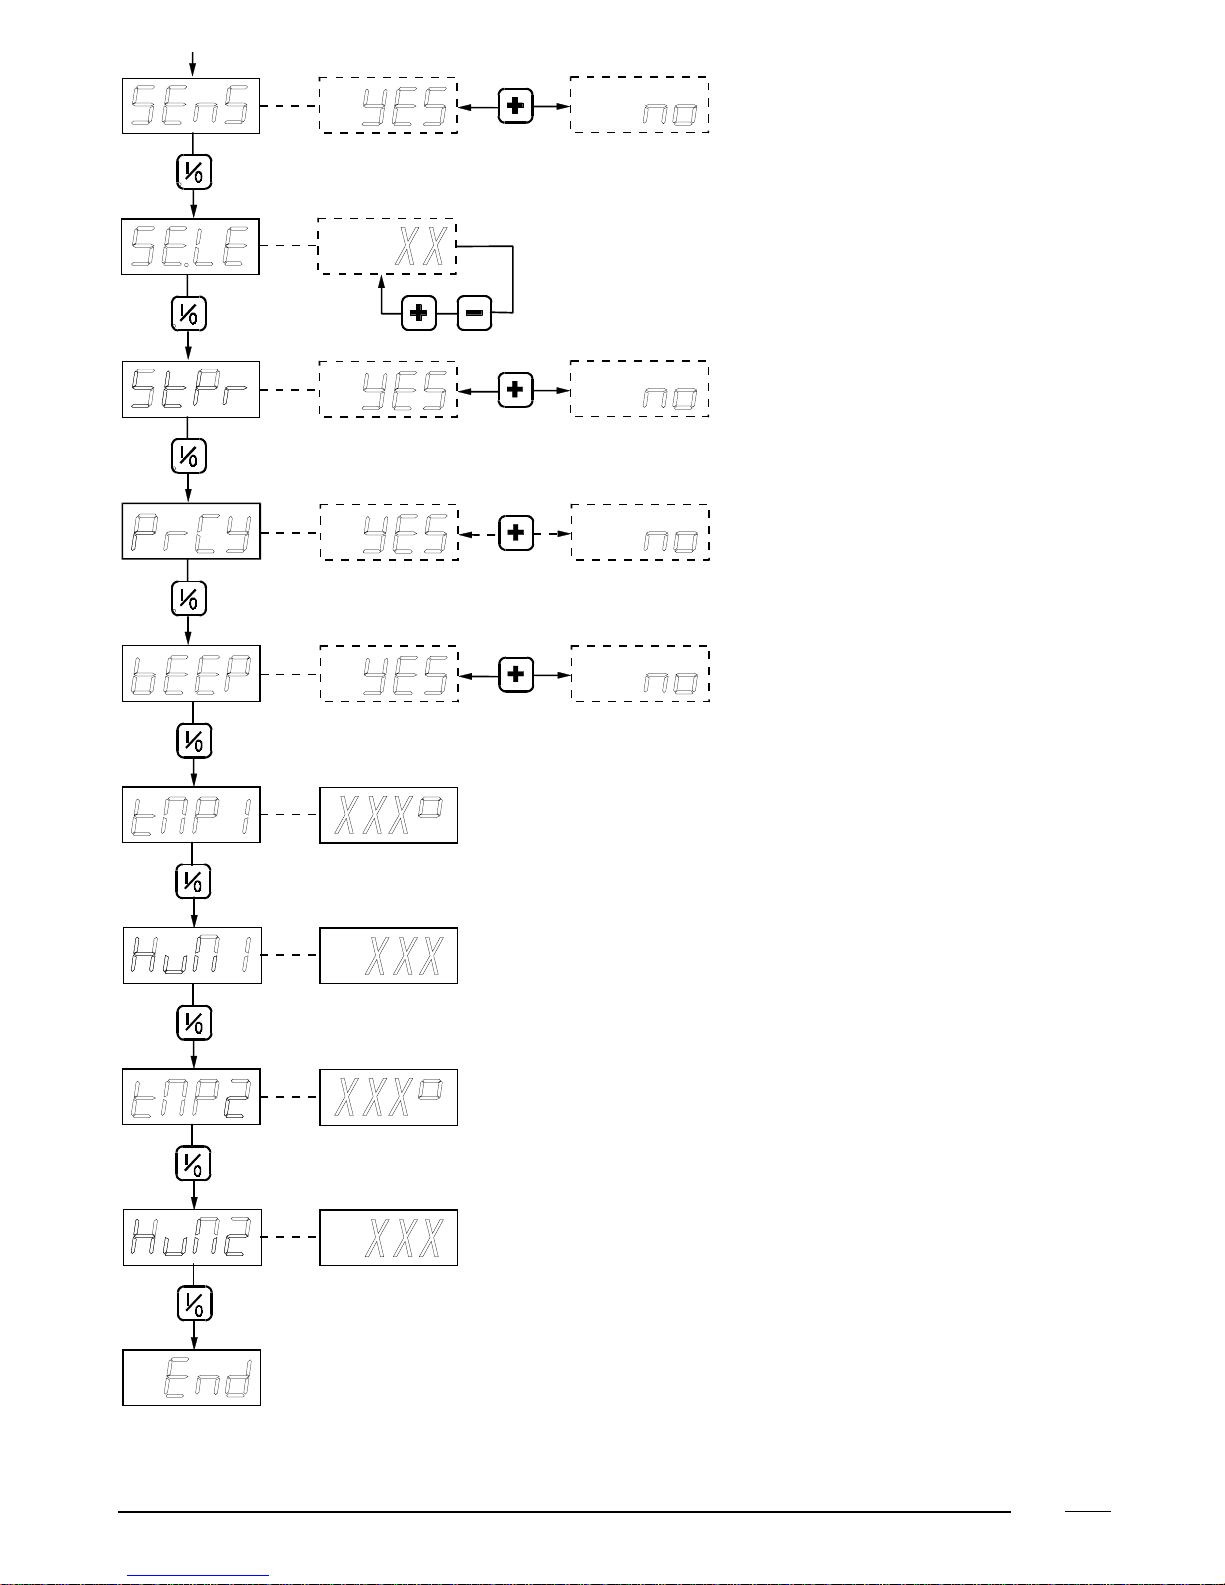
SEnS
Now it is shown on the bottom display (YES or no) whether the dryer is equipped with a residual moisture system with humidity
sensors.
Change this setting, if necessary, with the top button.
Press the middle button to continue.
If “no” was selected, then the display switches immediately to “bEEP”
SE.LE
Thebottom display indicates the calibration of thehumidity sensors (Sensor level). This is normally setat 5. If the drying results
are continuously too dry or too humid, then this value can be changed between 0 and 10. The lower this factor is set, the dryer
are the drying results. Is this value higher, then the drying results are more humid.
Ifthisfactorischanged,thenthiswillautomaticallyhaveaninfluenceonalldryingprogramswithresidualmoisturecontrol.
It is normally not necessary to change this factor. It is only meant to give the technicians the possibility to optimize the
drying results when the dryer is used in rather unusual environments.
Change this setting, if necessary, with the top button.
Press the middle button to continue.
St.Pr
Now the bottom display indicates (YES or no) whether the standard programs (31-40) should be shown.
Change this setting, if necessary, with the top button.
Press the middle button to continue.
Pr.CY
Here the bottom display indicates (YES or no) whether the cycle contact needs to be programmable. If yes, then the cycle contact
willduringthecyclecloseandopenagainalternately(pulsatingfunction).If"no"isselected,thenthecontactwillbeclosedduring
the entire drying cycle.
Change this setting, if necessary, with the top button.
Press the middle button to continue.
bEEP
The bottom display indicates (YES or no) whether a buzzer will sound at the end of the cycle.
Change this setting, if necessary, with the top button.
Press the middle button to continue.
tMP.1
The bottom display indicates the temperature inside the cylinder. This is meant as a test of the temperature sensor.
Press the middle button to continue.
If “no” was selected with “SEnS”, then the display will automatically go on to “End”
HuM.1
The bottom display now indicates the humidity inside the cylinder. This is meant as a test of the humidity sensor.
Press the middle button to continue.
tMP.2
The bottom display now indicates the temperature in the room. This is meant as a test of the temperature sensor.
Press the middle button to continue.
HuM.2
The bottom display now indicates the humidity in the room. This is meant as a test of the humidity sensor.
Press the middle button to continue.
End
This is the end of the technical menu
Press the middle button to continue.
Now the display shows IPSO for a while and then goes back to the beginning of the technical menu.

10
Questo manuale è adatto per i seguenti modelli
1
Indice


